Testing Prototypes in ProtoPie Connect
ProtoPie Connect allows you to test your prototypes on a variety of smart devices and desktop browsers. You can use ProtoPie Connect in the following ways:
To test prototypes using ProtoPie Connect and ProtoPie Player
To test prototypes using ProtoPie Connect and ProtoPie Player for Wear OS
To test prototypes on web browsers
To test prototypes in Stage View.
Download ProtoPie Connect here.
Adding Prototypes to ProtoPie Connect
Before testing, load your prototypes into ProtoPie Connect by following these simple steps:
Click the + New button and select the prototypes you want to add. Or drag-and-drop prototypes into ProtoPie Connect's interface.
Enterprise users can open prototypes directly from ProtoPie Cloud by selecting Cloud Pie. To fetch the most recent version of a Cloud Pie, click on the circular arrow icon (Reload).
Select the Pie file and click the trash icon to remove a prototype from the list.
To replace a prototype, place the cursor on the prototype and click on the two-way arrow icon.
Technical note: Adding a new Pie file creates a new pieid. Replacing a Pie file reuses the same pieId of the previous prototype.

Arranging Pies into Groups
To keep your Pies organized and easy to manage, you can group them together. To create a new Pie group, click on the Group icon. To add a Pie to a group, drag and drop it into the group. Be sure to expand the group before doing so.
To move a Pie from one group to another one, drag and drop it into another group.
Only groups containing at least one Pie can be expanded/ collapsed.
Only groups containing at least one Pie can be selected/ deselected.
To rename a group, double-click on the group name and enter the new name.
To delete a group, hover over it with the cursor and click the Trash icon.

Testing Prototypes Using ProtoPie Connect & ProtoPie Player
ProtoPie Player is a free companion app for ProtoPie Studio and ProtoPie Connect. You can view, experience, and test any prototypes added to ProtoPie Connect on iOS, iPadOS, and Android devices.
There are three ways to connect ProtoPie Player to ProtoPie Connect:
Scanning the QR code
Entering the IP address
Using a USB cable
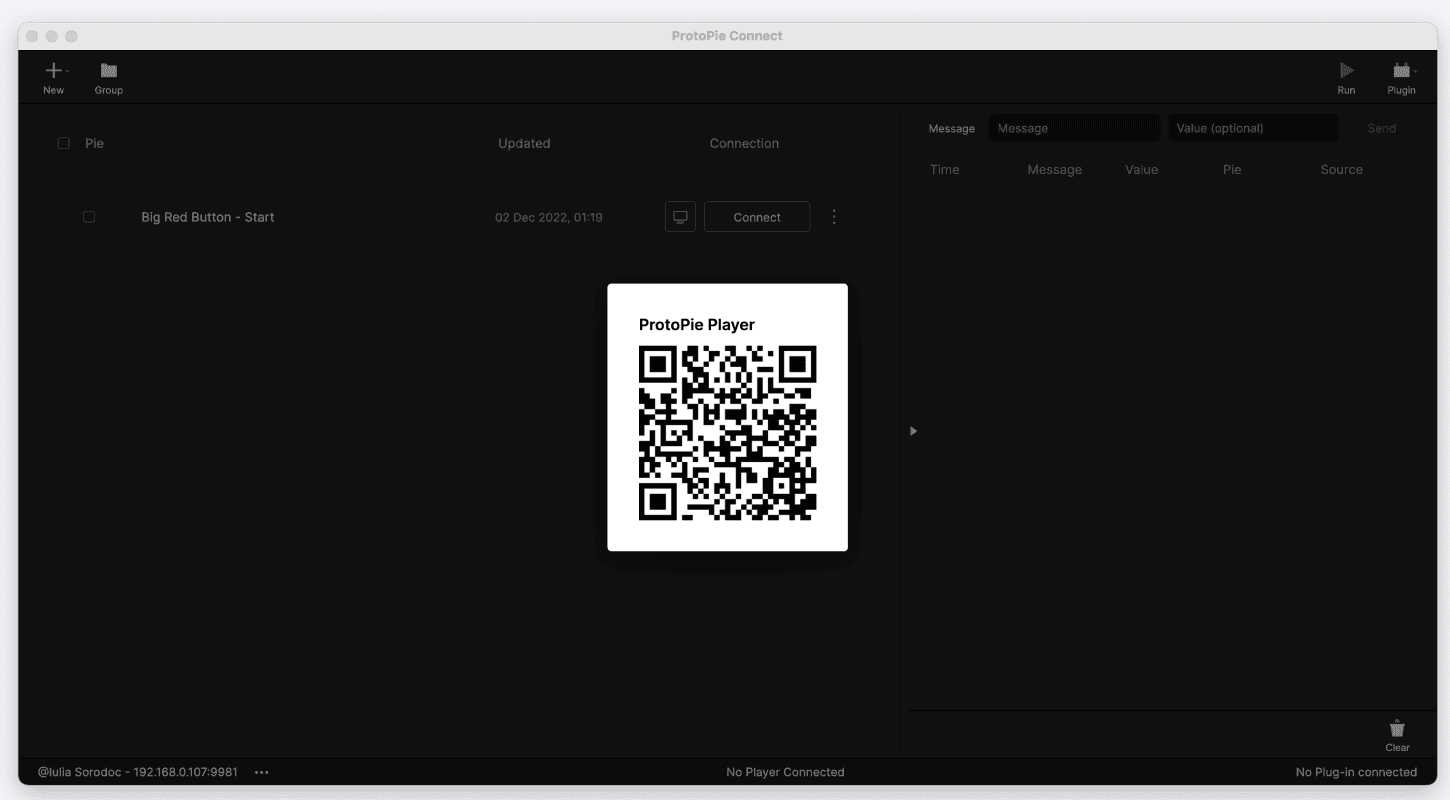
Connect ProtoPie Player to ProtoPie Connect Scanning the QR Code
Ensure your computer and smart device are connected to the same WiFi network.
Click on Connect for the prototype you want to open in ProtoPie Connect.
Select QR Code from the list.
Tap on the Scan QR Code button in ProtoPie Player.
Scan the QR code to run the prototype in the Player.
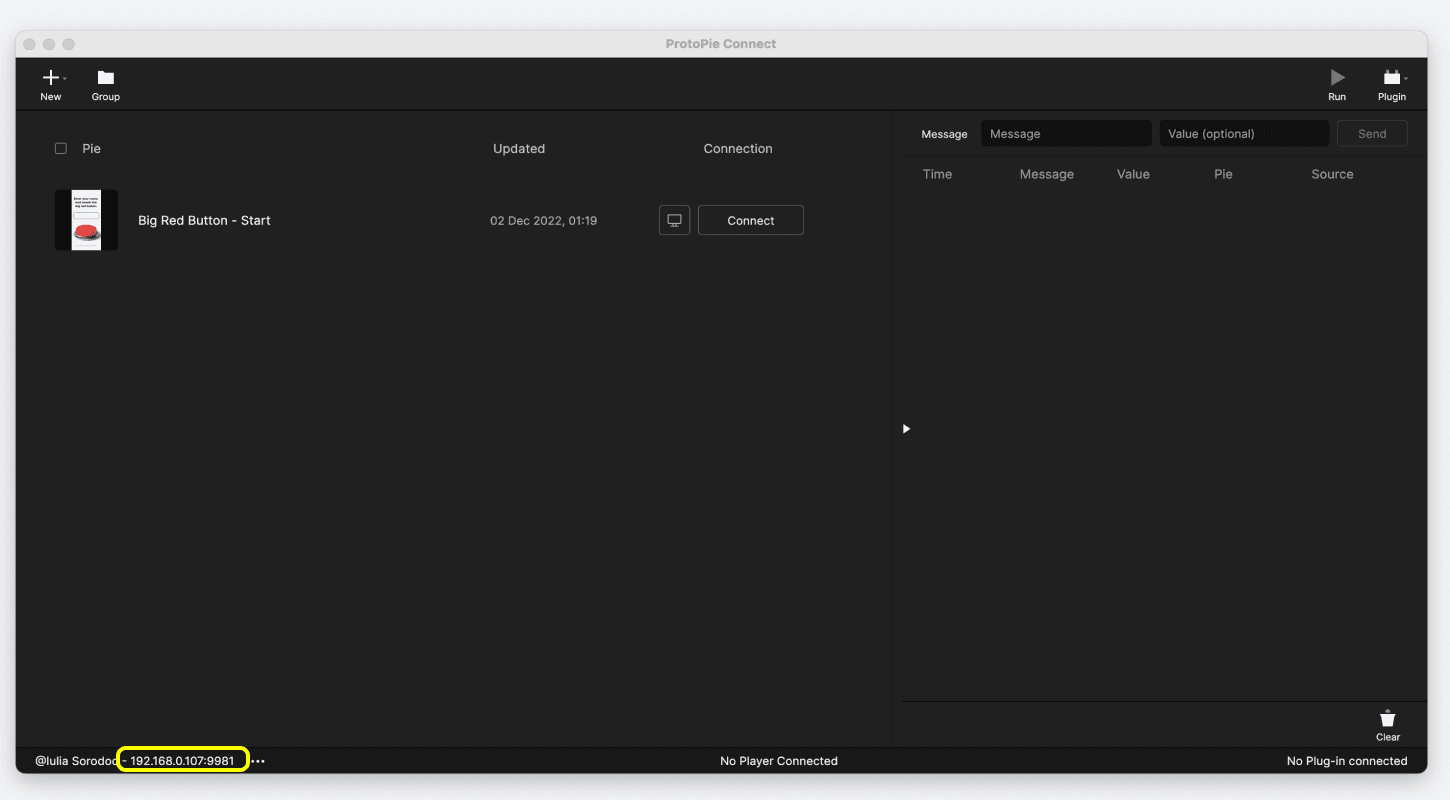
Connect ProtoPie Player to ProtoPie Connect Entering the IP Address
Make sure your computer and smart device are connected to the same WiFi network.
Tap on Type IP Address from the dropdown menu in ProtoPie Player.
Enter the IP address shown in ProtoPie Connect.
Tap on the Connect button to run the prototype on your smart device.
Testing Prototypes Using ProtoPie Connect & ProtoPie Player for Wear OS
ProtoPie Player for Wear OS, unlike the regular ProtoPie Player, only works in conjunction with Connect Enterprise.
Make sure both ProtoPie Player for Wear OS and ProtoPie Connect are connected to the same internet network.
Open them—ProtoPie Player for Wear OS and ProtoPie Connect will automatically detect each other
Click on Tap to connect in the ProtoPie Player for Wear OS to pair it with ProtoPie Connect.
Add a smartwatch prototype to ProtoPie Connect.
Click on the Run button at the top of ProtoPie Connect's interface to open the prototype in the Player for Wear OS.
To restart or exit the prototype, double-tap the smartwatch screen.
Testing Prototypes on Web Browsers
To view a prototype on a browser, it is recommended to use a Chromium browser for optimal performance. There are two ways to open a prototype on a desktop web browser from ProtoPie Connect.
On the same machine where ProtoPie Connect is running
On a different machine
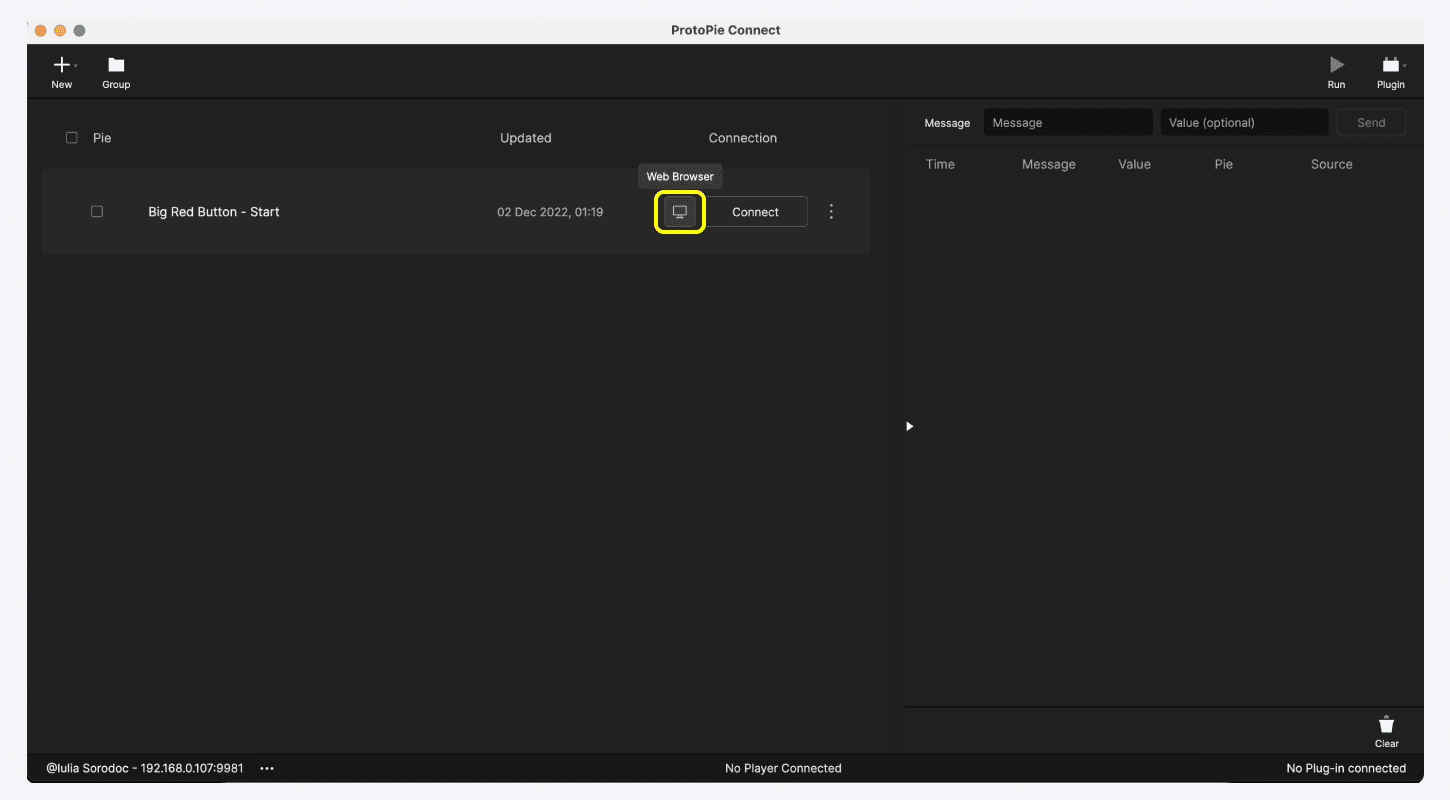
Testing Prototypes On the Same Machine
Click on the Web Browser icon next to the prototype you want to open.
In the browser, the URL will have the following format: http://localhost:9981/.
Testing Prototypes On a Different Machine
Ensure your computer and the other machine are connected to the same WiFi network with ProtoPie Connect.
Open any web browser on the other machine.
Enter your ProtoPie Connect IP address in the address bar. The ProtoPie Connect interface will be displayed.
Click on the Web Browser icon next to the prototype you want to open.
In the browser, the URL will have the following format: http://protopie.connect.ip.address:9981/.
Using Voice Prototyping Features in the Web Browser
Starting from ProtoPie Connect 1.8.0, voice prototyping features are supported in the Web Player, just like they are in the ProtoPie Player app for iOS/Android and ProtoPie Studio's Preview window. Currently, the supported features are:
Compatible web browsers
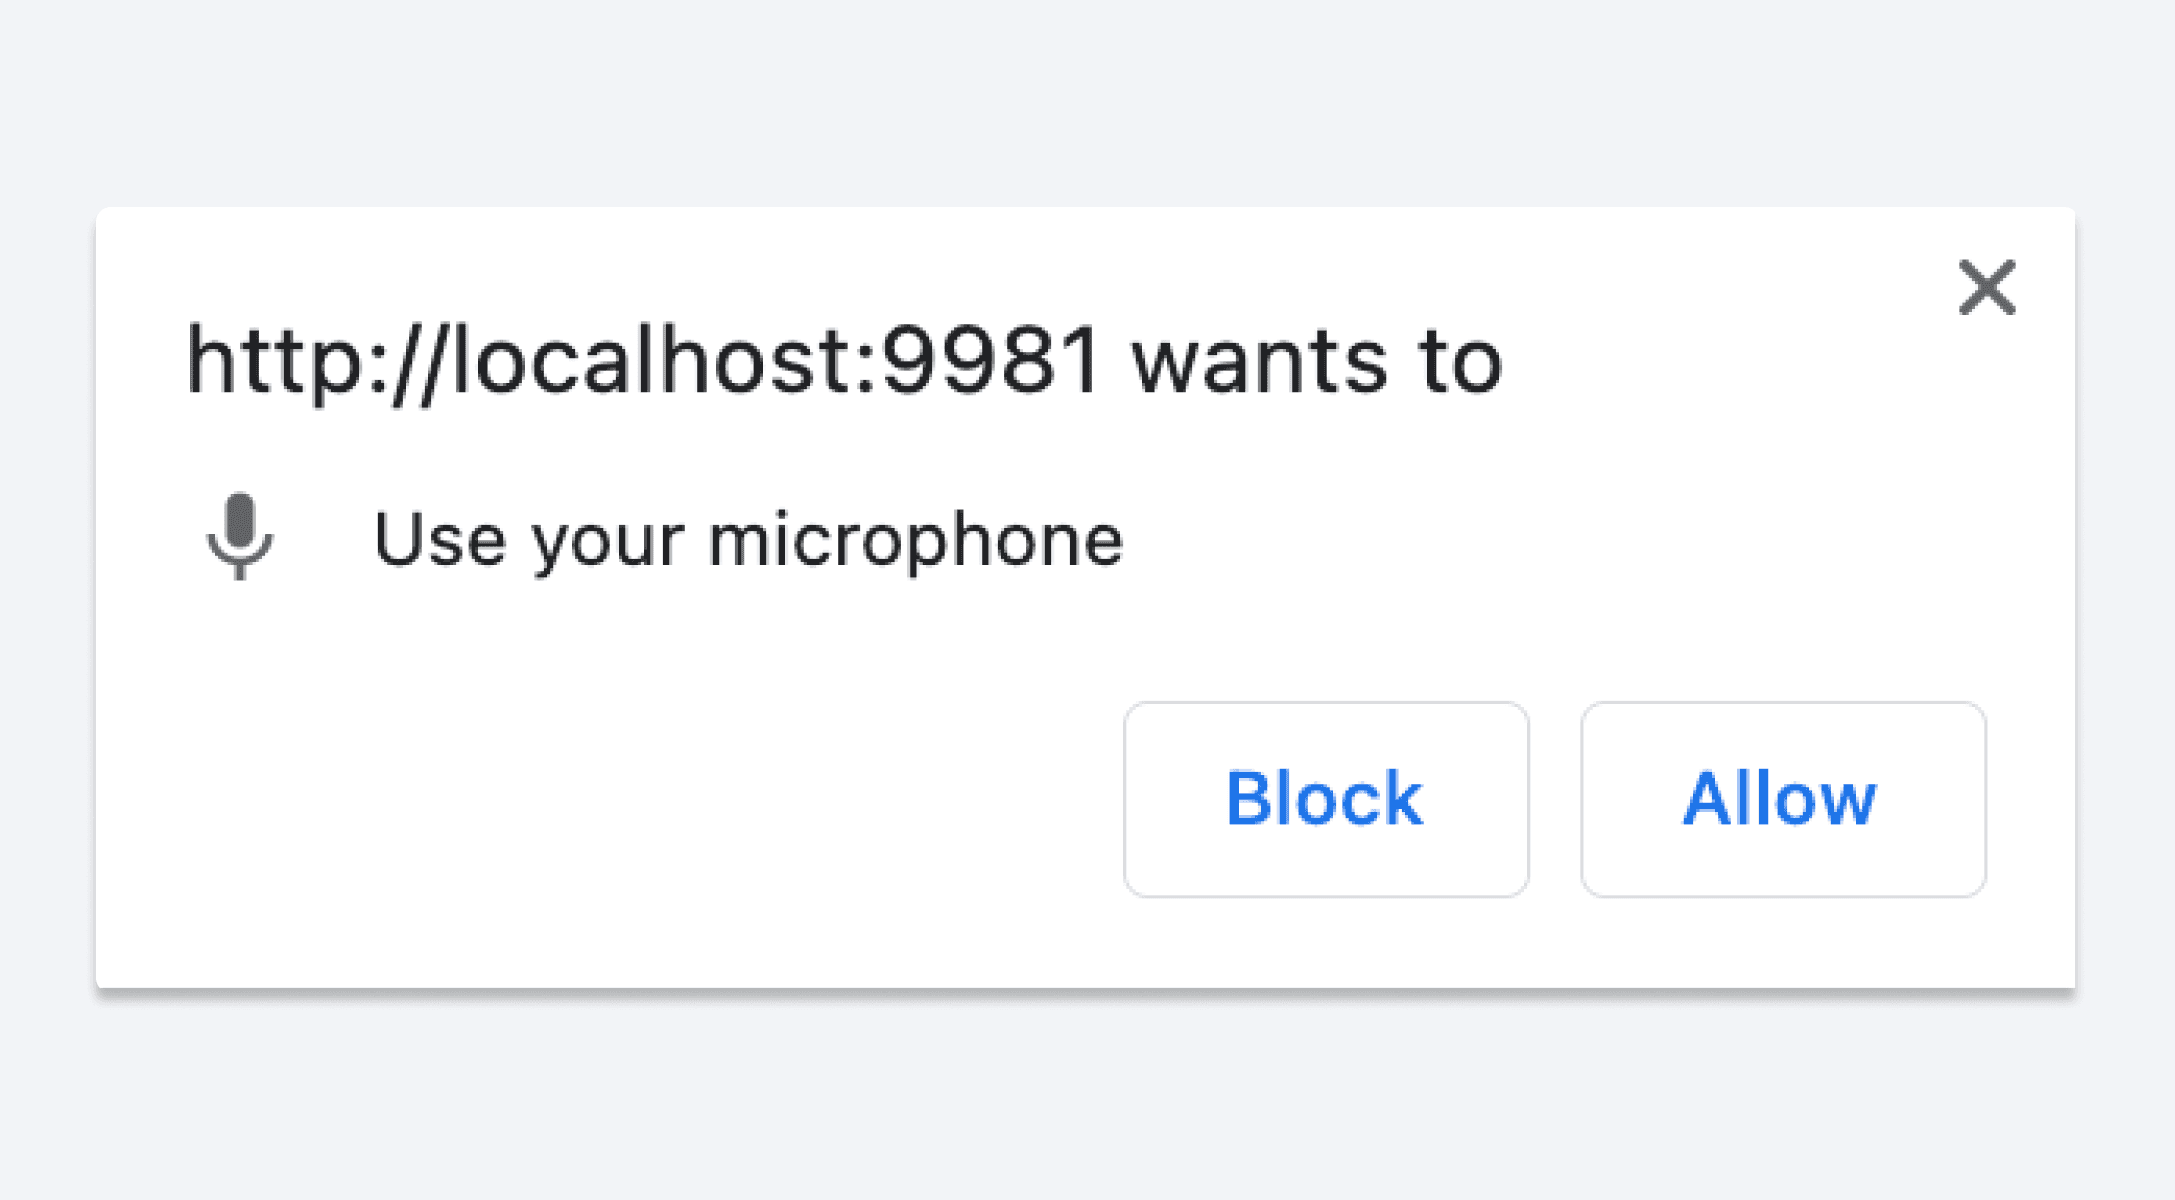
Each browser behaves differently when dealing with microphone permissions. To use the Voice Command Trigger and Listen Response, the browser needs microphone permission from the user. The browser will ask for microphone permission when the microphone needs to be enabled in the prototype, like in the screenshot below. To enable microphone access, click Allow.
Voice prototyping features for the ProtoPie Connect’s Web Player work best in Chromium browsers such as Google Chrome and Microsoft Edge. To properly play voice interactions some setup may be required on the browser side depending on the browser used and how the prototype is loaded.
Web Browser Setup
There are two ways to play prototypes in the web browser:
On IP address
On http://localhost:9981/
Playing prototypes on http://localhost:9981/ requires no setup and works across browsers.
Playing prototypes on IP address (e.g., http://192.168.0.40:9981/) requires a one-time browser setup to enable microphone usage, and is supported on Google Chrome and Microsoft Edge.
Chromium browsers will only allow your device's microphone permission when a site has a secure origin — i.e. serve from https or localhost.
The following one-time setup is required to use a microphone with ProtoPie Connect's Web Player.
In the Chrome/Edge browser, navigate to
flags.
chrome://flags/#unsafely-treat-insecure-origin-as-secure
edge://flags/#unsafely-treat-insecure-origin-as-secure
Enable
Insecure origins treated as secure.
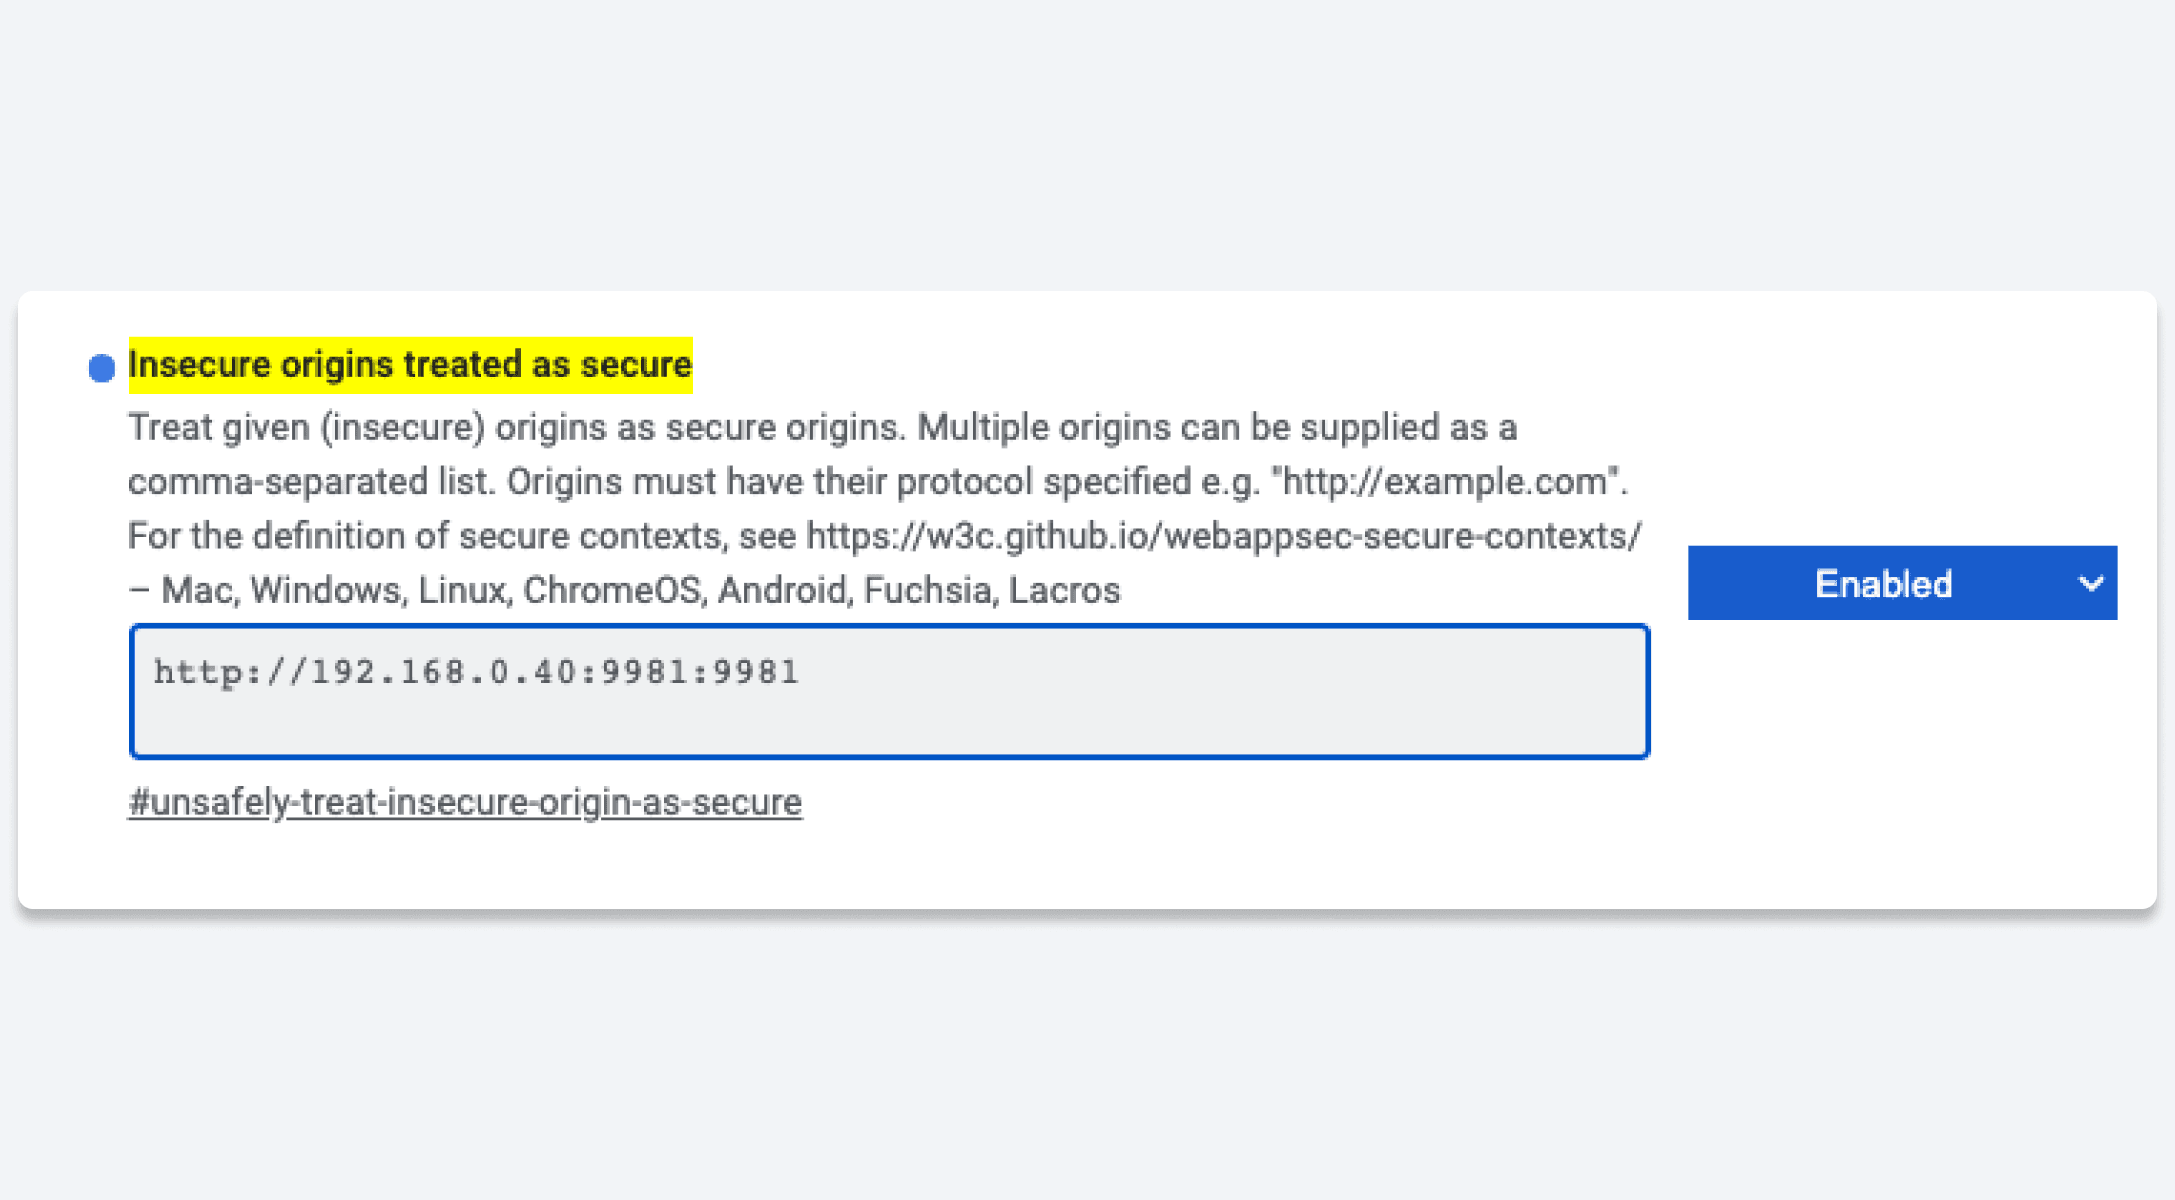
Add the ProtoPie Connect server address with port number 9981.
Note: The server address can be found in the bottom left corner of ProtoPie Connect.
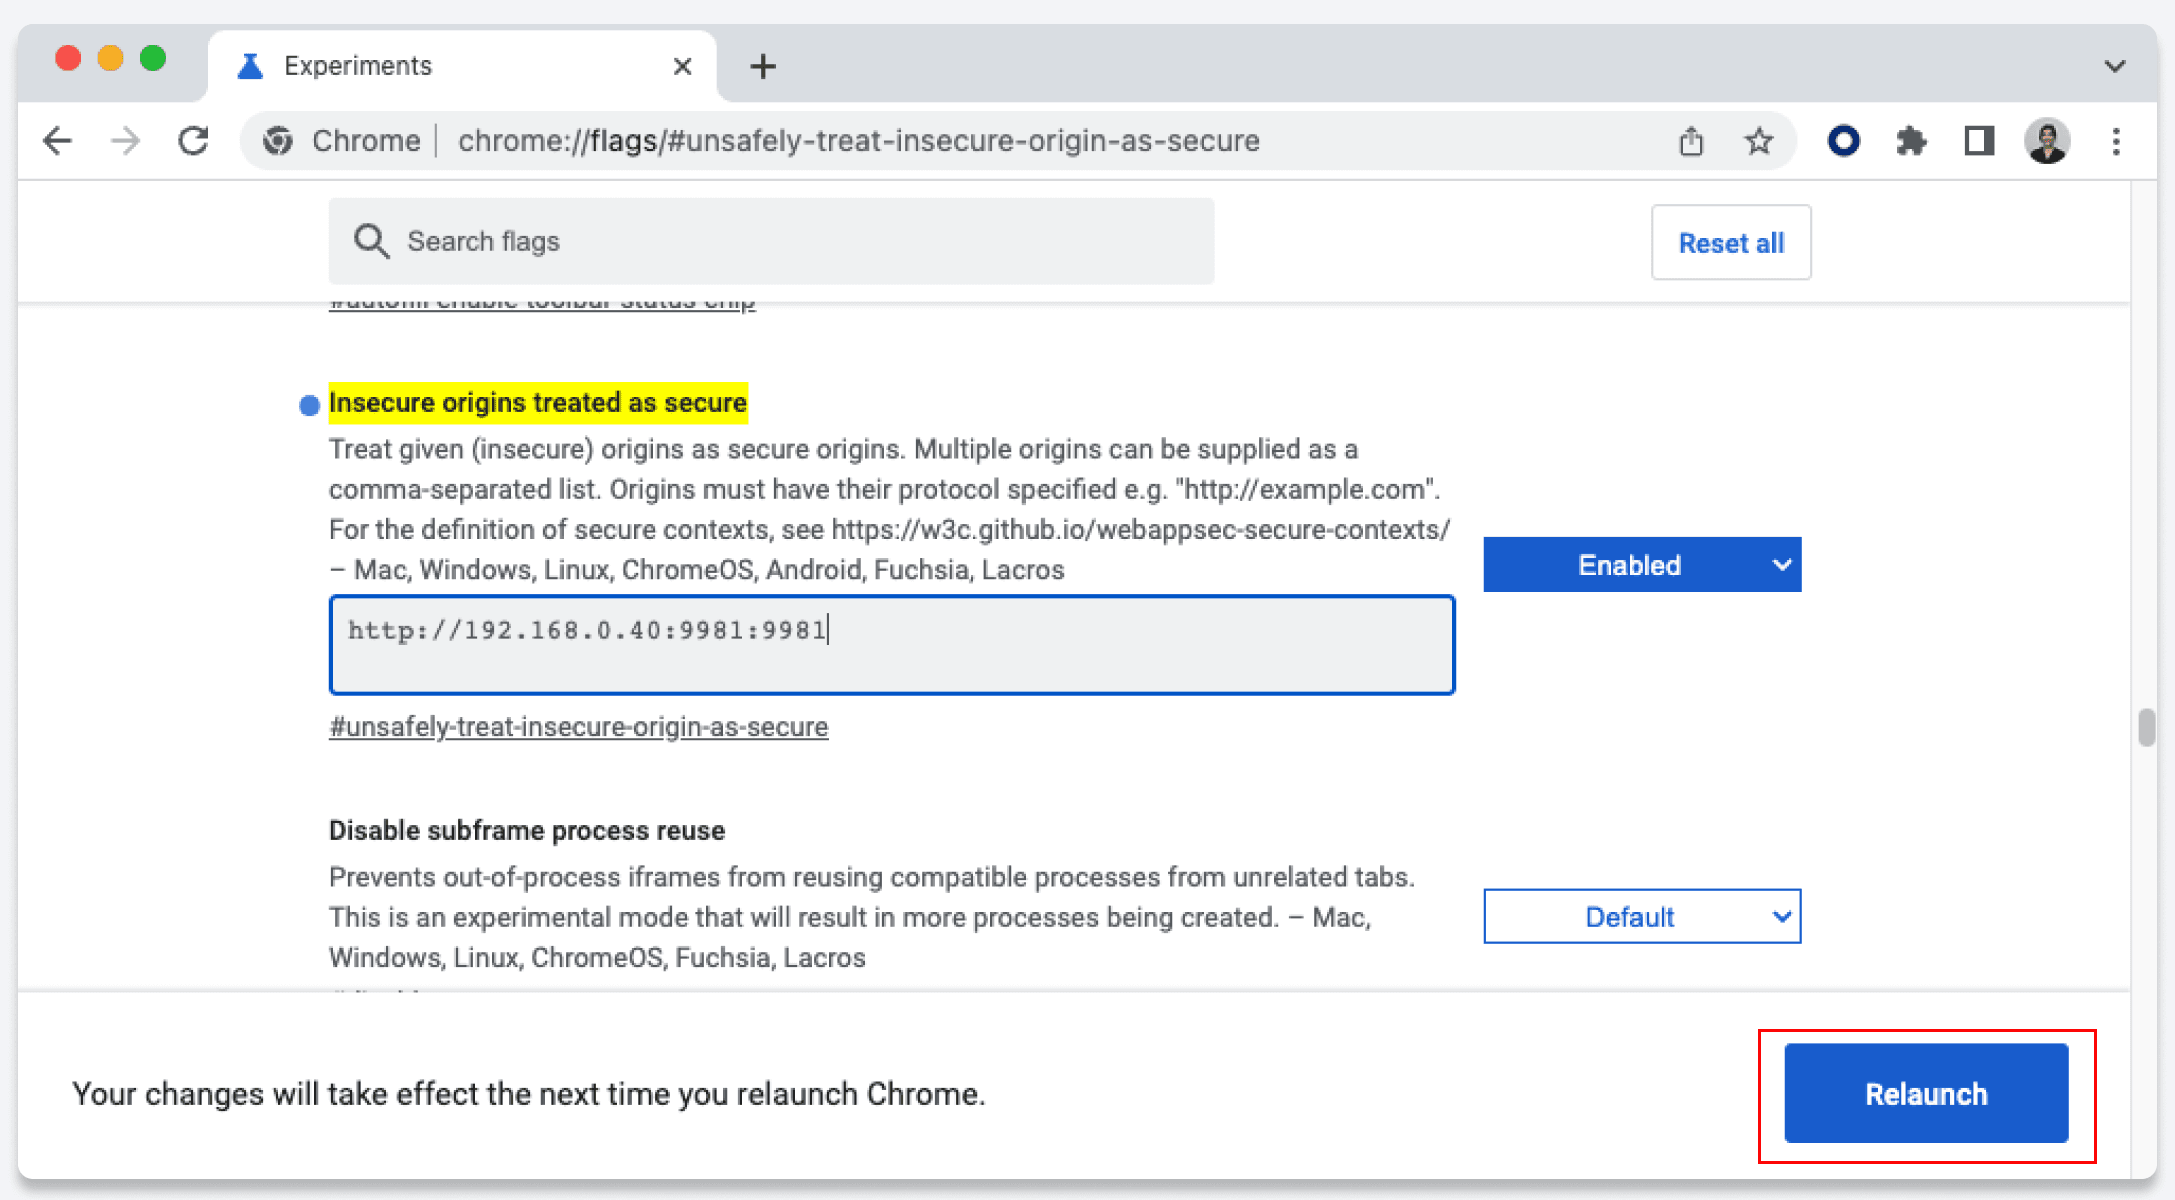
Relaunch (Restart) the Chrome/Edge browser.
Customizing View Options
As on ProtoPie Cloud, you can customize how prototypes display on the web browser using URL parameters.
URLs with such parameters have the following format: http://localhost:9981/pie?pieid=[ number]&name=[pie name]…
Use the “&” symbol to separate parameters in the URL.
If you use a browser on a different machine, replace localhost with the IP address shown in ProtoPie Connect. For example, http://192.168.123.101:9981/pie?pieid=23.
pieid: Pie ID
|
bg: Background color
|
hotspotHints: Show hotspot hints in prototype
|
cursorHide: Hide the cursor in prototype
|
scaleToFit: Scale the prototype to fit the screen
|
Some examples of URLs with parameters:
Change the background color to white, show hotspot hints, and scale the prototype to fit the screen.
http://localhost:9981/pie?pieid=1&bg=white&touchHint=true&scaleToFit=true
Change the background color to yellow, and hide the cursor
http://localhost:9981/pie?pieid=1&bg=yellow&cursorHide=true
FAQs
debug-messages-protopie-connect
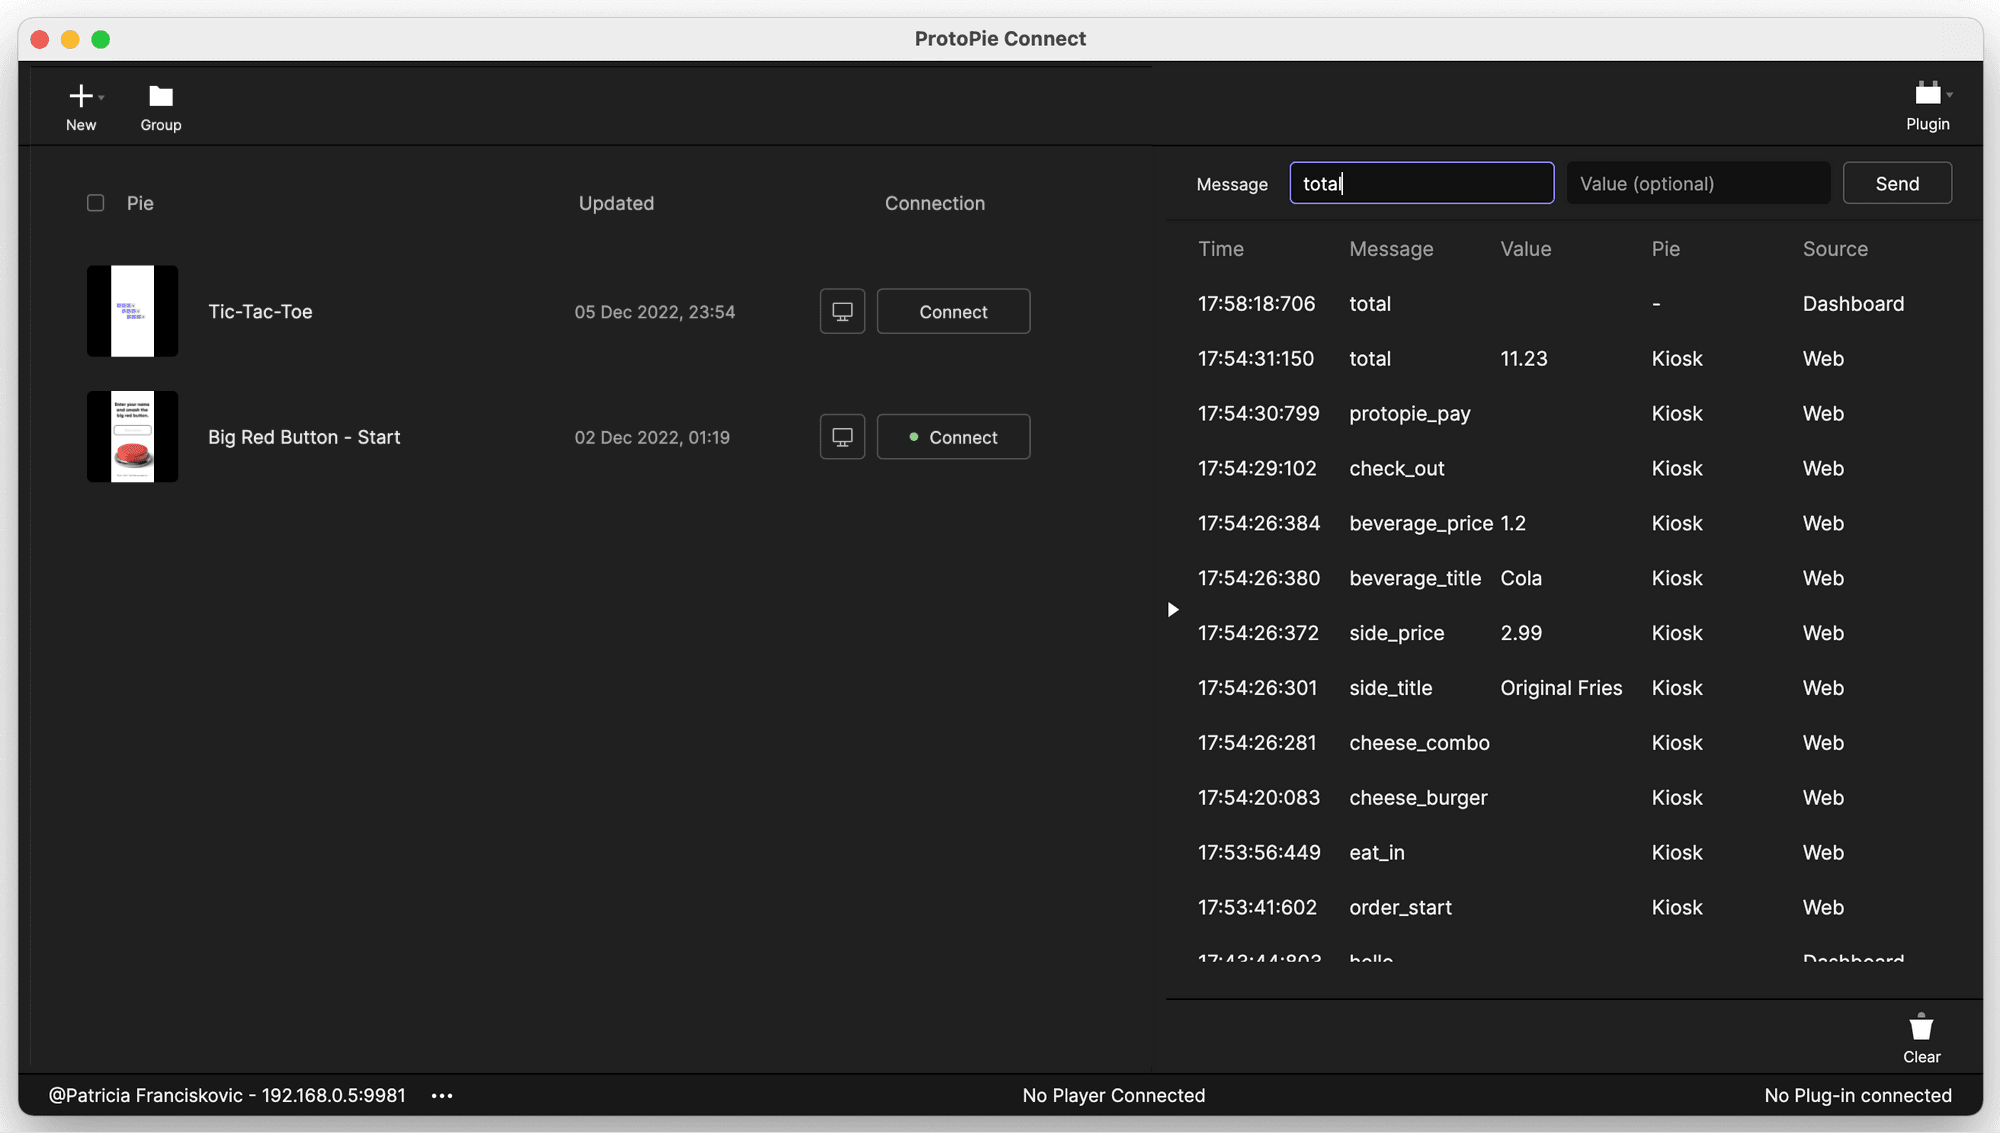
How to debug messages in ProtoPie Connect?
You can see all messages sent and received by all the connected prototypes, custom plugins, and hardware devices on the right side of the ProtoPie Connect interface. For debugging purposes, you can try sending a message from the dashboard and check if it’s received correctly in the prototype.