Introducing ProtoPie

Getting Started

Making Your First Prototype

ProtoPie Ecosystem

ProtoPie Studio Interface

Import

Getting Started

Importing From Adobe XD

Importing From Figma

Importing From Sketch

ProtoPie Genie

Basic Elements

Containers

Devices

Layers

Preview Window

Scenes

Scroll/Paging

Shortcuts

System Status Bar

Triggers & Responses

Easing

Annotations

Responses

Timelines

Triggers

Formulas

Getting Started

Functions

Layer Properties

Syntax

Formulas Use Cases

Variables

Getting Started

Variables

Predefined Variables

Variables Use Cases

AI

Getting Started

AI Interaction Creation

AI Document Q&A

AI Panel Interface

Tips for Best Results

Auto Layout

Getting Started

Auto Layout Properties

Components

Getting Started

Component Guides

Editing Components

Nested Components

Send & Receive Messages

Interaction Libraries

Getting Started

Managing Interaction Libraries

Managing Library Members

Voice Prototyping

Getting Started

Listen Response

Speak Response

Use Cases

Voice Command Trigger

Connecting Devices

Connecting blokdots

Connecting Mobile Devices

ProtoPie Cloud

Getting Started

Managing Prototypes

Managing Storage

Sharing Prototypes

ProtoPie Player

Testing Prototypes

Managing Fonts

Offline Testing

ProtoPie Player for Wear OS

Teams

Getting Started

Editors & Viewers

Onboarding Your Team

Projects

Team Owner & Team Admin

Handoff

Getting Started

Creating Interaction Recordings

Managing Interaction Recordings

Recording Page

User Testing

Getting Started

Overview

Creating Test Rooms

External Integrations

Managing Test Sessions

Test Results & Analysis

User Testing on ProtoPie Cloud

ProtoPie Connect

Getting Started

API Plugin

Arduino Plugin

blokdots Plugin

Connect Embedded

Custom Layer Integrations

Custom Plugins

Connect Devices

Gamepad Plugin

IFTTT Plugin

Logitech G29 Steering Wheel Plugin

Testing Prototypes

Feature Comparison

Unity Plugin

ProtoPie Enterprise

Getting Started

Organization Settings

Service Admin

Single Sign-On (SSO)

Security

Overview

Access Control

Data Transit, Storage & Backup

Incident Response

Network & ProtoPie Player App Security

Physical Security

Risk Management

Menu

Introducing ProtoPie

Getting Started

Making Your First Prototype

ProtoPie Ecosystem

ProtoPie Studio Interface

Import

Getting Started

Importing From Adobe XD

Importing From Figma

Importing From Sketch

ProtoPie Genie

Basic Elements

Containers

Devices

Layers

Preview Window

Scenes

Scroll/Paging

Shortcuts

System Status Bar

Triggers & Responses

Easing

Annotations

Responses

Timelines

Triggers

Formulas

Getting Started

Functions

Layer Properties

Syntax

Formulas Use Cases

Variables

Getting Started

Variables

Predefined Variables

Variables Use Cases

AI

Getting Started

AI Interaction Creation

AI Document Q&A

AI Panel Interface

Tips for Best Results

Auto Layout

Getting Started

Auto Layout Properties

Components

Getting Started

Component Guides

Editing Components

Nested Components

Send & Receive Messages

Interaction Libraries

Getting Started

Managing Interaction Libraries

Managing Library Members

Voice Prototyping

Getting Started

Listen Response

Speak Response

Use Cases

Voice Command Trigger

Connecting Devices

Connecting blokdots

Connecting Mobile Devices

ProtoPie Cloud

Getting Started

Managing Prototypes

Managing Storage

Sharing Prototypes

ProtoPie Player

Testing Prototypes

Managing Fonts

Offline Testing

ProtoPie Player for Wear OS

Teams

Getting Started

Editors & Viewers

Onboarding Your Team

Projects

Team Owner & Team Admin

Handoff

Getting Started

Creating Interaction Recordings

Managing Interaction Recordings

Recording Page

User Testing

Getting Started

Overview

Creating Test Rooms

External Integrations

Managing Test Sessions

Test Results & Analysis

User Testing on ProtoPie Cloud

ProtoPie Connect

Getting Started

API Plugin

Arduino Plugin

blokdots Plugin

Connect Embedded

Custom Layer Integrations

Custom Plugins

Connect Devices

Gamepad Plugin

IFTTT Plugin

Logitech G29 Steering Wheel Plugin

Testing Prototypes

Feature Comparison

Unity Plugin

ProtoPie Enterprise

Getting Started

Organization Settings

Service Admin

Single Sign-On (SSO)

Security

Overview

Access Control

Data Transit, Storage & Backup

Incident Response

Network & ProtoPie Player App Security

Physical Security

Risk Management

Using IFTTT with ProtoPie Connect

What is IFTTT?

IFTTT is a web automation service that enables integration with various devices and services including Twitter, Dropbox, Evernote, Fitbit, Amazon Alexa, and Google Assistant.

IFTTT stands for 'If This Then That', and the Applets you create in IFTTT work similarly to ProtoPie’s triggers and responses: If this happens — then that happens.

Learn more about IFTTT Applets.

How does the IFTTT plugin work?

ProtoPie Connect communicates with IFTTT’s partner services through messages called Webhooks. These work similarly to the Send and Receive messages in ProtoPie. A message (“Event”) is sent to IFTTT and in response, IFTTT translates the message into an action.

By using ProtoPie Connect with IFTTT’s Webhooks, you can connect your prototypes to all their partner web services and devices.

Creating Applets in IFTTT

Create an account on the IFTTT website.

Configuring the Trigger


{'_type': 'localeString', 'en': 'configuring-trigger-in-ifttt'}
  1. Once logged in, click on Create on the top right corner of the IFTTT page

  2. Click on Add from the If This section and search for Webhooks

  3. Select “Receive a web request

  4. Name your event and click on Create Trigger. You can only use letters, numbers, and underscores in the name (for instance: “send_email”)

Configuring the Action


{'_type': 'localeString', 'en': 'configuring-the-action-in-ifttt'}
  1. Click on the Add button in the Then That section

  2. Search for your desired action in the Choose a service field

  • For example, “Gmail” - “Send yourself an Email”

    3.   Configure the action fields
    3.   Configure the action fields
    3.   Configure the action fields
    3.   Configure the action fields
    3.   Configure the action fields
  • Fill in the sections ‘Subject, Body, To address, CC address, BCC address, and Attachment URL’ Click on the Add ingredient button to add up to 3 customizable values (”Value1, Value2, Value3”) that will have to be configured in ProtoPie Studio (see Configuring Messages in ProtoPie Studio)

  • Click on Update Action

  • Review your Applet and click on Finish

    4.   Your Applet is now active. It can be deactivated and reactivated by switching the **Connected** button
    4.   Your Applet is now active. It can be deactivated and reactivated by switching the **Connected** button
    4.   Your Applet is now active. It can be deactivated and reactivated by switching the **Connected** button
    4.   Your Applet is now active. It can be deactivated and reactivated by switching the **Connected** button
    4.   Your Applet is now active. It can be deactivated and reactivated by switching the **Connected** button

Connecting IFTTT to ProtoPie Connect

Configure ProtoPie Connect to send a request to IFTTT.

Testing your Applet

  1. Open and log into ProtoPie Connect.


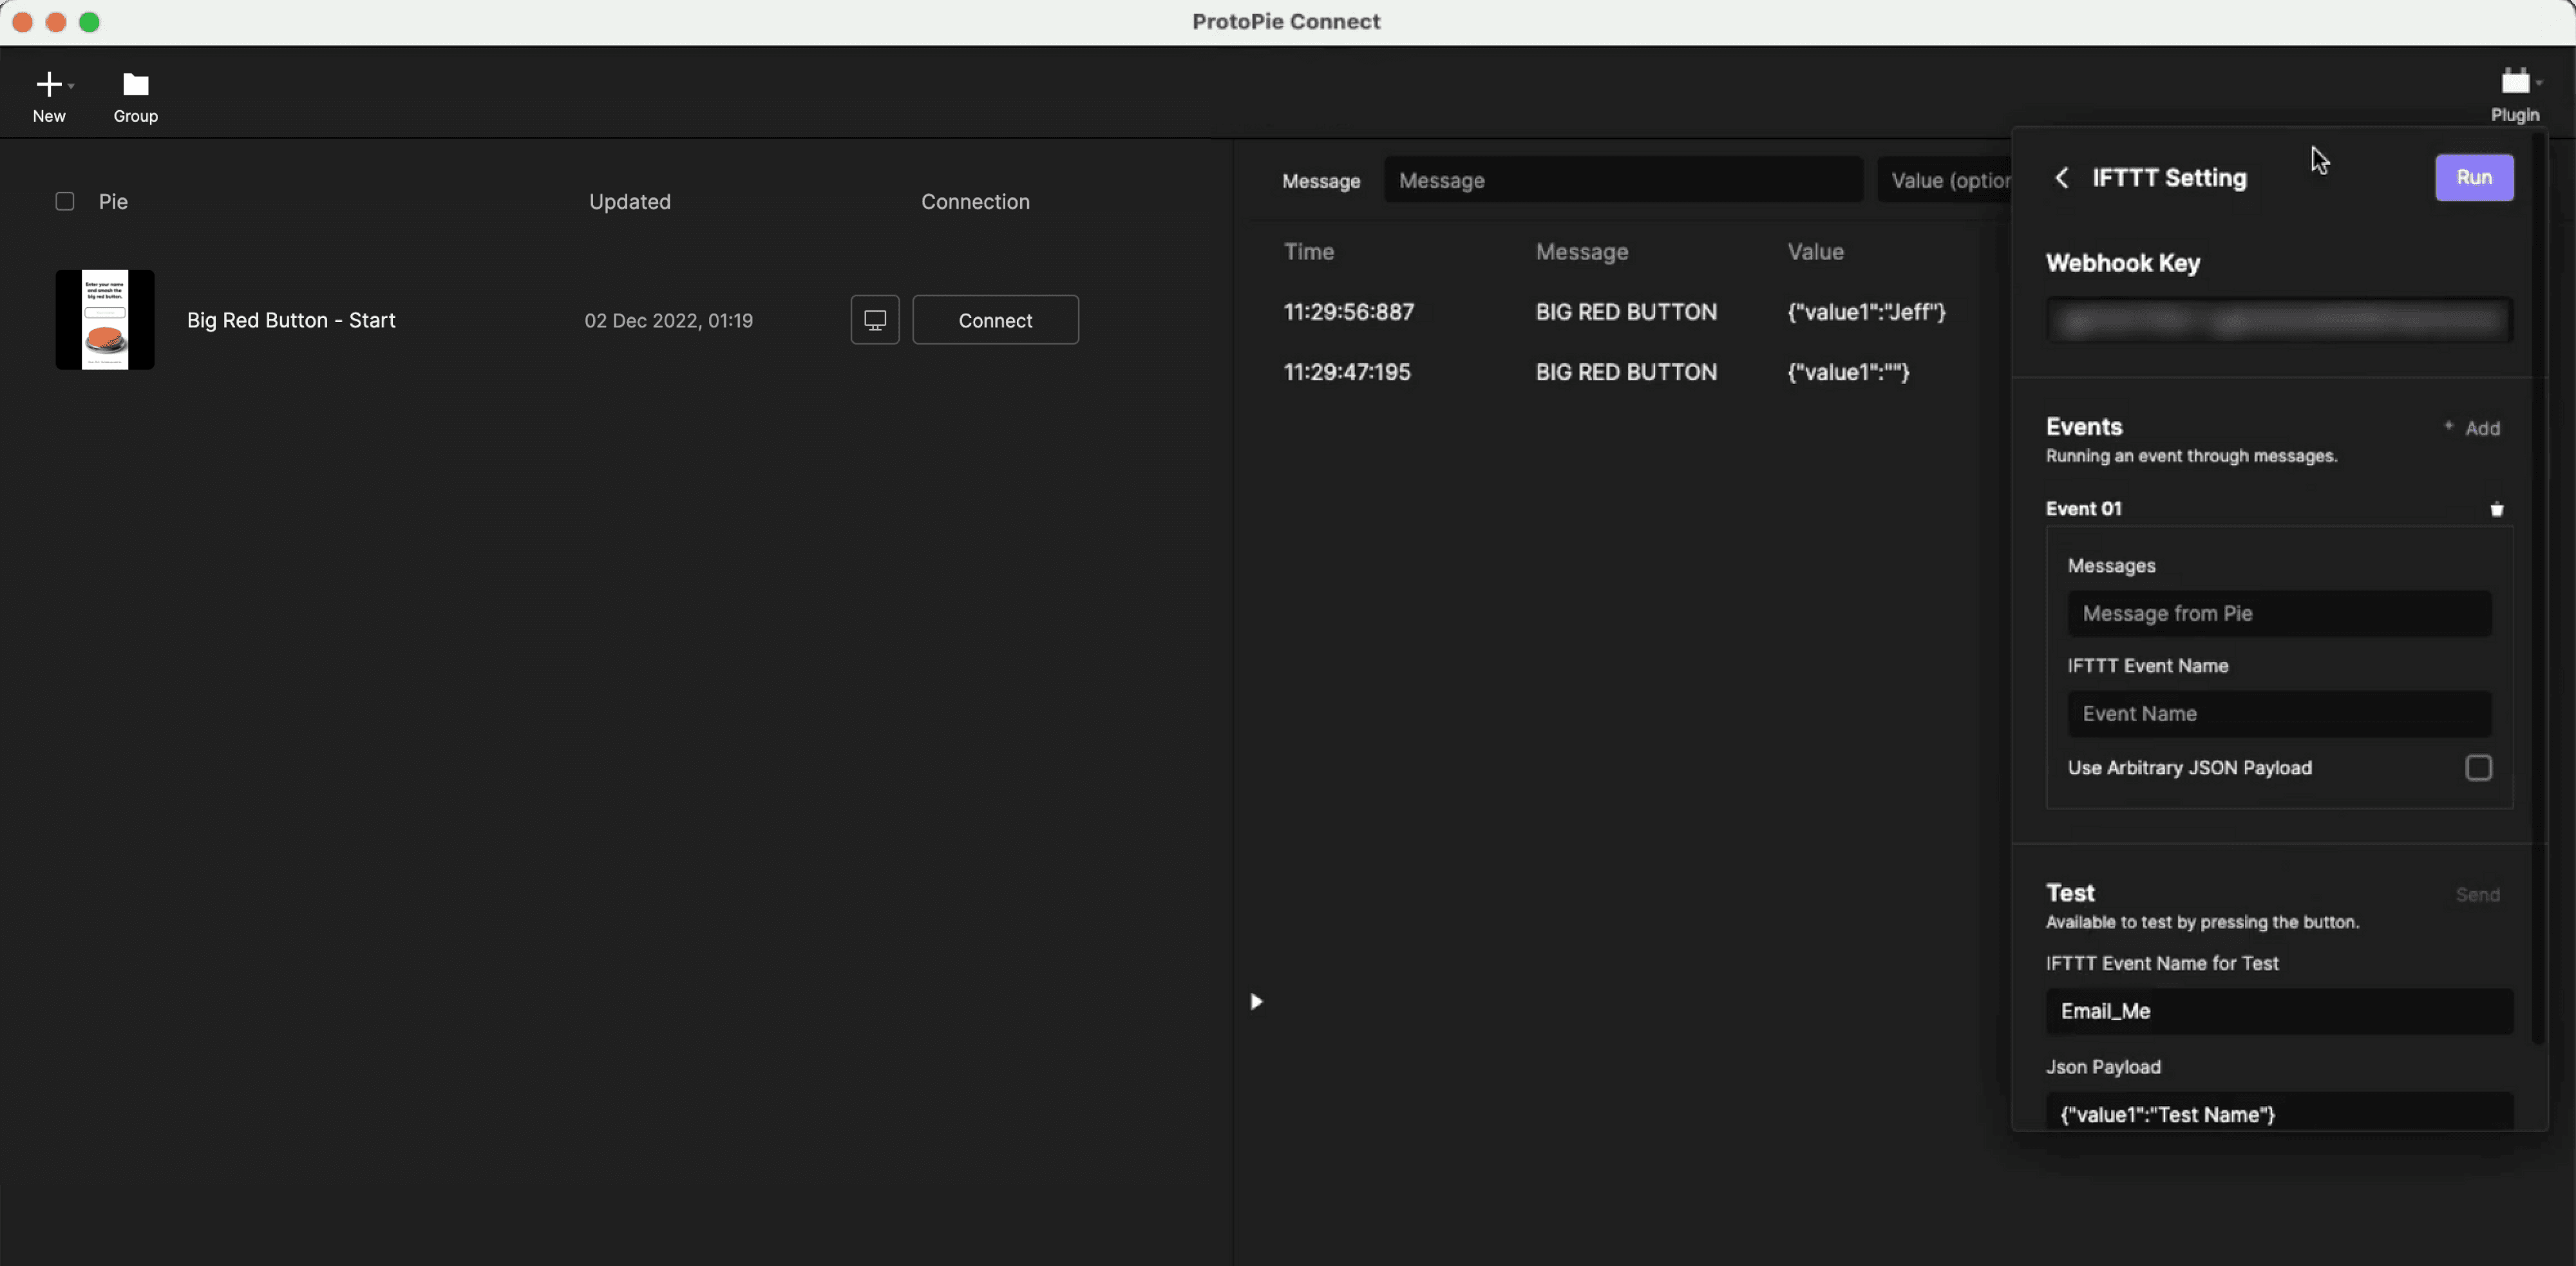
  2. Select IFTTT from the Plugin dropdown menu.

    • Copy-paste your private Webhook Key, which you can find on the IFTTT website under Explore → ”Webhooks” → Documentation

    • Click on the Run button


  3. You can test the Applet in the Test section

    • Enter your event name and JSON payload

    • Click on Send


{'_type': 'localeString', 'en': 'testing-your-applet'}

You can verify if your Applet is working correctly by going to My Applets on the IFTTT website and clicking on View activity.


{'_type': 'localeString', 'en': 'view-activity-applet'}
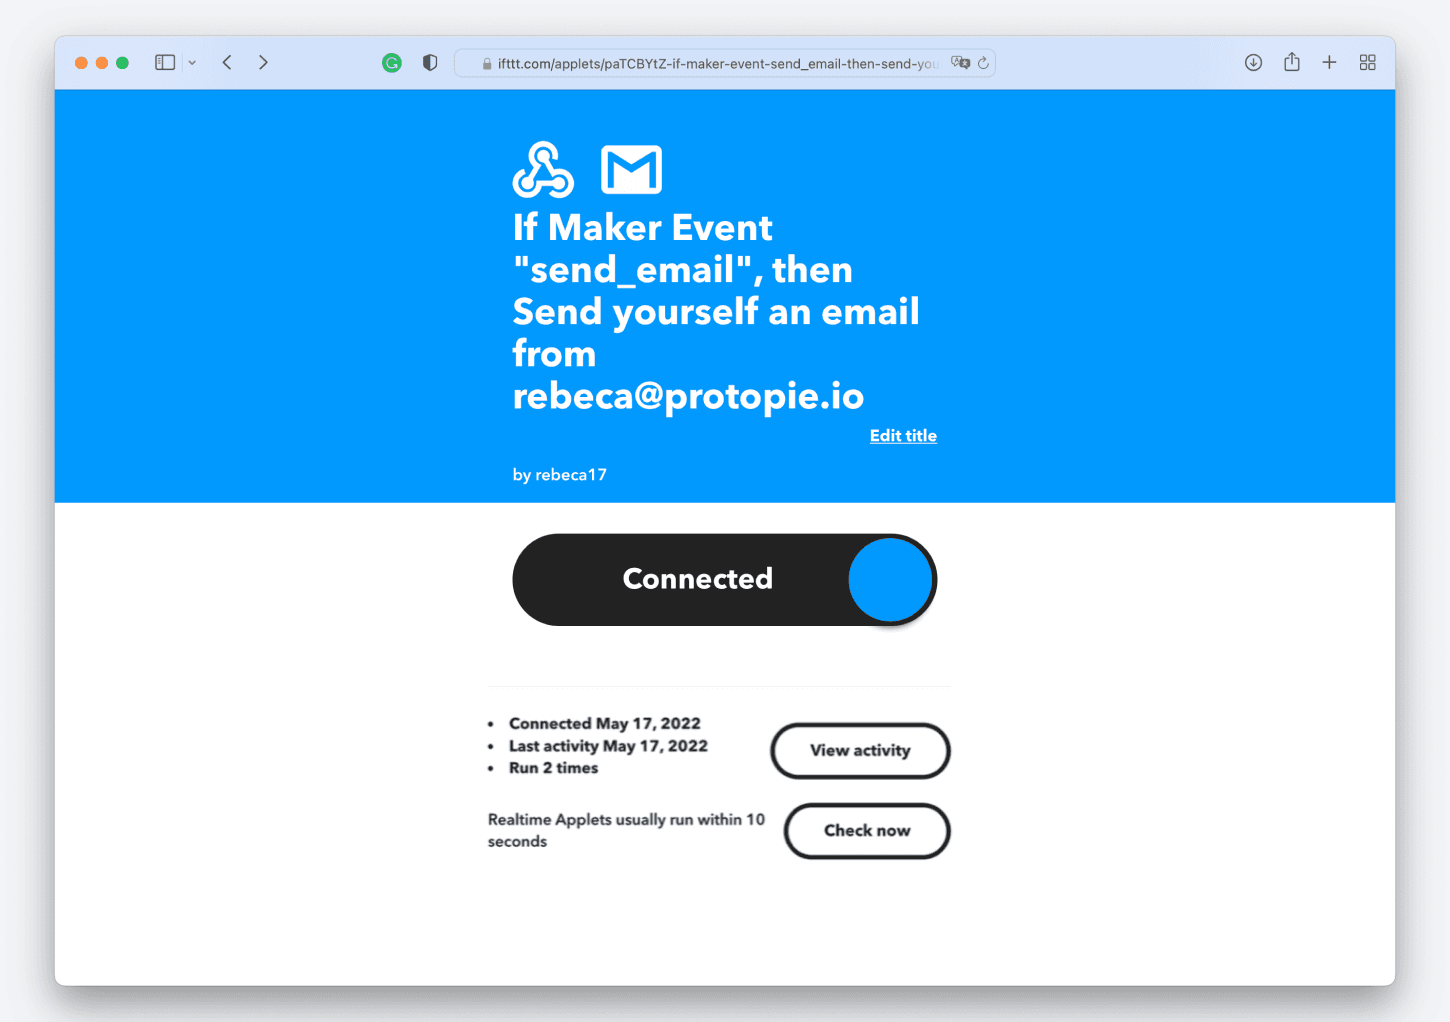
  1. You will receive an email with the values specified in the JSON payload.

Configuring Messages in ProtoPie Studio

Now that you have created and tested your Applet, you need to configure the corresponding messages in the prototype using ProtoPie Studio.

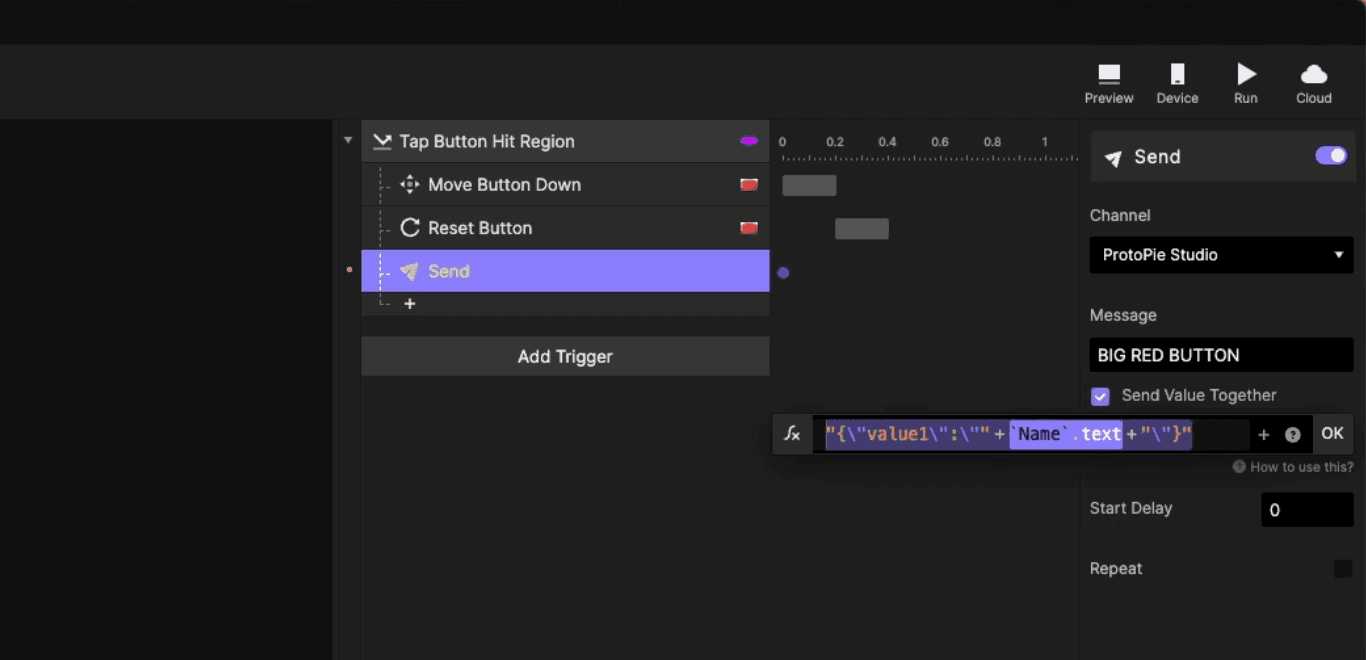
Set up the Send responses that will trigger the action in the Applet.

  • Use the channel “ProtoPie Studio” to communicate with ProtoPie Connect and activate “Send Value Together”.

  • Configure your JSON Payload values if you used one or more in the IFTTT Applet.

{'_type': 'localeString', 'en': 'json-upload-ifttt'}
  • Test the prototype in ProtoPie Connect