MCP Enterpriseで利用可能です。
セットアップは、MCPサーバーのインストール、スキルのインストール、そして1回限りのサインイン(ステップ2)の3つのステップで行います。2つの方法から1つ選んでください。
Code MCPは、公開環境の cloud.protopie.io ではなく、会社専用のProtoPie Cloudに接続します。公開環境でサインインしようとしても拒否されます。
会社専用のホストURLが必要です。例:https://<company>.protopie.cloud(専用クラウド)または https://protopie.<company>.com(オンプレミス)。
方法Aでは、セットアップ中にエージェントがホストURLを尋ねます。ホストURLを入力するか、Pieのリンクを貼り付けてください。
まだわからない場合は、いったんスキップして後から設定できます(「トラブルシューティング」を参照)。
MCP対応のエージェントに、以下のプロンプトを1つ貼り付けます。Claude Desktopでは「Chat」ではなく「</> Code」タブを使用してください。これにより、protopie-code-mcpサーバーが追加され、スキルがインストールされます。その後、ステップ2に進んでください。
現在稼働している環境に「ProtoPie Code MCP」をセットアップしてください。インストールガイドを読み、ご利用のクライアント向けの「方法B — 手動でインストールする」セクションに従ってください: <http://www.protopie.io/learn/docs/mcp-code-mcp-setup>
現在稼働している環境に「ProtoPie Code MCP」をセットアップしてください。インストールガイドを読み、ご利用のクライアント向けの「方法B — 手動でインストールする」セクションに従ってください: <http://www.protopie.io/learn/docs/mcp-code-mcp-setup>
現在稼働している環境に「ProtoPie Code MCP」をセットアップしてください。インストールガイドを読み、ご利用のクライアント向けの「方法B — 手動でインストールする」セクションに従ってください: <http://www.protopie.io/learn/docs/mcp-code-mcp-setup>
現在稼働している環境に「ProtoPie Code MCP」をセットアップしてください。インストールガイドを読み、ご利用のクライアント向けの「方法B — 手動でインストールする」セクションに従ってください: <http://www.protopie.io/learn/docs/mcp-code-mcp-setup>
現在稼働している環境に「ProtoPie Code MCP」をセットアップしてください。インストールガイドを読み、ご利用のクライアント向けの「方法B — 手動でインストールする」セクションに従ってください: <http://www.protopie.io/learn/docs/mcp-code-mcp-setup>
エージェントがステップを完了できない場合(設定ファイルの編集ができないなど)は、以下の方法Bを使用してください。
お使いのエージェントを見つけ、そのコマンドを実行するか設定を貼り付け、サインインします(ステップ2)。サーバー定義はどこでも同じです:command: npx、args: ["-y", "@protopie.io/code-mcp"]、キー protopie-code-mcp。
実行場所
Claude Code / Codex → ターミナル
Claude Desktop → </> Code タブ(Chatではありません)
Cursor / VS Code / Antigravity → 設定ファイルにJSONを貼り付け、ターミナルで install-skill コマンドを実行します
Claude Code
claude mcp add --scope user protopie-code-mcp -- npx -y @protopie.io/code-mcp && \
npx -y @protopie.io/code-mcp install-skill -a
claude mcp add --scope user protopie-code-mcp -- npx -y @protopie.io/code-mcp && \
npx -y @protopie.io/code-mcp install-skill -a
claude mcp add --scope user protopie-code-mcp -- npx -y @protopie.io/code-mcp && \
npx -y @protopie.io/code-mcp install-skill -a
claude mcp add --scope user protopie-code-mcp -- npx -y @protopie.io/code-mcp && \
npx -y @protopie.io/code-mcp install-skill -a
claude mcp add --scope user protopie-code-mcp -- npx -y @protopie.io/code-mcp && \
npx -y @protopie.io/code-mcp install-skill -a
Codex
codex mcp add protopie-code-mcp -- npx -y @protopie.io/code-mcp && \
npx -y @protopie.io/code-mcp install-skill -a
codex mcp add protopie-code-mcp -- npx -y @protopie.io/code-mcp && \
npx -y @protopie.io/code-mcp install-skill -a
codex mcp add protopie-code-mcp -- npx -y @protopie.io/code-mcp && \
npx -y @protopie.io/code-mcp install-skill -a
codex mcp add protopie-code-mcp -- npx -y @protopie.io/code-mcp && \
npx -y @protopie.io/code-mcp install-skill -a
codex mcp add protopie-code-mcp -- npx -y @protopie.io/code-mcp && \
npx -y @protopie.io/code-mcp install-skill -a
Cursor — ~/.cursor/mcp.json(グローバル)または .cursor/mcp.json(プロジェクト)に追加し、スキルをインストールします:
{ "mcpServers": { "protopie-code-mcp": { "command": "npx", "args": ["-y", "@protopie.io/code-mcp"] } } }{ "mcpServers": { "protopie-code-mcp": { "command": "npx", "args": ["-y", "@protopie.io/code-mcp"] } } }{ "mcpServers": { "protopie-code-mcp": { "command": "npx", "args": ["-y", "@protopie.io/code-mcp"] } } }{ "mcpServers": { "protopie-code-mcp": { "command": "npx", "args": ["-y", "@protopie.io/code-mcp"] } } }{ "mcpServers": { "protopie-code-mcp": { "command": "npx", "args": ["-y", "@protopie.io/code-mcp"] } } }npx -y @protopie.io/code-mcp install-skill -a
npx -y @protopie.io/code-mcp install-skill -a
npx -y @protopie.io/code-mcp install-skill -a
npx -y @protopie.io/code-mcp install-skill -a
npx -y @protopie.io/code-mcp install-skill -a
VS Code(GitHub Copilotが有効である必要があります) — ⌘⇧P → MCP: Open User Configuration を開き、追加してStartします。その後、スキルをインストールします:
{ "servers": { "protopie-code-mcp": { "type": "stdio", "command": "npx", "args": ["-y", "@protopie.io/code-mcp"] } } }{ "servers": { "protopie-code-mcp": { "type": "stdio", "command": "npx", "args": ["-y", "@protopie.io/code-mcp"] } } }{ "servers": { "protopie-code-mcp": { "type": "stdio", "command": "npx", "args": ["-y", "@protopie.io/code-mcp"] } } }{ "servers": { "protopie-code-mcp": { "type": "stdio", "command": "npx", "args": ["-y", "@protopie.io/code-mcp"] } } }{ "servers": { "protopie-code-mcp": { "type": "stdio", "command": "npx", "args": ["-y", "@protopie.io/code-mcp"] } } }npx -y @protopie.io/code-mcp install-skill -a
npx -y @protopie.io/code-mcp install-skill -a
npx -y @protopie.io/code-mcp install-skill -a
npx -y @protopie.io/code-mcp install-skill -a
npx -y @protopie.io/code-mcp install-skill -a
Antigravity — ~/.gemini/config/mcp_config.json(または特定プロジェクト用の .agents/mcp_config.json)に追加し、スキルをインストールします:
{ "mcpServers": { "protopie-code-mcp": { "command": "npx", "args": ["-y", "@protopie.io/code-mcp"] } } }{ "mcpServers": { "protopie-code-mcp": { "command": "npx", "args": ["-y", "@protopie.io/code-mcp"] } } }{ "mcpServers": { "protopie-code-mcp": { "command": "npx", "args": ["-y", "@protopie.io/code-mcp"] } } }{ "mcpServers": { "protopie-code-mcp": { "command": "npx", "args": ["-y", "@protopie.io/code-mcp"] } } }{ "mcpServers": { "protopie-code-mcp": { "command": "npx", "args": ["-y", "@protopie.io/code-mcp"] } } }npx -y @protopie.io/code-mcp install-skill -a
npx -y @protopie.io/code-mcp install-skill -a
npx -y @protopie.io/code-mcp install-skill -a
npx -y @protopie.io/code-mcp install-skill -a
npx -y @protopie.io/code-mcp install-skill -a
デフォルトでは、Code MCPは https://cloud.protopie.io に接続します。オンプレミスまたは専用のエンタープライズクラウドの場合は、インスタンスを指す PROTOPIE_CLOUD_URL 環境変数を追加してください。貼り付けるリンクとサインインは、同じホストに属している必要があります。
設定ベースのクライアント(Cursor / VS Code / Antigravity) — サーバー設定に追加します:
{ "mcpServers": { "protopie-code-mcp": { "command": "npx", "args": ["-y", "@protopie.io/code-mcp"], "env": { "PROTOPIE_CLOUD_URL": "https://<your-host>" } } } }{ "mcpServers": { "protopie-code-mcp": { "command": "npx", "args": ["-y", "@protopie.io/code-mcp"], "env": { "PROTOPIE_CLOUD_URL": "https://<your-host>" } } } }{ "mcpServers": { "protopie-code-mcp": { "command": "npx", "args": ["-y", "@protopie.io/code-mcp"], "env": { "PROTOPIE_CLOUD_URL": "https://<your-host>" } } } }{ "mcpServers": { "protopie-code-mcp": { "command": "npx", "args": ["-y", "@protopie.io/code-mcp"], "env": { "PROTOPIE_CLOUD_URL": "https://<your-host>" } } } }{ "mcpServers": { "protopie-code-mcp": { "command": "npx", "args": ["-y", "@protopie.io/code-mcp"], "env": { "PROTOPIE_CLOUD_URL": "https://<your-host>" } } } }Claude Code / Codex — 登録時に -e PROTOPIE_CLOUD_URL=https://<your-host> を追加します。
どちらの方法にも適用されます。Code MCPはProtoPie Cloudのデータを読み取るため、1回のサインインが必要です。
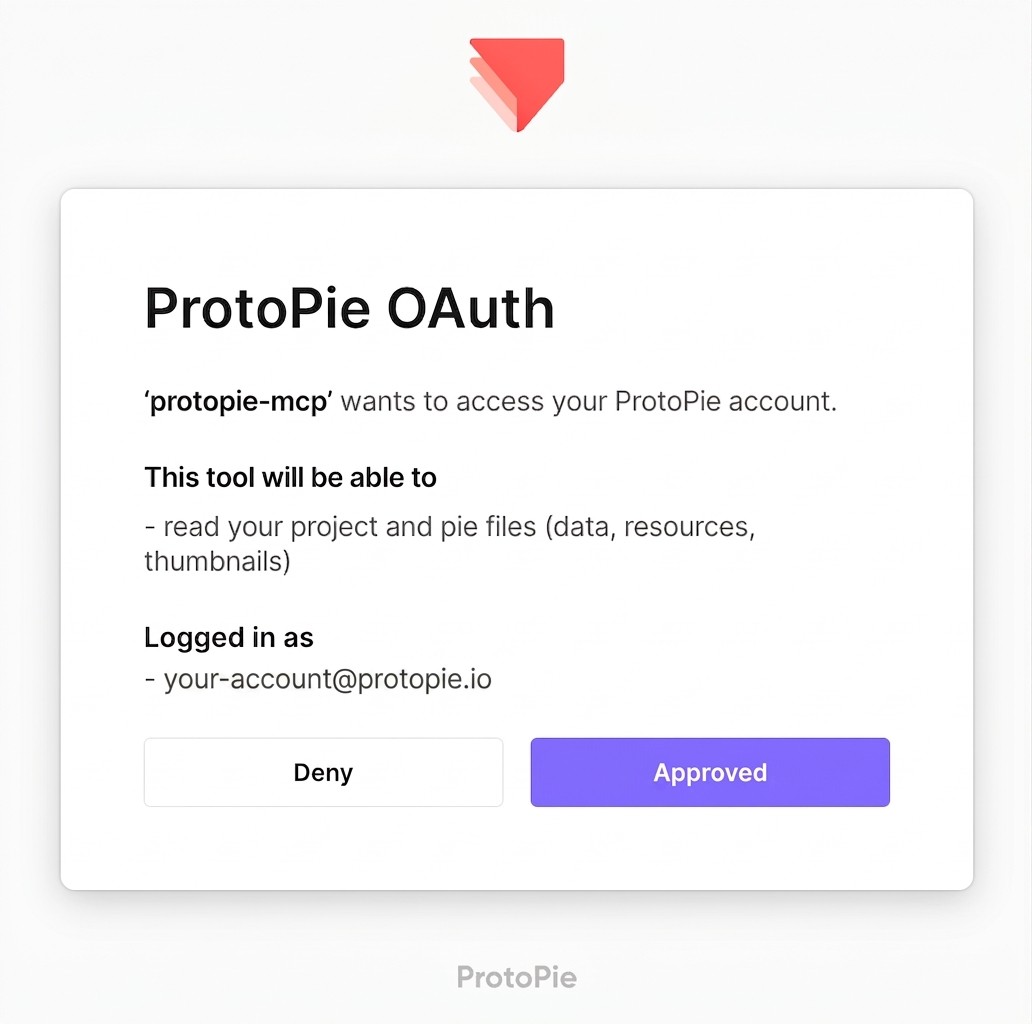
エージェントに auth_login ツールの呼び出しを依頼します。ブラウザウィンドウが開き、ProtoPie CloudのOAuthフローを完了させます。
トークンは、OSのキーチェーン(macOSキーチェーン、Windows資格情報マネージャー、またはLinux libsecret)に保存され、Cloudホストにスコープされます。
いつでも auth_status ツールで確認できます(「ProtoPieの認証ステータスを確認して」など)。
アカウントは一度に1つのみ使用できます。新しいサインインは古い情報を上書きし、サインアウトするとクリアされます。エージェントは、お使いのアカウントがダウンロード可能なPieにのみアクセスできます。
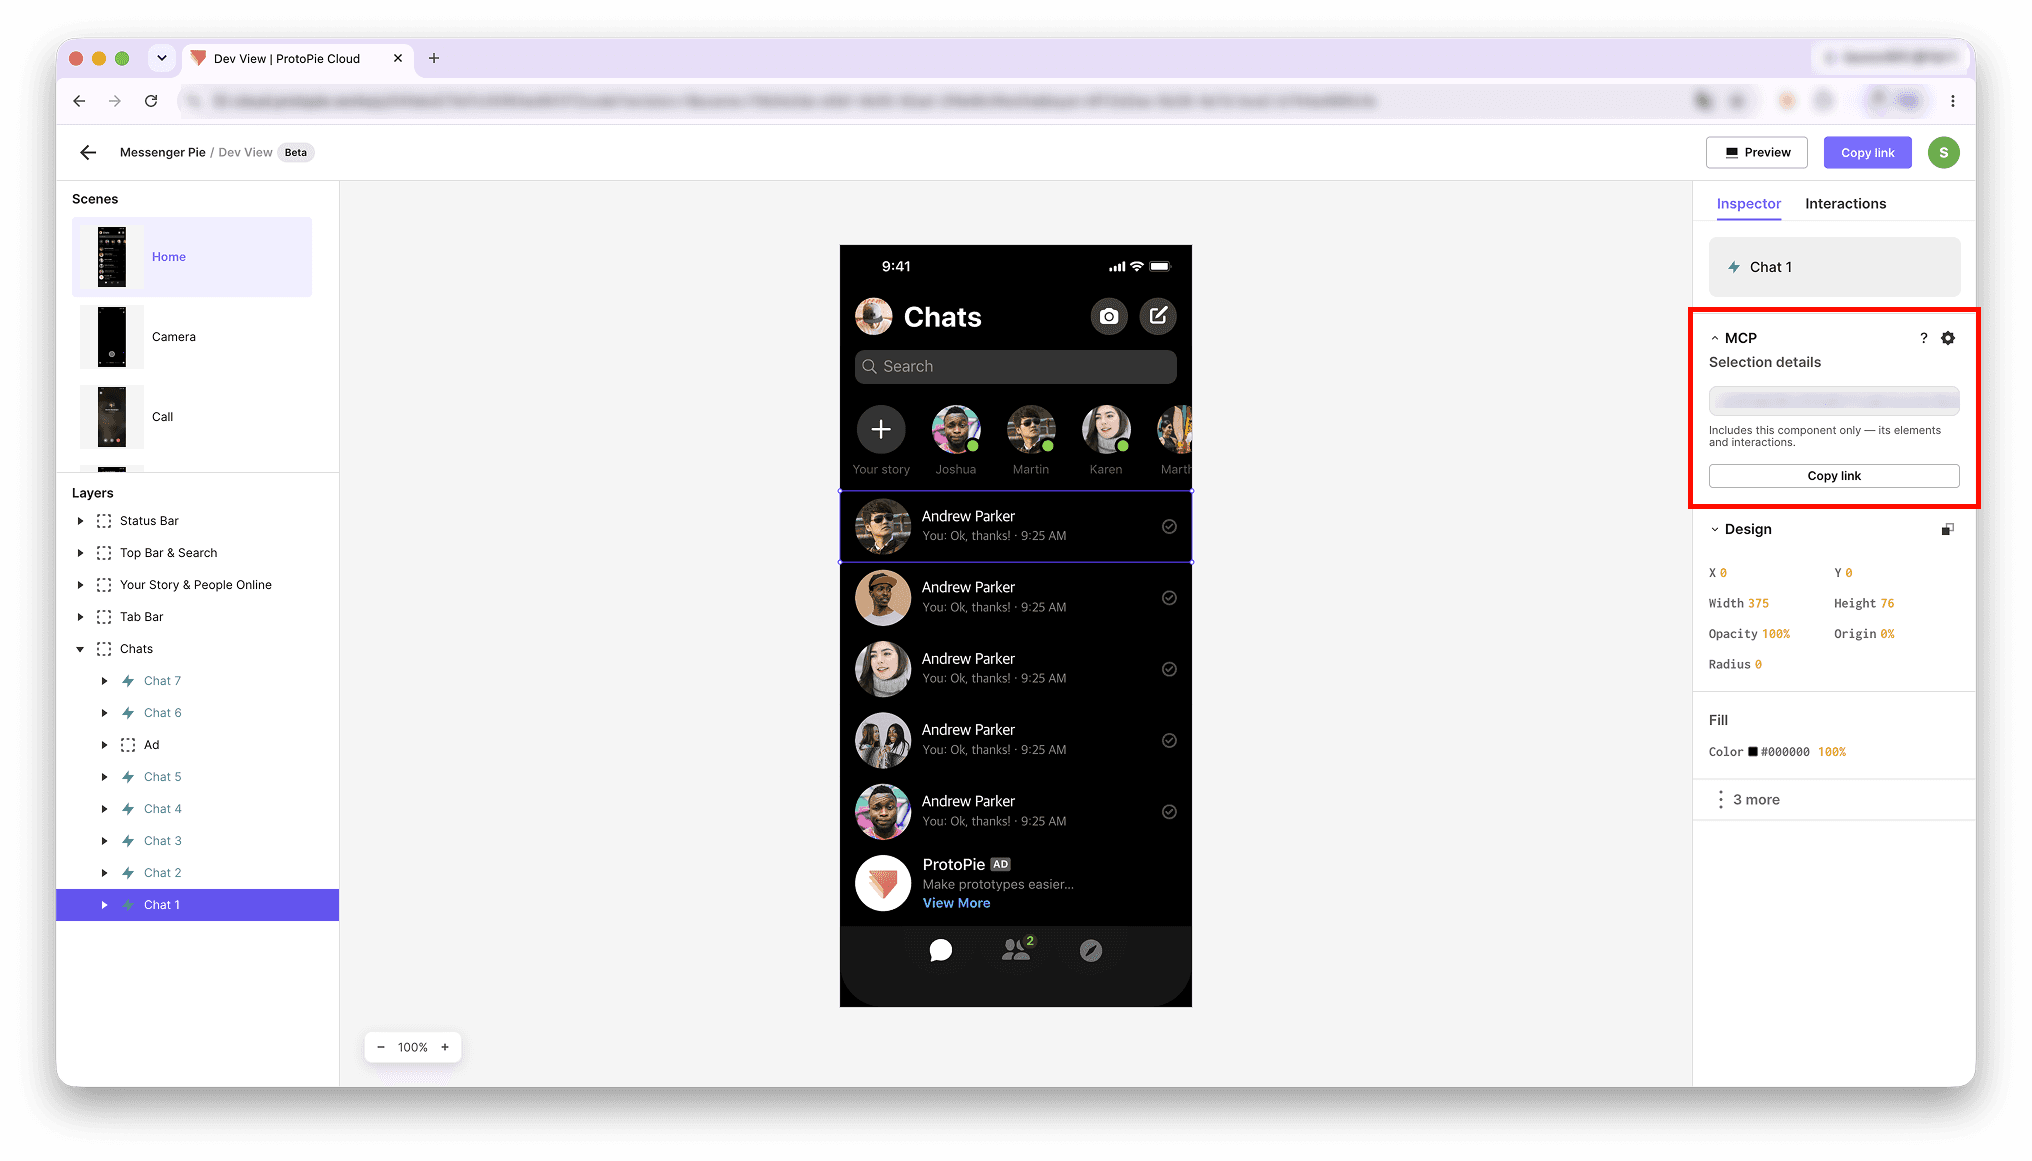
ProtoPie Cloudで、Pieの開発者ビューを開き、MCPタブに移動し、要素(Pie全体、シーン、コンポーネント、またはレイヤー)を選択して、[リンクをコピー]をクリックします。
エージェントにリンクを貼り付け、「この要素とそのインタラクションをReact(またはお使いのスタック)で実装して」のようにプロンプトを入力します。
エージェントはサーバーからその選択内容を正確に読み取り、対応するコードを記述します。ブラウザでURLを開くことはありません。
小さな範囲を選択して段階的に実装する — シーンまたは要素にスコープされたリンクは、Pie全体を対象とするプロンプトよりも高速で信頼性が高くなります。
最新バージョンを対象にするには、開発者ビューから再度コピーする(リンクはリビジョンを固定します)。
レイヤーに名前を付ける。生成されるコードに名前が反映されます(Rectangle 41 よりも cta-button の方が適しています)。
Figmaからインポートされたテキストは、画像として取り込まれることがあります。テキストが正しく表示されない場合は、そのレイヤーが実際に画像になっていないか確認してください。
Code MCPは、以下の場合にのみ機能します:
PieがEnterprise組織のチームスペースに保存されていること。
お客様が同じ組織の閲覧者または編集者であること。
Pieのダウンロードアクセスが有効になっていること。
Pieのリンクがパスワードで保護されていないこと。
ダウンロードアクセスは、チーム/プロジェクトの権限、または「閲覧およびダウンロード可能」の共有設定から付与できます。匿名アクセスはサポートされていません。
これらのアクセス要件のいずれかが満たされていない場合、開発者ビューにMCPリンクは表示されず、次のメッセージが表示されます:
「MCPリンクは利用できません。Pieの所有者に、組織へのアクセス権とPieのダウンロード権限の付与を依頼してください。」
Code MCPは、匿名の使用状況テレメトリ(イベント数のみ。プロトタイプの内容は一切送信されません)を送信することがあります。これには、実行されたツール、成功/失敗、所要時間、おおよそのサイズ区分、一方向ハッシュ化されたPie ID、ランダムなデバイスID、およびCloudアカウントIDなどが記録されます。レイヤーのテキスト、名前、PieのURL、または .pie のコンテンツが送信されることはありません。
無効にするには、サーバー上で PROTOPIE_MCP_AMPLITUDE_KEY を空の文字列に設定します:
設定ベースのクライアント(Cursor / VS Code / Antigravity):
{ "mcpServers": { "protopie-code-mcp": { "command": "npx", "args": ["-y", "@protopie.io/code-mcp"], "env": { "PROTOPIE_MCP_AMPLITUDE_KEY": "" } } } }{ "mcpServers": { "protopie-code-mcp": { "command": "npx", "args": ["-y", "@protopie.io/code-mcp"], "env": { "PROTOPIE_MCP_AMPLITUDE_KEY": "" } } } }{ "mcpServers": { "protopie-code-mcp": { "command": "npx", "args": ["-y", "@protopie.io/code-mcp"], "env": { "PROTOPIE_MCP_AMPLITUDE_KEY": "" } } } }{ "mcpServers": { "protopie-code-mcp": { "command": "npx", "args": ["-y", "@protopie.io/code-mcp"], "env": { "PROTOPIE_MCP_AMPLITUDE_KEY": "" } } } }{ "mcpServers": { "protopie-code-mcp": { "command": "npx", "args": ["-y", "@protopie.io/code-mcp"], "env": { "PROTOPIE_MCP_AMPLITUDE_KEY": "" } } } }Claude Code / Codex:登録時に -e PROTOPIE_MCP_AMPLITUDE_KEY= を追加します。
オプション:PROTOPIE_MCP_AMPLITUDE_SERVER_ZONE=EU を設定すると、テレメトリの送信先がEU地域になります(デフォルトは米国です)。
Enterpriseプランを利用しているのにサインインが拒否される場合 → 公開環境の cloud.protopie.io にサインインしている可能性があります。会社専用のProtoPie CloudホストURL(またはPieのリンク)をエージェントに伝え、PROTOPIE_CLOUD_URL を更新してください。その後、エージェントのセッションを再起動して、もう一度サインインしてください。
正しいホストURLを使用しても拒否される場合は、組織のサービス管理者にお問い合わせください。
「Authentication required(認証が必要です)」 → auth_login ツールを実行し、その後 auth_status を確認してください。
ツールが表示されない → インストール後にエージェントのセッションを再起動してください(Claude DesktopのCodeタブでは、アプリを完全に終了してから再起動します)。Node 20+であることを確認してください。
ファイルパスとともに spilled: true と表示される → 結果の容量が大きいため、ディスクに保存されました。エージェントはそこから読み込みます。大きなシーンでは通常の挙動です。
Pieを変更することはできますか? → いいえ、読み取り専用です。
開発者ビューについての詳細はこちら