INSIGHTS & INSPIRATION
PRODUCT LEARNING & SUPPORT
INSIGHTS & INSPIRATION
PRODUCT LEARNING & SUPPORT
Introducing ProtoPie
Triggers & Responses
Auto Layout
Interaction Libraries
Connecting Devices
ProtoPie Enterprise
Menu
Introducing ProtoPie
Triggers & Responses
Auto Layout
Interaction Libraries
Connecting Devices
ProtoPie Enterprise
ProtoPie ConnectでArduinoを使う
ProtoPie Connectに内蔵されたArduinoプラグインを使えば、ソフトウェアとハードウェアの両方にまたがるマルチスクリーン体験を作成できます。
ProtoPie ConnectはArduinoボードとのシリアル通信をサポートしています。最も一般的な構成は、Arduinoハードウェアを、ProtoPie Connectが動作しているマシンにUSB経由で接続することです。
詳しく見るで、Arduinoの使い方を学びましょう。
USB経由でArduinoをProtoPie Connectに接続する
ProtoPie Connectのプラグイン一覧でArduinoを選択します。
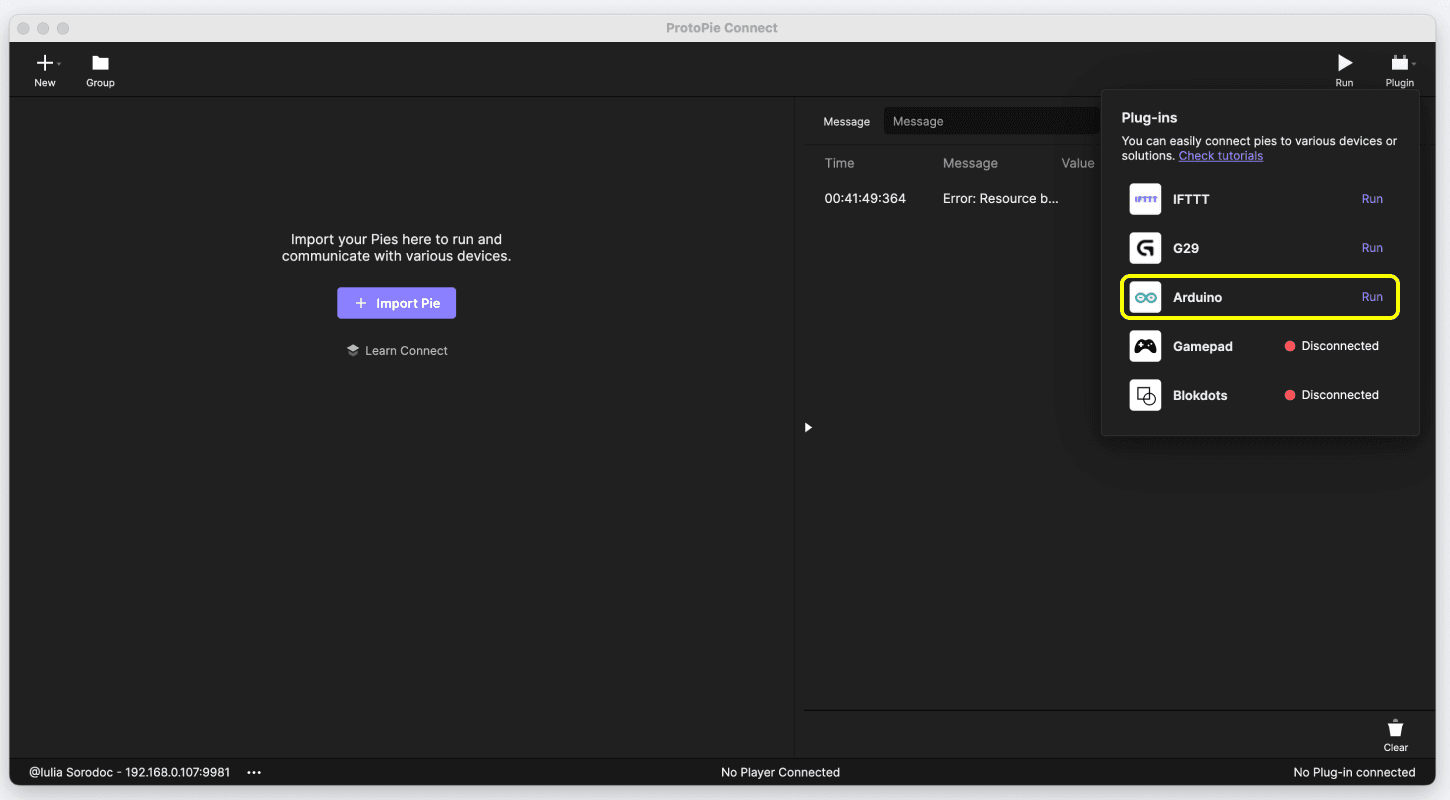
希望するポートとボーレートを選択します:
ポート: Arduinoボードに対応するポートを選択します。
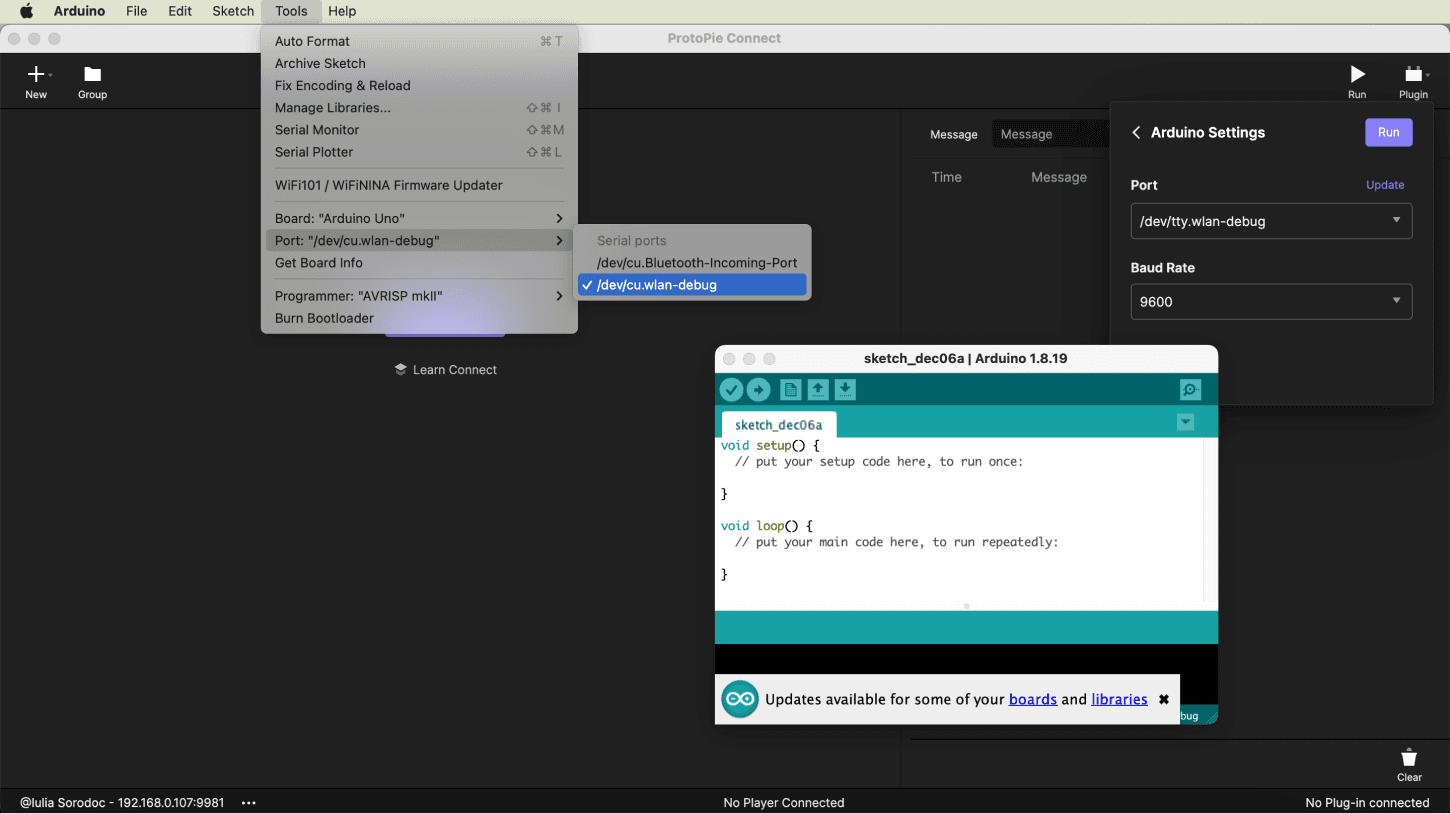
ボーレート: この値は、シリアル接続の更新を確認する頻度を決定します。デフォルト値の9600を選択できます。
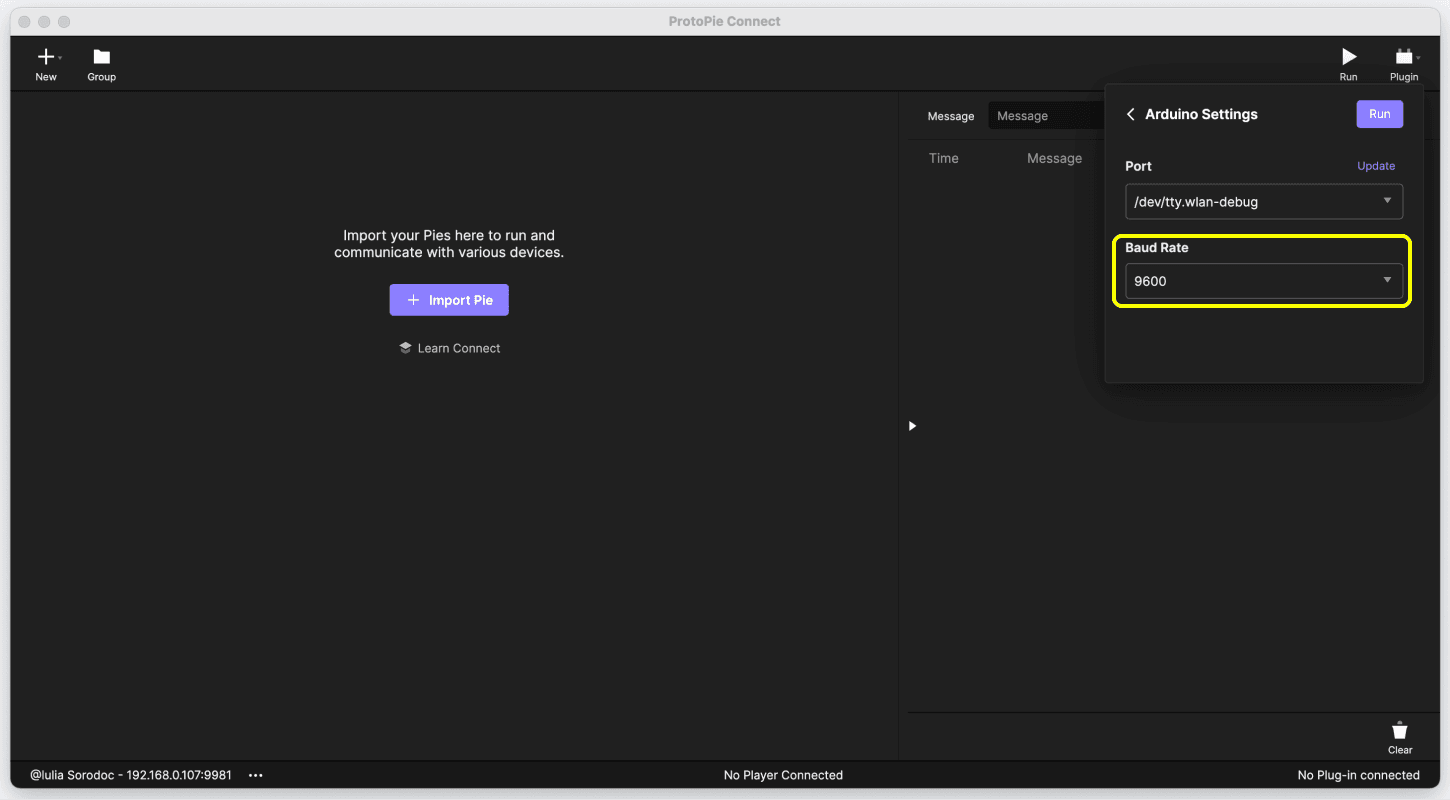
*Arduinoプラグインは、シリアル通信するあらゆるマイクロコントローラーで動作します。たとえばESP32マイコンを使いたい場合は、ESP32を接続したあと、適切なポートとボーレートを選択してシリアルポートを開き、ProtoPie Connectでデータを受信できます。
ProtoPie ConnectでArduinoを使う
ProtoPie ConnectとArduinoはMessage||Value形式で通信します。値なしでメッセージだけを送信したい場合は、Messageだけで十分です。
Arduinoからメッセージを送信する
Serial.println()関数を使って、メッセージ(および値)をProtoPie Connectに送信し、その後それらを対応するすべてのプロトタイプに送信します。
次の例では、ArduinoがROTATEというメッセージと90という値を2秒ごとにProtoPie Connectへ送信します。
void setup() {
  Serial.begin(9600);
}

void loop() {
  // Send "ROTATE" to ProtoPie
  // message: ROTATE
  // value: 90
  Serial.println("ROTATE||90");
  delay(2000);
}
void setup() {
  Serial.begin(9600);
}

void loop() {
  // Send "ROTATE" to ProtoPie
  // message: ROTATE
  // value: 90
  Serial.println("ROTATE||90");
  delay(2000);
}
void setup() {
  Serial.begin(9600);
}

void loop() {
  // Send "ROTATE" to ProtoPie
  // message: ROTATE
  // value: 90
  Serial.println("ROTATE||90");
  delay(2000);
}
void setup() {
  Serial.begin(9600);
}

void loop() {
  // Send "ROTATE" to ProtoPie
  // message: ROTATE
  // value: 90
  Serial.println("ROTATE||90");
  delay(2000);
}
void setup() {
  Serial.begin(9600);
}

void loop() {
  // Send "ROTATE" to ProtoPie
  // message: ROTATE
  // value: 90
  Serial.println("ROTATE||90");
  delay(2000);
}
Arduinoにメッセージを送信する
Arduinoハードウェアでは、受信したメッセージをMessage||Value形式で解釈するための別のコードが必要です。
以下の例では、ArduinoがProtoPie Connectから受信したメッセージを受け取り、解釈します。
#include <string.h>

// Declare struct
struct MessageValue {
  String message;
  String value; // Note that value is of String type
};

// Declare function that parse message format
struct MessageValue getMessage(String inputtedStr) {
  struct MessageValue result;

  char charArr[50];
  inputtedStr.toCharArray(charArr, 50);
  char* ptr = strtok(charArr, "||");
  result.message = String(ptr);
  ptr = strtok(NULL, "||");

  if (ptr == NULL) {
    result.value = String("");
    return result;
  }

  result.value = String(ptr);

  return result;
}

// Declare MessageValue struct's instance
struct MessageValue receivedData;

void setup() {
  Serial.begin(9600);

/*
		if you want to make waiting time for reading serial data short,
		set waiting time with `Serial.setTimeout` function.
	*/
	Serial.setTimeout(10);
}

void loop() {
// Take out strings until Serial buffer is empty
	while (Serial.available() > 0) {
// From ProtoPie Connect 1.9.0, We can use '\0' as delimiter in Arduino Serial
		String receivedString = Serial.readStringUntil('\0');

		receivedData = getMessage(receivedString);
  }

	// Do something with received message from ProtoPie Connect

	if (receivedData.message.equals("FIRST")) { // If message from ProtoPie Connect equals "FIRST" do the following
		l1 = receivedData.value.toInt(); // receivedData.value.toInt() converts the value from ProtoPie Connect to integer type and assigns it to l1
		analogWrite(firstLED, l1);
	}
}
#include <string.h>

// Declare struct
struct MessageValue {
  String message;
  String value; // Note that value is of String type
};

// Declare function that parse message format
struct MessageValue getMessage(String inputtedStr) {
  struct MessageValue result;

  char charArr[50];
  inputtedStr.toCharArray(charArr, 50);
  char* ptr = strtok(charArr, "||");
  result.message = String(ptr);
  ptr = strtok(NULL, "||");

  if (ptr == NULL) {
    result.value = String("");
    return result;
  }

  result.value = String(ptr);

  return result;
}

// Declare MessageValue struct's instance
struct MessageValue receivedData;

void setup() {
  Serial.begin(9600);

/*
		if you want to make waiting time for reading serial data short,
		set waiting time with `Serial.setTimeout` function.
	*/
	Serial.setTimeout(10);
}

void loop() {
// Take out strings until Serial buffer is empty
	while (Serial.available() > 0) {
// From ProtoPie Connect 1.9.0, We can use '\0' as delimiter in Arduino Serial
		String receivedString = Serial.readStringUntil('\0');

		receivedData = getMessage(receivedString);
  }

	// Do something with received message from ProtoPie Connect

	if (receivedData.message.equals("FIRST")) { // If message from ProtoPie Connect equals "FIRST" do the following
		l1 = receivedData.value.toInt(); // receivedData.value.toInt() converts the value from ProtoPie Connect to integer type and assigns it to l1
		analogWrite(firstLED, l1);
	}
}
#include <string.h>

// Declare struct
struct MessageValue {
  String message;
  String value; // Note that value is of String type
};

// Declare function that parse message format
struct MessageValue getMessage(String inputtedStr) {
  struct MessageValue result;

  char charArr[50];
  inputtedStr.toCharArray(charArr, 50);
  char* ptr = strtok(charArr, "||");
  result.message = String(ptr);
  ptr = strtok(NULL, "||");

  if (ptr == NULL) {
    result.value = String("");
    return result;
  }

  result.value = String(ptr);

  return result;
}

// Declare MessageValue struct's instance
struct MessageValue receivedData;

void setup() {
  Serial.begin(9600);

/*
		if you want to make waiting time for reading serial data short,
		set waiting time with `Serial.setTimeout` function.
	*/
	Serial.setTimeout(10);
}

void loop() {
// Take out strings until Serial buffer is empty
	while (Serial.available() > 0) {
// From ProtoPie Connect 1.9.0, We can use '\0' as delimiter in Arduino Serial
		String receivedString = Serial.readStringUntil('\0');

		receivedData = getMessage(receivedString);
  }

	// Do something with received message from ProtoPie Connect

	if (receivedData.message.equals("FIRST")) { // If message from ProtoPie Connect equals "FIRST" do the following
		l1 = receivedData.value.toInt(); // receivedData.value.toInt() converts the value from ProtoPie Connect to integer type and assigns it to l1
		analogWrite(firstLED, l1);
	}
}
#include <string.h>

// Declare struct
struct MessageValue {
  String message;
  String value; // Note that value is of String type
};

// Declare function that parse message format
struct MessageValue getMessage(String inputtedStr) {
  struct MessageValue result;

  char charArr[50];
  inputtedStr.toCharArray(charArr, 50);
  char* ptr = strtok(charArr, "||");
  result.message = String(ptr);
  ptr = strtok(NULL, "||");

  if (ptr == NULL) {
    result.value = String("");
    return result;
  }

  result.value = String(ptr);

  return result;
}

// Declare MessageValue struct's instance
struct MessageValue receivedData;

void setup() {
  Serial.begin(9600);

/*
		if you want to make waiting time for reading serial data short,
		set waiting time with `Serial.setTimeout` function.
	*/
	Serial.setTimeout(10);
}

void loop() {
// Take out strings until Serial buffer is empty
	while (Serial.available() > 0) {
// From ProtoPie Connect 1.9.0, We can use '\0' as delimiter in Arduino Serial
		String receivedString = Serial.readStringUntil('\0');

		receivedData = getMessage(receivedString);
  }

	// Do something with received message from ProtoPie Connect

	if (receivedData.message.equals("FIRST")) { // If message from ProtoPie Connect equals "FIRST" do the following
		l1 = receivedData.value.toInt(); // receivedData.value.toInt() converts the value from ProtoPie Connect to integer type and assigns it to l1
		analogWrite(firstLED, l1);
	}
}
#include <string.h>

// Declare struct
struct MessageValue {
  String message;
  String value; // Note that value is of String type
};

// Declare function that parse message format
struct MessageValue getMessage(String inputtedStr) {
  struct MessageValue result;

  char charArr[50];
  inputtedStr.toCharArray(charArr, 50);
  char* ptr = strtok(charArr, "||");
  result.message = String(ptr);
  ptr = strtok(NULL, "||");

  if (ptr == NULL) {
    result.value = String("");
    return result;
  }

  result.value = String(ptr);

  return result;
}

// Declare MessageValue struct's instance
struct MessageValue receivedData;

void setup() {
  Serial.begin(9600);

/*
		if you want to make waiting time for reading serial data short,
		set waiting time with `Serial.setTimeout` function.
	*/
	Serial.setTimeout(10);
}

void loop() {
// Take out strings until Serial buffer is empty
	while (Serial.available() > 0) {
// From ProtoPie Connect 1.9.0, We can use '\0' as delimiter in Arduino Serial
		String receivedString = Serial.readStringUntil('\0');

		receivedData = getMessage(receivedString);
  }

	// Do something with received message from ProtoPie Connect

	if (receivedData.message.equals("FIRST")) { // If message from ProtoPie Connect equals "FIRST" do the following
		l1 = receivedData.value.toInt(); // receivedData.value.toInt() converts the value from ProtoPie Connect to integer type and assigns it to l1
		analogWrite(firstLED, l1);
	}
}
ユースケース
ArduinoがProtoPie Connectとどのように連携するかをよりよく理解するために、以下のユースケースを再現してみましょう。
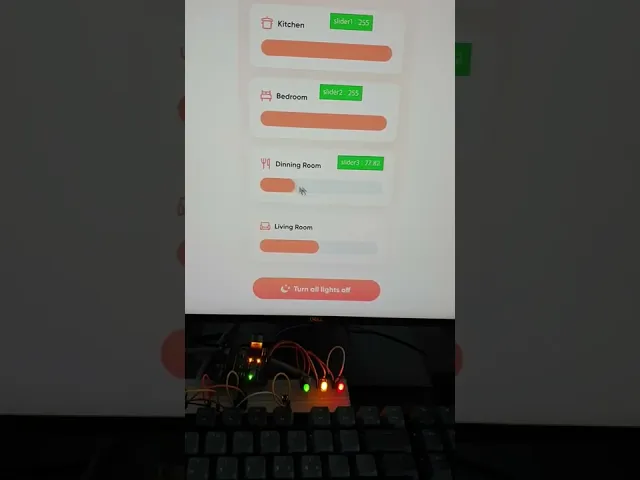
自宅の照明を制御する
ライトを順番にオン/オフします。ProtoPie Connectに接続したArduinoボードを使って、自分で試してみましょう。
このプロトタイプをProtoPie Connectに追加します。
この回路図に従って、Arduinoボードとライトの制御を設定します。
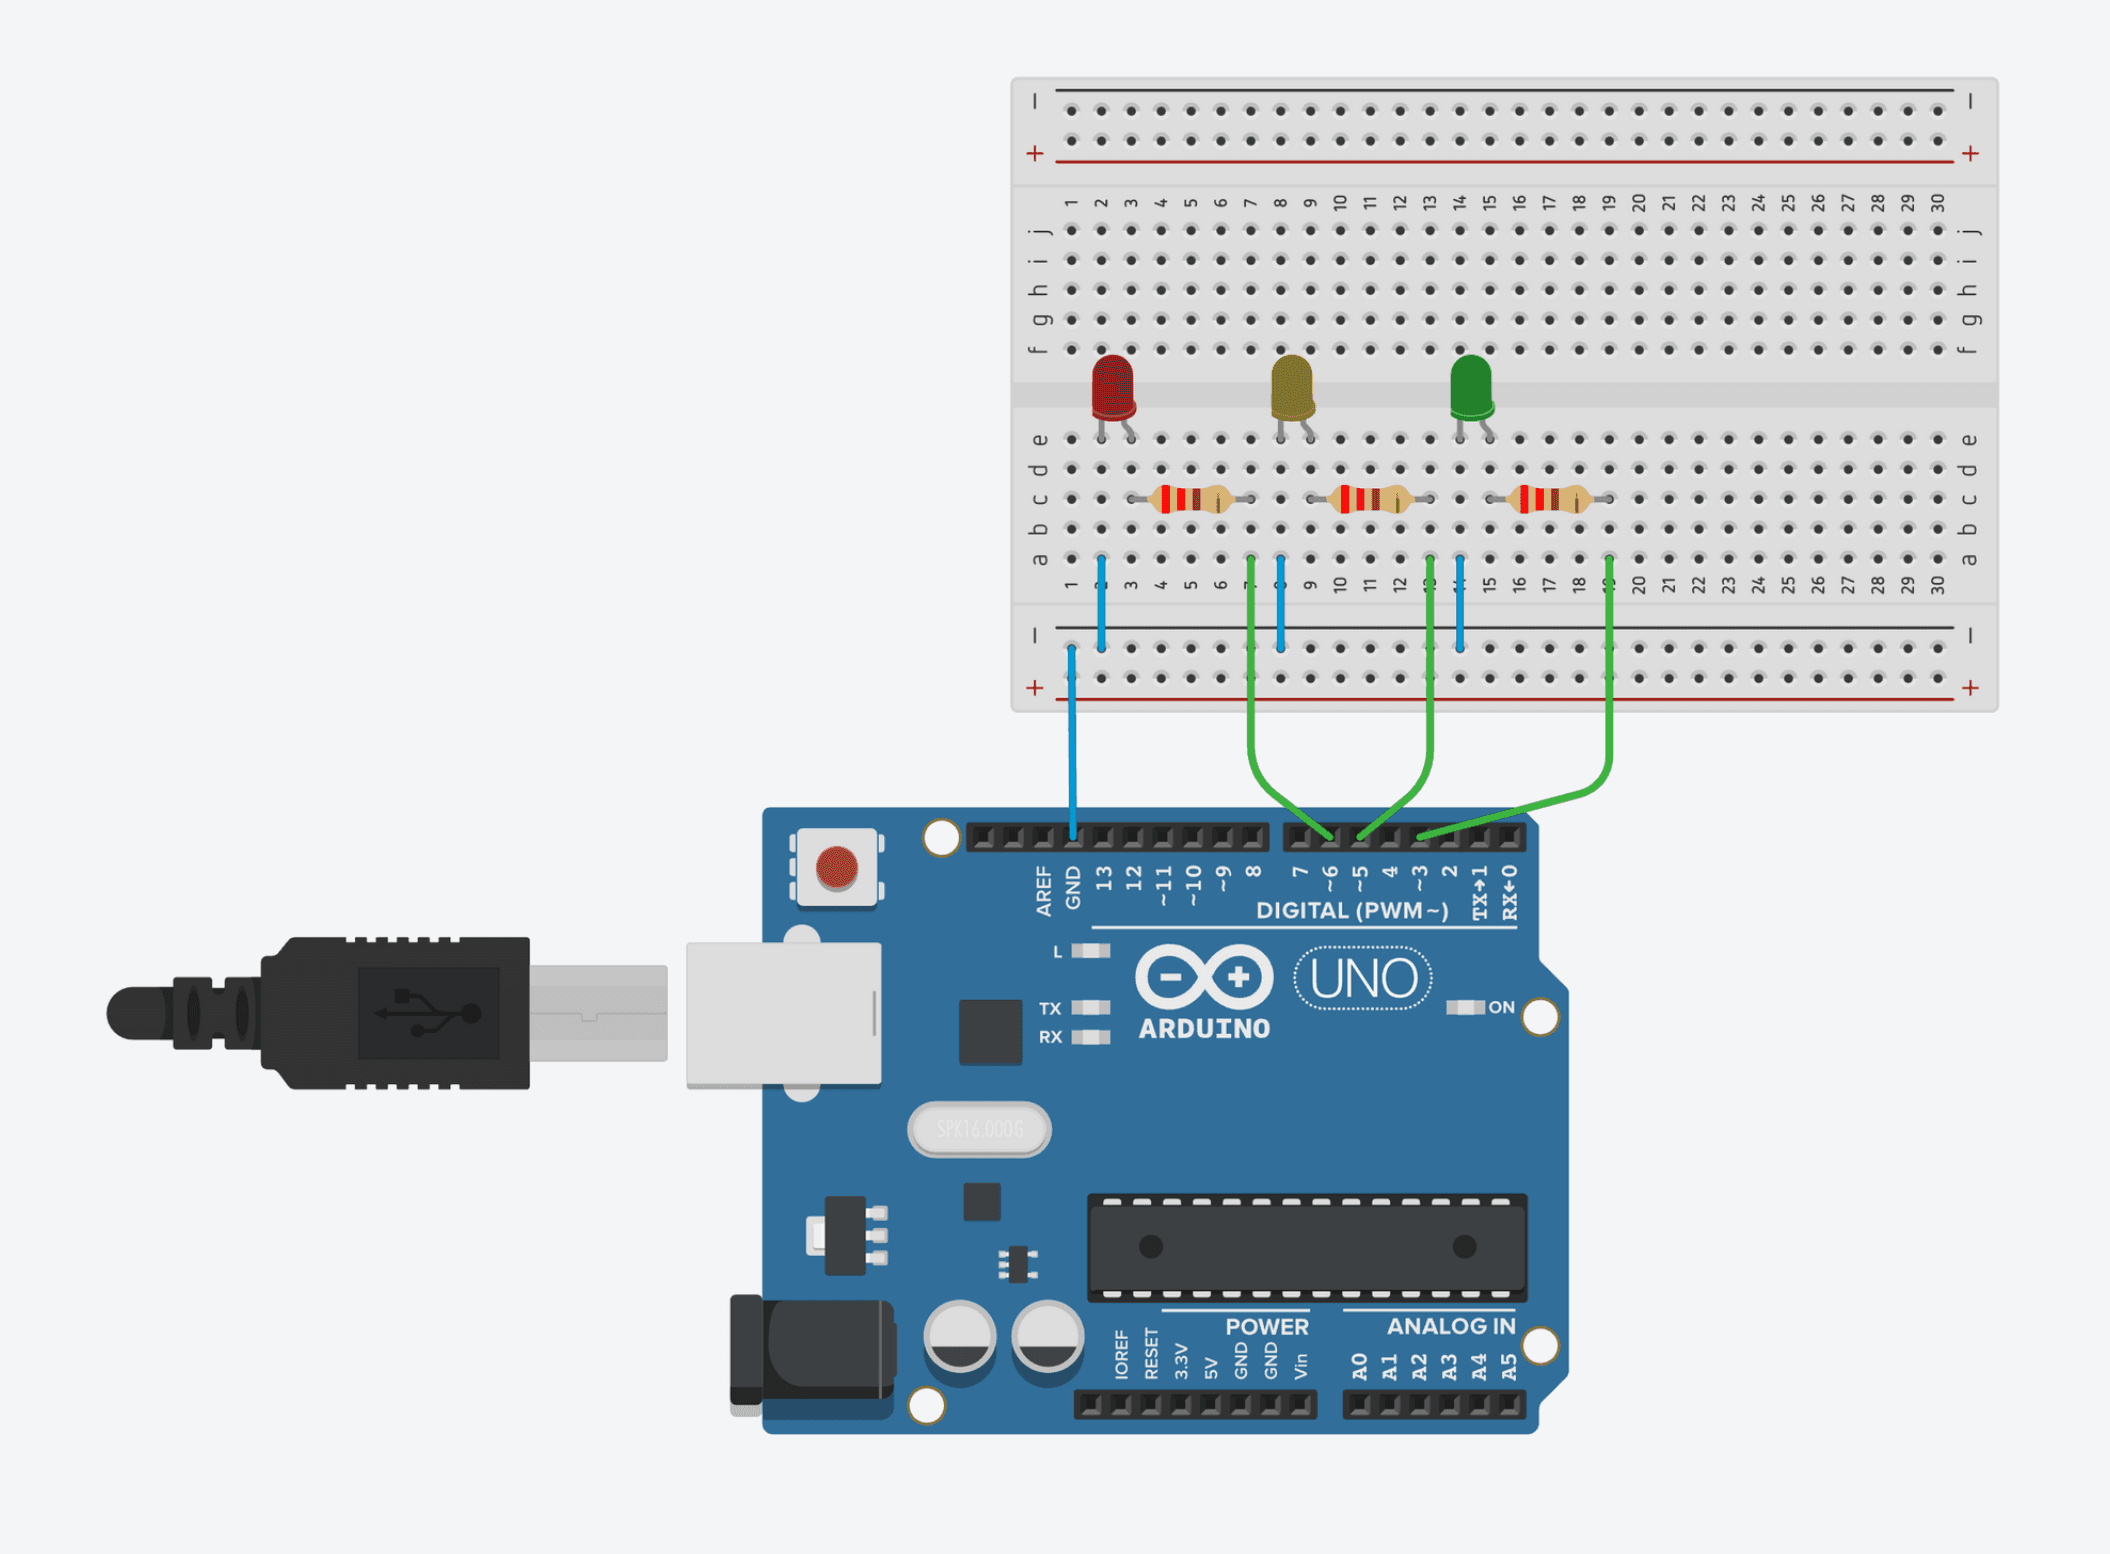
ArduinoボードをProtoPie Connectに接続します。
このサンプルコードを使って、ArduinoからProtoPie Connectへメッセージを送信します。
#include <string.h>

struct MessageValue {
  String message;
  String value;
};

struct MessageValue getMessage(String inputtedStr) {
  struct MessageValue result;

  char charArr[50];
  inputtedStr.toCharArray(charArr, 50);
  char* ptr = strtok(charArr, "||");
  result.message = String(ptr);
  ptr = strtok(NULL, "||");

  if (ptr == NULL) {
    result.value = String("");
    return result;
  }

  result.value = String(ptr);

  return result;
}

int firstLED = 3;
int secondLED = 5;
int thirdLED = 6;
struct MessageValue receivedData;

void setup() {
  pinMode(firstLED, OUTPUT);
  pinMode(secondLED, OUTPUT);
  pinMode(thirdLED, OUTPUT);
  Serial.begin(9600);
  Serial.setTimeout(10); // Set waiting time for serial data to 10 milliSeconds
}

void loop() {
  while (Serial.available() > 0) { // Take out strings until Serial is empty
    String receivedString = Serial.readStringUntil('\0'); // From 1.9.0 version, We can use '\0' as delimiter in Arduino Serial
    receivedData = getMessage(receivedString);
  }

  if (receivedData.message.equals("FIRST")) {
    analogWrite(firstLED, receivedData.value.toInt());
    delay(30);
  } else if (receivedData.message.equals("SECOND")) {
    analogWrite(secondLED, receivedData.value.toInt());
    delay(30);
  } else {
    analogWrite(thirdLED, receivedData.value.toInt());
    delay(30);
  }
}
#include <string.h>

struct MessageValue {
  String message;
  String value;
};

struct MessageValue getMessage(String inputtedStr) {
  struct MessageValue result;

  char charArr[50];
  inputtedStr.toCharArray(charArr, 50);
  char* ptr = strtok(charArr, "||");
  result.message = String(ptr);
  ptr = strtok(NULL, "||");

  if (ptr == NULL) {
    result.value = String("");
    return result;
  }

  result.value = String(ptr);

  return result;
}

int firstLED = 3;
int secondLED = 5;
int thirdLED = 6;
struct MessageValue receivedData;

void setup() {
  pinMode(firstLED, OUTPUT);
  pinMode(secondLED, OUTPUT);
  pinMode(thirdLED, OUTPUT);
  Serial.begin(9600);
  Serial.setTimeout(10); // Set waiting time for serial data to 10 milliSeconds
}

void loop() {
  while (Serial.available() > 0) { // Take out strings until Serial is empty
    String receivedString = Serial.readStringUntil('\0'); // From 1.9.0 version, We can use '\0' as delimiter in Arduino Serial
    receivedData = getMessage(receivedString);
  }

  if (receivedData.message.equals("FIRST")) {
    analogWrite(firstLED, receivedData.value.toInt());
    delay(30);
  } else if (receivedData.message.equals("SECOND")) {
    analogWrite(secondLED, receivedData.value.toInt());
    delay(30);
  } else {
    analogWrite(thirdLED, receivedData.value.toInt());
    delay(30);
  }
}
#include <string.h>

struct MessageValue {
  String message;
  String value;
};

struct MessageValue getMessage(String inputtedStr) {
  struct MessageValue result;

  char charArr[50];
  inputtedStr.toCharArray(charArr, 50);
  char* ptr = strtok(charArr, "||");
  result.message = String(ptr);
  ptr = strtok(NULL, "||");

  if (ptr == NULL) {
    result.value = String("");
    return result;
  }

  result.value = String(ptr);

  return result;
}

int firstLED = 3;
int secondLED = 5;
int thirdLED = 6;
struct MessageValue receivedData;

void setup() {
  pinMode(firstLED, OUTPUT);
  pinMode(secondLED, OUTPUT);
  pinMode(thirdLED, OUTPUT);
  Serial.begin(9600);
  Serial.setTimeout(10); // Set waiting time for serial data to 10 milliSeconds
}

void loop() {
  while (Serial.available() > 0) { // Take out strings until Serial is empty
    String receivedString = Serial.readStringUntil('\0'); // From 1.9.0 version, We can use '\0' as delimiter in Arduino Serial
    receivedData = getMessage(receivedString);
  }

  if (receivedData.message.equals("FIRST")) {
    analogWrite(firstLED, receivedData.value.toInt());
    delay(30);
  } else if (receivedData.message.equals("SECOND")) {
    analogWrite(secondLED, receivedData.value.toInt());
    delay(30);
  } else {
    analogWrite(thirdLED, receivedData.value.toInt());
    delay(30);
  }
}
#include <string.h>

struct MessageValue {
  String message;
  String value;
};

struct MessageValue getMessage(String inputtedStr) {
  struct MessageValue result;

  char charArr[50];
  inputtedStr.toCharArray(charArr, 50);
  char* ptr = strtok(charArr, "||");
  result.message = String(ptr);
  ptr = strtok(NULL, "||");

  if (ptr == NULL) {
    result.value = String("");
    return result;
  }

  result.value = String(ptr);

  return result;
}

int firstLED = 3;
int secondLED = 5;
int thirdLED = 6;
struct MessageValue receivedData;

void setup() {
  pinMode(firstLED, OUTPUT);
  pinMode(secondLED, OUTPUT);
  pinMode(thirdLED, OUTPUT);
  Serial.begin(9600);
  Serial.setTimeout(10); // Set waiting time for serial data to 10 milliSeconds
}

void loop() {
  while (Serial.available() > 0) { // Take out strings until Serial is empty
    String receivedString = Serial.readStringUntil('\0'); // From 1.9.0 version, We can use '\0' as delimiter in Arduino Serial
    receivedData = getMessage(receivedString);
  }

  if (receivedData.message.equals("FIRST")) {
    analogWrite(firstLED, receivedData.value.toInt());
    delay(30);
  } else if (receivedData.message.equals("SECOND")) {
    analogWrite(secondLED, receivedData.value.toInt());
    delay(30);
  } else {
    analogWrite(thirdLED, receivedData.value.toInt());
    delay(30);
  }
}
#include <string.h>

struct MessageValue {
  String message;
  String value;
};

struct MessageValue getMessage(String inputtedStr) {
  struct MessageValue result;

  char charArr[50];
  inputtedStr.toCharArray(charArr, 50);
  char* ptr = strtok(charArr, "||");
  result.message = String(ptr);
  ptr = strtok(NULL, "||");

  if (ptr == NULL) {
    result.value = String("");
    return result;
  }

  result.value = String(ptr);

  return result;
}

int firstLED = 3;
int secondLED = 5;
int thirdLED = 6;
struct MessageValue receivedData;

void setup() {
  pinMode(firstLED, OUTPUT);
  pinMode(secondLED, OUTPUT);
  pinMode(thirdLED, OUTPUT);
  Serial.begin(9600);
  Serial.setTimeout(10); // Set waiting time for serial data to 10 milliSeconds
}

void loop() {
  while (Serial.available() > 0) { // Take out strings until Serial is empty
    String receivedString = Serial.readStringUntil('\0'); // From 1.9.0 version, We can use '\0' as delimiter in Arduino Serial
    receivedData = getMessage(receivedString);
  }

  if (receivedData.message.equals("FIRST")) {
    analogWrite(firstLED, receivedData.value.toInt());
    delay(30);
  } else if (receivedData.message.equals("SECOND")) {
    analogWrite(secondLED, receivedData.value.toInt());
    delay(30);
  } else {
    analogWrite(thirdLED, receivedData.value.toInt());
    delay(30);
  }
}
外科用ロボットアーム
ワイヤレスコントローラーで制御するロボットアーム(Arduino Braccioロボットアーム)のプロトタイプ作成方法を学びましょう。
ロボティクスのプロトタイピングにおけるProtoPieの実用的な活用例を紹介したこの記事をご覧ください。