MCP Enterprise에서 사용 가능합니다.
설정은 MCP 서버 설치, 스킬 설치, 그리고 최초 1회 로그인(2단계)의 세 가지로 구성됩니다. 두 가지 방법 중 하나를 선택하세요.
Code MCP는 공개 환경인 cloud.protopie.io 가 아닌 회사 전용 ProtoPie Cloud에 연결됩니다. 공개 환경에서 로그인하면 접근이 거부됩니다.
회사 전용 호스트 URL이 필요합니다. 예: https://<company>.protopie.cloud (전용 클라우드) 또는 https://protopie.<company>.com (온프레미스).
방법 A를 사용하면 설정 중 에이전트가 호스트 URL을 요청합니다. 호스트 URL을 입력하거나 Pie 링크를 붙여넣으세요.
아직 호스트 URL을 모른다면 일단 건너뛰고 나중에 설정할 수 있습니다(‘문제 해결’ 섹션 참조).
MCP를 지원하는 에이전트에 다음 프롬프트를 붙여넣으세요. Claude Desktop의 경우 Chat이 아닌 </> Code 탭을 사용하세요. 이 명령은 protopie-code-mcp 서버를 추가하고 스킬을 설치합니다. 완료되면 2단계로 이동하세요.
현재 실행 중인 환경에 "ProtoPie Code MCP"를 설정해 주세요. 다음 클라이언트용 설치 가이드를 읽고 "Method B — Install it yourself" 섹션을 따르세요: <http://www.protopie.io/learn/docs/mcp-code-mcp-setup>
현재 실행 중인 환경에 "ProtoPie Code MCP"를 설정해 주세요. 다음 클라이언트용 설치 가이드를 읽고 "Method B — Install it yourself" 섹션을 따르세요: <http://www.protopie.io/learn/docs/mcp-code-mcp-setup>
현재 실행 중인 환경에 "ProtoPie Code MCP"를 설정해 주세요. 다음 클라이언트용 설치 가이드를 읽고 "Method B — Install it yourself" 섹션을 따르세요: <http://www.protopie.io/learn/docs/mcp-code-mcp-setup>
현재 실행 중인 환경에 "ProtoPie Code MCP"를 설정해 주세요. 다음 클라이언트용 설치 가이드를 읽고 "Method B — Install it yourself" 섹션을 따르세요: <http://www.protopie.io/learn/docs/mcp-code-mcp-setup>
현재 실행 중인 환경에 "ProtoPie Code MCP"를 설정해 주세요. 다음 클라이언트용 설치 가이드를 읽고 "Method B — Install it yourself" 섹션을 따르세요: <http://www.protopie.io/learn/docs/mcp-code-mcp-setup>
에이전트가 단계를 완료하지 못하는 경우(예: 설정 파일을 수정하지 못하는 경우) 아래의 방법 B를 사용하세요.
사용 중인 에이전트를 찾아서 해당 명령을 실행하거나 설정을 붙여넣은 다음, 로그인(2단계)을 진행하세요. 서버 정의는 어디서나 동일합니다: command: npx, args: ["-y", "@protopie.io/code-mcp"], key protopie-code-mcp.
실행 위치
Claude Code / Codex → 터미널
Claude Desktop → </> Code 탭 (Chat 아님)
Cursor / VS Code / Antigravity → 설정을 JSON 파일에 붙여넣은 다음, 터미널에서 install-skill 명령을 실행합니다.
Claude Code
claude mcp add --scope user protopie-code-mcp -- npx -y @protopie.io/code-mcp && \
npx -y @protopie.io/code-mcp install-skill -a
claude mcp add --scope user protopie-code-mcp -- npx -y @protopie.io/code-mcp && \
npx -y @protopie.io/code-mcp install-skill -a
claude mcp add --scope user protopie-code-mcp -- npx -y @protopie.io/code-mcp && \
npx -y @protopie.io/code-mcp install-skill -a
claude mcp add --scope user protopie-code-mcp -- npx -y @protopie.io/code-mcp && \
npx -y @protopie.io/code-mcp install-skill -a
claude mcp add --scope user protopie-code-mcp -- npx -y @protopie.io/code-mcp && \
npx -y @protopie.io/code-mcp install-skill -a
Codex
codex mcp add protopie-code-mcp -- npx -y @protopie.io/code-mcp && \
npx -y @protopie.io/code-mcp install-skill -a
codex mcp add protopie-code-mcp -- npx -y @protopie.io/code-mcp && \
npx -y @protopie.io/code-mcp install-skill -a
codex mcp add protopie-code-mcp -- npx -y @protopie.io/code-mcp && \
npx -y @protopie.io/code-mcp install-skill -a
codex mcp add protopie-code-mcp -- npx -y @protopie.io/code-mcp && \
npx -y @protopie.io/code-mcp install-skill -a
codex mcp add protopie-code-mcp -- npx -y @protopie.io/code-mcp && \
npx -y @protopie.io/code-mcp install-skill -a
Cursor — ~/.cursor/mcp.json (전역) 또는 .cursor/mcp.json (프로젝트)에 추가한 다음, 스킬을 설치하세요:
{ "mcpServers": { "protopie-code-mcp": { "command": "npx", "args": ["-y", "@protopie.io/code-mcp"] } } }{ "mcpServers": { "protopie-code-mcp": { "command": "npx", "args": ["-y", "@protopie.io/code-mcp"] } } }{ "mcpServers": { "protopie-code-mcp": { "command": "npx", "args": ["-y", "@protopie.io/code-mcp"] } } }{ "mcpServers": { "protopie-code-mcp": { "command": "npx", "args": ["-y", "@protopie.io/code-mcp"] } } }{ "mcpServers": { "protopie-code-mcp": { "command": "npx", "args": ["-y", "@protopie.io/code-mcp"] } } }npx -y @protopie.io/code-mcp install-skill -a
npx -y @protopie.io/code-mcp install-skill -a
npx -y @protopie.io/code-mcp install-skill -a
npx -y @protopie.io/code-mcp install-skill -a
npx -y @protopie.io/code-mcp install-skill -a
VS Code (GitHub Copilot 활성화 필요) — ⌘⇧P → MCP: Open User Configuration을 선택하여 추가한 다음 Start를 누르고, 스킬을 설치하세요:
{ "servers": { "protopie-code-mcp": { "type": "stdio", "command": "npx", "args": ["-y", "@protopie.io/code-mcp"] } } }{ "servers": { "protopie-code-mcp": { "type": "stdio", "command": "npx", "args": ["-y", "@protopie.io/code-mcp"] } } }{ "servers": { "protopie-code-mcp": { "type": "stdio", "command": "npx", "args": ["-y", "@protopie.io/code-mcp"] } } }{ "servers": { "protopie-code-mcp": { "type": "stdio", "command": "npx", "args": ["-y", "@protopie.io/code-mcp"] } } }{ "servers": { "protopie-code-mcp": { "type": "stdio", "command": "npx", "args": ["-y", "@protopie.io/code-mcp"] } } }npx -y @protopie.io/code-mcp install-skill -a
npx -y @protopie.io/code-mcp install-skill -a
npx -y @protopie.io/code-mcp install-skill -a
npx -y @protopie.io/code-mcp install-skill -a
npx -y @protopie.io/code-mcp install-skill -a
Antigravity — ~/.gemini/config/mcp_config.json (또는 단일 프로젝트의 경우 .agents/mcp_config.json)에 추가한 다음, 스킬을 설치하세요:
{ "mcpServers": { "protopie-code-mcp": { "command": "npx", "args": ["-y", "@protopie.io/code-mcp"] } } }{ "mcpServers": { "protopie-code-mcp": { "command": "npx", "args": ["-y", "@protopie.io/code-mcp"] } } }{ "mcpServers": { "protopie-code-mcp": { "command": "npx", "args": ["-y", "@protopie.io/code-mcp"] } } }{ "mcpServers": { "protopie-code-mcp": { "command": "npx", "args": ["-y", "@protopie.io/code-mcp"] } } }{ "mcpServers": { "protopie-code-mcp": { "command": "npx", "args": ["-y", "@protopie.io/code-mcp"] } } }npx -y @protopie.io/code-mcp install-skill -a
npx -y @protopie.io/code-mcp install-skill -a
npx -y @protopie.io/code-mcp install-skill -a
npx -y @protopie.io/code-mcp install-skill -a
npx -y @protopie.io/code-mcp install-skill -a
기본적으로 Code MCP는 https://cloud.protopie.io에 연결됩니다. 온프레미스 또는 전용 엔터프라이즈 클라우드를 사용하는 경우, 인스턴스를 가리키는 PROTOPIE_CLOUD_URL 환경 변수를 추가하세요. 붙여넣는 링크와 로그인은 동일한 호스트에 속해야 합니다.
설정 기반 클라이언트 (Cursor / VS Code / Antigravity) — 서버 설정에 다음을 추가합니다:
{ "mcpServers": { "protopie-code-mcp": { "command": "npx", "args": ["-y", "@protopie.io/code-mcp"], "env": { "PROTOPIE_CLOUD_URL": "https://<your-host>" } } } }{ "mcpServers": { "protopie-code-mcp": { "command": "npx", "args": ["-y", "@protopie.io/code-mcp"], "env": { "PROTOPIE_CLOUD_URL": "https://<your-host>" } } } }{ "mcpServers": { "protopie-code-mcp": { "command": "npx", "args": ["-y", "@protopie.io/code-mcp"], "env": { "PROTOPIE_CLOUD_URL": "https://<your-host>" } } } }{ "mcpServers": { "protopie-code-mcp": { "command": "npx", "args": ["-y", "@protopie.io/code-mcp"], "env": { "PROTOPIE_CLOUD_URL": "https://<your-host>" } } } }{ "mcpServers": { "protopie-code-mcp": { "command": "npx", "args": ["-y", "@protopie.io/code-mcp"], "env": { "PROTOPIE_CLOUD_URL": "https://<your-host>" } } } }Claude Code / Codex — 등록 시 -e PROTOPIE_CLOUD_URL=https://<your-host>를 추가합니다.
두 가지 방법 모두에 적용됩니다. Code MCP는 ProtoPie Cloud 데이터를 읽기 때문에 로그인이 한 번 필요합니다.
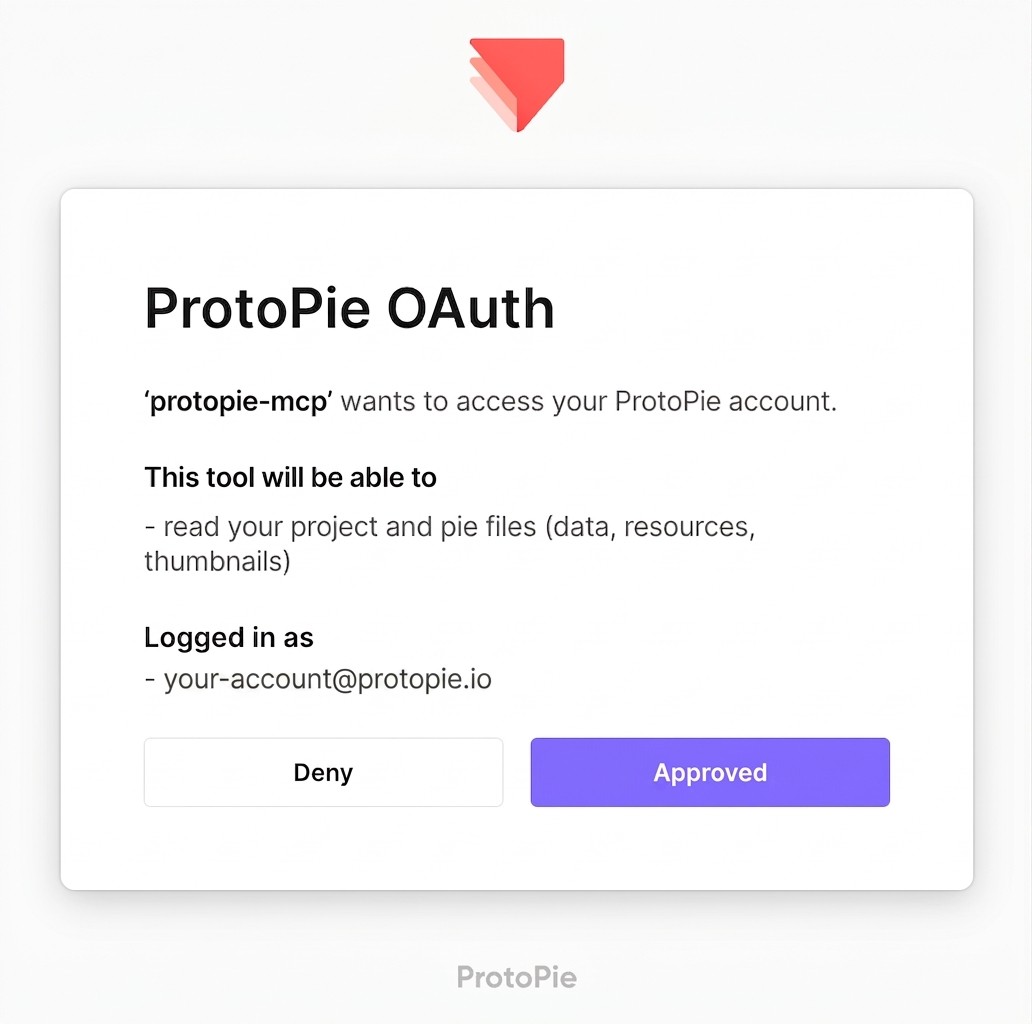
에이전트에게 auth_login 도구를 호출하도록 요청하세요. 브라우저 창이 열려 ProtoPie Cloud OAuth 인증 과정을 완료할 수 있습니다.
토큰은 Cloud 호스트 범위로 제한되어 OS 키체인(macOS Keychain, Windows 자격 증명 관리자 또는 Linux libsecret)에 저장됩니다.
언제든지 auth_status 도구로 확인해 보세요. (“내 ProtoPie 인증 상태 확인해 줘”)
한 번에 하나의 계정만 유지됩니다. 새로 로그인하면 기존 정보가 덮어씌워지며, 로그아웃하면 정보가 삭제됩니다. 에이전트는 귀하의 계정으로 다운로드할 수 있는 Pie만 액세스할 수 있습니다.
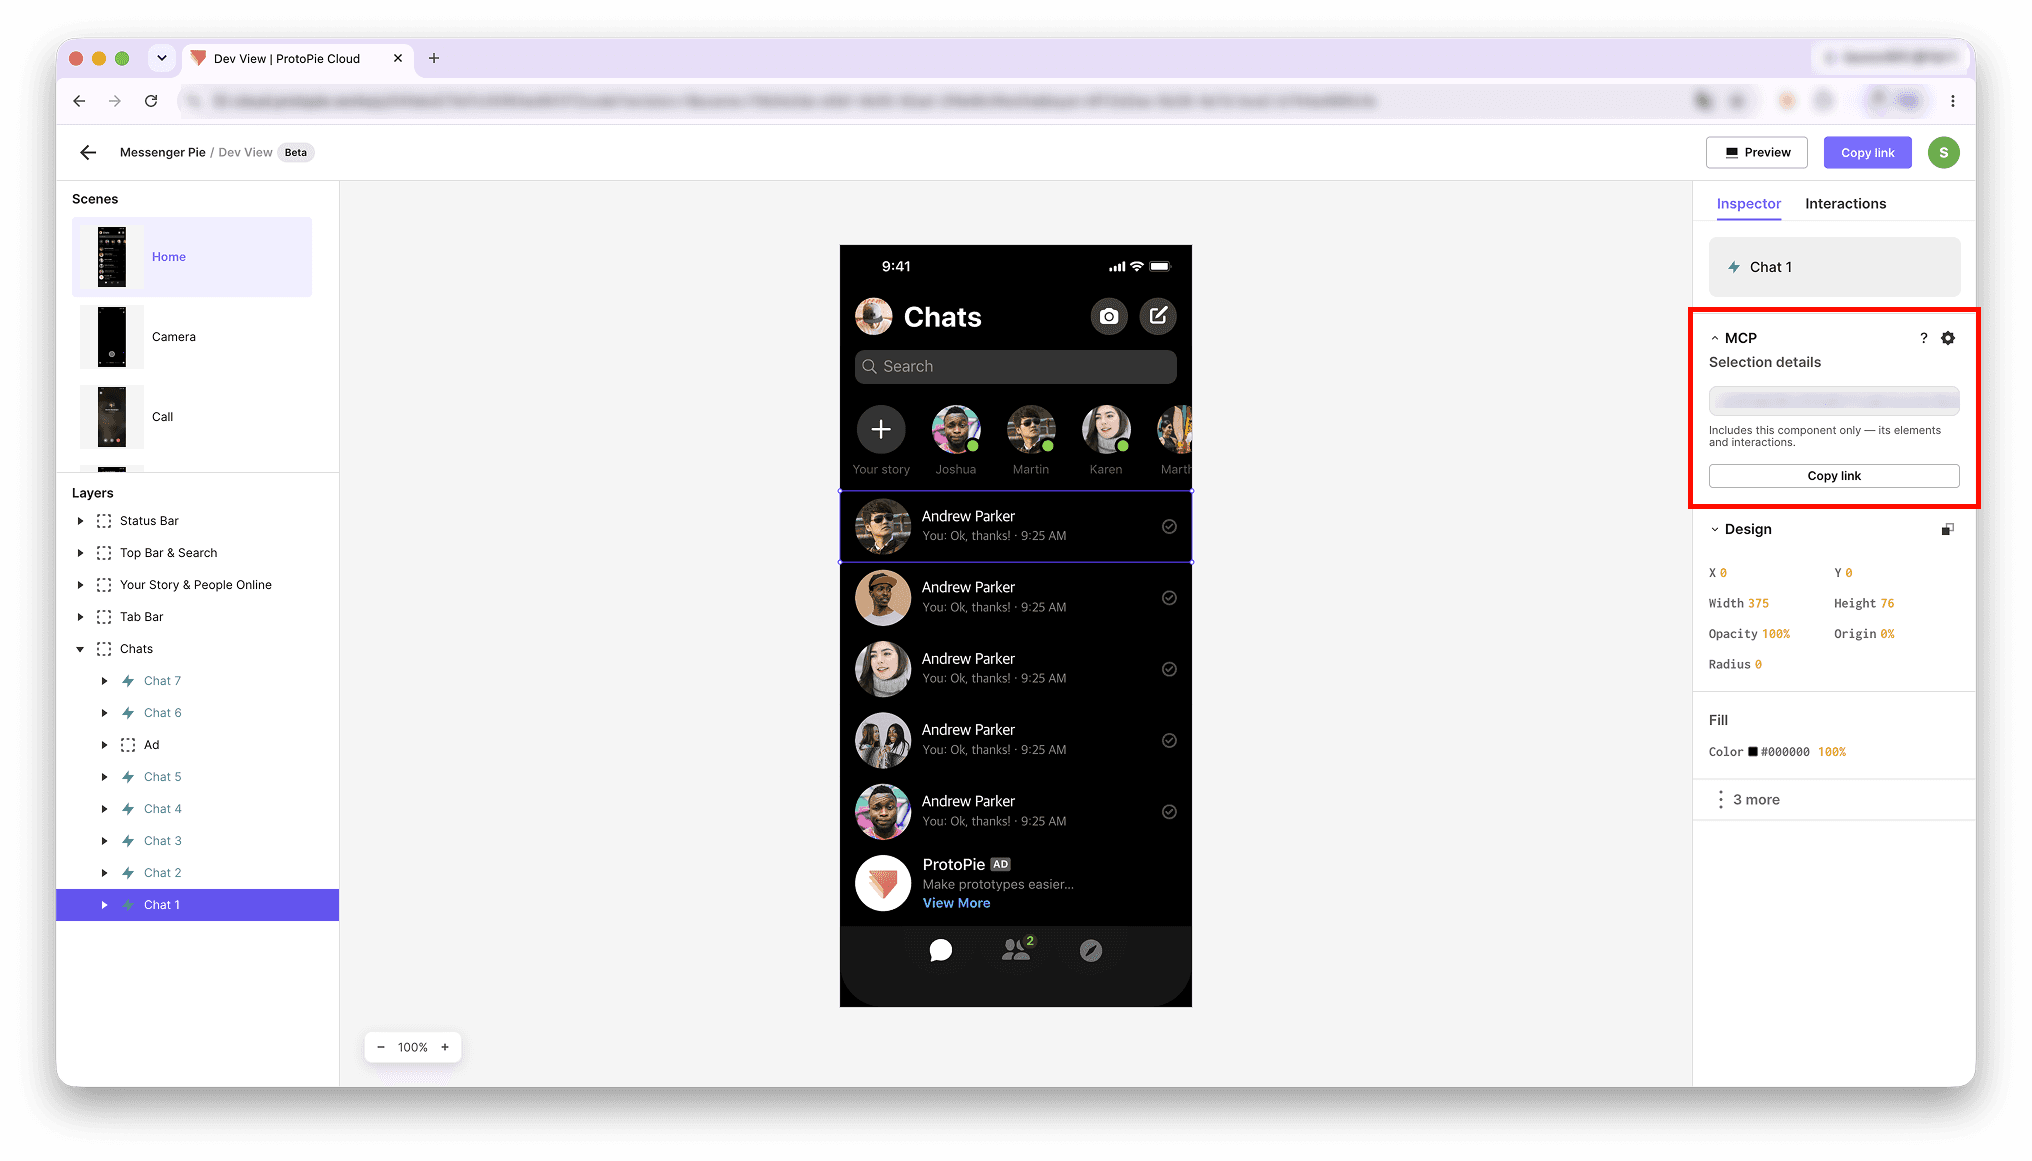
ProtoPie Cloud에서 해당 Pie의 개발자 뷰(Dev View)를 열고, MCP 탭으로 이동한 후, 요소(전체 Pie, 씬, 컴포넌트 또는 레이어)를 선택하고 링크 복사를 누릅니다.
링크를 에이전트에 붙여넣고 프롬프트를 작성합니다. 예: “이 요소와 인터랙션을 React(또는 사용 중인 스택)로 구현해 줘.”
에이전트는 서버에서 정확히 해당 선택 영역을 읽고 일치하는 코드를 작성합니다. 브라우저에서 URL을 직접 열지 않습니다.
작은 단위로 선택하여 단계별로 구현하세요. 전체 Pie를 요청하는 것보다 씬 또는 요소 범위의 링크를 제공하는 것이 더 빠르고 신뢰할 수 있습니다.
최신 버전을 반영하려면 개발자 뷰에서 링크를 다시 복사하세요. (링크는 특정 버전에 고정됩니다.)
레이어 이름을 지정해 두세요. 생성되는 코드는 레이어 이름을 반영합니다. (cta-button이 Rectangle 41보다 훨씬 좋습니다.)
Figma에서 가져온 텍스트가 간혹 이미지로 변환되어 전달될 수 있습니다. 텍스트가 올바르게 작동하지 않는다면 해당 레이어가 실제 이미지로 되어 있는지 확인하세요.
Code MCP는 다음 조건이 충족될 때만 작동합니다:
Pie가 Enterprise 조직 팀 스페이스에 저장되어 있어야 합니다.
동일한 조직 내에서 뷰어(Viewer) 또는 에디터(Editor) 권한을 가지고 있어야 합니다.
해당 Pie의 다운로드 권한이 활성화되어 있어야 합니다.
Pie 링크가 비밀번호로 보호되어 있지 않아야 합니다.
다운로드 권한은 팀/프로젝트 권한 또는 “보기 및 다운로드 가능” 공유 설정을 통해 부여받을 수 있습니다. 익명 액세스는 지원되지 않습니다.
이러한 액세스 요구 사항 중 하나라도 충족되지 않으면 개발자 뷰에 MCP 링크가 표시되지 않으며 다음 메시지가 나타납니다:
“MCP 링크를 사용할 수 없습니다. Pie 소유자에게 조직 액세스 및 Pie 다운로드 권한을 요청하세요.”
Code MCP는 **익명 사용 원격 분석 데이터**를 전송할 수 있습니다. 이는 이벤트 횟수만 포함하며, **프로토타입 콘텐츠는 절대 포함하지 않습니다**. 실행된 도구 종류, 성공/실패 여부, 소요 시간, 대략적인 크기 분류, 단방향 해시 처리된 pie ID, 무작위 디바이스 ID 및 Cloud 계정 ID 등을 기록합니다. 레이어 텍스트, 이름, pie URL 또는 .pie 파일 콘텐츠는 절대 전송하지 않습니다.
이 기능을 끄려면 서버에서 PROTOPIE_MCP_AMPLITUDE_KEY를 빈 문자열로 설정하세요:
설정 기반 클라이언트 (Cursor / VS Code / Antigravity):
{ "mcpServers": { "protopie-code-mcp": { "command": "npx", "args": ["-y", "@protopie.io/code-mcp"], "env": { "PROTOPIE_MCP_AMPLITUDE_KEY": "" } } } }{ "mcpServers": { "protopie-code-mcp": { "command": "npx", "args": ["-y", "@protopie.io/code-mcp"], "env": { "PROTOPIE_MCP_AMPLITUDE_KEY": "" } } } }{ "mcpServers": { "protopie-code-mcp": { "command": "npx", "args": ["-y", "@protopie.io/code-mcp"], "env": { "PROTOPIE_MCP_AMPLITUDE_KEY": "" } } } }{ "mcpServers": { "protopie-code-mcp": { "command": "npx", "args": ["-y", "@protopie.io/code-mcp"], "env": { "PROTOPIE_MCP_AMPLITUDE_KEY": "" } } } }{ "mcpServers": { "protopie-code-mcp": { "command": "npx", "args": ["-y", "@protopie.io/code-mcp"], "env": { "PROTOPIE_MCP_AMPLITUDE_KEY": "" } } } }Claude Code / Codex: 등록 시 -e PROTOPIE_MCP_AMPLITUDE_KEY=를 추가합니다.
선택 사항: PROTOPIE_MCP_AMPLITUDE_SERVER_ZONE=EU를 설정하면 원격 분석 데이터가 EU 리전으로 전송됩니다 (기본값은 US).
Enterprise 플랜을 사용 중인데도 로그인이 거부되는 경우 → 공개 환경인 cloud.protopie.io에 로그인하고 있을 가능성이 높습니다. 회사 전용 ProtoPie Cloud 호스트 URL(또는 Pie 링크)을 에이전트에 전달해 PROTOPIE_CLOUD_URL을 업데이트한 다음, 에이전트 세션을 재시작하고 다시 로그인하세요.
올바른 호스트 URL을 사용해도 로그인이 거부된다면 조직의 서비스 관리자에게 문의하세요.
“Authentication required (인증 필요)” → auth_login 도구를 실행한 다음 auth_status를 확인하세요.
도구가 나타나지 않음 → 설치 후 에이전트 세션을 재시작하세요 (Claude Desktop Code 탭의 경우 완전히 종료했다가 다시 실행). Node 20+ 버전인지 확인하세요.
파일 경로와 함께 spilled: true가 나타남 → 결과가 너무 커서 디스크에 저장되었습니다. 에이전트가 해당 경로에서 파일을 읽어옵니다. 용량이 큰 씬에서는 정상적인 현상입니다.
에이전트가 내 Pie를 수정할 수 있나요? → 아니요, 읽기 전용입니다.
개발자 뷰(Dev View)에 대해 더 알아보기