[Beta] ProtoPie MCP is here! Learn More.

Introducing ProtoPie

시작하기

첫 번째 프로토타입 제작하기

ProtoPie 생태계

ProtoPie Studio 인터페이스

Import

시작하기

Adobe XD에서 가져오기

Figma에서 가져오기

Sketch에서 가져오기

프로토파이 지니 (ProtoPie Genie)

Basic Elements

컨테이너

기기

레이어

미리보기 창

장면

스크롤/페이징

단축키

시스템 상태 표시줄

Triggers & Responses

이징 (Easing)

주석

응답

타임라인

트리거

Formulas

시작하기

함수

레이어 속성

구문

수식 활용 사례

Variables

시작하기

Variables

정의된 변수

변수 활용 사례

AI

시작하기

AI 상호작용 생성

AI 문서 Q&A

AI 패널 인터페이스

최상의 결과를 위한 팁

ProtoPie MCP

Getting Started

Studio MCP Introduction

Studio MCP Installation & Setup

Code MCP Introduction

Code MCP Installation & Setup

Dev View

Auto Layout

시작하기

오토 레이아웃 속성

Components

시작하기

컴포넌트 가이드

구성 요소 편집

중첩된 컴포넌트

메시지 보내기 및 받기

Interaction Libraries

시작하기

상호작용 라이브러리 관리

도서관 회원 관리

Voice Prototyping

시작하기

수신 응답

음성 응답

사용 사례

음성 명령 트리거

Connecting Devices

blokdots 연결 중

모바일 기기 연결

ProtoPie Cloud

시작하기

프로토타입 관리

스토리지 관리

프로토타입 공유

ProtoPie Player

プロトタイプのテスト

글꼴 관리

오프라인 테스트

Wear OS용 ProtoPie Player

Teams

시작하기

편집기 및 뷰어

팀 온보딩하기

프로젝트

팀 소유자 및 팀 관리자

Handoff

시작하기

상호작용 기록 생성

통화 녹음 관리

녹화 페이지

User Testing

시작하기

제품 소개

테스트 룸 생성하기

외부 연동

테스트 세션 관리

테스트 결과 및 분석

ProtoPie Cloud에서의 사용자 테스트

ProtoPie Connect

시작하기

API 플러그인

아두이노 플러그인

blokdots 플러그인

커넥트 임베디드

사용자 정의 레이어 통합

사용자 지정 플러그인

기기 연결

게임패드 플러그인

IFTTT 플러그인

로지텍 G29 스티어링 휠 플러그인

プロトタイプのテスト

기능 비교

Unity 플러그인

ProtoPie Enterprise

시작하기

조직 설정

서비스 관리자

단일 로그인 (SSO)

Security

제품 소개

접근 제어

데이터 전송, 저장 및 백업

침해 사고 대응

네트워크 및 ProtoPie Player 앱 보안

물리적 보안

리스크 관리

메뉴

Introducing ProtoPie

시작하기

첫 번째 프로토타입 제작하기

ProtoPie 생태계

ProtoPie Studio 인터페이스

Import

시작하기

Adobe XD에서 가져오기

Figma에서 가져오기

Sketch에서 가져오기

프로토파이 지니 (ProtoPie Genie)

Basic Elements

컨테이너

기기

레이어

미리보기 창

장면

스크롤/페이징

단축키

시스템 상태 표시줄

Triggers & Responses

이징 (Easing)

주석

응답

타임라인

트리거

Formulas

시작하기

함수

레이어 속성

구문

수식 활용 사례

Variables

시작하기

Variables

정의된 변수

변수 활용 사례

AI

시작하기

AI 상호작용 생성

AI 문서 Q&A

AI 패널 인터페이스

최상의 결과를 위한 팁

ProtoPie MCP

Getting Started

Studio MCP Introduction

Studio MCP Installation & Setup

Code MCP Introduction

Code MCP Installation & Setup

Dev View

Auto Layout

시작하기

오토 레이아웃 속성

Components

시작하기

컴포넌트 가이드

구성 요소 편집

중첩된 컴포넌트

메시지 보내기 및 받기

Interaction Libraries

시작하기

상호작용 라이브러리 관리

도서관 회원 관리

Voice Prototyping

시작하기

수신 응답

음성 응답

사용 사례

음성 명령 트리거

Connecting Devices

blokdots 연결 중

모바일 기기 연결

ProtoPie Cloud

시작하기

프로토타입 관리

스토리지 관리

프로토타입 공유

ProtoPie Player

プロトタイプのテスト

글꼴 관리

오프라인 테스트

Wear OS용 ProtoPie Player

Teams

시작하기

편집기 및 뷰어

팀 온보딩하기

프로젝트

팀 소유자 및 팀 관리자

Handoff

시작하기

상호작용 기록 생성

통화 녹음 관리

녹화 페이지

User Testing

시작하기

제품 소개

테스트 룸 생성하기

외부 연동

테스트 세션 관리

테스트 결과 및 분석

ProtoPie Cloud에서의 사용자 테스트

ProtoPie Connect

시작하기

API 플러그인

아두이노 플러그인

blokdots 플러그인

커넥트 임베디드

사용자 정의 레이어 통합

사용자 지정 플러그인

기기 연결

게임패드 플러그인

IFTTT 플러그인

로지텍 G29 스티어링 휠 플러그인

プロトタイプのテスト

기능 비교

Unity 플러그인

ProtoPie Enterprise

시작하기

조직 설정

서비스 관리자

단일 로그인 (SSO)

Security

제품 소개

접근 제어

데이터 전송, 저장 및 백업

침해 사고 대응

네트워크 및 ProtoPie Player 앱 보안

물리적 보안

리스크 관리

Studio MCP Installation & Setup

Step 1 — Turn on the MCP Server in Studio

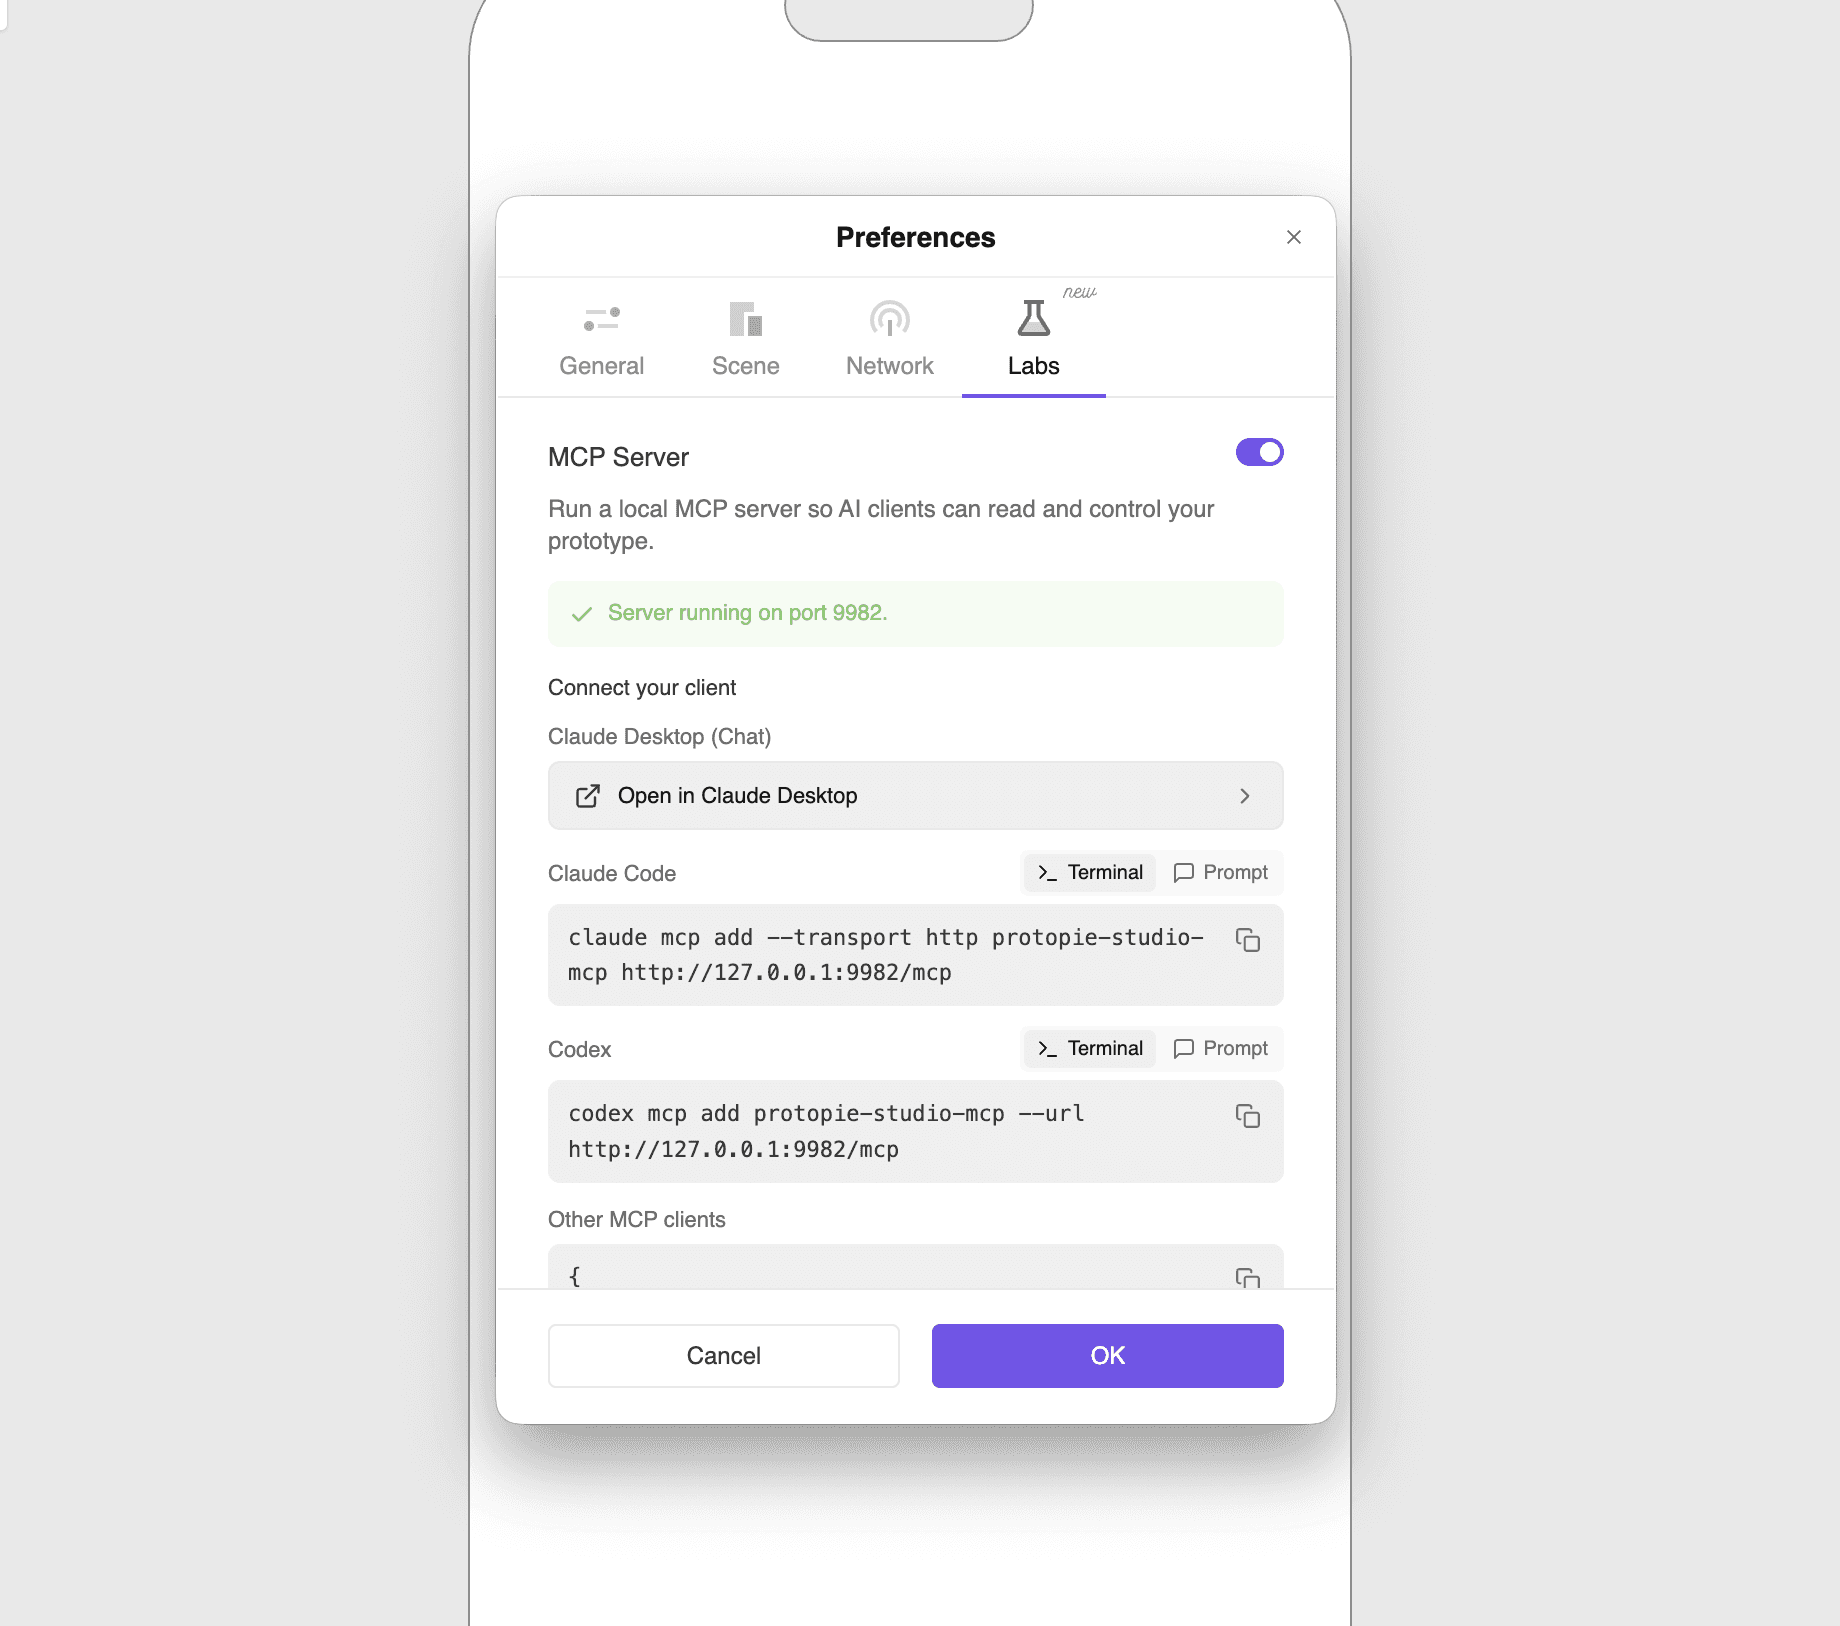
스크린샷 2026-06-29 오전 10.59.58.png
  1. In ProtoPie Studio, open Preferences → Labs.

  2. Turn on the MCP Server toggle. The server starts immediately — no save or app restart needed.

  3. Below the toggle, you’ll see the server status and per-client connection details. Use each copy button to grab the exact command or config.

🔢 About the port — the default port is 9982, but if it's already in use another port is assigned automatically. Always copy the actual command/URL shown in Labs.

Step 2 — Connect from your AI client

Pick the client that matches your setup. If code and the terminal feel like a hassle, 2-1 (Claude Desktop one-click) is the easiest. Options 2-2 through 2-5 all connect to the same address, http://127.0.0.1:<PORT>/mcp, where <PORT> is the actual port shown in Labs (default 9982).

2-1. Claude Desktop (Chat) — one-click (recommended, easiest)

Connect with a single button — no code or config files.

  1. In Studio, turn on Preferences → Labs → MCP Server.

  2. On the same screen, click Open in Claude Desktop.

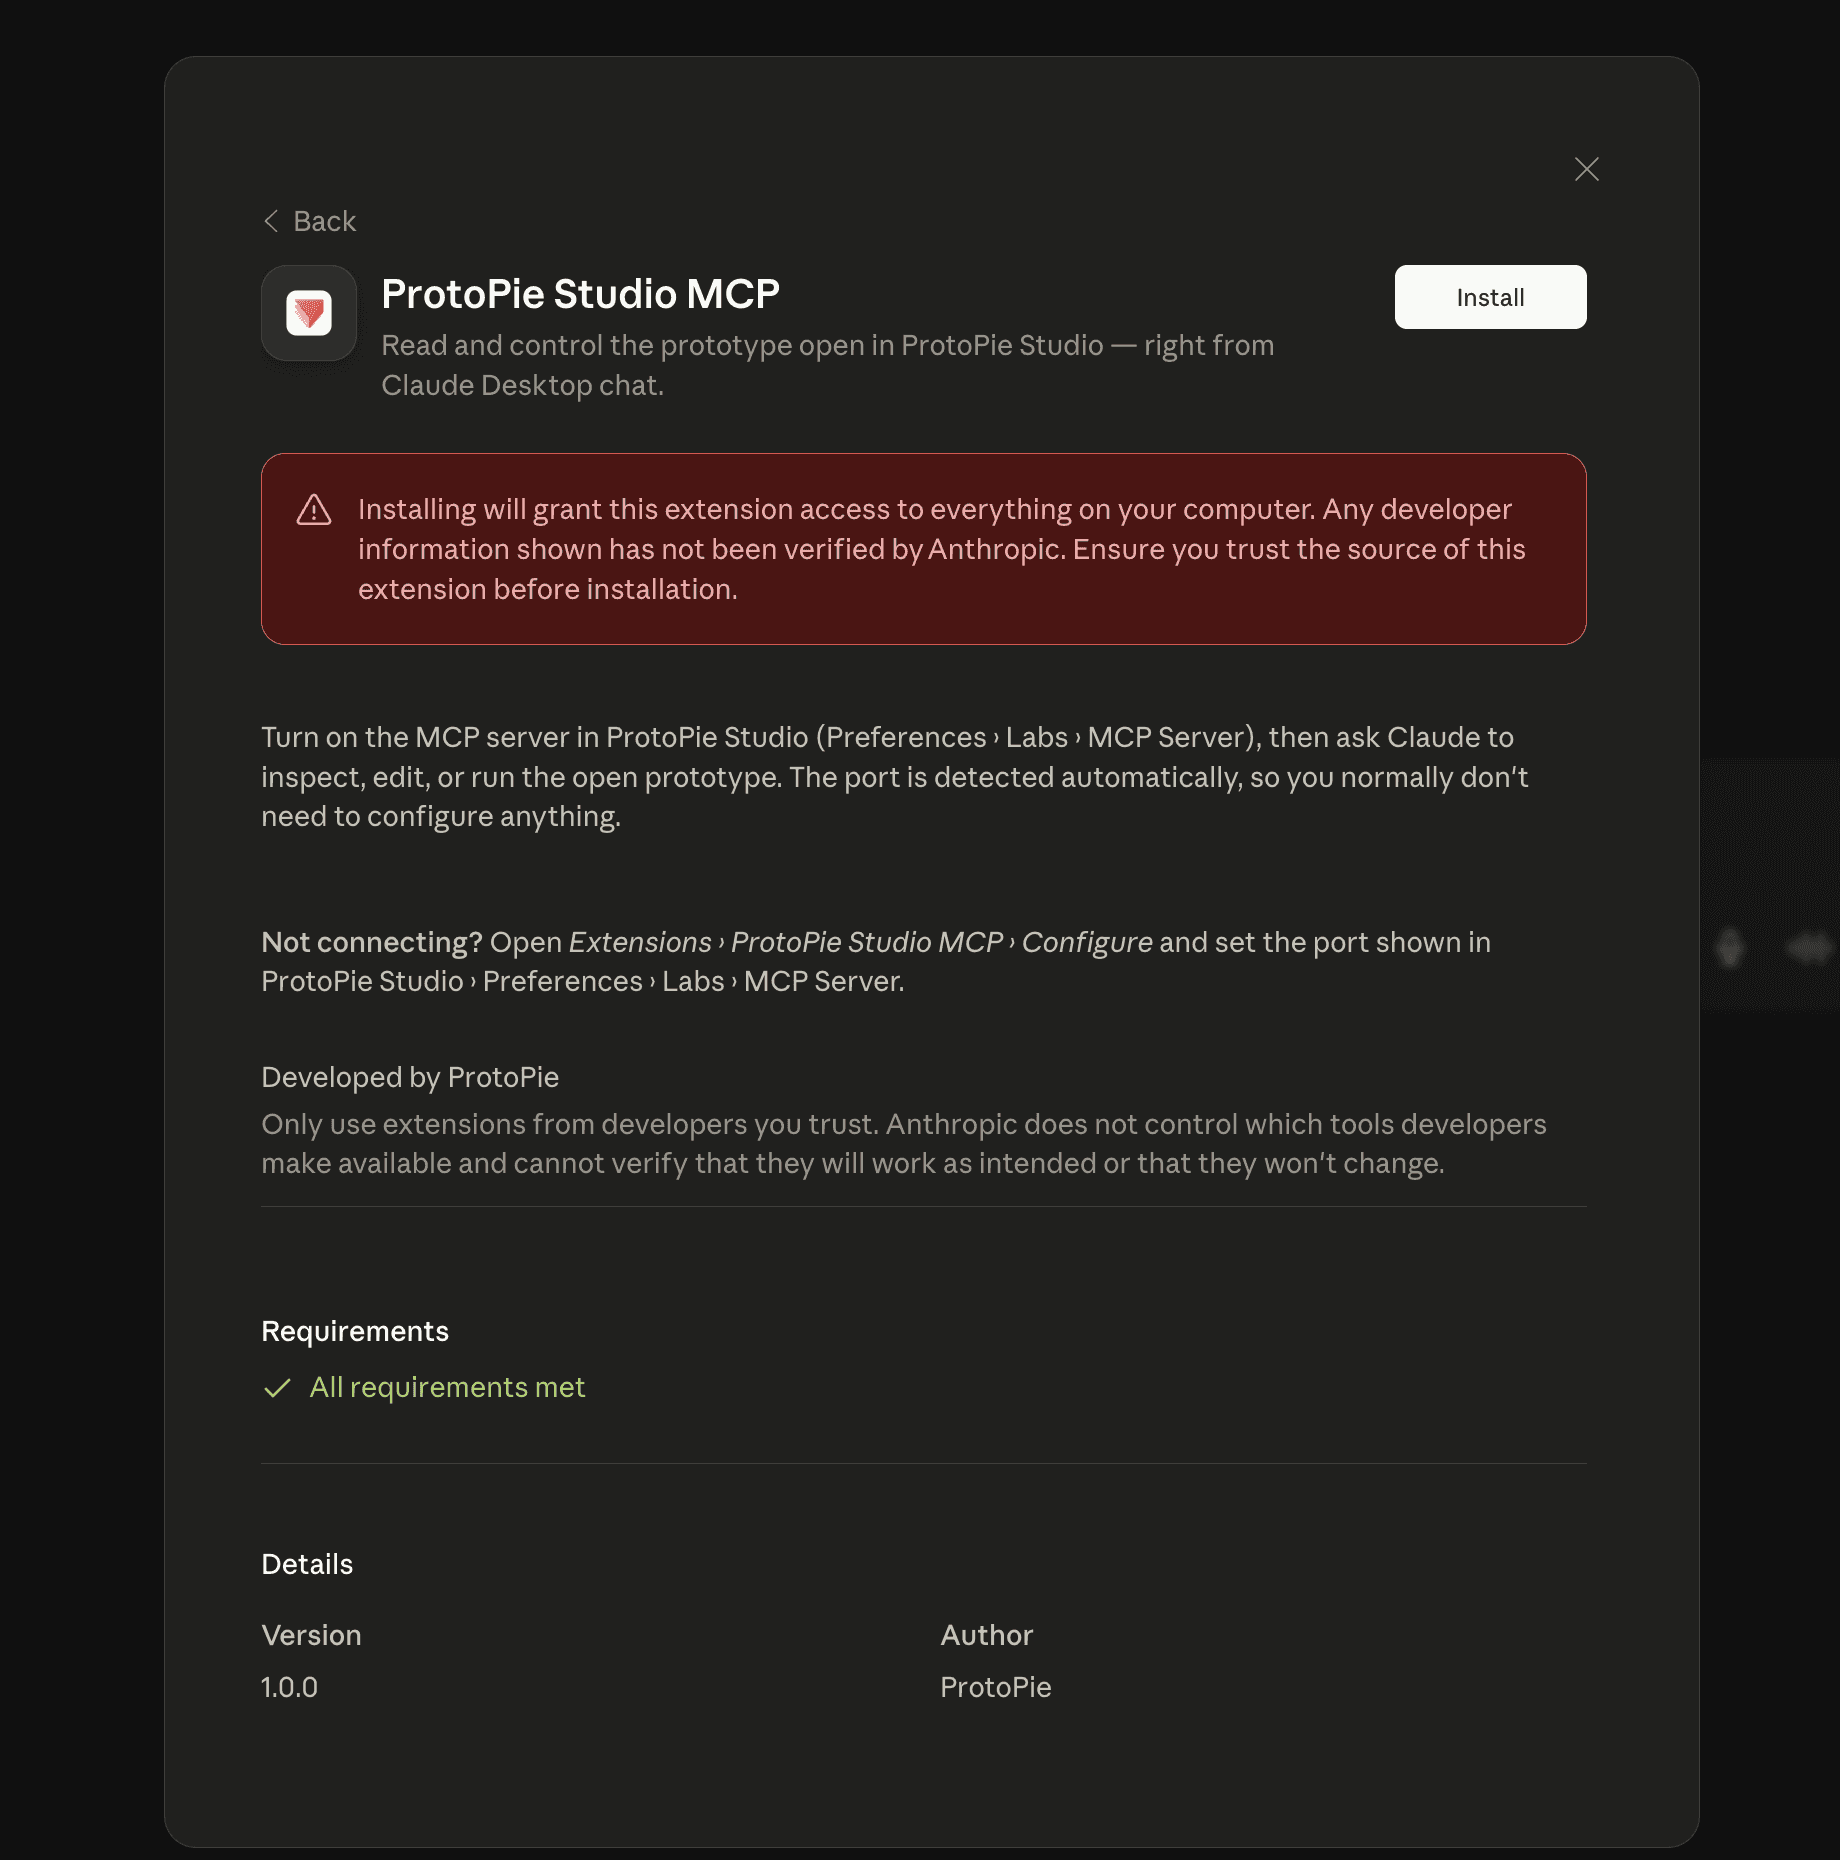
  3. Claude Desktop automatically shows a prompt to install the ProtoPie Studio MCP extension (.mcpb). Install it. (You only do this once.)

    1. The extension auto-detects and connects to the current Studio port — no extra setup.


    Screenshot 2026-06-29 at 11.06.00 AM.png
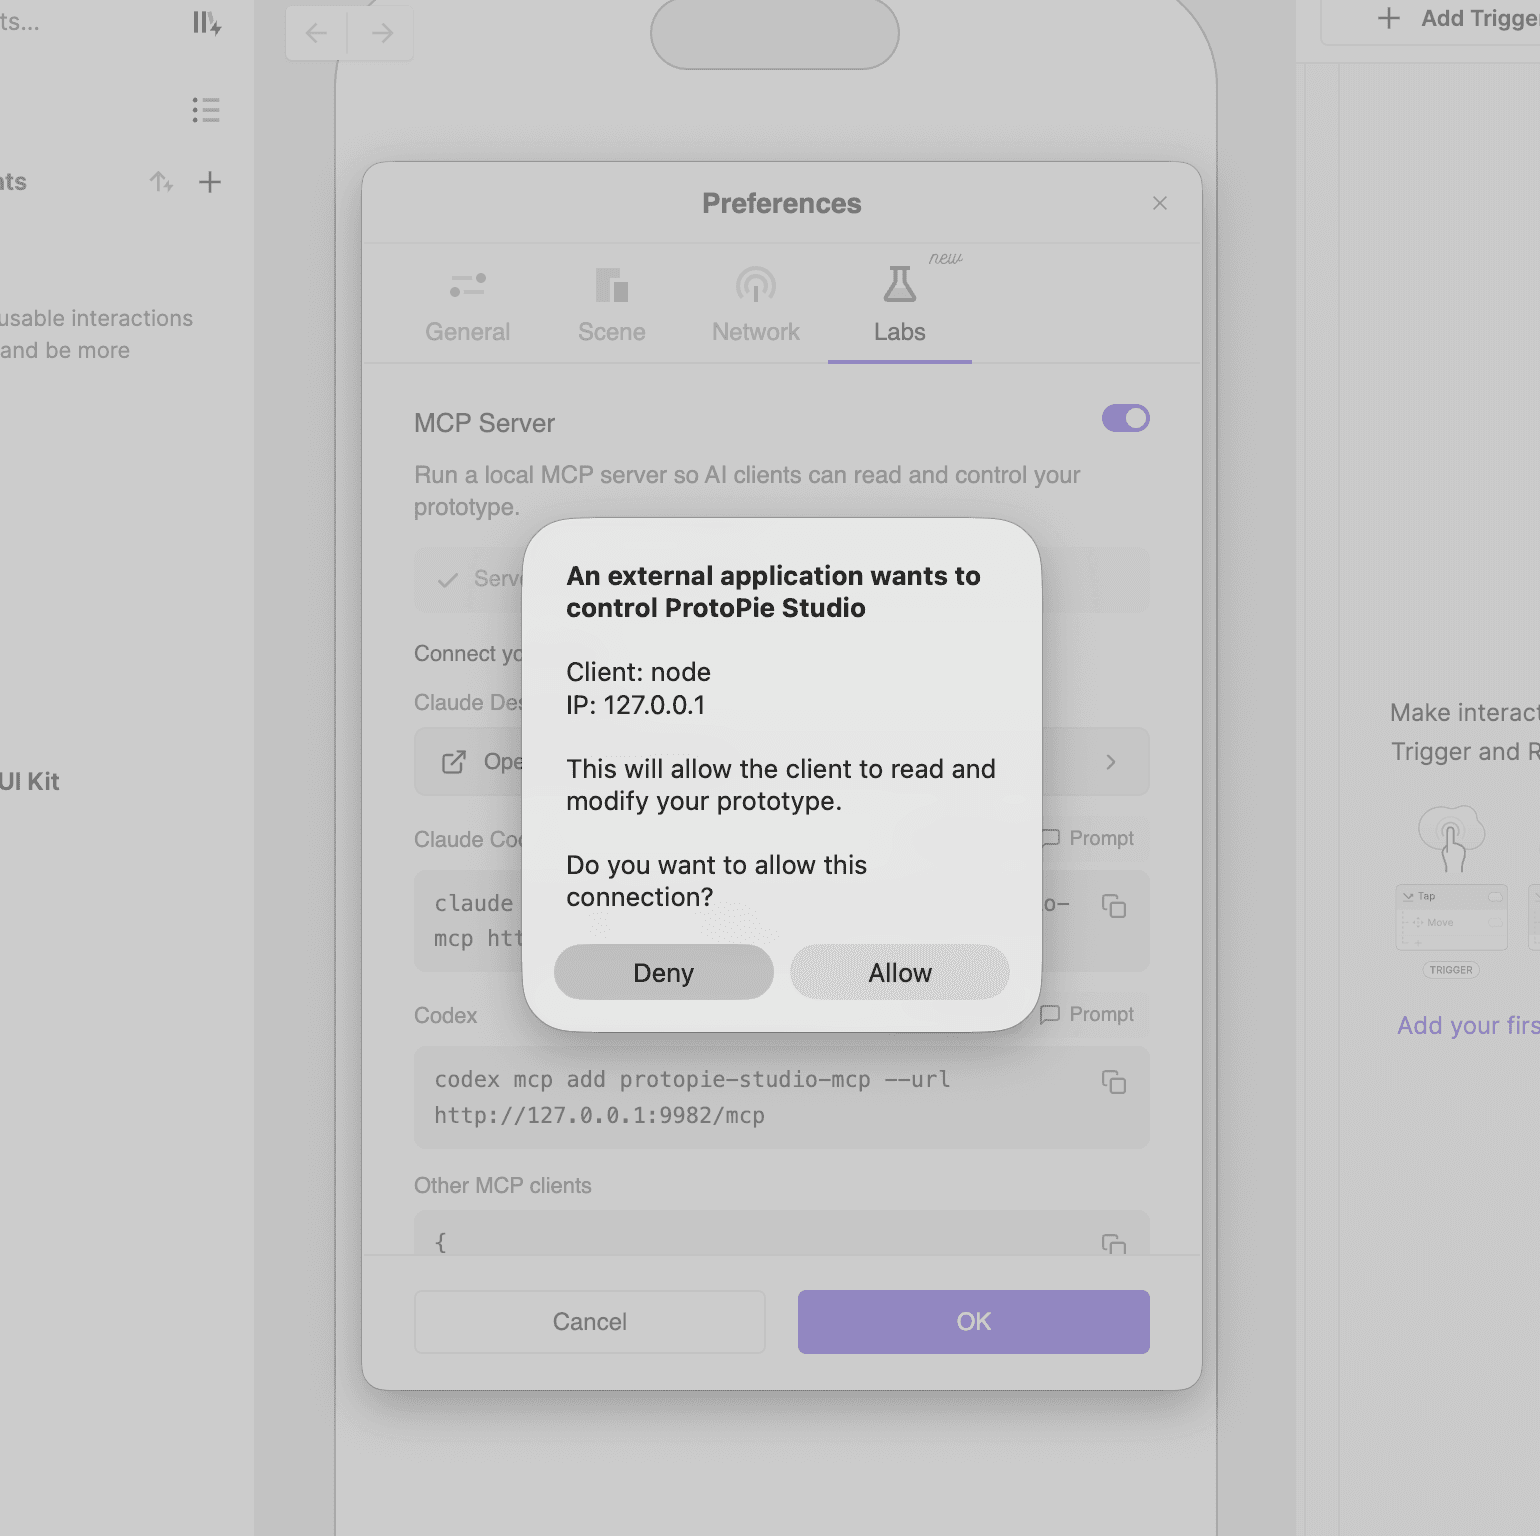
  4. Use it right away in the Claude Desktop chat. On first use, approve the Allow dialog in Studio.


    image.png

⚠️ Claude Desktop's Chat mode and Code tab keep separate MCP lists. This one-click extension is for Chat mode; for the Code tab, follow 2-2.

  • Manual alternative (when the button isn’t available)

    Chat mode’s claude_desktop_config.json only supports stdio, so an HTTP server goes through the mcp-remote bridge (requires Node.js / npx).

    1. Open claude_desktop_config.json via Settings → Developer → Edit Config:

      • macOS: ~/Library/Application Support/Claude/claude_desktop_config.json

      • Windows: %APPDATA%\Claude\claude_desktop_config.json

    2. Add it under mcpServers:

      {
        "mcpServers": {
          "protopie-studio-mcp": {
            "command": "npx",
            "args": ["mcp-remote", "<http://127.0.0.1:9982/mcp>", "--transport", "http-only"]
          }
        }
      }
      {
        "mcpServers": {
          "protopie-studio-mcp": {
            "command": "npx",
            "args": ["mcp-remote", "<http://127.0.0.1:9982/mcp>", "--transport", "http-only"]
          }
        }
      }
      {
        "mcpServers": {
          "protopie-studio-mcp": {
            "command": "npx",
            "args": ["mcp-remote", "<http://127.0.0.1:9982/mcp>", "--transport", "http-only"]
          }
        }
      }
      {
        "mcpServers": {
          "protopie-studio-mcp": {
            "command": "npx",
            "args": ["mcp-remote", "<http://127.0.0.1:9982/mcp>", "--transport", "http-only"]
          }
        }
      }
      {
        "mcpServers": {
          "protopie-studio-mcp": {
            "command": "npx",
            "args": ["mcp-remote", "<http://127.0.0.1:9982/mcp>", "--transport", "http-only"]
          }
        }
      }
    3. Save, then fully quit and restart Claude Desktop. Approve Allow on first use.

2-2. Claude Code (terminal CLI, or the Code tab in Claude Desktop)

Connect from the terminal or from Claude Desktop’s Code tab (Claude Code built in) with the same command.

🗂️ Authoring in the Code tab — the Code tab asks you to choose a working directory (folder) first. That folder becomes your workspace, and the MCP server registers to it (local scope). If you switch folders the server may not appear there — use --scope user (below) to make it available everywhere.

  1. Move into your project folder (working directory), then run:

    claude mcp add --transport
    claude mcp add --transport
    claude mcp add --transport
    claude mcp add --transport
    claude mcp add --transport

    This registers it for the current project (local scope) only. To use it across all projects, add --scope user:

    claude mcp add --scope user --transport
    claude mcp add --scope user --transport
    claude mcp add --scope user --transport
    claude mcp add --scope user --transport
    claude mcp add --scope user --transport
  2. Reload Claude Code, run /mcp, and select protopie-studio-mcp.

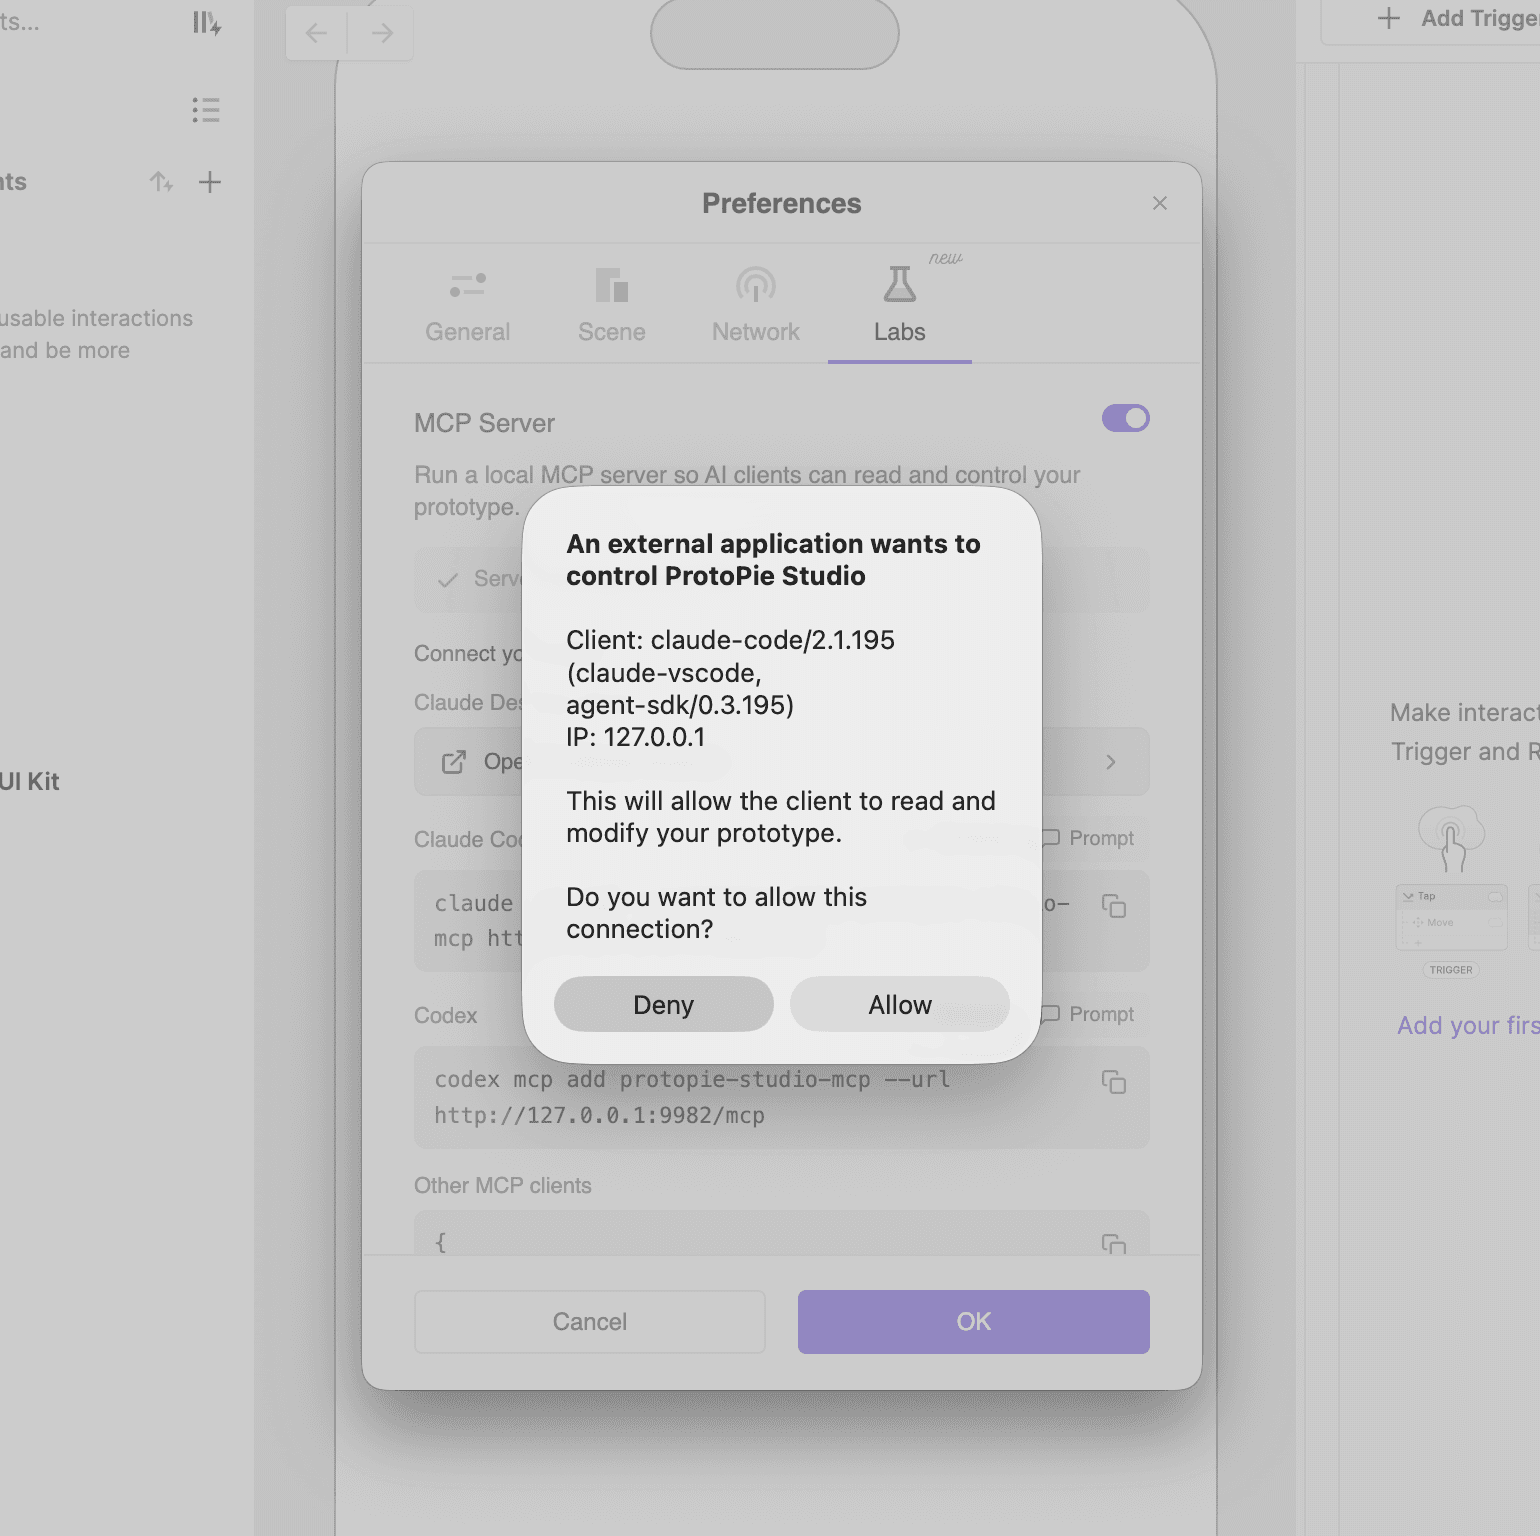
  3. When Studio shows the Allow / Deny dialog, click Allow.


    스크린샷 2026-06-29 오전 11.23.00.png
  4. You’re done when protopie-studio-mcp shows as connected in the tool list.

2-3. Codex

Run it in the terminal, or paste the JSON into your config:

codex mcp add protopie-studio-mcp --url

2-4. Cursor

  1. Settings → MCP → + Add new MCP server (or edit your project’s .cursor/mcp.json directly).

  2. Add the JSON:

    {
      "mcpServers": {
        "protopie-studio-mcp": {
          "url": "<http://127.0.0.1:9982/mcp>"
        }
      }
    }
    {
      "mcpServers": {
        "protopie-studio-mcp": {
          "url": "<http://127.0.0.1:9982/mcp>"
        }
      }
    }
    {
      "mcpServers": {
        "protopie-studio-mcp": {
          "url": "<http://127.0.0.1:9982/mcp>"
        }
      }
    }
    {
      "mcpServers": {
        "protopie-studio-mcp": {
          "url": "<http://127.0.0.1:9982/mcp>"
        }
      }
    }
    {
      "mcpServers": {
        "protopie-studio-mcp": {
          "url": "<http://127.0.0.1:9982/mcp>"
        }
      }
    }
  3. Save → connect → approve Allow in Studio on first use.

2-5. VS Code (Agent mode)

  1. Cmd/Ctrl + Shift + PMCP: Add Server → choose HTTP.

  2. Enter http://127.0.0.1:9982/mcp as the URL and protopie-studio-mcp as the Server ID, then pick a scope. This saves a servers entry in mcp.json with type: "http" and the url.

  3. Start the server, find the tools in Agent mode, and approve Allow on first use.

ℹ️ VS Code note — MCP / Agent mode requires GitHub Copilot to be enabled on your account.

ℹ️ Other MCP clients — paste the JSON from the "Other MCP clients" item in Labs: { "mcpServers": { "protopie-studio-mcp": { "url": "<http://127.0.0.1>:<PORT>/mcp" } } }

Step 3 — Approve the connection (Allow / Deny)

  • The first time a client connects, Studio shows an Allow / Deny dialog. Click Allow to connect.

  • Before you approve, the connection is temporarily refused — just reconnect (retry) from the client.

Step 4 — Use Studio MCP

Studio MCP acts on the prototype that is open and focused in Studio — there’s no link to paste. With a .pie file open, ask the AI things like:

  • “Analyze the interactions in the current prototype.”

  • “Add a Tap trigger to this button.”

  • “Make a screen where tapping flips the card.”

  • “Capture a preview of the current screen.”

Troubleshooting & FAQ

  • It won’t connect. → Make sure you approved the Allow dialog in Studio; before approval, connections are temporarily refused. Even if the client shows an Authenticate button, that doesn’t apply here — use Reconnect (retry) instead.

  • Tools are missing or the connection drops. → Check that MCP Server is on under Preferences → Labs, that Studio is running, and that a .pie file is open. If it still fails, restart Studio and the client. In Claude Code, use claude mcp list to check registration and claude mcp get protopie-studio-mcp for details; if needed, run claude mcp remove protopie-studio-mcp and add it again.

  • I don’t see the Open in Claude Desktop button. → Confirm ProtoPie Studio is 10.3.0 or later (the button ships from 10.3.0). On an older version, update, or use the manual alternative (mcp-remote) in 2-1 or another client.

  • I added it in Claude Desktop but the tools don’t show. → Chat mode and the Code tab keep separate MCP lists. Add Chat mode via the Open in Claude Desktop extension (.mcpb), and the Code tab via the claude mcp add command. Make sure you added it in the mode you’re using.

  • How do I check which extensions (.mcpb) are installed in Claude Desktop (Chat)? → In Claude Desktop, press Cmd + , to open Preferences, then click Extensions to see the list of installed .mcpb extensions.

  • The port/address doesn’t match. → The port isn’t always 9982 — copy the actual command/URL shown in Labs. If you see a “port unavailable” message, quit the app holding that port and restart Studio.

  • It works in one project but not another (Claude Code / Code tab). → Local scope only registers in the folder where you ran the command. Use -scope user to make it available everywhere.


Learn more about Code MCP