[LIVE] How To Build a Magnetic Knob with Arduino & ProtoPie. Register Now.

Introducing ProtoPie

Getting Started

Making Your First Prototype

ProtoPie Ecosystem

ProtoPie Studio Interface

Import

Getting Started

Importing From Adobe XD

Importing From Figma

Importing From Sketch

ProtoPie Genie

Basic Elements

Containers

Devices

Layers

Preview Window

Scenes

Scroll/Paging

Shortcuts

System Status Bar

Triggers & Responses

Easing

Annotations

Responses

Timelines

Triggers

Formulas

Getting Started

Functions

Layer Properties

Syntax

Formulas Use Cases

Variables

Getting Started

Variables

Predefined Variables

Variables Use Cases

AI

Getting Started

AI Interaction Creation

AI Document Q&A

AI Panel Interface

Tips for Best Results

Auto Layout

Getting Started

Auto Layout Properties

Components

Getting Started

Component Guides

Editing Components

Nested Components

Send & Receive Messages

Interaction Libraries

Getting Started

Managing Interaction Libraries

Managing Library Members

Voice Prototyping

Getting Started

Listen Response

Speak Response

Use Cases

Voice Command Trigger

Connecting Devices

Connecting blokdots

Connecting Mobile Devices

ProtoPie Cloud

Getting Started

Managing Prototypes

Managing Storage

Sharing Prototypes

ProtoPie Player

Testing Prototypes

Managing Fonts

Offline Testing

ProtoPie Player for Wear OS

Teams

Getting Started

Editors & Viewers

Onboarding Your Team

Projects

Team Owner & Team Admin

Handoff

Getting Started

Creating Interaction Recordings

Managing Interaction Recordings

Recording Page

User Testing

Getting Started

Overview

Creating Test Rooms

External Integrations

Managing Test Sessions

Test Results & Analysis

User Testing on ProtoPie Cloud

ProtoPie Connect

Getting Started

API Plugin

Arduino Plugin

blokdots Plugin

Connect Embedded

Custom Layer Integrations

Custom Plugins

Connect Devices

Gamepad Plugin

IFTTT Plugin

Logitech G29 Steering Wheel Plugin

Testing Prototypes

Feature Comparison

Unity Plugin

ProtoPie Enterprise

Getting Started

Organization Settings

Service Admin

Single Sign-On (SSO)

Security

Overview

Access Control

Data Transit, Storage & Backup

Incident Response

Network & ProtoPie Player App Security

Physical Security

Risk Management

Menu

Introducing ProtoPie

Getting Started

Making Your First Prototype

ProtoPie Ecosystem

ProtoPie Studio Interface

Import

Getting Started

Importing From Adobe XD

Importing From Figma

Importing From Sketch

ProtoPie Genie

Basic Elements

Containers

Devices

Layers

Preview Window

Scenes

Scroll/Paging

Shortcuts

System Status Bar

Triggers & Responses

Easing

Annotations

Responses

Timelines

Triggers

Formulas

Getting Started

Functions

Layer Properties

Syntax

Formulas Use Cases

Variables

Getting Started

Variables

Predefined Variables

Variables Use Cases

AI

Getting Started

AI Interaction Creation

AI Document Q&A

AI Panel Interface

Tips for Best Results

Auto Layout

Getting Started

Auto Layout Properties

Components

Getting Started

Component Guides

Editing Components

Nested Components

Send & Receive Messages

Interaction Libraries

Getting Started

Managing Interaction Libraries

Managing Library Members

Voice Prototyping

Getting Started

Listen Response

Speak Response

Use Cases

Voice Command Trigger

Connecting Devices

Connecting blokdots

Connecting Mobile Devices

ProtoPie Cloud

Getting Started

Managing Prototypes

Managing Storage

Sharing Prototypes

ProtoPie Player

Testing Prototypes

Managing Fonts

Offline Testing

ProtoPie Player for Wear OS

Teams

Getting Started

Editors & Viewers

Onboarding Your Team

Projects

Team Owner & Team Admin

Handoff

Getting Started

Creating Interaction Recordings

Managing Interaction Recordings

Recording Page

User Testing

Getting Started

Overview

Creating Test Rooms

External Integrations

Managing Test Sessions

Test Results & Analysis

User Testing on ProtoPie Cloud

ProtoPie Connect

Getting Started

API Plugin

Arduino Plugin

blokdots Plugin

Connect Embedded

Custom Layer Integrations

Custom Plugins

Connect Devices

Gamepad Plugin

IFTTT Plugin

Logitech G29 Steering Wheel Plugin

Testing Prototypes

Feature Comparison

Unity Plugin

ProtoPie Enterprise

Getting Started

Organization Settings

Service Admin

Single Sign-On (SSO)

Security

Overview

Access Control

Data Transit, Storage & Backup

Incident Response

Network & ProtoPie Player App Security

Physical Security

Risk Management

Interactions Across Multiple Devices & Hardware

ProtoPie Connect allows you to have prototypes communicate with each other across multiple devices, and have them communicate with hardware and APIs.

New to ProtoPie Connect? Learn more about how to get started.

Using Send & Receive

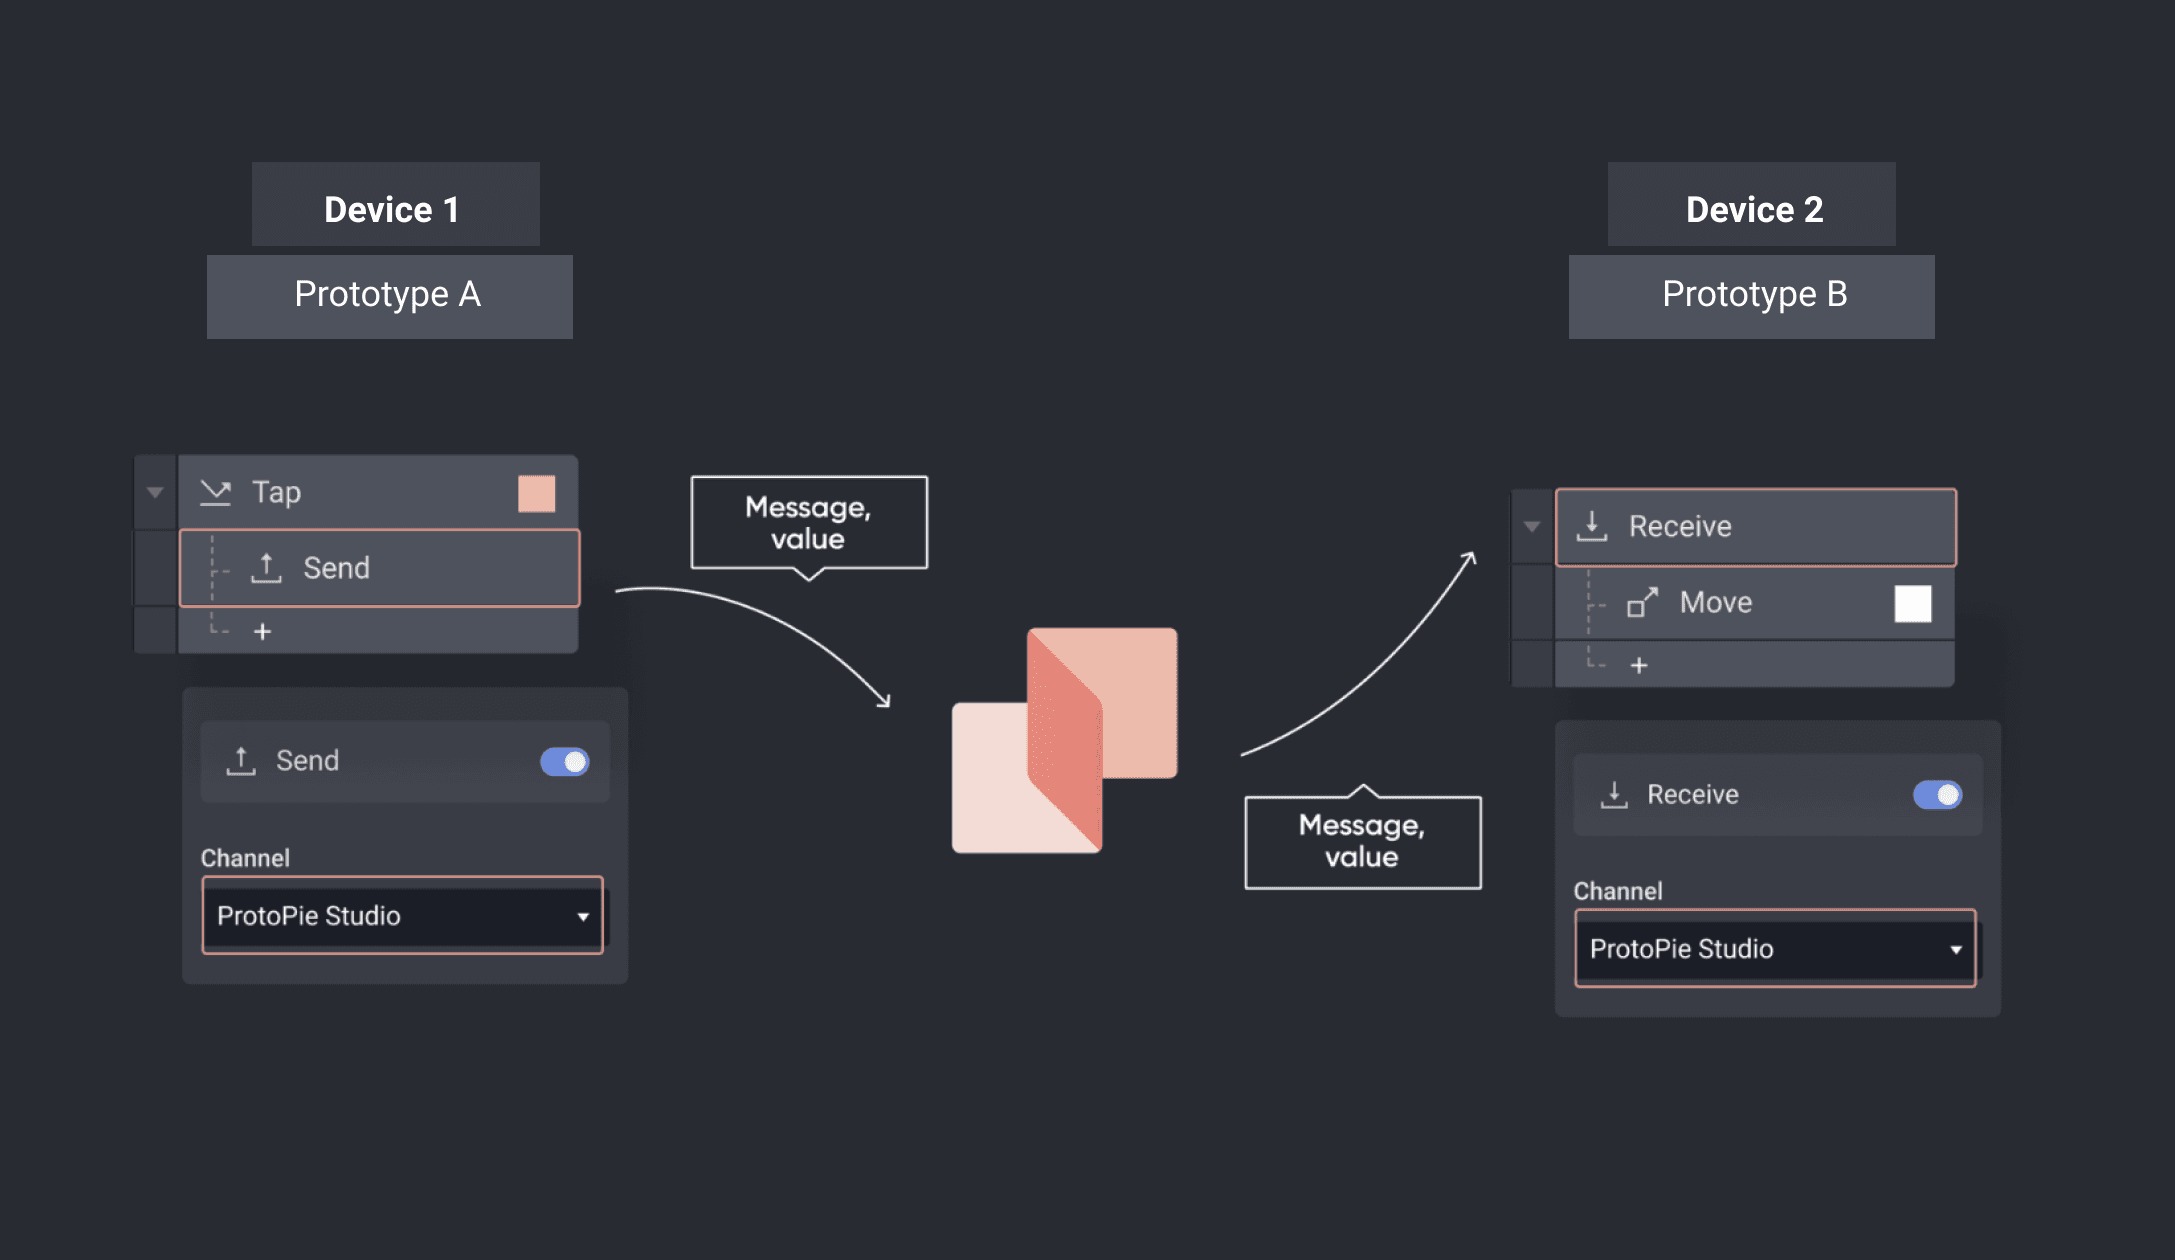
All communication between prototypes and ProtoPie Connect happens using the Send response and Receive trigger. When a message is sent, ProtoPie Connect relays that message to all prototypes added in ProtoPie Connect.

  • The message acts as the identifier to match the Send response and Receive trigger across prototypes. Only when a Receive trigger has the same message as the Send response (and vice-versa), communication between the two can happen.

  • Use ProtoPie Studio as a channel.

  • Sending a value with a message is optional and not required.

{'_type': 'localeString', 'en': 'using-send-and-receive'}

The Send response and Receive trigger can be used for other purposes and without ProtoPie Connect. Learn more about Send & Receive.

Debugging Messages

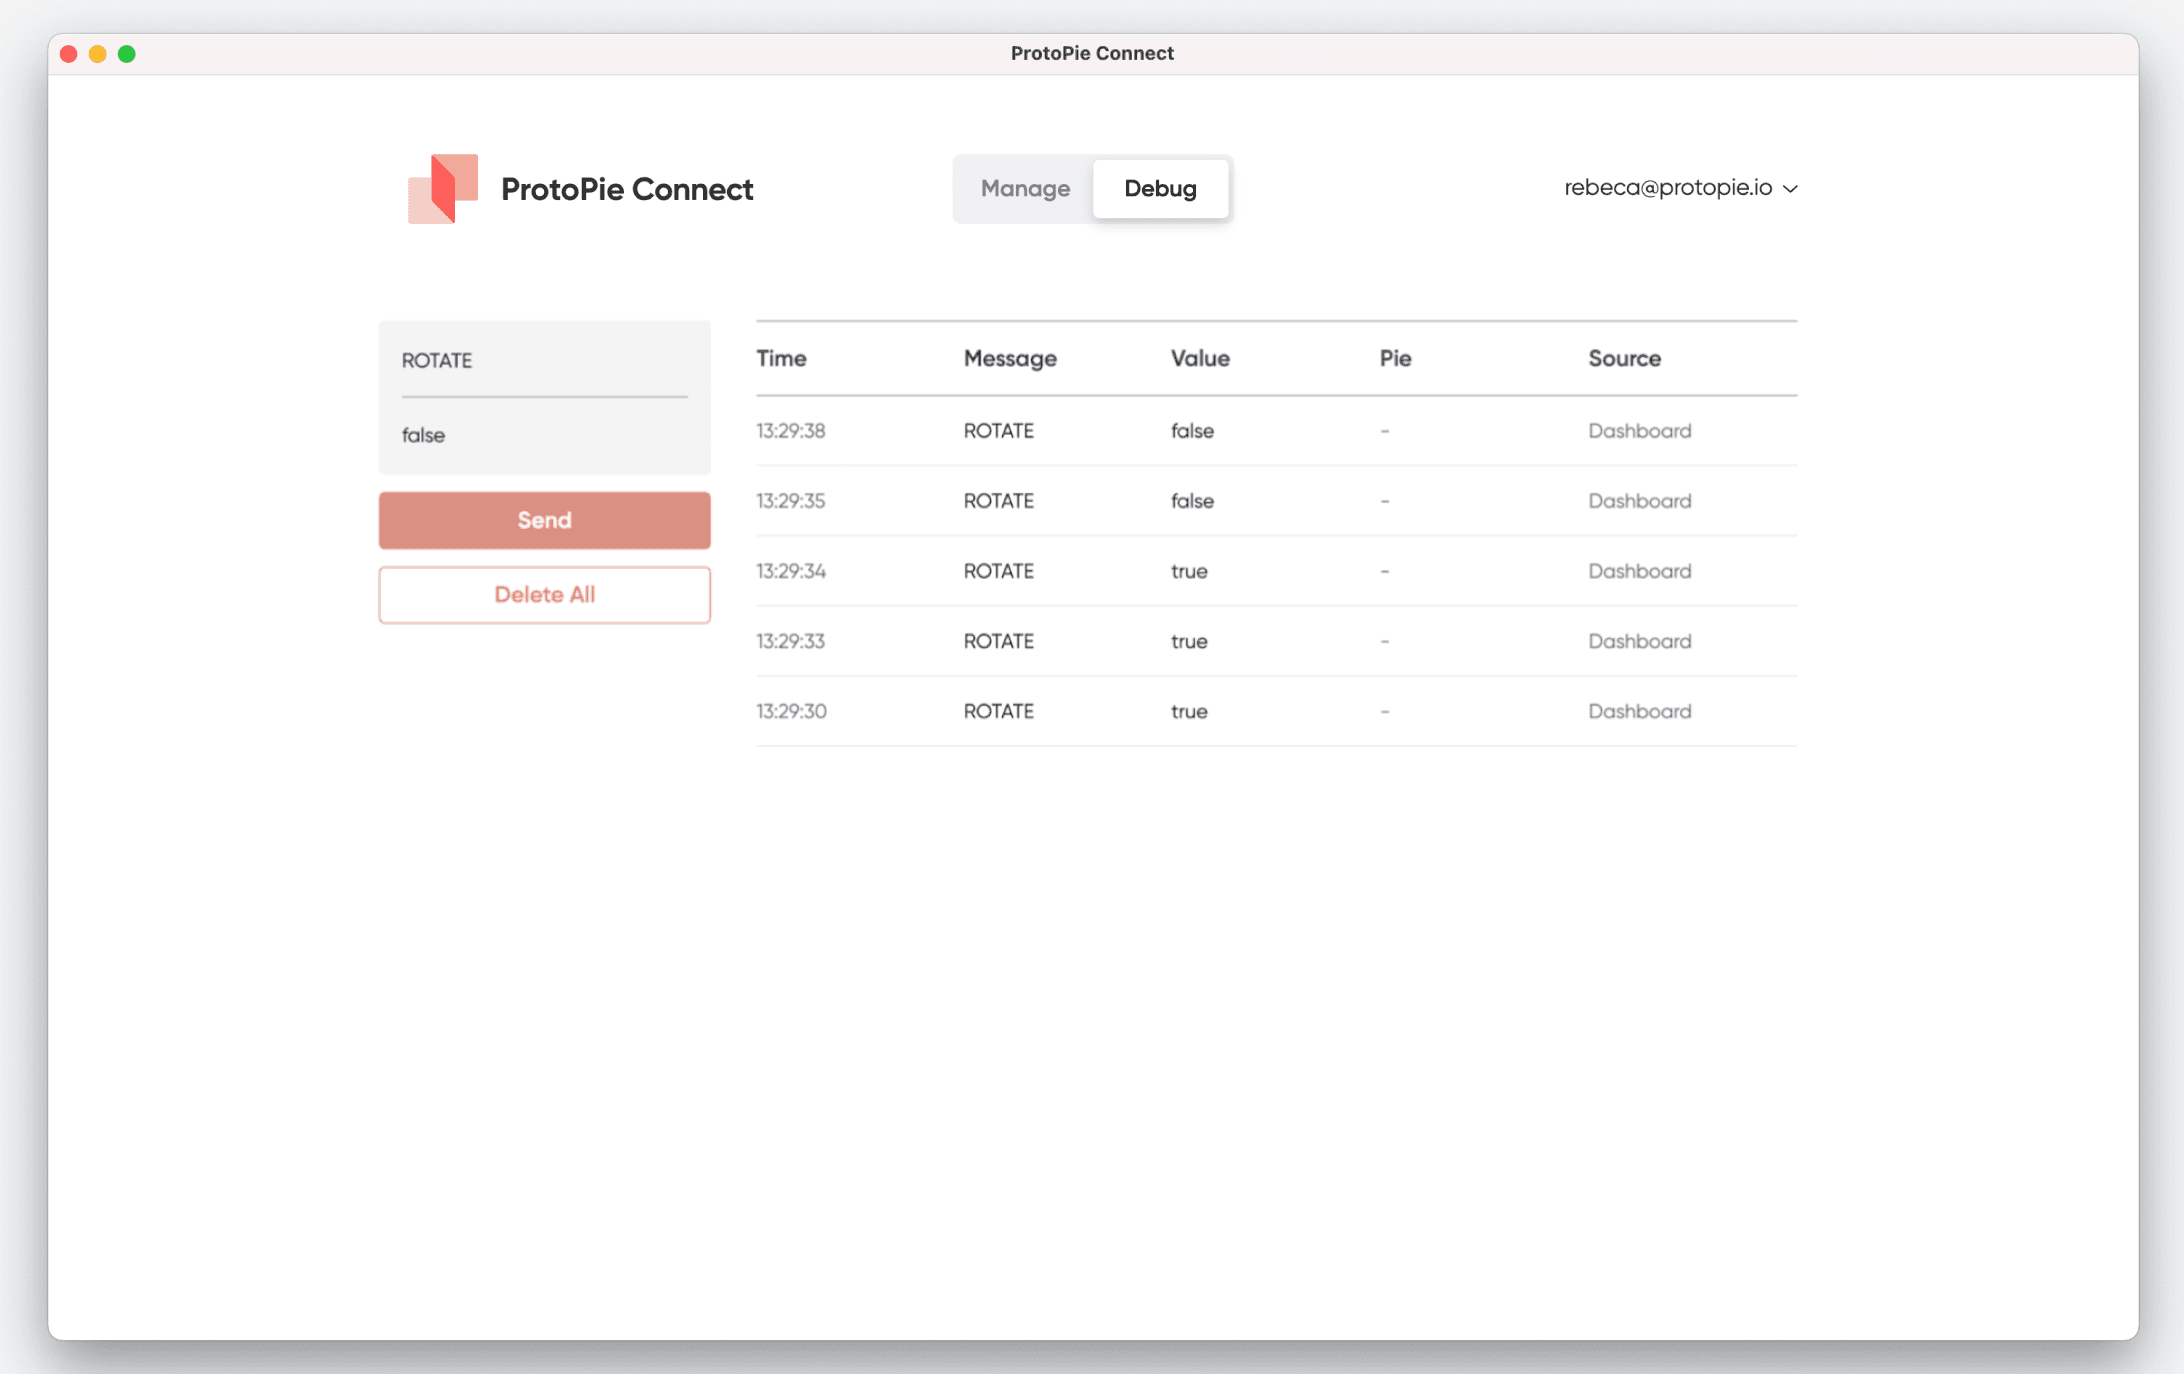
In the debug view, see all messages sent among prototypes, bridge apps, and hardware. For debugging purposes, try sending a test message and value to see if they can be received properly.

{'_type': 'localeString', 'en': 'debugging-messages'}

Creating Interactions with Hardware

Prototypes created with ProtoPie can communicate with any hardware. The underlying principle behind interactions with hardware is the same as prototypes communicating with each other across multiple devices.

  • Use the Send response and Receive trigger to send and receive messages.

  • Use messages (via Socket.IO) to communicate signals between hardware and prototypes.

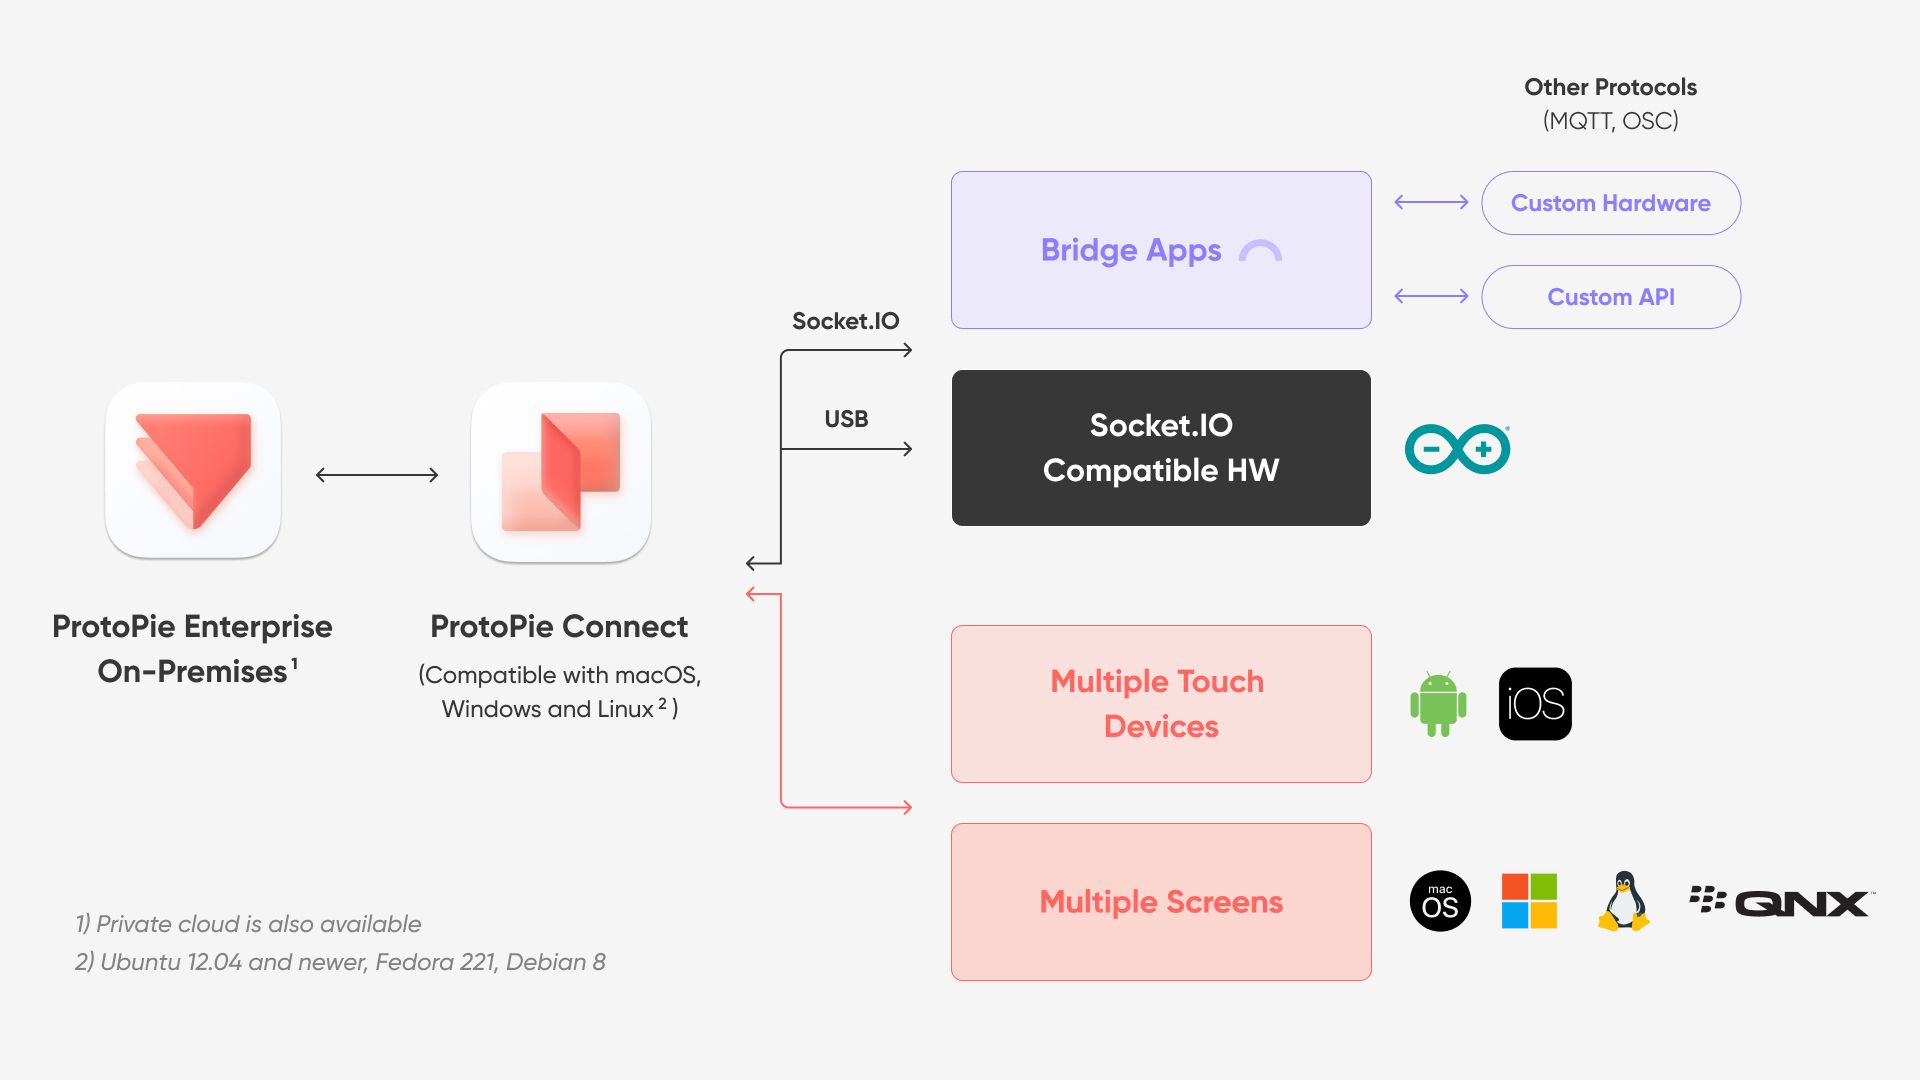
There are three different ways hardware can communicate with ProtoPie.

  1. Directly via Socket.IO

  2. Via bridge app

  3. Via serial (USB) connection for Arduino

{'_type': 'localeString', 'en': 'interactions-with-hardware-and-devices'}

Connecting Hardware Directly via Socket.IO

It is possible for some hardware to communicate via Socket.IO directly (without a bridge app).

  • Connect the hardware directly to ProtoPie Connect its Socket.IO server. This server is indicated using the IP address with port number 9981.

  • All Socket.IO messages sent, ProtoPie Connect will relay them to the prototypes.

  • Prototypes receiving these messages can respond to it. Some hardware supports bidirectional communication, meaning that prototypes can send messages to the hardware.

Learn more about Socket.IO.

Connecting Hardware via Bridge App

Connect any hardware via a bridge app as long as the signals can be converted to Socket.IO messages.

A bridge app converts hardware signals into Socket.IO messages for ProtoPie to interpret. Through Socket.IO, ProtoPie Connect can interpret events and data from the hardware.

  • Connect the bridge app directly to ProtoPie Connect its Socket.IO server. The server is indicated using the IP address with port number 9981.

  • All Socket.IO messages sent, ProtoPie Connect will relay them to the prototypes.

  • Prototypes receiving these messages can respond to them. Some hardware supports bidirectional communication, meaning that prototypes can send messages to the hardware. This is only possible if the bridge app can convert Socket.IO messages into signals the hardware can interpret.

Learn more about bridge apps.

Connecting Arduino via Serial (USB) Connection

For Arduino hardware, it is possible to have prototypes communicate—without a bridge app—via serial (USB) connection.

Learn more about connecting Arduino to ProtoPie Connect.