ProtoPie AI 已上线——现已进入 Beta 版。了解更多

ProtoPie AI 已上线——现已进入 Beta 版。了解更多

介绍 ProtoPie

入门

制作你的第一个原型

ProtoPie 生态系统

ProtoPie Studio 界面

导入

入门

从 Adobe XD 导入

从 Figma 导入

从 Sketch 导入

ProtoPie 精灵

基本元素

容器

设备

图层

预览窗口

场景

滚动/分页

快捷键

系统状态栏

触发条件与响应

缓动

注释

回复

时间线

触发器

公式

入门

功能

图层属性

语法

公式使用场景

变量

入门

变量

预定义变量

变量使用案例

AI

入门

AI 交互创作

AI 文档问答

AI 面板界面

获得最佳效果的提示

ProtoPie MCP

Getting Started

Studio MCP Introduction

Studio MCP Installation & Setup

Code MCP Introduction

Code MCP 安装与设置

Dev View

自动布局

入门

自动布局属性

组件

入门

组件指南

编辑组件

嵌套组件

发送和接收消息

交互库

入门

管理交互库

管理图书馆会员

语音原型设计

入门

收听回复

朗读回复

应用场景

语音命令触发

连接设备

连接 blokdots

连接移动设备

ProtoPie Cloud

入门

管理原型

管理存储

共享原型

ProtoPie Player

测试原型

管理字体

离线测试

适用于 Wear OS 的 ProtoPie Player

团队

入门

编辑者和查看者

让您的团队快速上手

项目

团队所有者和团队管理员

交接

入门

创建交互录制

管理交互录制

录制页面

用户测试

入门

概述

创建测试房间

外部集成

管理测试会话

测试结果与分析

ProtoPie Cloud 上的用户测试

ProtoPie Connec

入门

API 插件

Arduino 插件

blokdots 插件

连接嵌入式

自定义层集成

自定义插件

连接设备

游戏手柄插件

IFTTT 插件

罗技 G29 方向盘插件

测试原型

功能比较

Unity 插件

ProtoPie 企业版

入门

组织设置

服务管理员

单点登录(SSO)

安全

概述

访问控制

数据传输、存储与备份

事件响应

网络与 ProtoPie Player 应用的安全性

物理安全

风险管理

菜单

介绍 ProtoPie

入门

制作你的第一个原型

ProtoPie 生态系统

ProtoPie Studio 界面

导入

入门

从 Adobe XD 导入

从 Figma 导入

从 Sketch 导入

ProtoPie 精灵

基本元素

容器

设备

图层

预览窗口

场景

滚动/分页

快捷键

系统状态栏

触发条件与响应

缓动

注释

回复

时间线

触发器

公式

入门

功能

图层属性

语法

公式使用场景

变量

入门

变量

预定义变量

变量使用案例

AI

入门

AI 交互创作

AI 文档问答

AI 面板界面

获得最佳效果的提示

ProtoPie MCP

Getting Started

Studio MCP Introduction

Studio MCP Installation & Setup

Code MCP Introduction

Code MCP 安装与设置

Dev View

自动布局

入门

自动布局属性

组件

入门

组件指南

编辑组件

嵌套组件

发送和接收消息

交互库

入门

管理交互库

管理图书馆会员

语音原型设计

入门

收听回复

朗读回复

应用场景

语音命令触发

连接设备

连接 blokdots

连接移动设备

ProtoPie Cloud

入门

管理原型

管理存储

共享原型

ProtoPie Player

测试原型

管理字体

离线测试

适用于 Wear OS 的 ProtoPie Player

团队

入门

编辑者和查看者

让您的团队快速上手

项目

团队所有者和团队管理员

交接

入门

创建交互录制

管理交互录制

录制页面

用户测试

入门

概述

创建测试房间

外部集成

管理测试会话

测试结果与分析

ProtoPie Cloud 上的用户测试

ProtoPie Connec

入门

API 插件

Arduino 插件

blokdots 插件

连接嵌入式

自定义层集成

自定义插件

连接设备

游戏手柄插件

IFTTT 插件

罗技 G29 方向盘插件

测试原型

功能比较

Unity 插件

ProtoPie 企业版

入门

组织设置

服务管理员

单点登录(SSO)

安全

概述

访问控制

数据传输、存储与备份

事件响应

网络与 ProtoPie Player 应用的安全性

物理安全

风险管理

Studio MCP Installation & Setup

Step 1 — Turn on the MCP Server in Studio

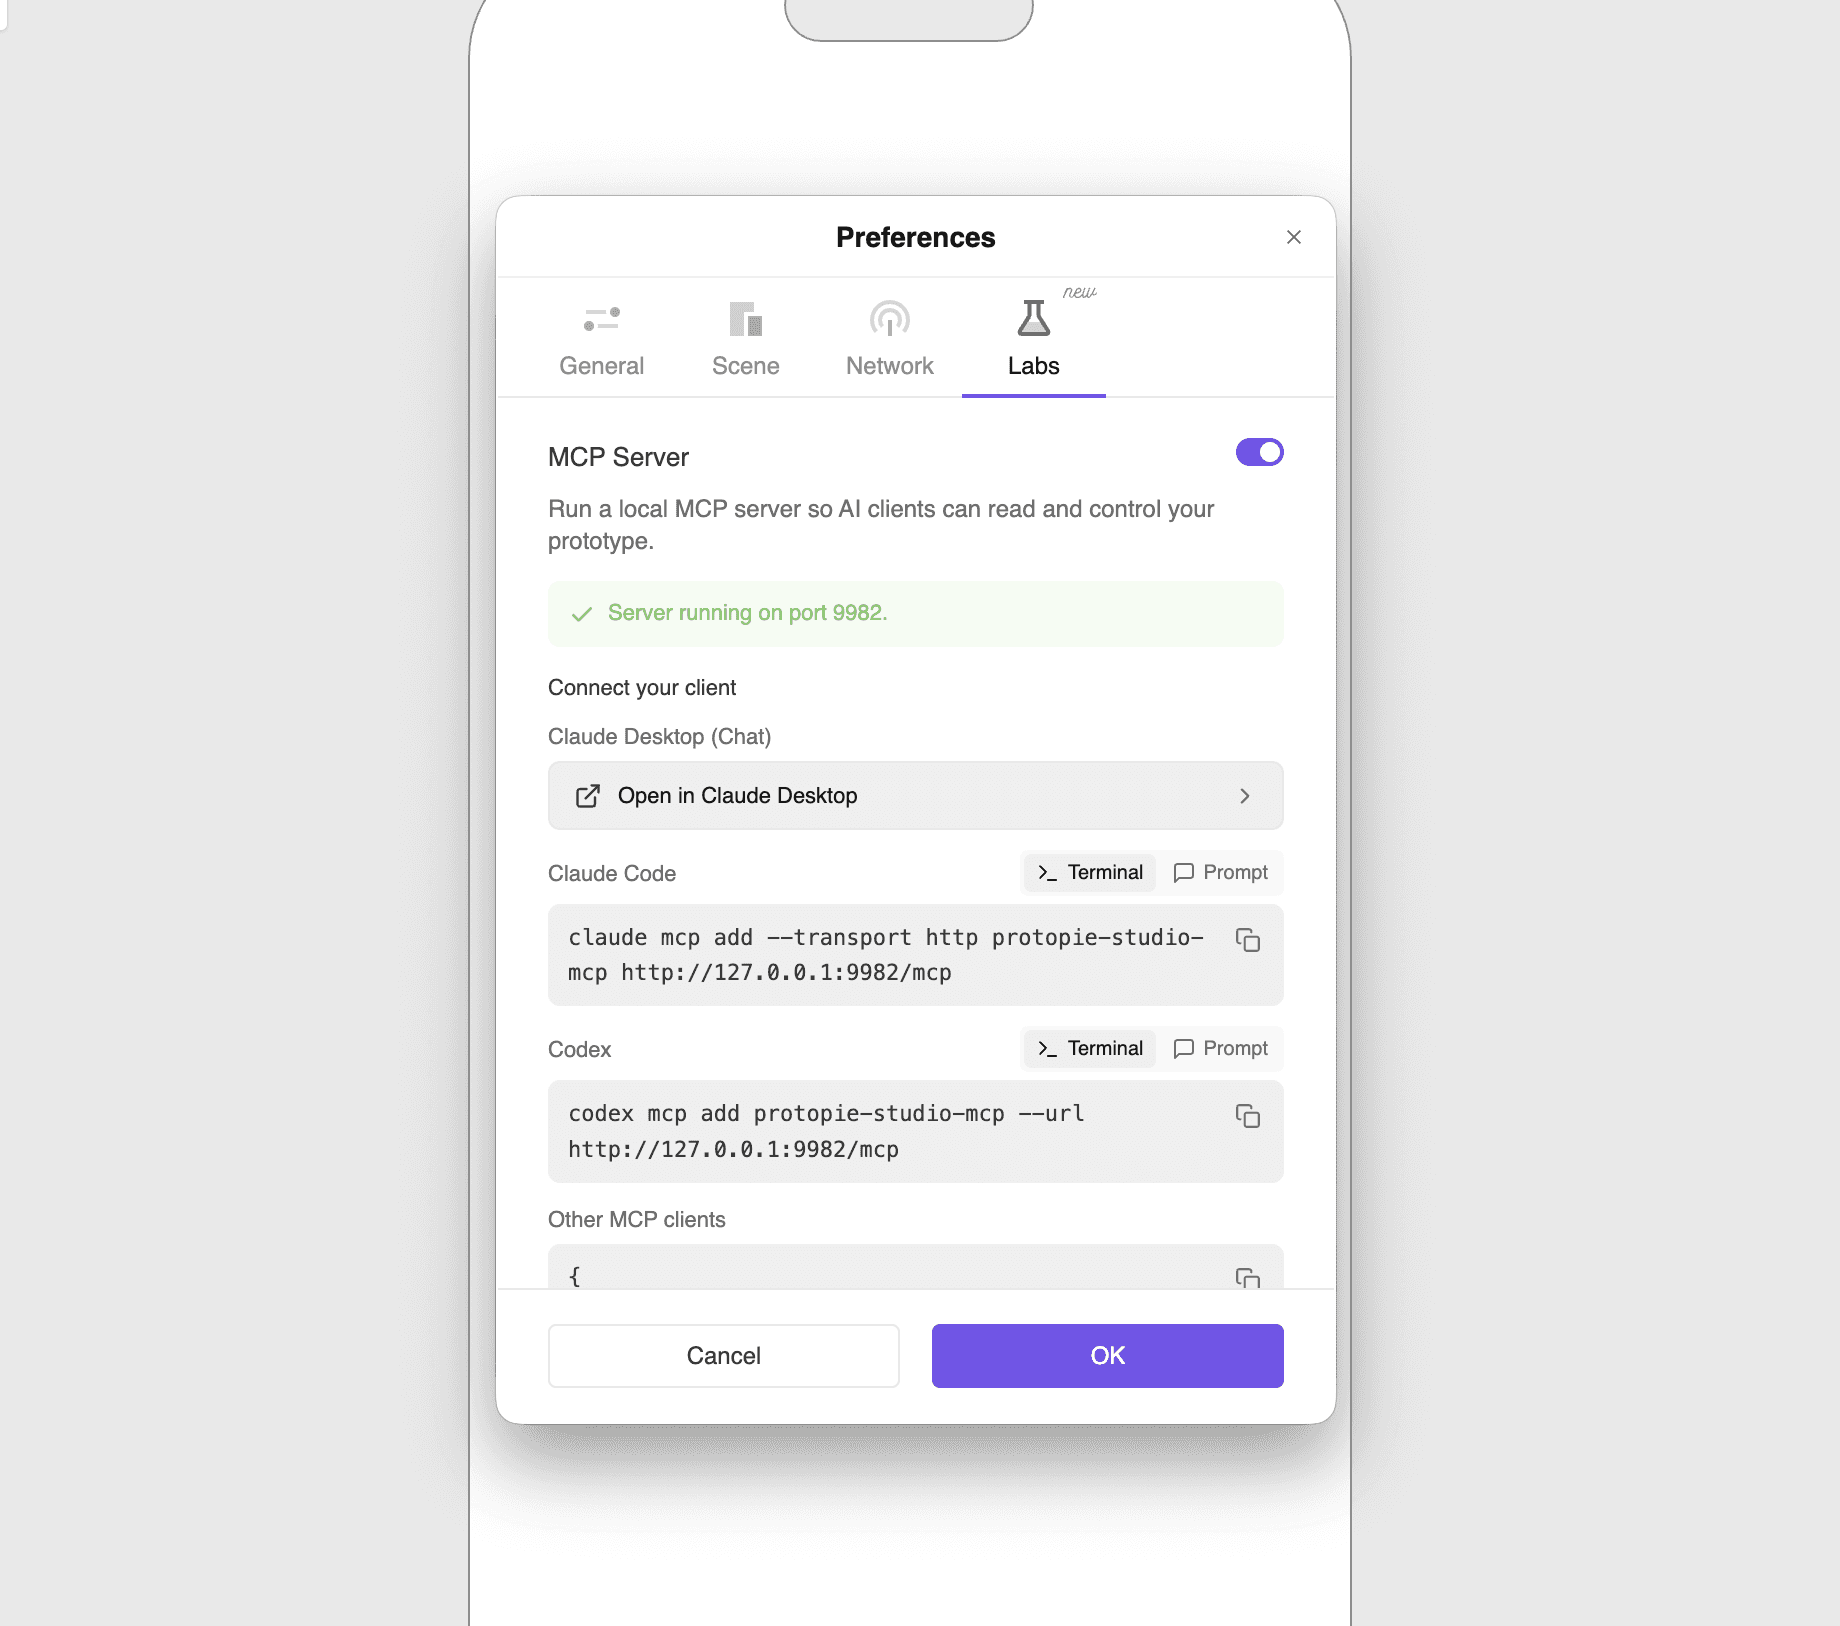
스크린샷 2026-06-29 오전 10.59.58.png
  1. In ProtoPie Studio, open Preferences → Labs.

  2. Turn on the MCP Server toggle. The server starts immediately — no save or app restart needed.

  3. Below the toggle, you’ll see the server status and per-client connection details. Use each copy button to grab the exact command or config.

🔢 About the port — the default port is 9982, but if it's already in use another port is assigned automatically. Always copy the actual command/URL shown in Labs.

Step 2 — Connect from your AI client

Pick the client that matches your setup. If code and the terminal feel like a hassle, 2-1 (Claude Desktop one-click) is the easiest. Options 2-2 through 2-5 all connect to the same address, http://127.0.0.1:<PORT>/mcp, where <PORT> is the actual port shown in Labs (default 9982).

2-1. Claude Desktop (Chat) — one-click (recommended, easiest)

Connect with a single button — no code or config files.

  1. In Studio, turn on Preferences → Labs → MCP Server.

  2. On the same screen, click Open in Claude Desktop.

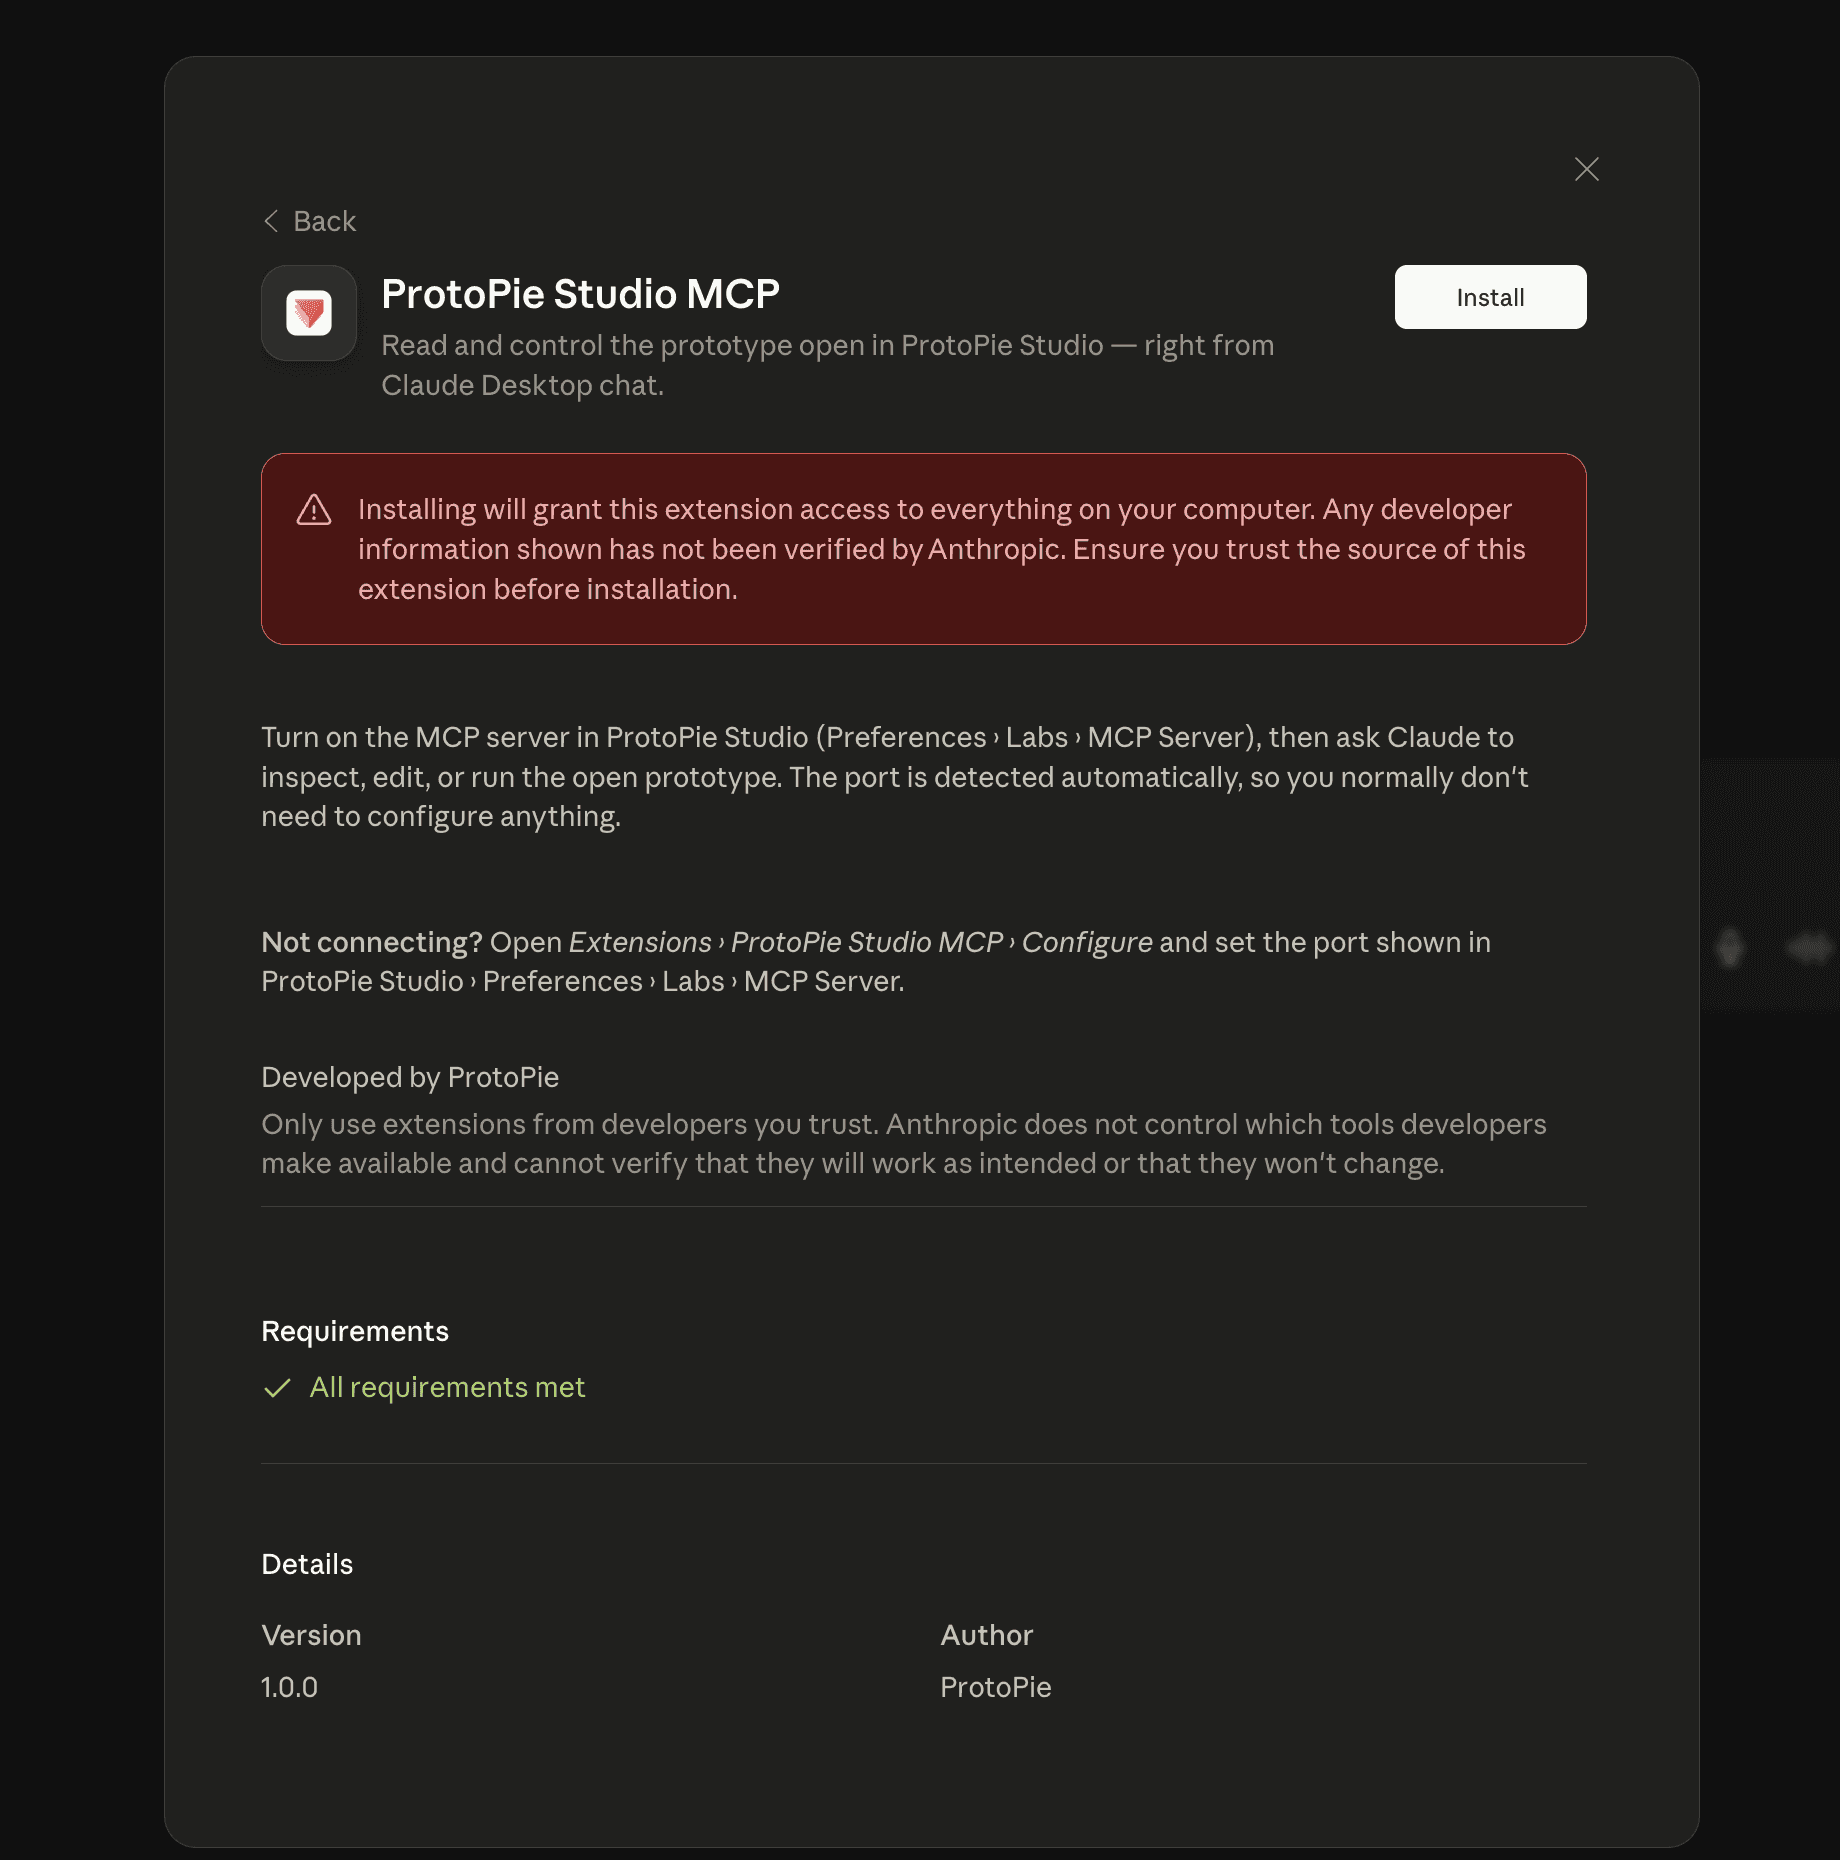
  3. Claude Desktop automatically shows a prompt to install the ProtoPie Studio MCP extension (.mcpb). Install it. (You only do this once.)

    1. The extension auto-detects and connects to the current Studio port — no extra setup.


    Screenshot 2026-06-29 at 11.06.00 AM.png
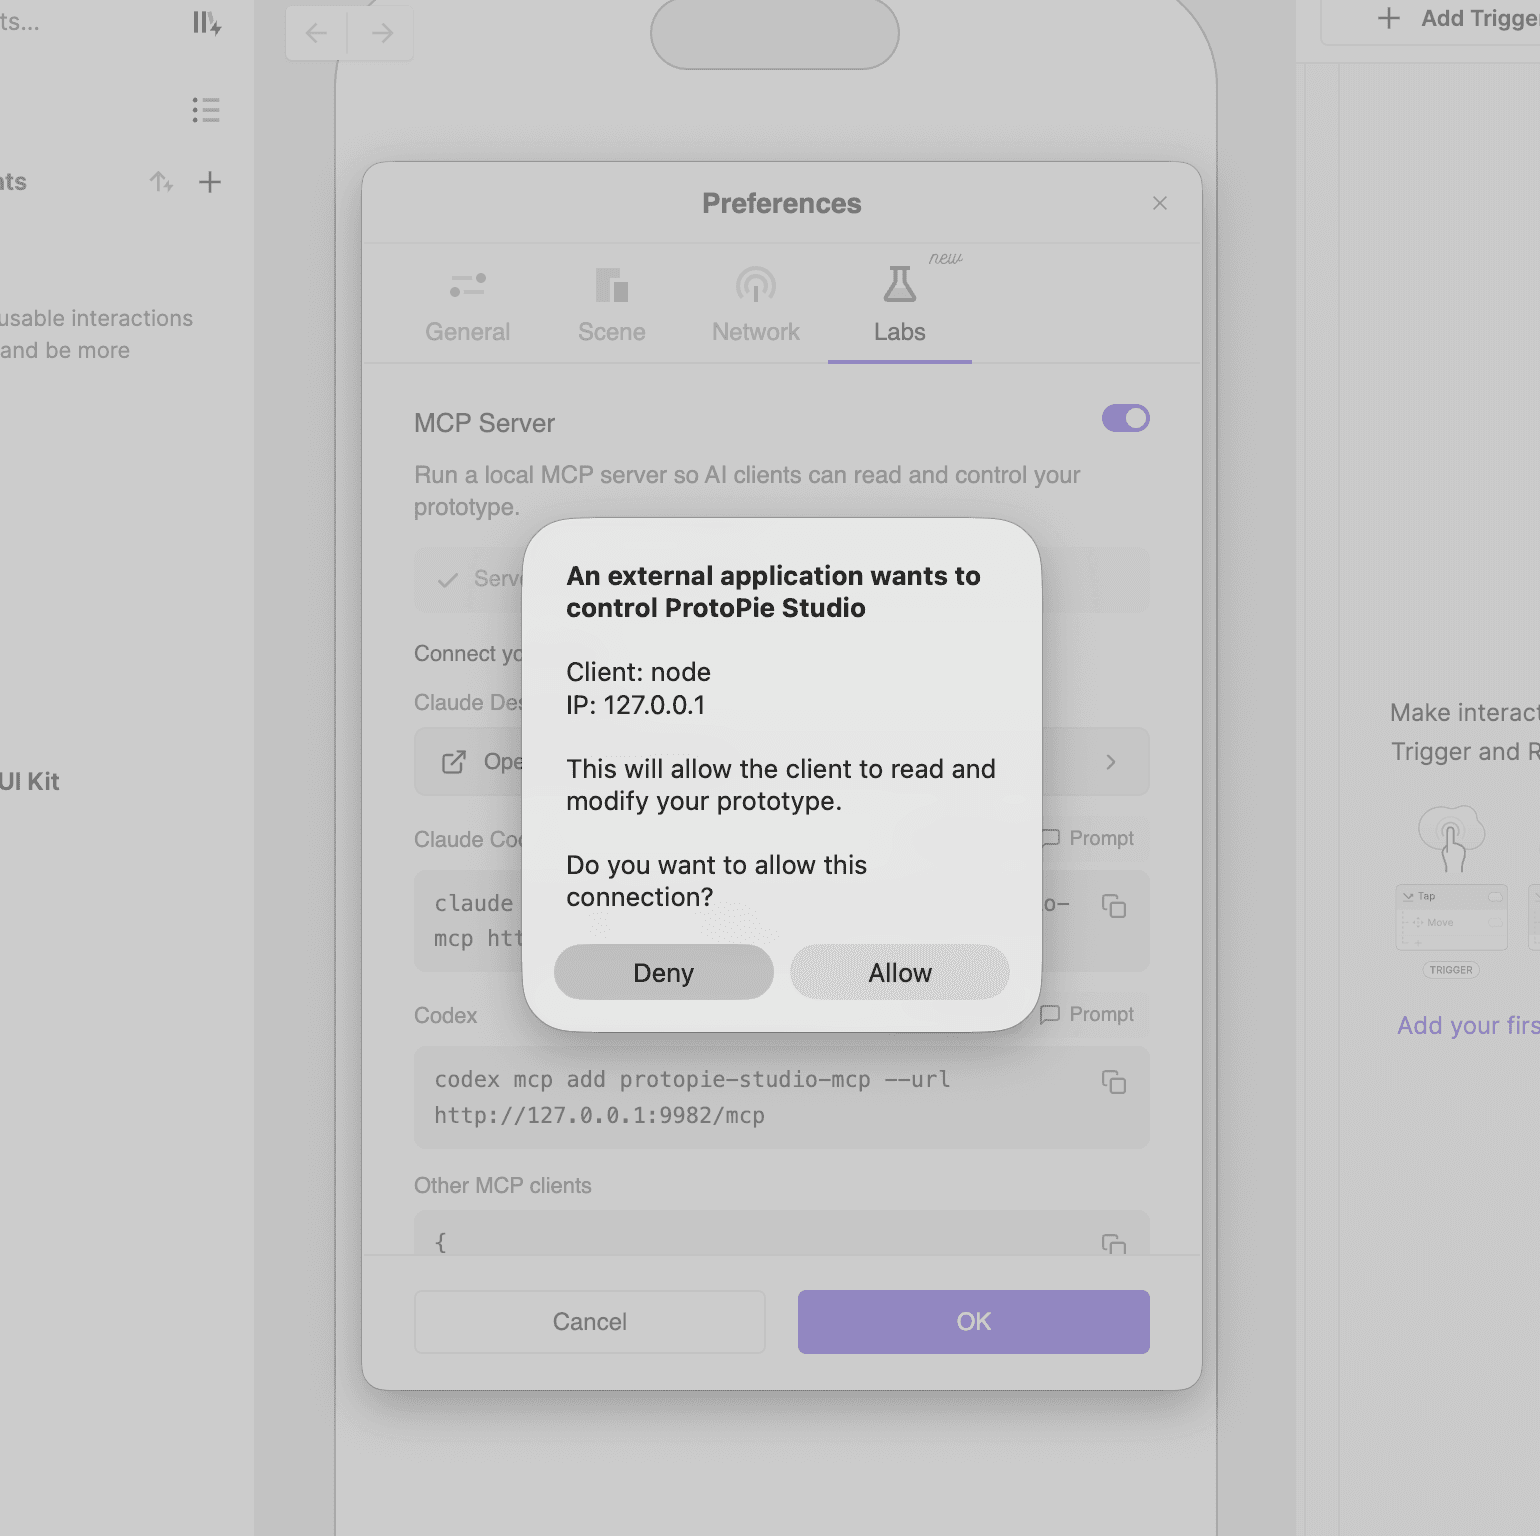
  4. Use it right away in the Claude Desktop chat. On first use, approve the Allow dialog in Studio.


    image.png

⚠️ Claude Desktop's Chat mode and Code tab keep separate MCP lists. This one-click extension is for Chat mode; for the Code tab, follow 2-2.

  • Manual alternative (when the button isn’t available)

    Chat mode’s claude_desktop_config.json only supports stdio, so an HTTP server goes through the mcp-remote bridge (requires Node.js / npx).

    1. Open claude_desktop_config.json via Settings → Developer → Edit Config:

      • macOS: ~/Library/Application Support/Claude/claude_desktop_config.json

      • Windows: %APPDATA%\Claude\claude_desktop_config.json

    2. Add it under mcpServers:

      {
        "mcpServers": {
          "protopie-studio-mcp": {
            "command": "npx",
            "args": ["mcp-remote", "<http://127.0.0.1:9982/mcp>", "--transport", "http-only"]
          }
        }
      }
      {
        "mcpServers": {
          "protopie-studio-mcp": {
            "command": "npx",
            "args": ["mcp-remote", "<http://127.0.0.1:9982/mcp>", "--transport", "http-only"]
          }
        }
      }
      {
        "mcpServers": {
          "protopie-studio-mcp": {
            "command": "npx",
            "args": ["mcp-remote", "<http://127.0.0.1:9982/mcp>", "--transport", "http-only"]
          }
        }
      }
      {
        "mcpServers": {
          "protopie-studio-mcp": {
            "command": "npx",
            "args": ["mcp-remote", "<http://127.0.0.1:9982/mcp>", "--transport", "http-only"]
          }
        }
      }
      {
        "mcpServers": {
          "protopie-studio-mcp": {
            "command": "npx",
            "args": ["mcp-remote", "<http://127.0.0.1:9982/mcp>", "--transport", "http-only"]
          }
        }
      }
    3. Save, then fully quit and restart Claude Desktop. Approve Allow on first use.

2-2. Claude Code (terminal CLI, or the Code tab in Claude Desktop)

Connect from the terminal or from Claude Desktop’s Code tab (Claude Code built in) with the same command.

🗂️ Authoring in the Code tab — the Code tab asks you to choose a working directory (folder) first. That folder becomes your workspace, and the MCP server registers to it (local scope). If you switch folders the server may not appear there — use --scope user (below) to make it available everywhere.

  1. Move into your project folder (working directory), then run:

    claude mcp add --transport
    claude mcp add --transport
    claude mcp add --transport
    claude mcp add --transport
    claude mcp add --transport

    This registers it for the current project (local scope) only. To use it across all projects, add --scope user:

    claude mcp add --scope user --transport
    claude mcp add --scope user --transport
    claude mcp add --scope user --transport
    claude mcp add --scope user --transport
    claude mcp add --scope user --transport
  2. Reload Claude Code, run /mcp, and select protopie-studio-mcp.

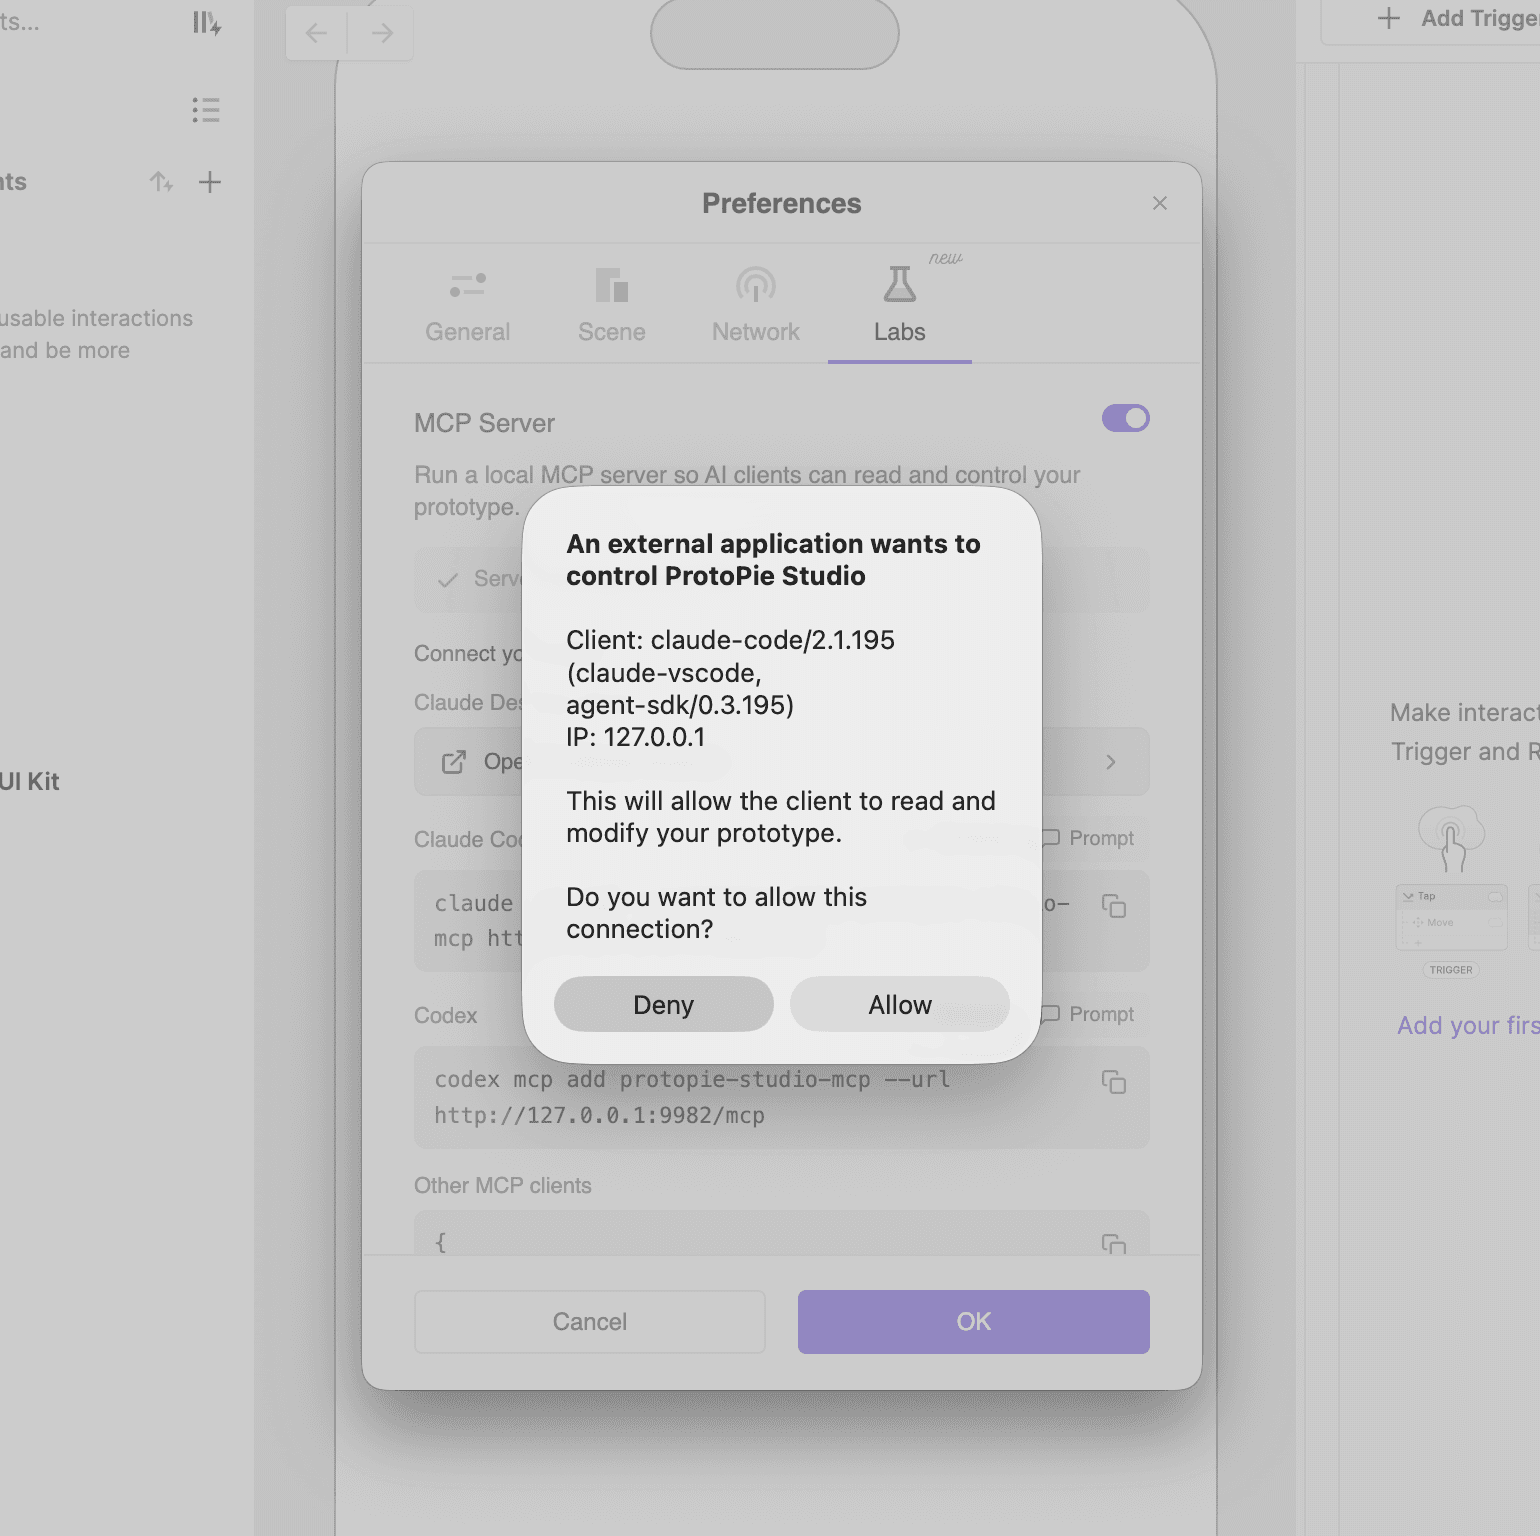
  3. When Studio shows the Allow / Deny dialog, click Allow.


    스크린샷 2026-06-29 오전 11.23.00.png
  4. You’re done when protopie-studio-mcp shows as connected in the tool list.

2-3. Codex

Run it in the terminal, or paste the JSON into your config:

codex mcp add protopie-studio-mcp --url

2-4. Cursor

  1. Settings → MCP → + Add new MCP server (or edit your project’s .cursor/mcp.json directly).

  2. Add the JSON:

    {
      "mcpServers": {
        "protopie-studio-mcp": {
          "url": "<http://127.0.0.1:9982/mcp>"
        }
      }
    }
    {
      "mcpServers": {
        "protopie-studio-mcp": {
          "url": "<http://127.0.0.1:9982/mcp>"
        }
      }
    }
    {
      "mcpServers": {
        "protopie-studio-mcp": {
          "url": "<http://127.0.0.1:9982/mcp>"
        }
      }
    }
    {
      "mcpServers": {
        "protopie-studio-mcp": {
          "url": "<http://127.0.0.1:9982/mcp>"
        }
      }
    }
    {
      "mcpServers": {
        "protopie-studio-mcp": {
          "url": "<http://127.0.0.1:9982/mcp>"
        }
      }
    }
  3. Save → connect → approve Allow in Studio on first use.

2-5. VS Code (Agent mode)

  1. Cmd/Ctrl + Shift + PMCP: Add Server → choose HTTP.

  2. Enter http://127.0.0.1:9982/mcp as the URL and protopie-studio-mcp as the Server ID, then pick a scope. This saves a servers entry in mcp.json with type: "http" and the url.

  3. Start the server, find the tools in Agent mode, and approve Allow on first use.

ℹ️ VS Code note — MCP / Agent mode requires GitHub Copilot to be enabled on your account.

ℹ️ Other MCP clients — paste the JSON from the "Other MCP clients" item in Labs: { "mcpServers": { "protopie-studio-mcp": { "url": "<http://127.0.0.1>:<PORT>/mcp" } } }

Step 3 — Approve the connection (Allow / Deny)

  • The first time a client connects, Studio shows an Allow / Deny dialog. Click Allow to connect.

  • Before you approve, the connection is temporarily refused — just reconnect (retry) from the client.

Step 4 — Use Studio MCP

Studio MCP acts on the prototype that is open and focused in Studio — there’s no link to paste. With a .pie file open, ask the AI things like:

  • “Analyze the interactions in the current prototype.”

  • “Add a Tap trigger to this button.”

  • “Make a screen where tapping flips the card.”

  • “Capture a preview of the current screen.”

Troubleshooting & FAQ

  • It won’t connect. → Make sure you approved the Allow dialog in Studio; before approval, connections are temporarily refused. Even if the client shows an Authenticate button, that doesn’t apply here — use Reconnect (retry) instead.

  • Tools are missing or the connection drops. → Check that MCP Server is on under Preferences → Labs, that Studio is running, and that a .pie file is open. If it still fails, restart Studio and the client. In Claude Code, use claude mcp list to check registration and claude mcp get protopie-studio-mcp for details; if needed, run claude mcp remove protopie-studio-mcp and add it again.

  • I don’t see the Open in Claude Desktop button. → Confirm ProtoPie Studio is 10.3.0 or later (the button ships from 10.3.0). On an older version, update, or use the manual alternative (mcp-remote) in 2-1 or another client.

  • I added it in Claude Desktop but the tools don’t show. → Chat mode and the Code tab keep separate MCP lists. Add Chat mode via the Open in Claude Desktop extension (.mcpb), and the Code tab via the claude mcp add command. Make sure you added it in the mode you’re using.

  • How do I check which extensions (.mcpb) are installed in Claude Desktop (Chat)? → In Claude Desktop, press Cmd + , to open Preferences, then click Extensions to see the list of installed .mcpb extensions.

  • The port/address doesn’t match. → The port isn’t always 9982 — copy the actual command/URL shown in Labs. If you see a “port unavailable” message, quit the app holding that port and restart Studio.

  • It works in one project but not another (Claude Code / Code tab). → Local scope only registers in the folder where you ran the command. Use -scope user to make it available everywhere.


Learn more about Code MCP