

Form field validation is at the core of any app or web UX design. It prevents user errors and guides them through a seamless experience like a helpful companion when completing online forms. During the design stage, creating prototypes specifically for form validation enables designers to gather valuable feedback on the user flow, ensure the correct information is entered, and thus, economize time and resources.
To do this, you will need a tool that perfectly harnesses the power of applying conditional logic to your designs. This article will guide you on prototyping input fields with ProtoPie and what's more? You can easily test your prototype using real text entry on your own device's native keyboard.
Overview
What is Required Field Validation?
How to prototype required field validation in ProtoPie
What is Range Checking?
How to prototype range checking in ProtoPie
What is Consistency Checking?
How to prototype consistency checking in ProtoPie
What is Data Type Validation?
How to prototype data type validation in ProtoPie
What is Pattern Matching?
How to prototype pattern matching in ProtoPie
Design better user experiences with ProtoPie
Before you start
To actively participate in this tutorial, download the sample .pie below and toggle between scenes. We recommend starting with the blank project first — have some fun practicing, and then peek at the complete one to see how you're doing. Enjoy prototyping!
What is Required Field Validation?
Required Field Validation is a form validation technique that ensures an input field must be filled out before the form can be submitted. It’s a way to ensure that necessary data is provided by the user. This validation is typically indicated by a red asterisk (``*``) and is a common method for indicating a required field.
It’s used in various input types such as text, search, URL, tel, email, password, date pickers, number, checkbox, radio, and file. This validation helps improve the user experience by preventing the submission of incomplete forms. ProtoPie's input layer feature makes this process easy as pie.
How to prototype required field validation in ProtoPie
Now, let's explore an example of a text field requesting essential first names. In the initial project, we've readied some designs and interactions for you:
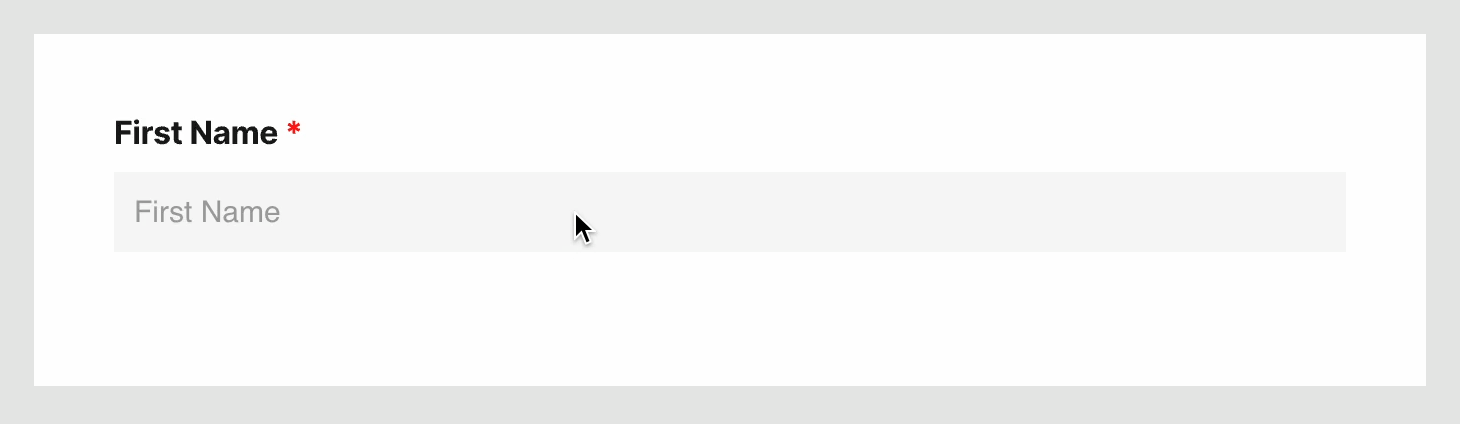
Required field validation
In terms of design, there's an error message that appears on the screen. This will be animated later to show or hide based on users' input.
As for the interactions, we've set up the default and focus states for the "Text Field" using the "Focus" trigger.
Let’s start by hiding the error message. You can achieve this by setting its opacity to 0.
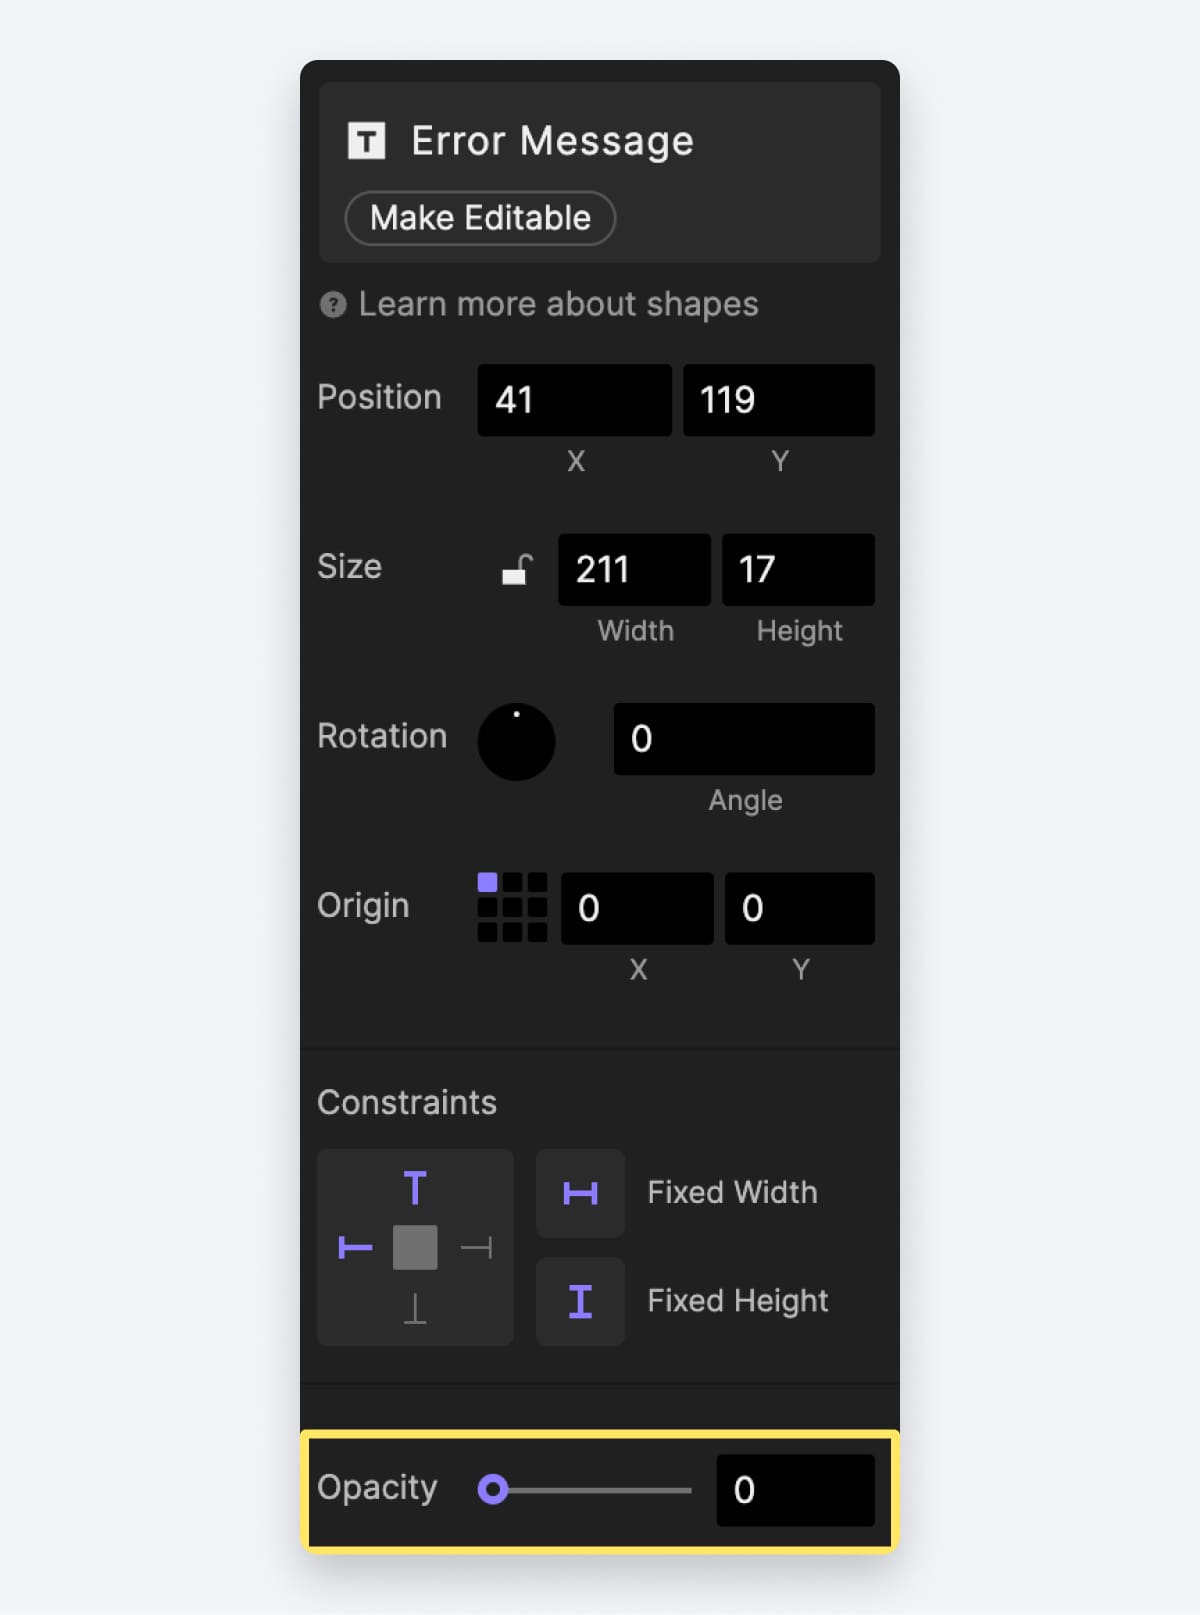
Set the opacity of the error message to 0.
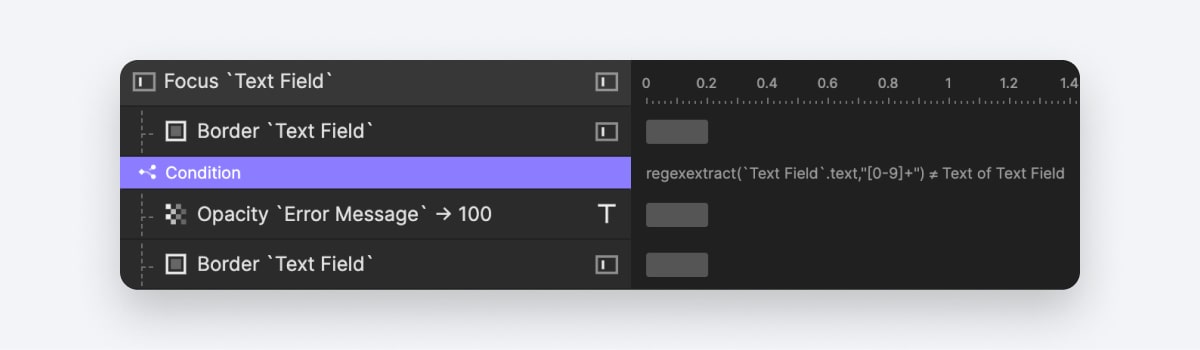
Once you've typed something, click outside the text field or press the Enter key on your keyboard. At this point, we'll check if the text field is still empty. If the text field is empty, we display an error state for the text field along with an error message below.
Let’s add a condition under the “Focus Out” trigger. For the condition, let’s set it to be
Text of Text Field = "NONE"This condition checks if the text field is empty.
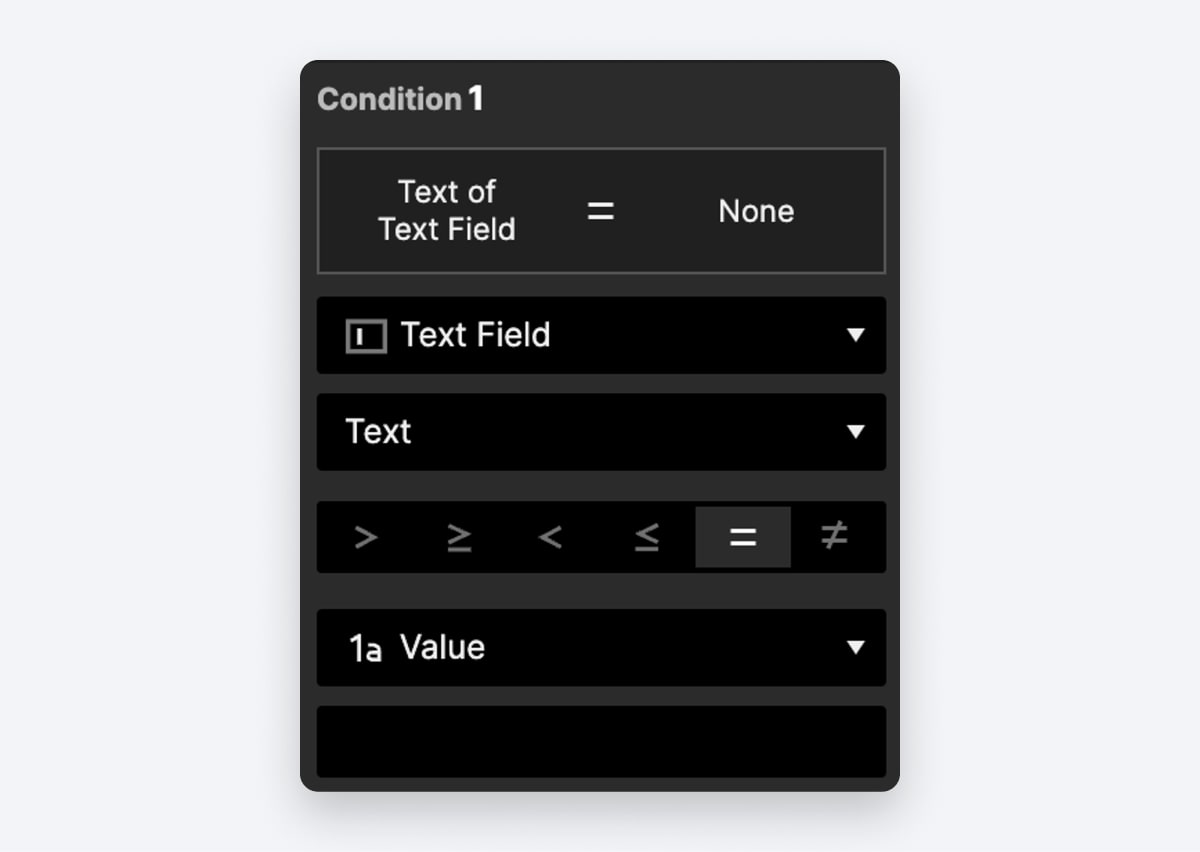
Condition to check if the text field is empty.
When the condition is satisfied, it's time to animate the error state.
Add an "Opacity" response to the "Error Message" layer, setting its opacity to 100.
Additionally, include a "Border" response for the "Text Field" layer, assigning a red color to its border.
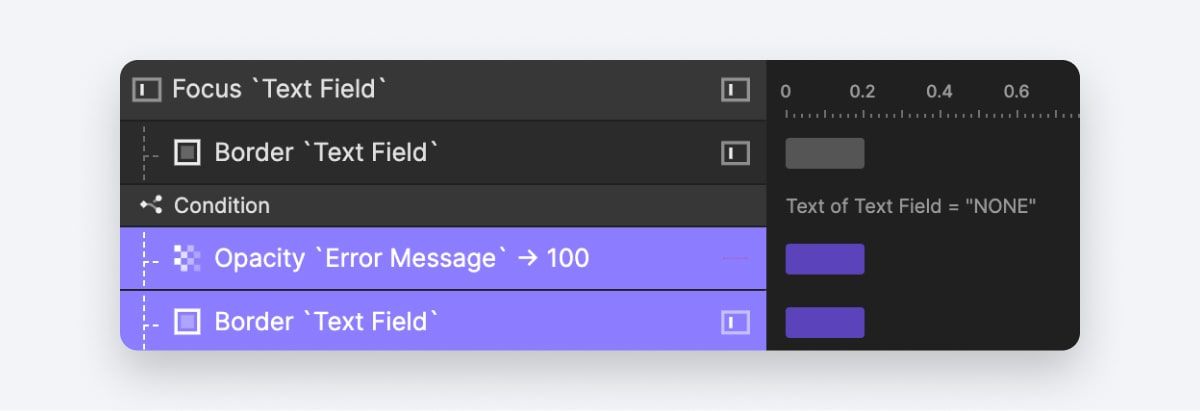
Animate the error state.
Next up, let's introduce additional interactions so that when our text field picks up content, it will dismiss the error message. To achieve this, we'll utilize the “Detect” trigger. A Detect trigger consistently monitors any changes in our target object.
Add a "Detect" trigger to the "Text Field" layer, and let's detect its "Text" property. (For an input layer, the Text property signifies the content inside the field)
Next, create a condition to verify if the text field is filled. Use the condition
Text of Text Field ≠ "NONE"Under this condition, make the error message disappear by applying an “Opacity” response to it and setting it to 0.
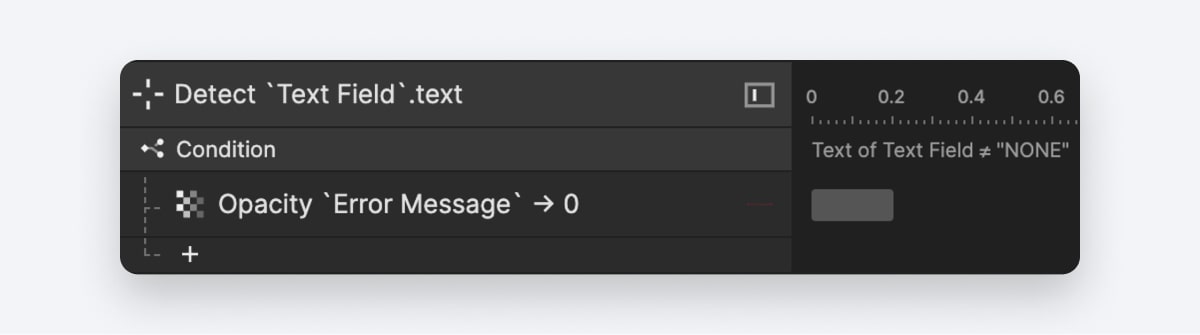
Detect content in text field.
What is Range Checking?
Range checking is a type of input validation that verifies whether the input data falls within a predefined range. Here are some examples of range checking:
Age: For example, a secondary school student is likely to be aged between 11 and 16. The computer can be programmed only to accept numbers between 11 and 16.
Geographic Data: Latitude and longitude are commonly used in geographic data. A latitude value should be between -90 and 90, while a longitude value must be between -180 and 180. Any values out of this range are invalid.
Strings: Minimum and maximum length check for strings. For instance, check if a password is between 8 and 16 characters long.
How to prototype range checking in ProtoPie
From the example project, let’s navigate to the scene called “Range Checking”.
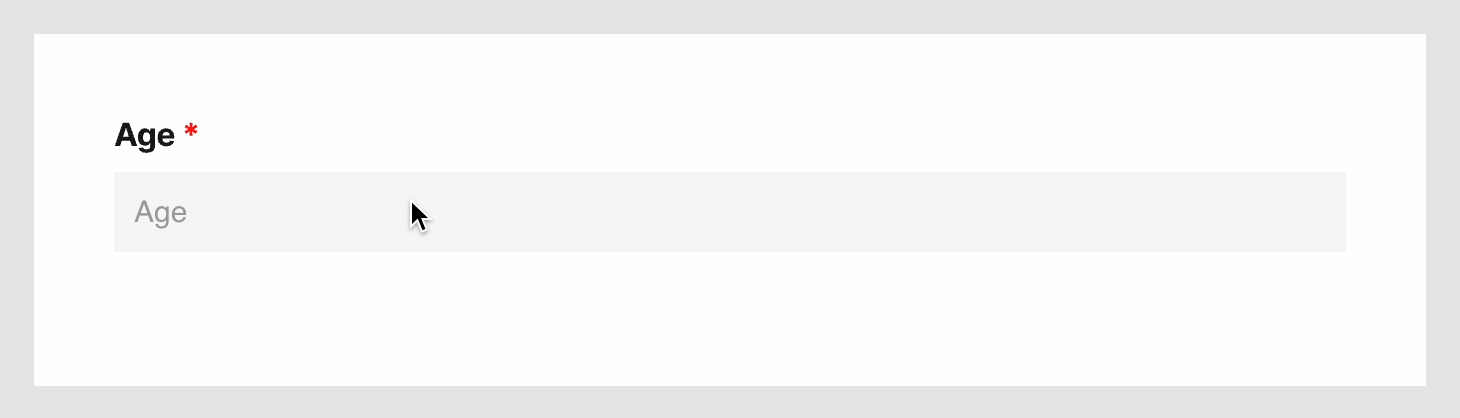
Let's begin by looking at an example where secondary school students are required to input their age, ensuring that it falls within the range of 11 to 16 years.
Range checking
This interaction builds upon our first example, ensuring the requirement for user input. The pre-configured interactions for this scenario can be found within the "Age" group in the interaction panel.
Let’s make ProtoPie validate the input value when users focus out from this text field.
Add one more condition under the “Focus Out” trigger. Configure the condition as
Text of Text Field - Age < 11to handle cases where users enter an age smaller than 11. Implement the following responses:
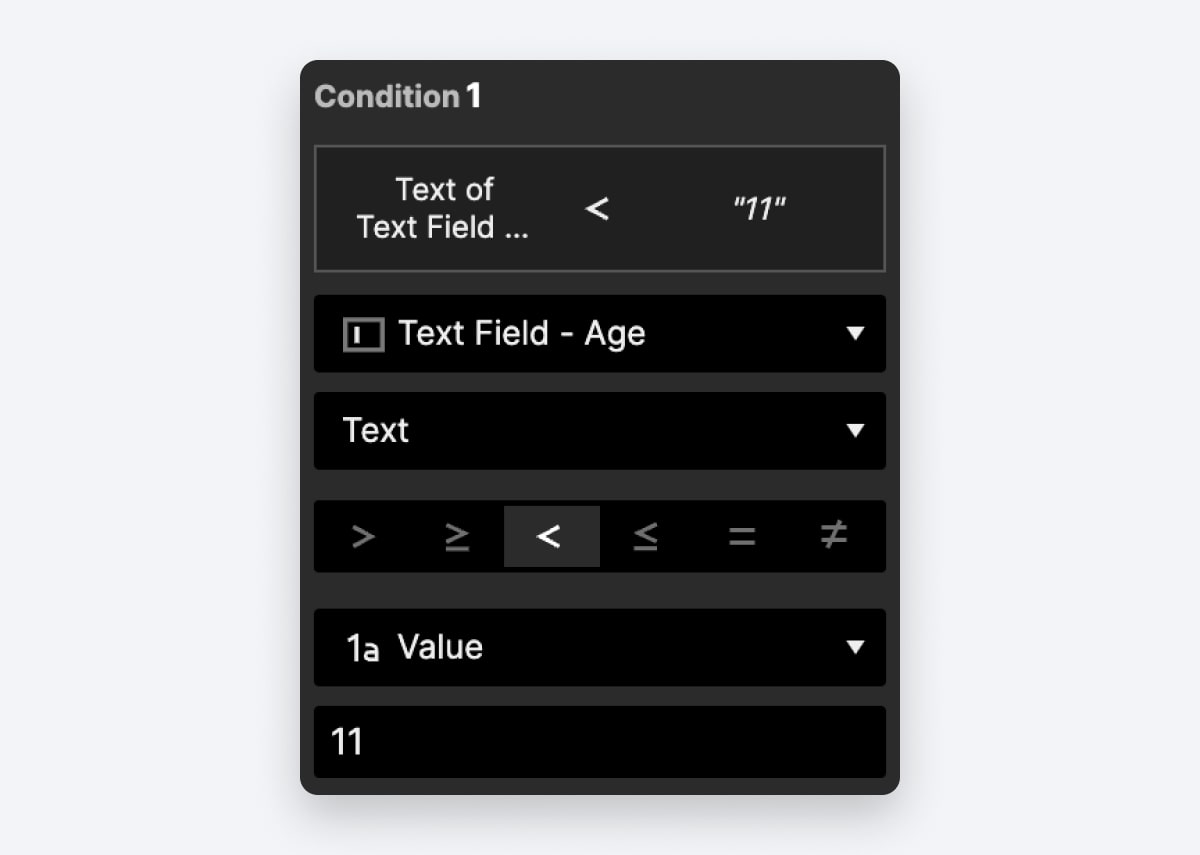
Condition to verify if the value is less than 11.
Add an "Opacity" response to the "Error Message - Age" layer, setting its opacity to 100.
Include a "Border" response for the "Text Field - Age" layer, assigning a red color to its border.
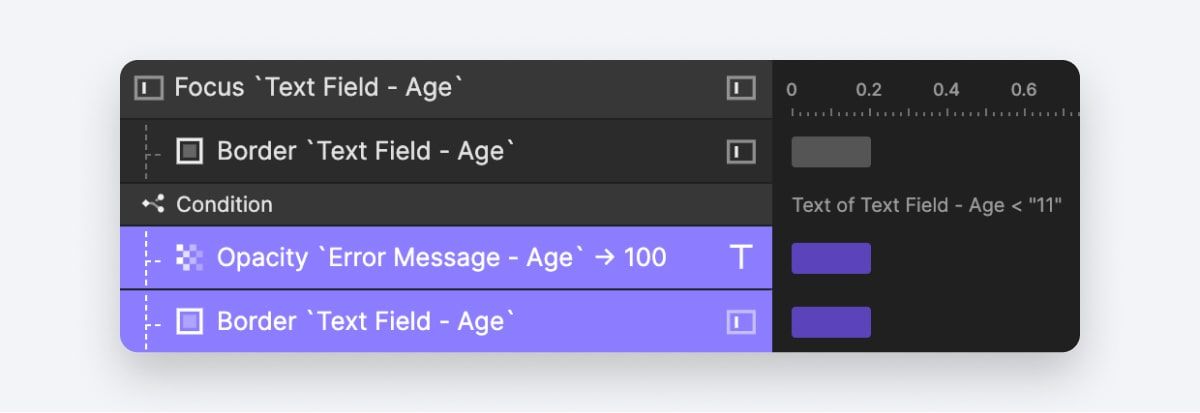
Age below 11 triggers an error state.
Create another condition to check for ages greater than 16 using
Text of Text Field - Age > 16. Implement the same interactions as the previous condition by copying and pasting them. This ensures that an error message appears when users enter an age greater than 16.
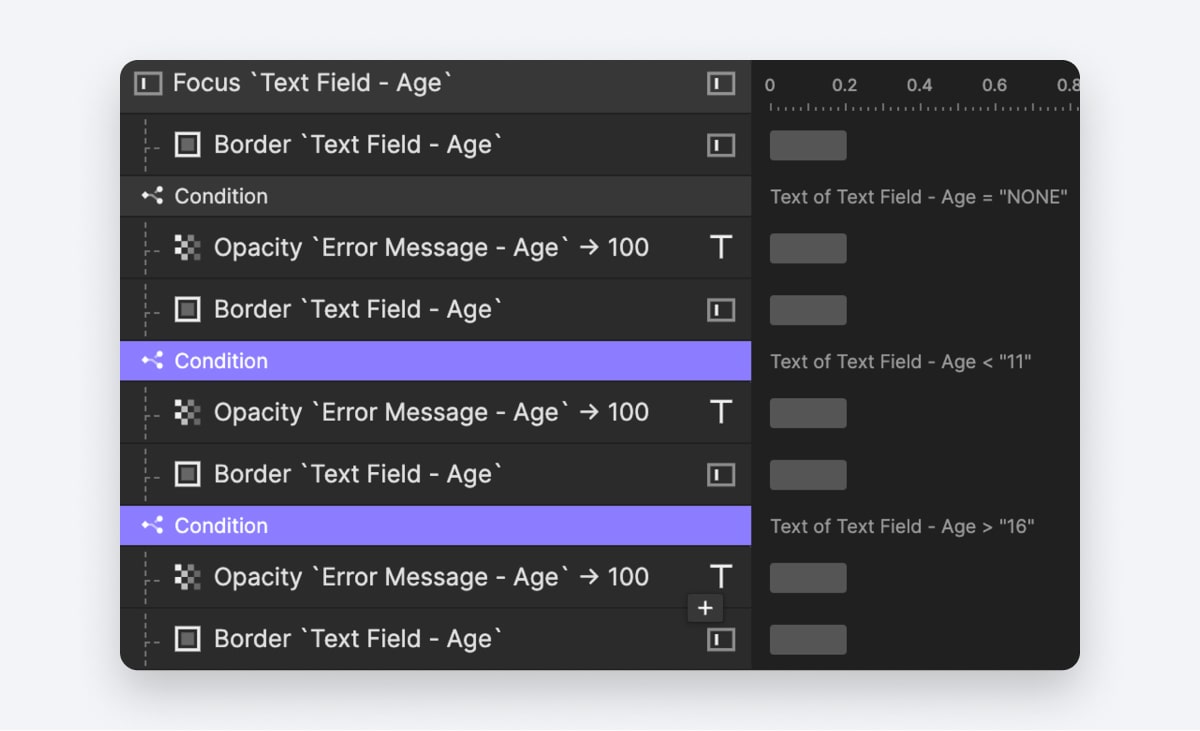
The same error state is triggered when the age exceeds 16.
Let's proceed to the second example, where we validate the length of the password. The requirement is for the password to be between 8 to 16 characters long.
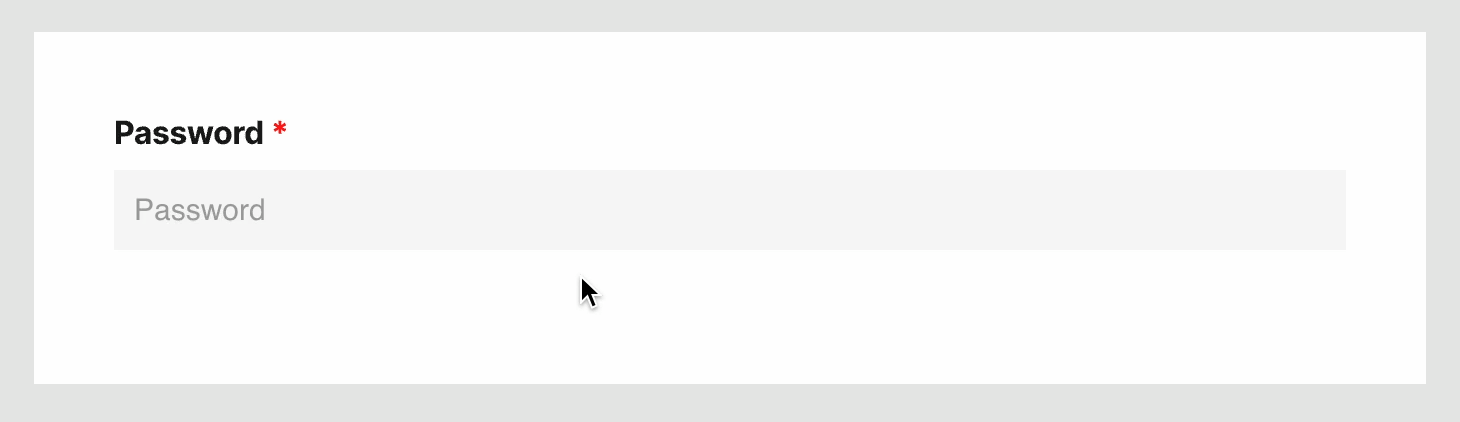
The password must meet a certain length.
You can find some pre-made interactions in the “Password” group in the interaction panel.
Now let’s configure the error states for the “Focus Out”.
Our first condition is used to check if the password is too short, so we use
length(Text Field - Password.text) < 8. Thelength()is a function in ProtoPie that checks the length of a string.

Condition to check if the password is too short.
Our second condition is to check if the password is too long:
length(Text Field - Password.text) > 16
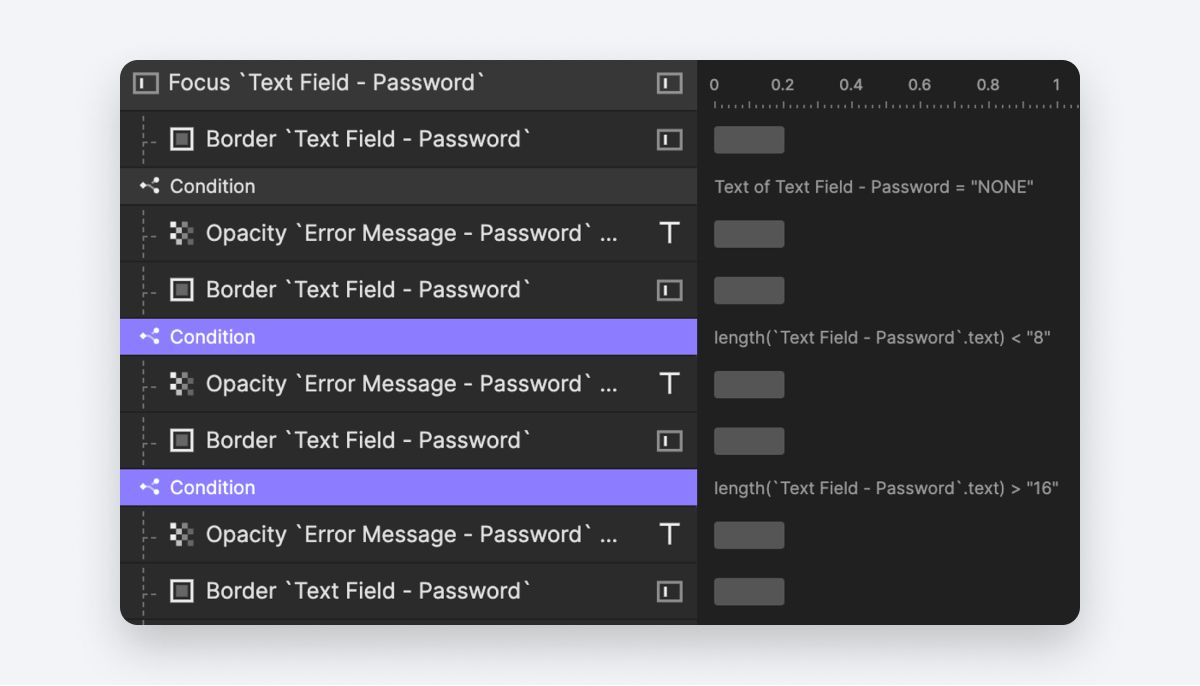
Condition to verify if the password length is either too short or too long.
What Is Consistency Checking?
Consistency checking is a type of data validation that ensures the data entered is logically consistent. It checks for internal conflicts in the data, specifically, whether the rules written for data have contradictory statements, for example:
Password confirmation: a field asking for a re-entered password might check if it matches the previously entered password.
Order and Delivery Dates: Check if the delivery date is after the shipping date for a parcel. Similarly, a package’s shipping date should not be before the order date.
How to prototype consistency checking in ProtoPie
Let's consider an example where users are required to re-enter their password for confirmation.
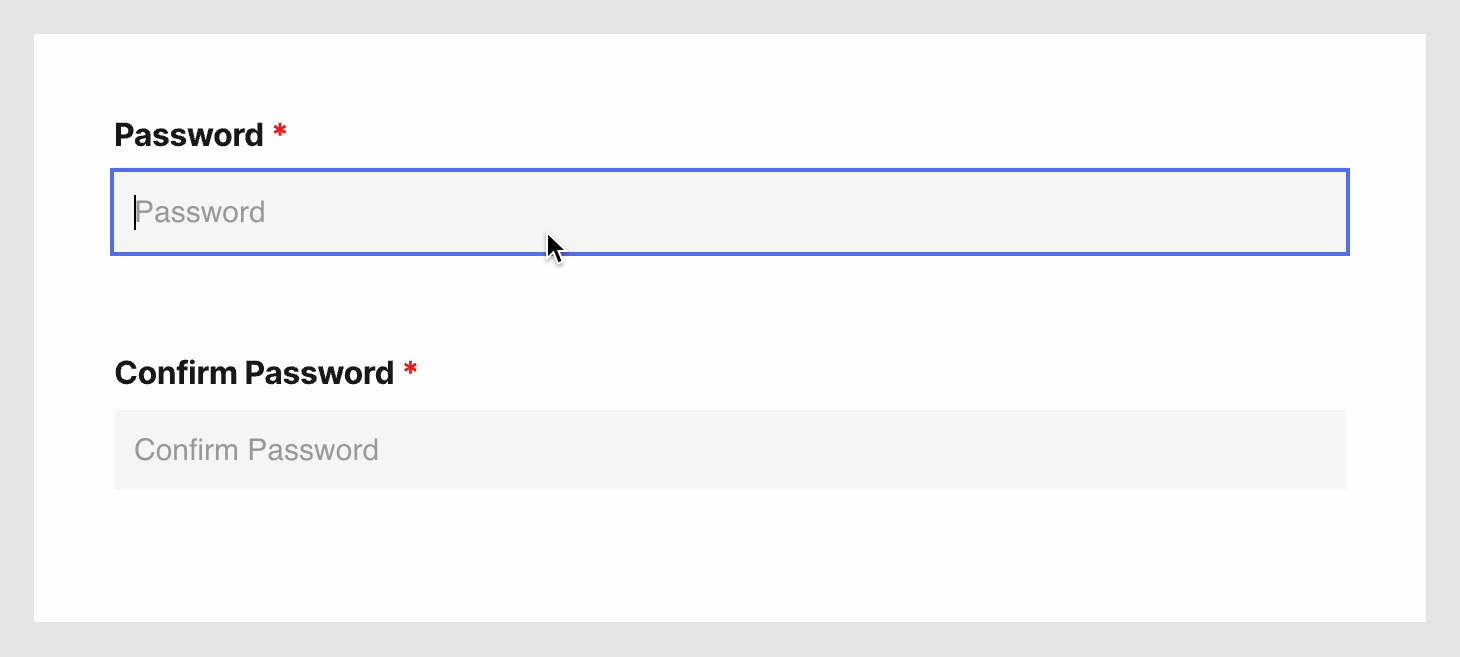
Consistency checking
From our example project, navigate to the scene called “Consistency Checking”. We have already prepared the interactions for the password field. Now let’s focus on the “Confirm Password” field.
In the “Confirm Password” group in the interaction panel, find the “Mouse Out” trigger.
Add a condition to check when
Text of Text Field - Confirm Password ≠ Text of Text Field - Password. This condition signifies that the two passwords don't match.
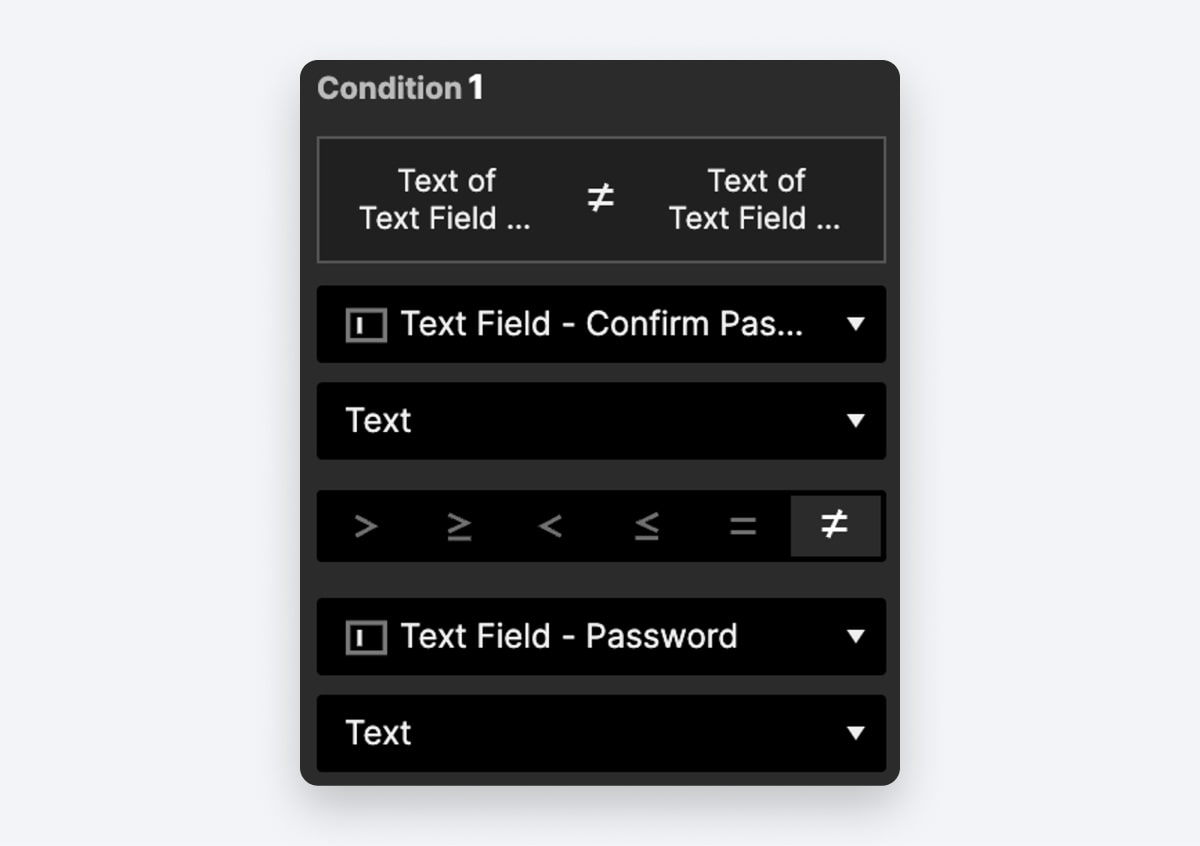
Condition to compare the content in both password fields.
Under this condition, we can now configure an error state by making the border of the text field red and displaying an error message.
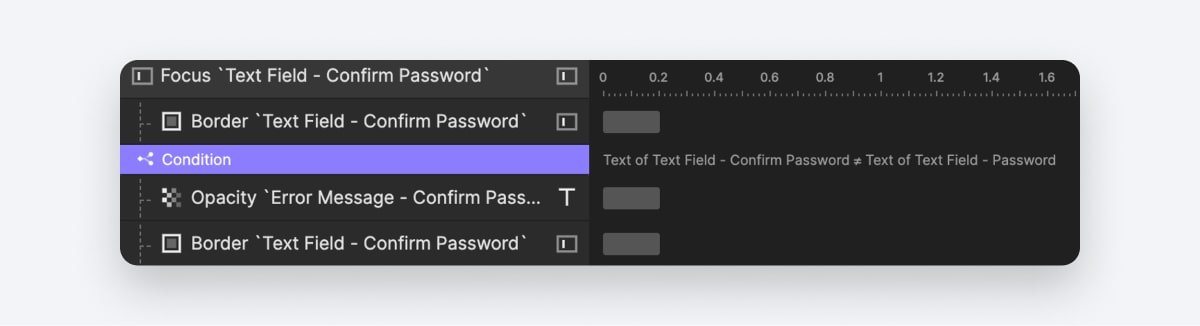
Add error states for when the passwords entered in both fields do not match.
What is Data Type Validation?
Data type check is a form of input validation that ensures the data entered into a field matches the expected data type. For example,
Age: An age field would typically only allow numbers. For example, when filling out a form online, the age field would reject any non-numeric entries.
Credit Card Number: When entering a credit card number, only numbers are allowed. Any letters or special characters would be rejected.
City Name: In some applications, the city name field would only allow letters. For instance, it would reject entries like “Toronto123” and only accept alphabetic entries like “Toronto”.
How to prototype data type validation in ProtoPie
Let's examine a practical scenario where the input field specifically requests an integer quantity.
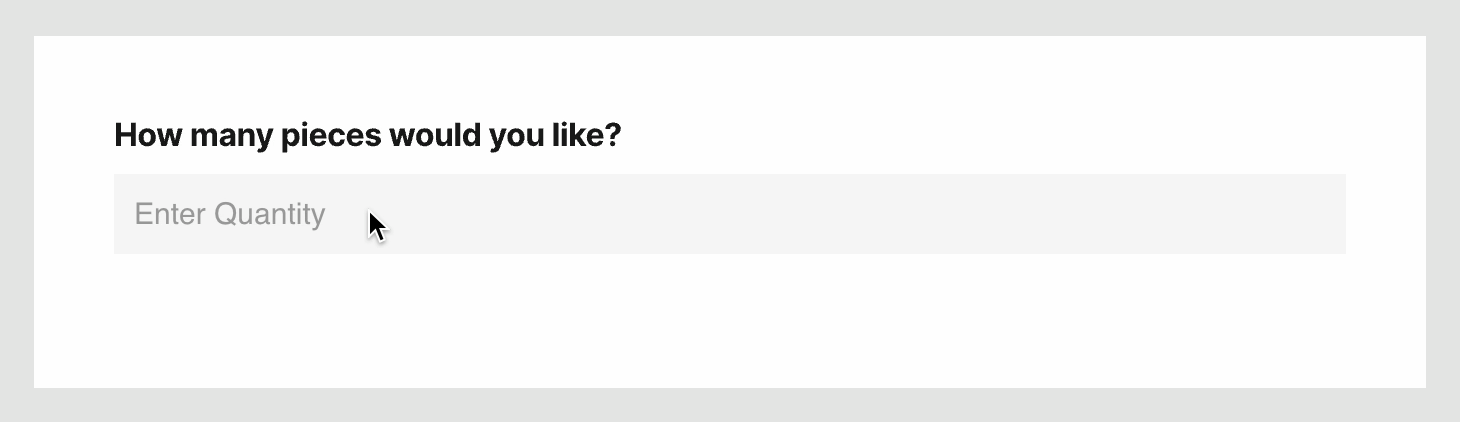
Data type validation
This example is located in the "Data Type Validation" scene within our sample project.
Under the "Mouse Out" trigger, create a condition to validate users' input.
In this condition, we need to strictly reject any input that’s not a number. Use the following condition: `regexextract(Text Field``.text,"[0-9]+") ≠ Text of Text Field```
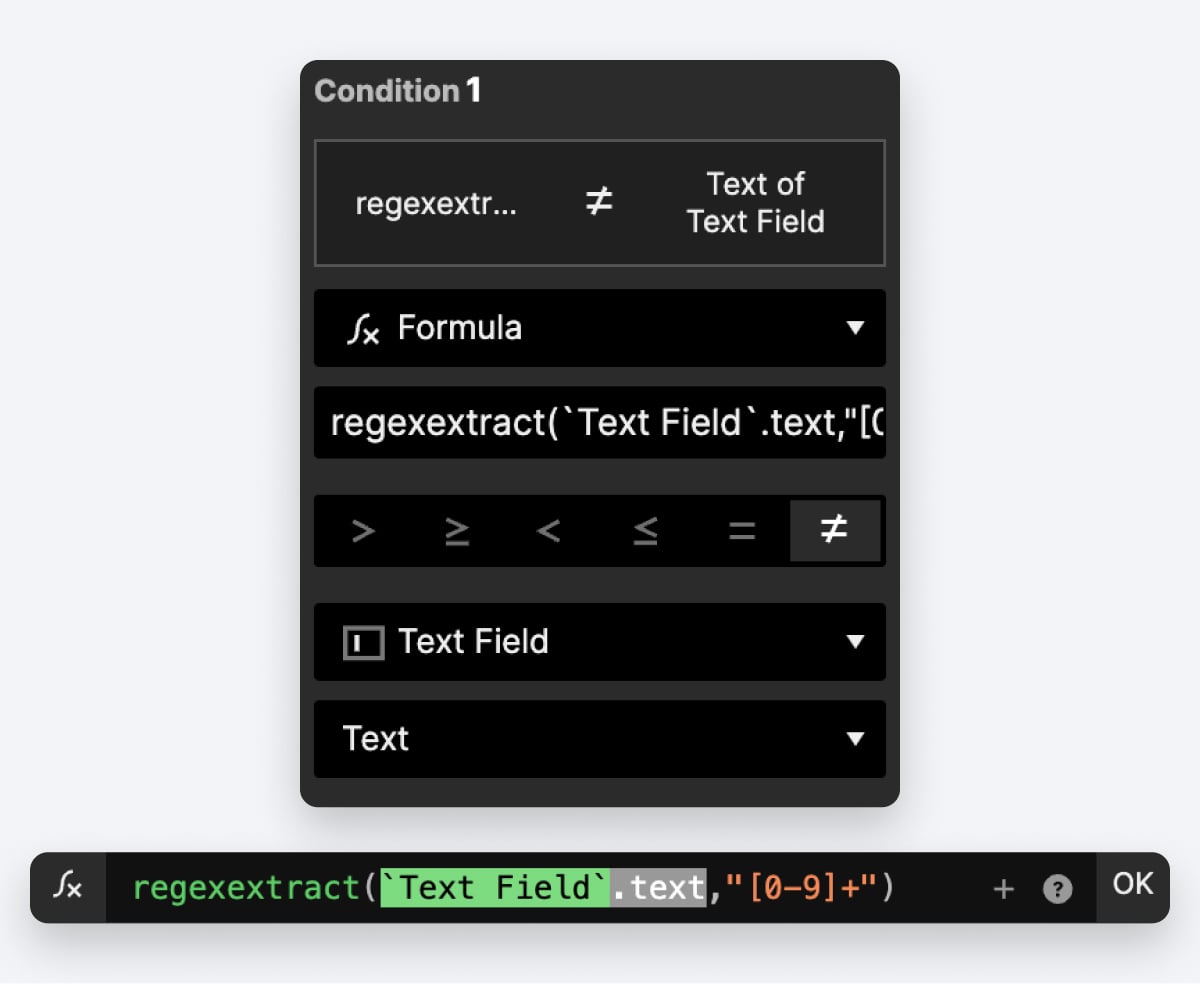
Condition to verify if the value is a number.
regexextract(): This function is used to extract the first substring that matches a specified regular expression pattern.``Text Field
.text: Refers to the text content of the "Text Field" input."[0-9]+": This is a regular expression pattern. Here's what it means:
[0-9]: Matches any digit from 0 to 9.+: Specifies that the preceding pattern (in this case,[0-9]) should occur one or more times consecutively.
The left side of the equation (regexextract(Text Field.text,"[0-9]+")) extracts the first sub-string that consists of numeric digits from the entered text. For instance:
If you type "123abc," it returns "123."
If you type "def456," it returns "456."
The condition checks whether this extracted numeric substring does not match the original text in the "Text Field." If they don't match, it implies that non-numeric characters are present in the input.
Under this condition, we can set up an error state for the specified condition by adjusting the text field's border color to red and presenting an error message.
*Adjust the box color to indicate an error message. *
What is Pattern Matching?
Pattern matching in input validation involves defining a specific pattern or format, then checking whether the input data conforms to this pattern. Typically, regular expressions (regex) are employed for this purpose in software development.
Regular expressions, commonly known as regex, function by specifying patterns that can be used to search for particular characters or words within strings. If delving into code is not your preference, you can always leverage AI to generate the necessary code for you.
Here are a couple of examples illustrating pattern matching:
Email Validation: Ensuring the validity of an email address involves checking if the input adheres to the general pattern of an email. This may include characters preceding an "@" symbol, followed by additional characters, and concluding with a period. After the period, there should be at least two letters from a to z.
Password Validation: Verifying a password often requires adherence to a specific pattern. For example, a password might need to contain at least one number, one uppercase, and one lowercase letter, and be a minimum of 8 characters in length.
For further insight into regular expressions, you can refer to this quick guide. If coding isn't your forte, feel free to ask AI for assistance in generating the required code!
How to prototype pattern matching in ProtoPie
Let's explore password pattern checking in the "Pattern Matching" scene of our sample project, where users are required to include at least 1 uppercase letter and 3 numbers in their password.

Pattern matching
Under the "Mouse Out" trigger, create the first condition to verify if the password meets the uppercase letter requirement. Configure the condition as follows:
regexextract(Text Field - Password`.text,"[A-Z]") = "NONE”```
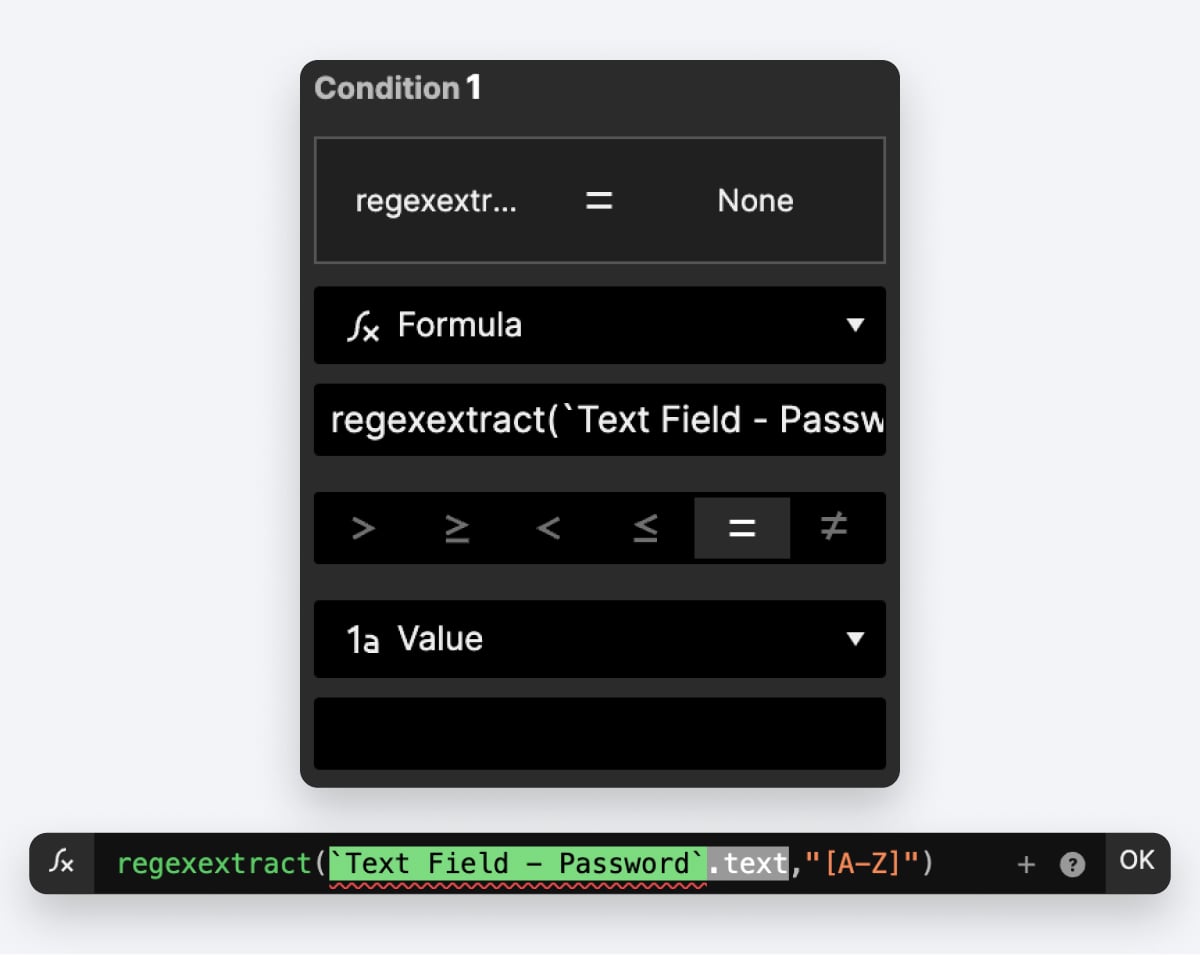
Condition to verify if there is at least one uppercase letter.
The pattern
[A-Z]alone successfully matches the first uppercase letter in the string. For instance, if you type "abcDE," it returns "D." Even though this function stops checking after finding the first result, as long as it returns anything, it indicates the input includes at least one uppercase letter.If it returns "NONE," the condition is not met, signaling a failure. Below this condition, we can proceed to animate an error state for the field.
For the second condition, verify if the password includes at least 3 numbers using the following requirement:
regexextract(Text Field - Password`.text,"^(.?[0-9]){3,}.$")= "NONE”```
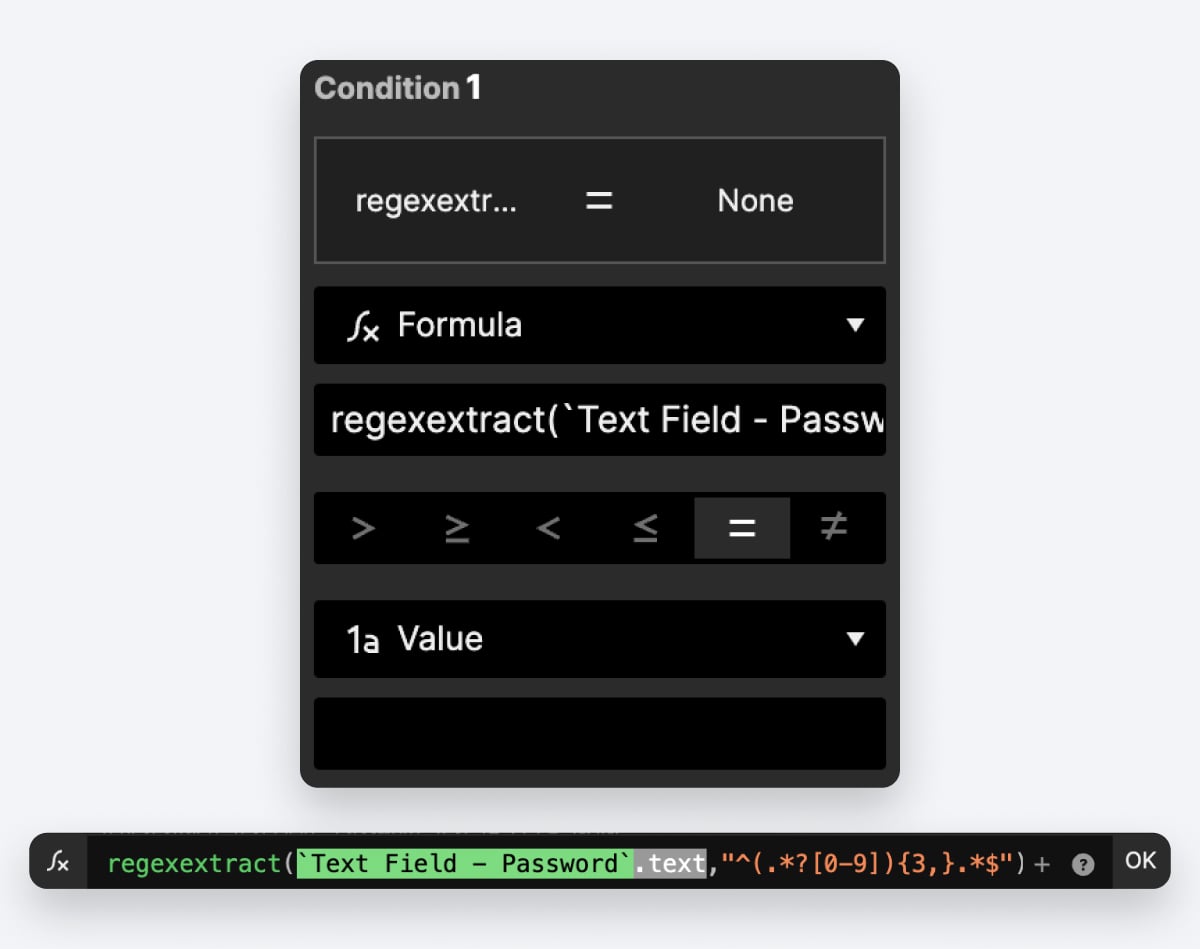
Condition to ensure there are at least three numbers.
^: Asserts the start of the string.(.*?[0-9]): Matches any sequence of characters (non-greedy) followed by a digit.{3,}: Specifies that the preceding pattern(.*?[0-9])must appear at least three times..*: Matches any remaining characters.$: Asserts the end of the string.
With this function, ProtoPie is instructed to rigorously check and return a string that meets the specified requirement. If it returns "NONE," the condition is not satisfied, indicating a failure. In such cases, we should proceed to animate an error state for the password field.
Design better user experiences with ProtoPie
Form fields are just one of the many things in product design that ProtoPie makes way more efficient. Incorporating validation patterns like required field checks, range validation, consistency checks, data type validation, and pattern matching is a breeze.
Take advantage of ProtoPie's high-fidelity prototyping features today and enhance the overall effectiveness of your designs!


