

Introduction
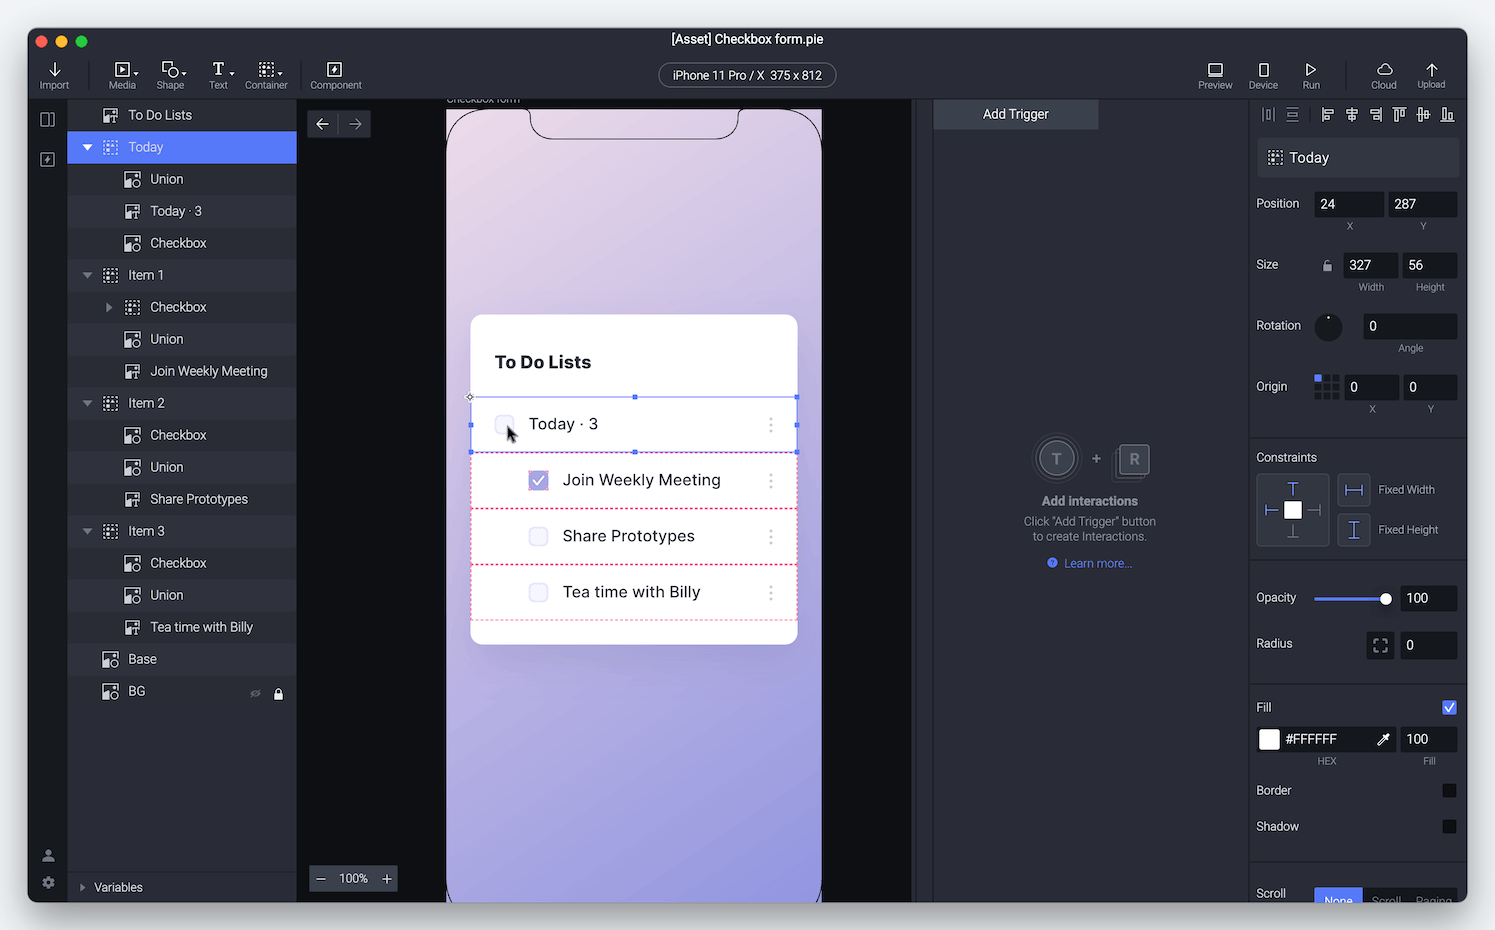
A checkbox form is an input element in UI design that lets the user select multiple options from a range of choices. There can be several checkboxes (sub-items) nested inside a checkbox form. The user can check the checkbox to activate it and uncheck the checkbox to deactivate it. This effect can be easily achieved in Protopie using Components and Send & Receive functionality. In this lesson, we will make use of the checkbox component which comprises two conditional triggers and opacity responses associated with each trigger. The component will also make use of Send & Receive to check/uncheck all the items in the scene.
What you'll learn
Create a checkbox component
Add **Send & Receive **in the component
Check all items using Send & Receive
Uncheck all items using Send & Receive
Store checkbox state in a variable
The check all item responds to all sub-items
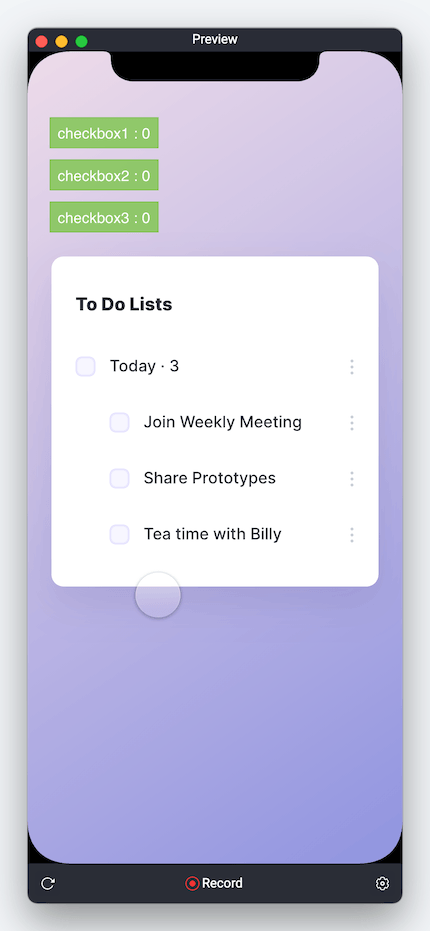
In the end, you’ll be able to make something like this!

[Starting Pie File] [Completed Pie File]
Step-by-step instructions
1. Create a checkbox component
1. Make the unchecked item a component. Also, copy and paste the checked item to the component that we just created.
Components are layer sets with interactions that can be reused across your prototype. This will avoid unnecessary repetitive work and save your time. You can duplicate the checkbox component that consists of the triggers and responses into your scene and reuse it whenever necessary.
ctrl/command + c to copy, ctrl/command + v to paste
2. Rename the layers and set the checked layer's opacity to 0.
We need to make sure that the checked layer sits on top of the unchecked layer in the layers panel. We'll just work with the opacity of the topmost layer (checked layer) and turn it on and off (on refers to 100%, off refers to 0%). In the default state, the item will be unchecked. As the checked item is on top of the unchecked item, its opacity should be 0% by default.
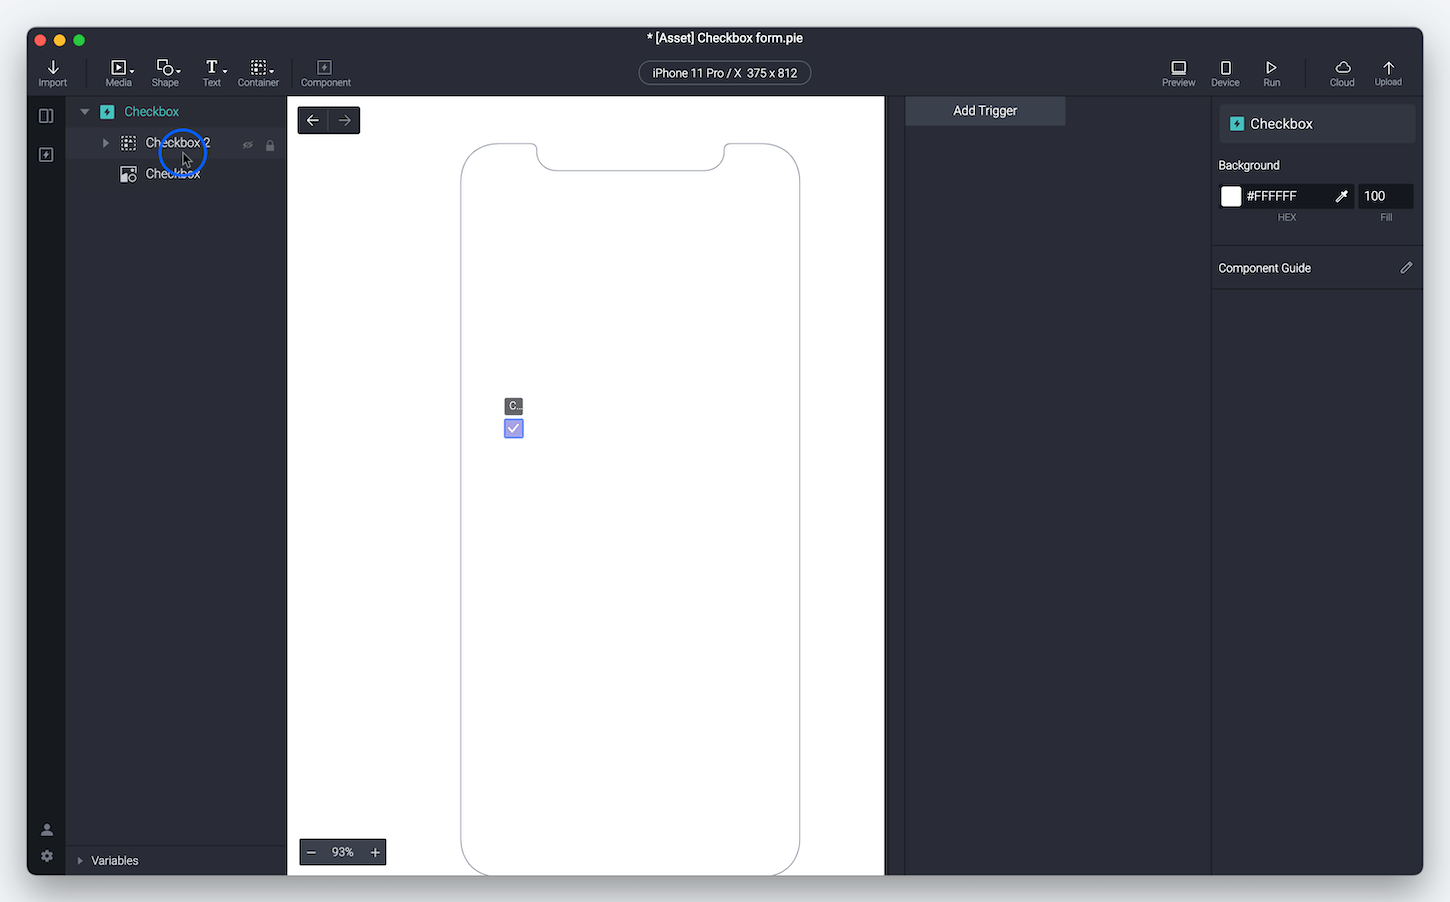
Rename the layers and set the checked layer's opacity to 0
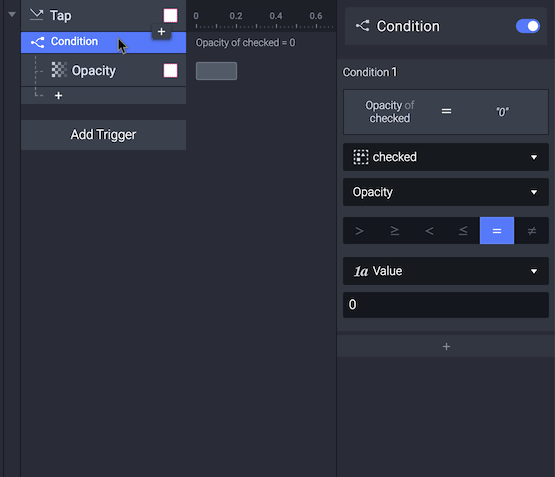
3. Add a Tap trigger to the checkbox.

4. Add a condition and set the checked item's opacity to 0.
A condition can make sure certain responses be triggered only when the corresponding conditions are met. Here we have to use condition because the checkbox has 2 possible states and they are in conflict with each other. Hence we will use two different conditions, each of which will generate a specific response.
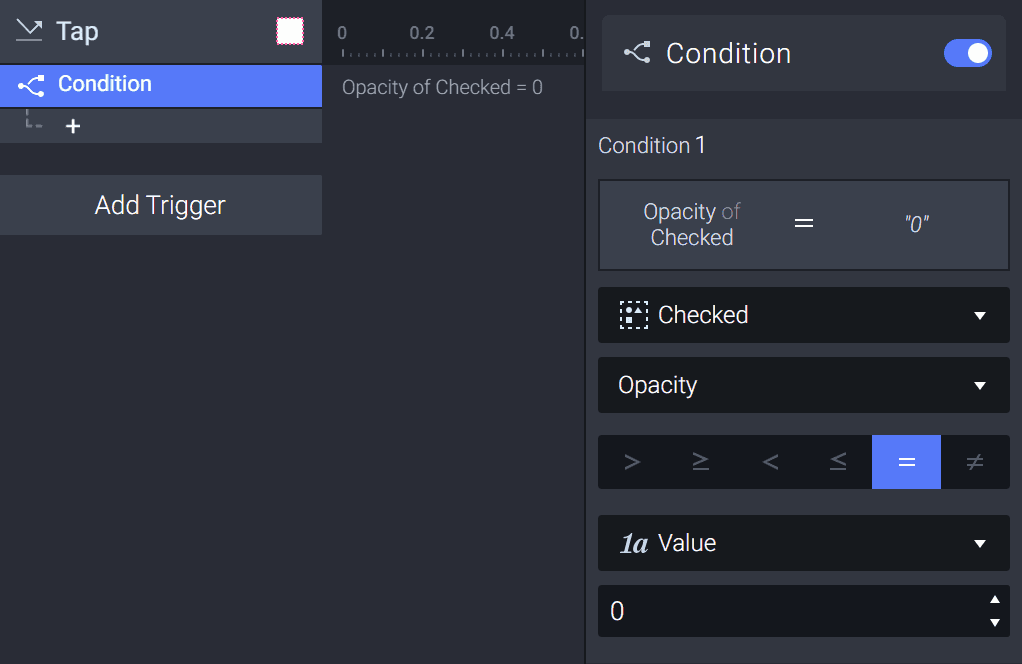
A condition means doing a logic check (such as =,<,>), and Trigger response only when the logic check is passed
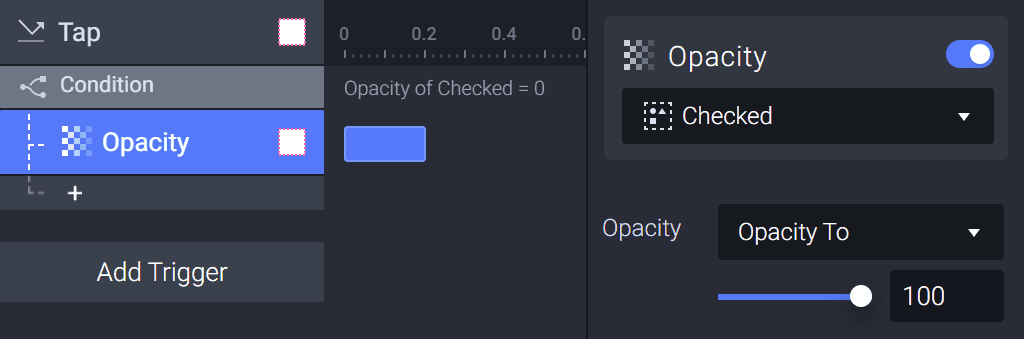
5. When the checked layer's opacity = 0, use an opacity response and set its opacity value to 100.
When the opacity value is set to 100, the checked layer appears. So when tapping the checkbox, if it's not checked, then it would be checked.
6. When the checked layer's opacity = 100, use an opacity response and set its opacity value to 0.
When the opacity value is set to 0, the checked layer disappears. So when tapping the checkbox, if it's checked, then uncheck it.
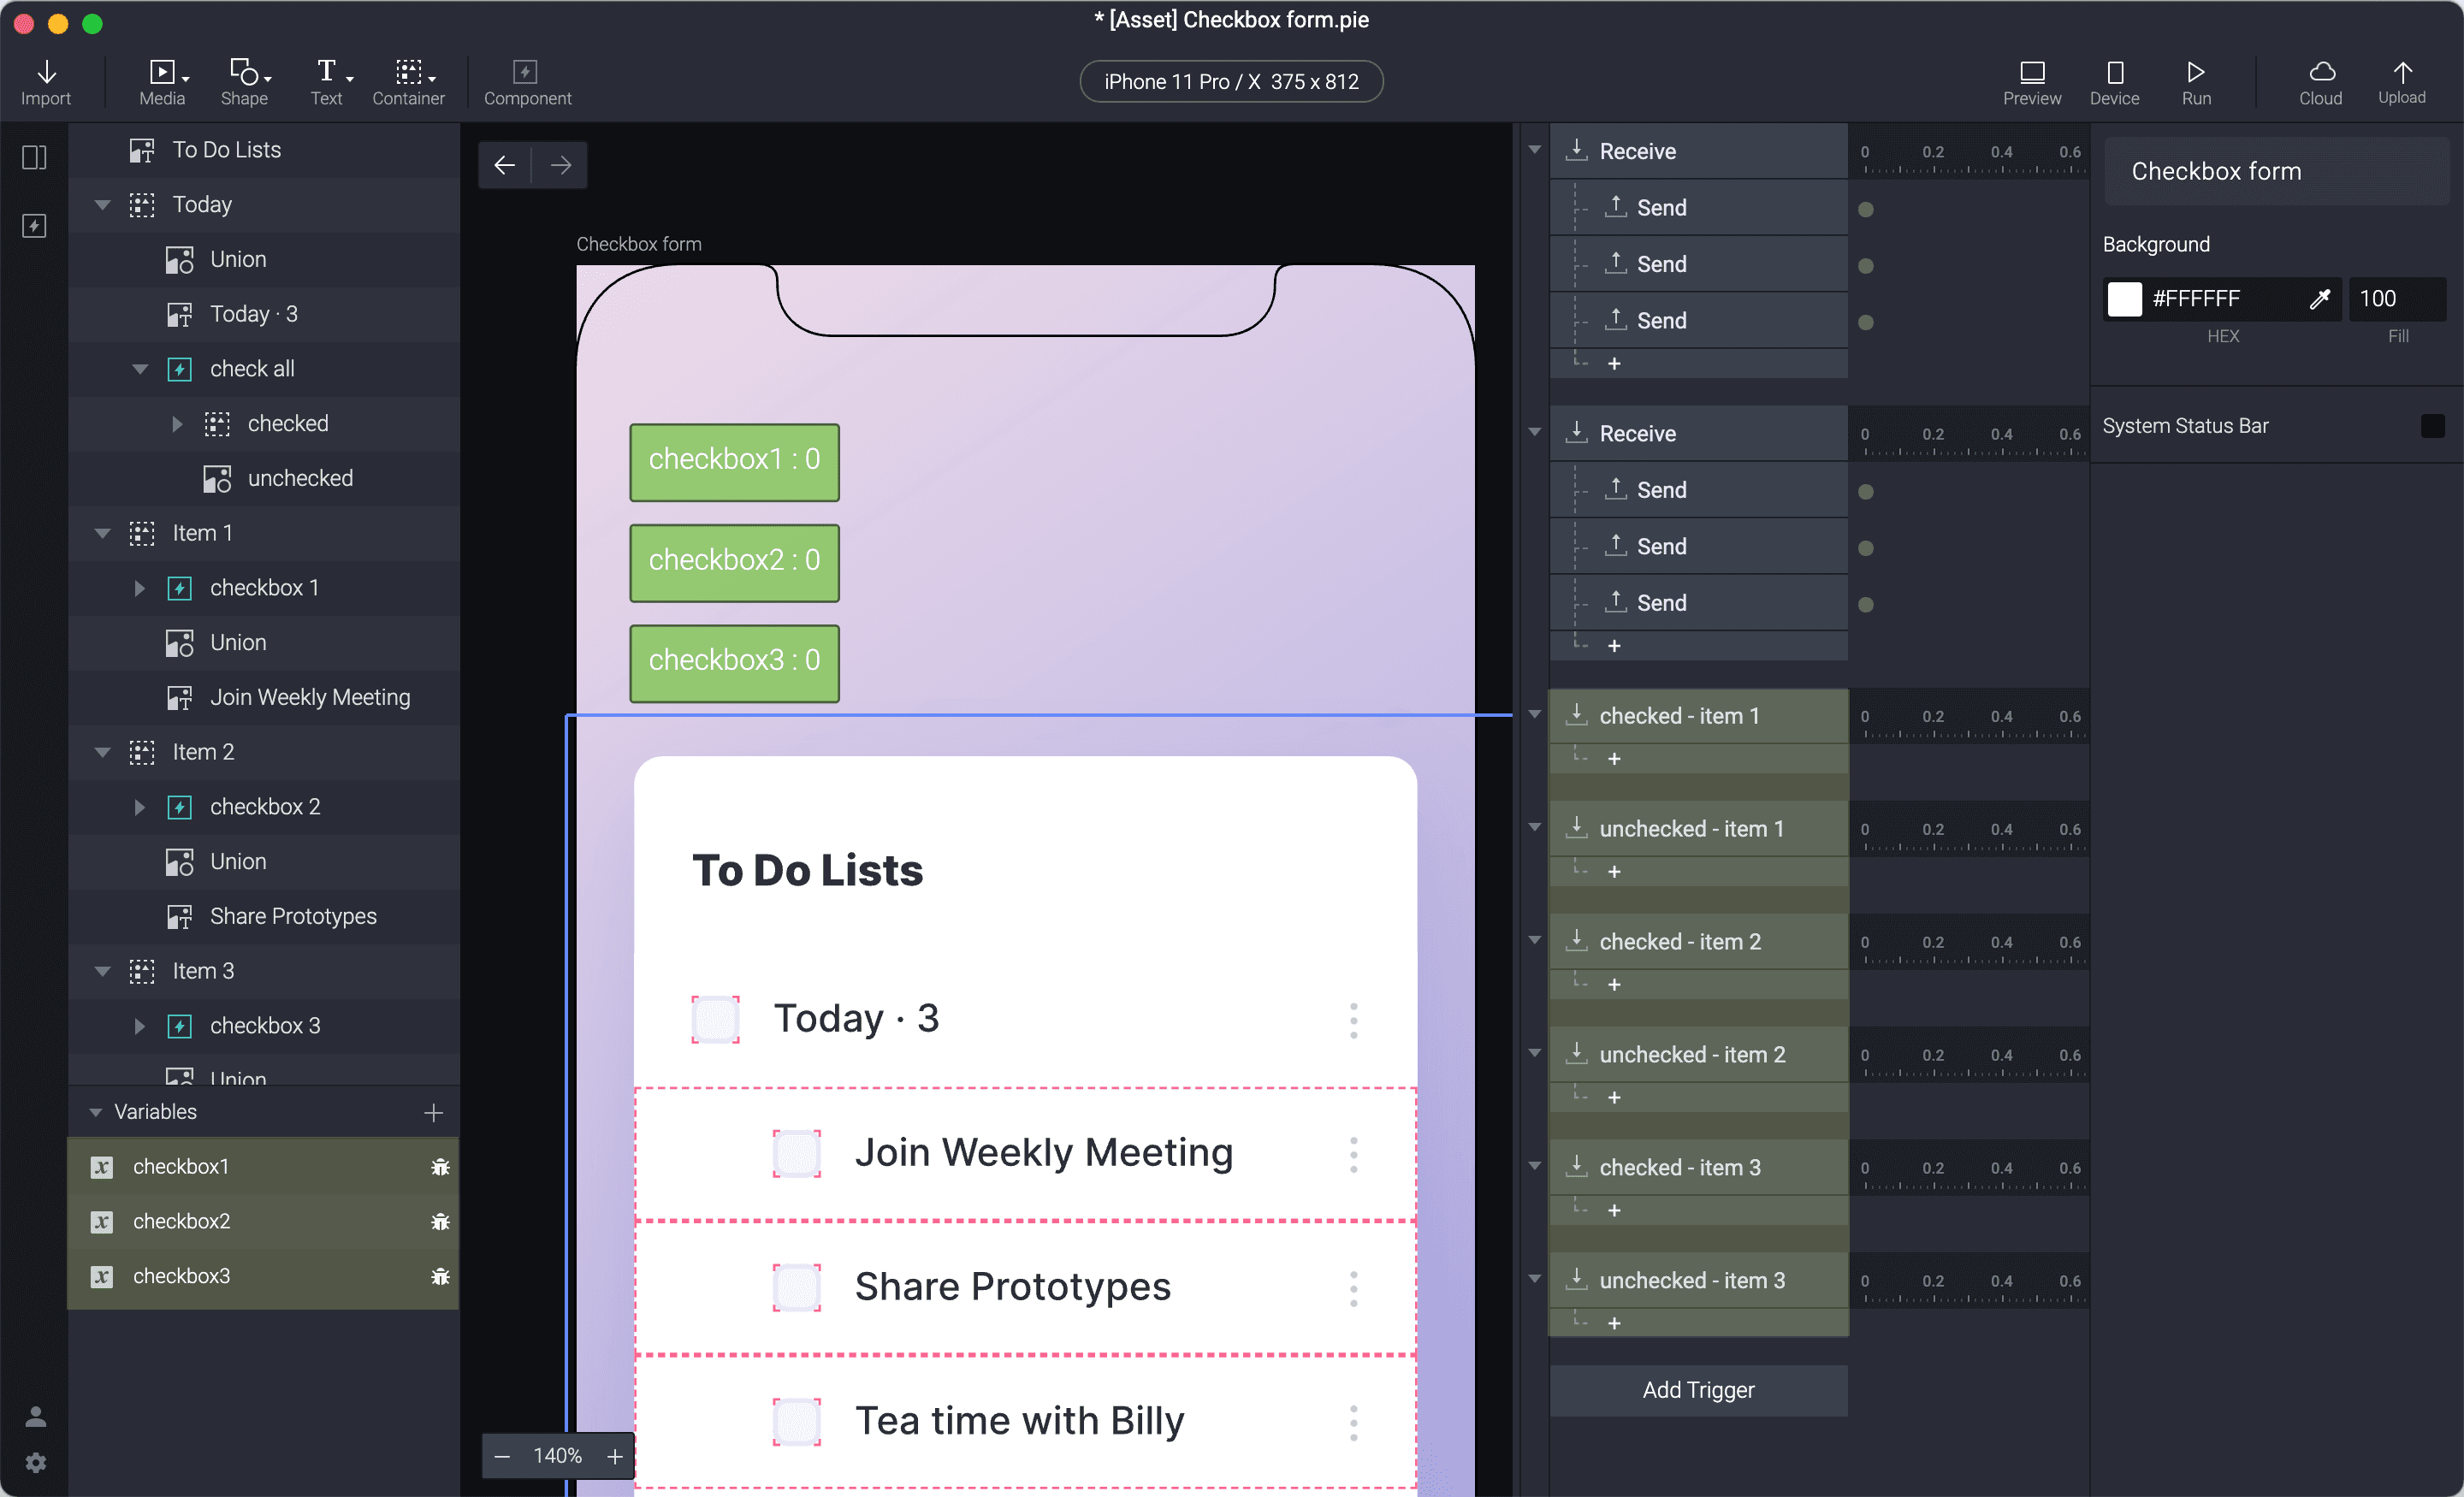
2. Add Send in the component
In the component, we need to enable both Send and Receive.
Basically, components are isolated from each other and scenes. To overcome this limitation, we need to use Send and Receive. Learn more.
We need to ensure that the checkbox items send a checked message when checked and an unchecked message when unchecked. We have to also ensure that when any of the sub-items are unchecked, then the check all item should also be unchecked. Similarly, if all the sub-items are checked, then the check all item should also be checked.
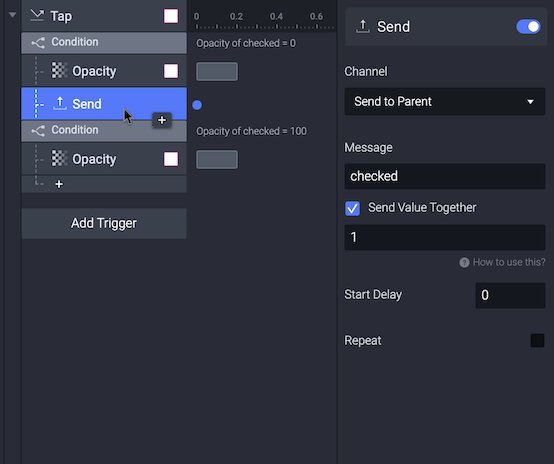
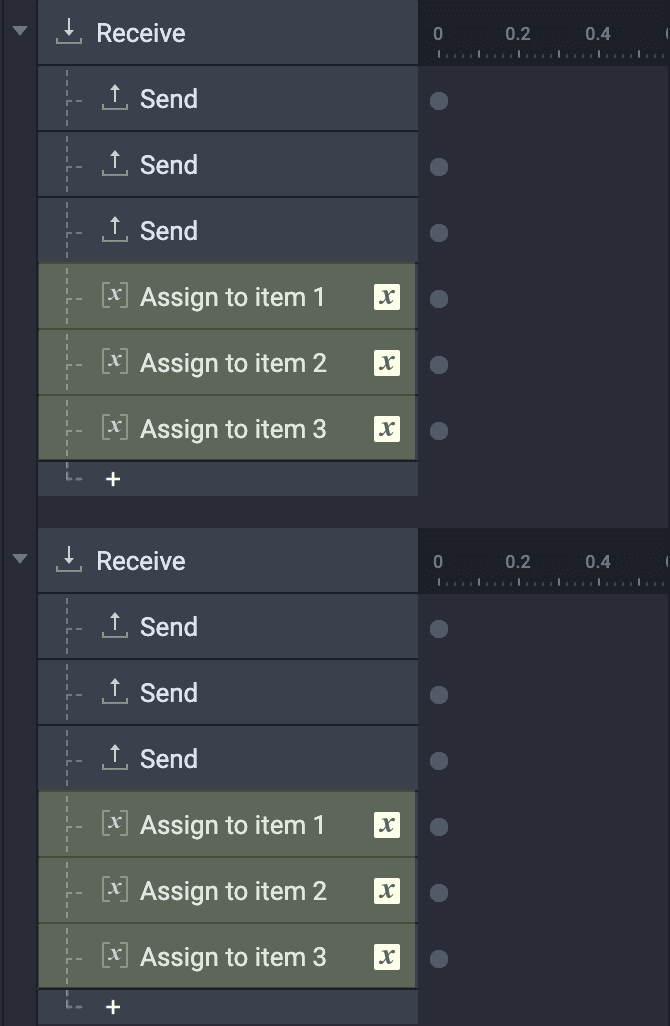
1. Add a Send response under the condition when the item is checked. Choose 'Send to parent'. And give it a message. Also, send the value together. The value can be 1. The value is used to differentiate the states of the checkbox item. We use 1 for checking the item and 0 for unchecking the item. As a user, you can use whatever number you like, as long as it is consistent throughout the entire prototype.
Use Send to parent when we have multiple instances of the same component. This time we will have 4 instances of the checkbox component in the scene. So we should use the "Send to parent" channel.
This time we're also sending values together with the Send response. We send 0 when unchecking the item, and send 1 when checking the item. In the main scene, we'll use some variables to receive these messages. These variables will be used for condition checks later on for the logic of the check all item.
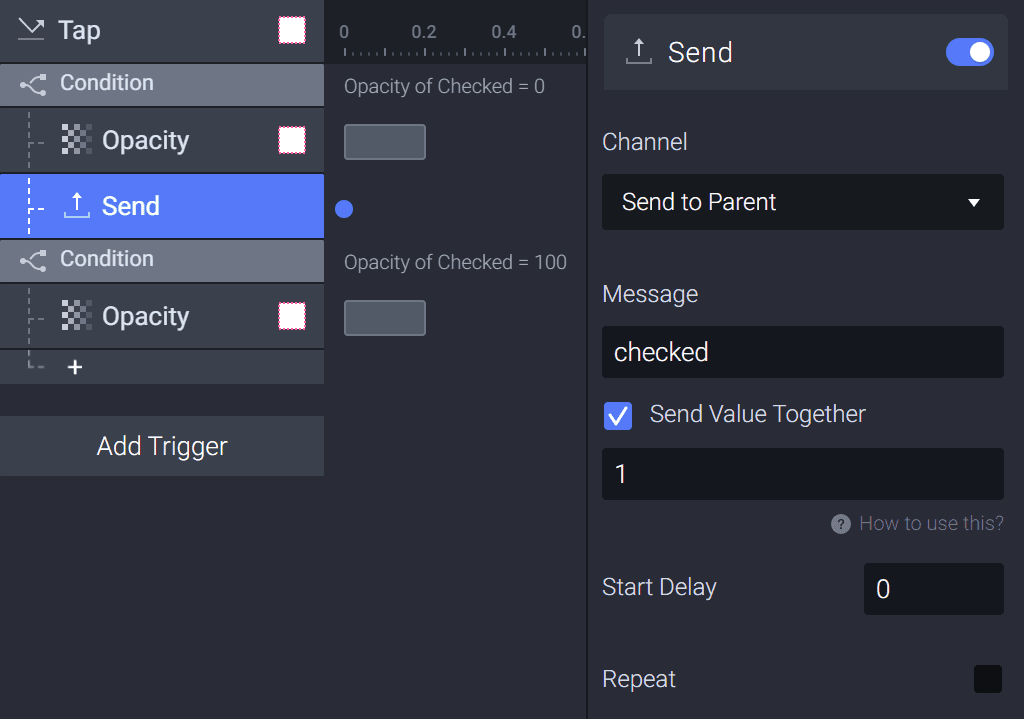
When using the Send response, we can always choose to send a value together or not
**💡 **Channel Explanation (Send to "who")
****Send to Parent: send a message from the component to a parent component or scene when there's no parent component.
Send to Child Component: send a message from the component to a child component.
Send to Current Scene: send a message from the component to the scene where the component is used.
Send to Current Component: This channel allows you to send a message that remains within the component.
Note: When we are dealing with components having the same value or just one component in the scene, we can use Send to Current Scene instead and in that case, we don't need to specify the components, and the message is sent globally to the scene. This time we want to use Send to parent because we have multiple instances of the same component in the scene and we want to know which instance we're receiving messages from.
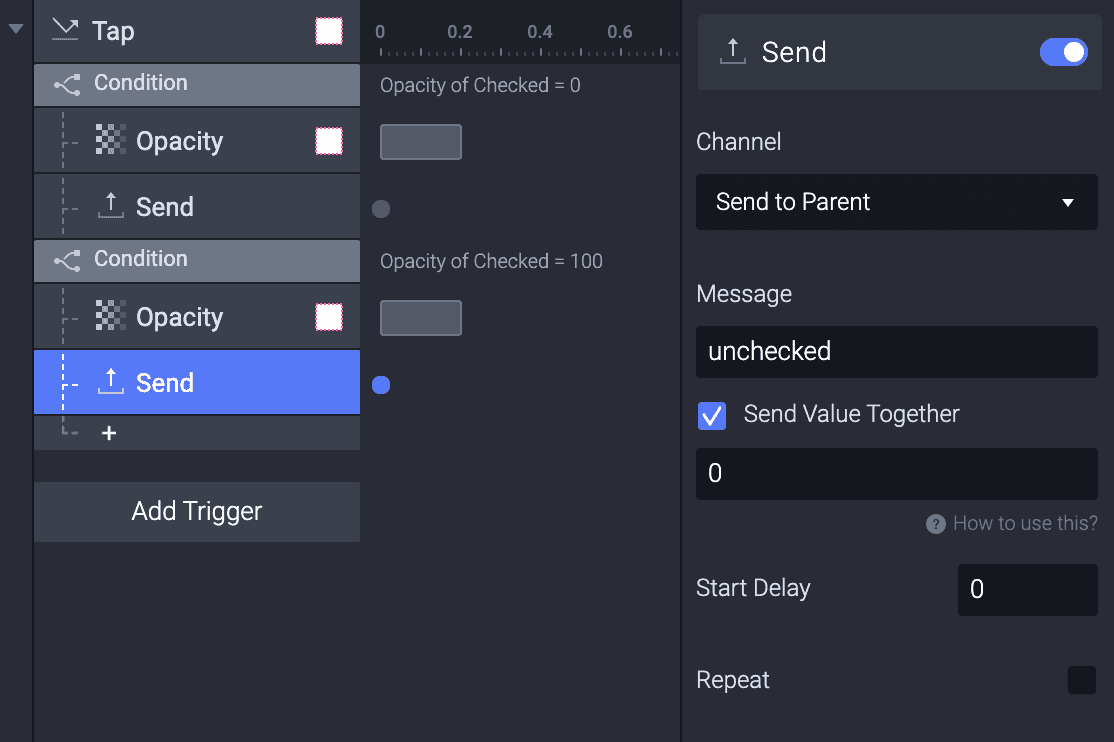
2. Similarly add a Send response under the condition when the item is unchecked. Now this time change the message to 'unchecked' and set the value to 0.
The values will be sent to the main scene and stored in variables. These variables store the checkbox state. 1 means the checkbox is checked, 0 means it's unchecked.
3. Check all items using Send & Receive
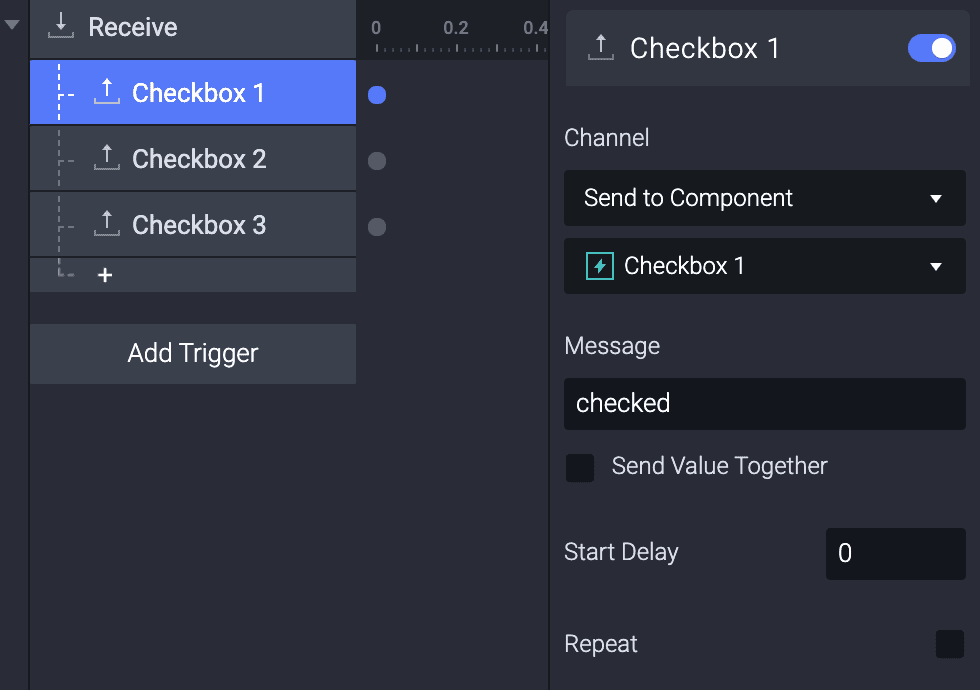
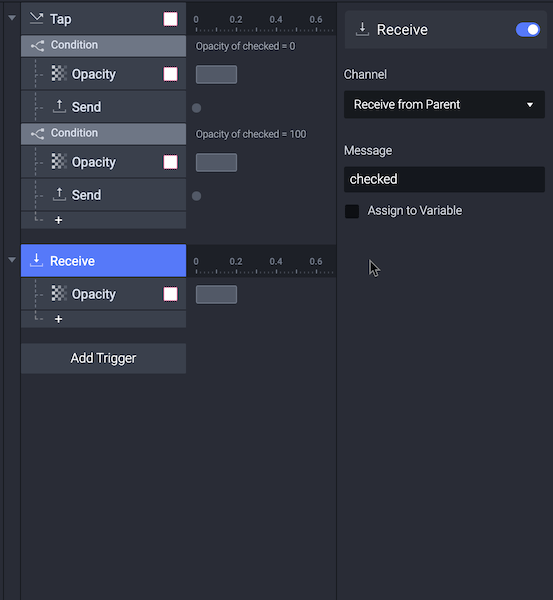
1. Go back to the main scene. Add a Receive trigger to receive the message from the check all item.
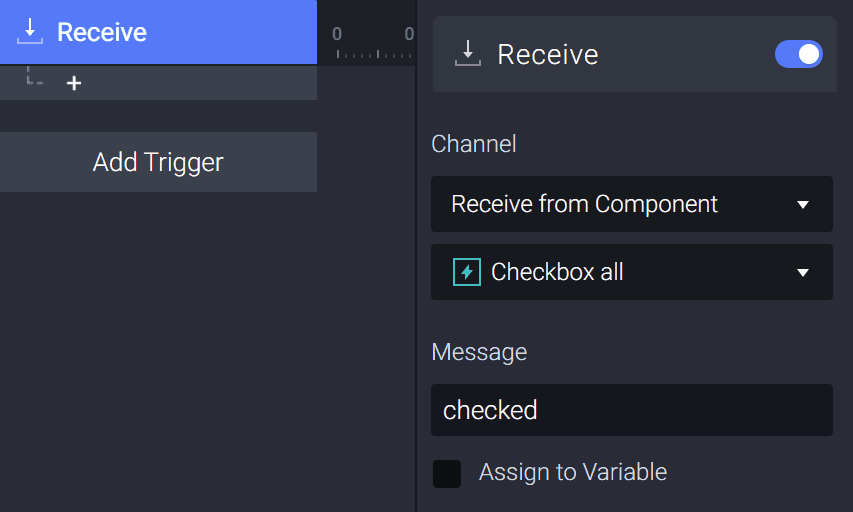
2. When the check all item receives a message called checked, all items should be checked. So we add a Send response to each item individually and give a message called checked.
The Send to component channel gives us the ability to choose which component instance to send the message to. When the check all item is checked, we need to make sure that all the sub-items are checked simultaneously. The check all item will respond to this message and check all the sub-items when checked.
3. Go back to the component. Add a Receive trigger to receive the message from the main scene. When it receives a message called 'checked', then set the checked group's opacity to 100.
Now if we check the check all items, all other 3 sub-items would also be checked.
"Receive from parent" means receive messages from the parent of the component, or the main scene if there's no parent component.
4. Uncheck all items using Send & Receive
******Go back to the main scene. **Similarly, if the check all component receives an unchecked, it will also send an **unchecked **message to each item individually.
1. Add a Receive trigger to receive the message from the check all item. The message can be unchecked.
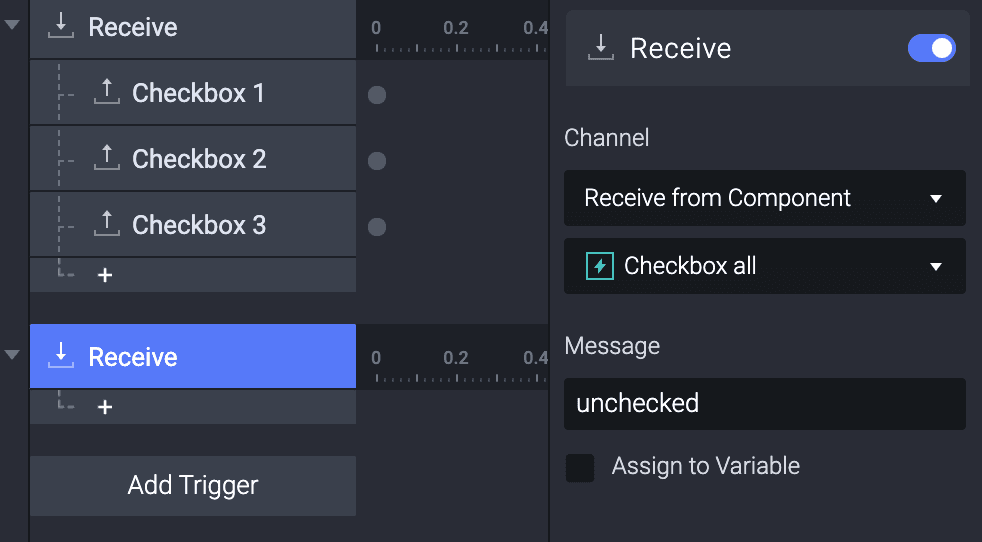
2. When the check all item receives a message called unchecked, all items should be checked. So we add a Send response to each item individually and give a message called unchecked.
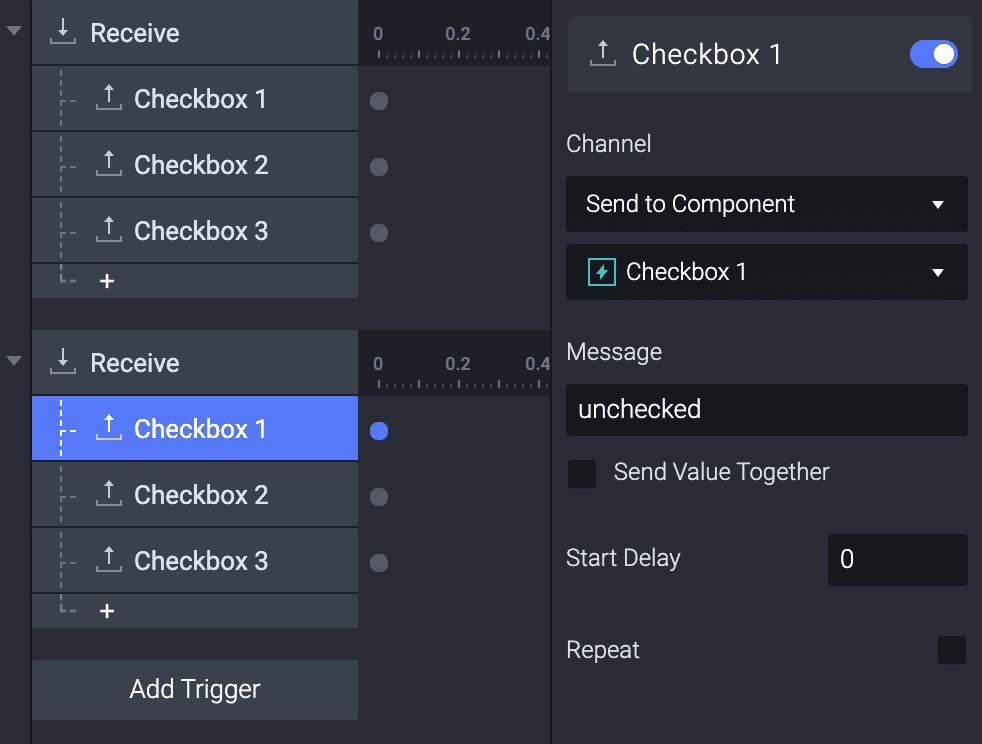
3. Similarly, if the component receives a message called unchecked, then set the **checked **group's opacity to 0.
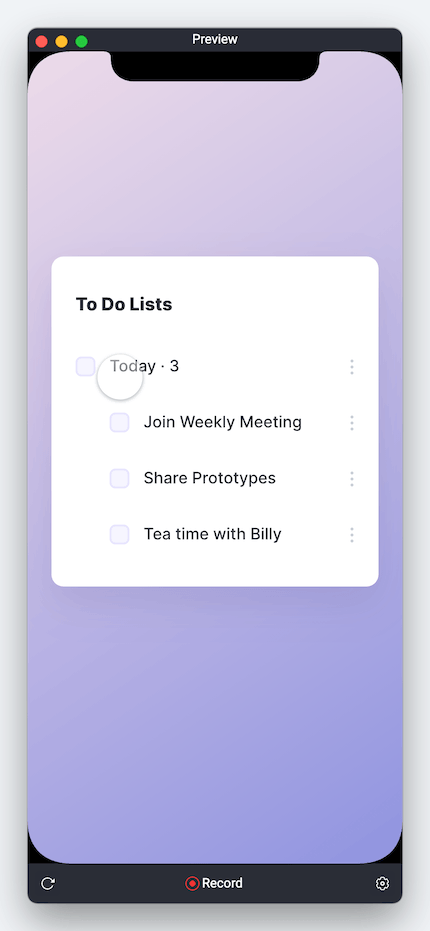
4. Let's check in the preview window. Now if we uncheck the check all item, all other 3 sub-items would also be unchecked.
5. Store checkbox state in a variable
To make the interactions more complete, we'd like the check all item to respond to all sub-items, which are:
If all sub-items are checked, check all item should also be checked
If any of the sub-items are unchecked, the check all item should also be unchecked
To make this happen, we need to know which item is checked and which item is not on the main scene. To do this, we need to use variables to store each item's state as a value.
1. Create a variable to store the value sent along with the message from checkbox 1.
When creating variables, we can create variables "For all scenes" or "For this scene". This time both would work.
To use a Receive trigger, we just need to add it from the Add Trigger menu. For every Receive trigger, we can choose the "receiving" channel, the target component we're receiving from, and assign a value to the variable.
To store value to a variable, we just need to check the Assign to Variable option and choose the variable we want to assign a value to.
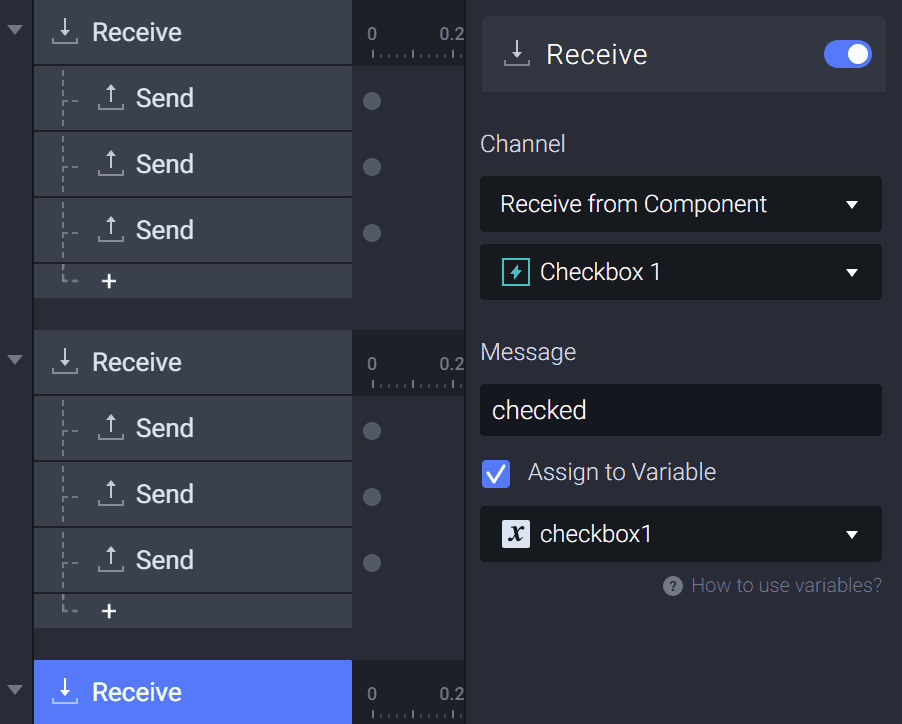
Store the "checked" state in the variable "checkbox1"
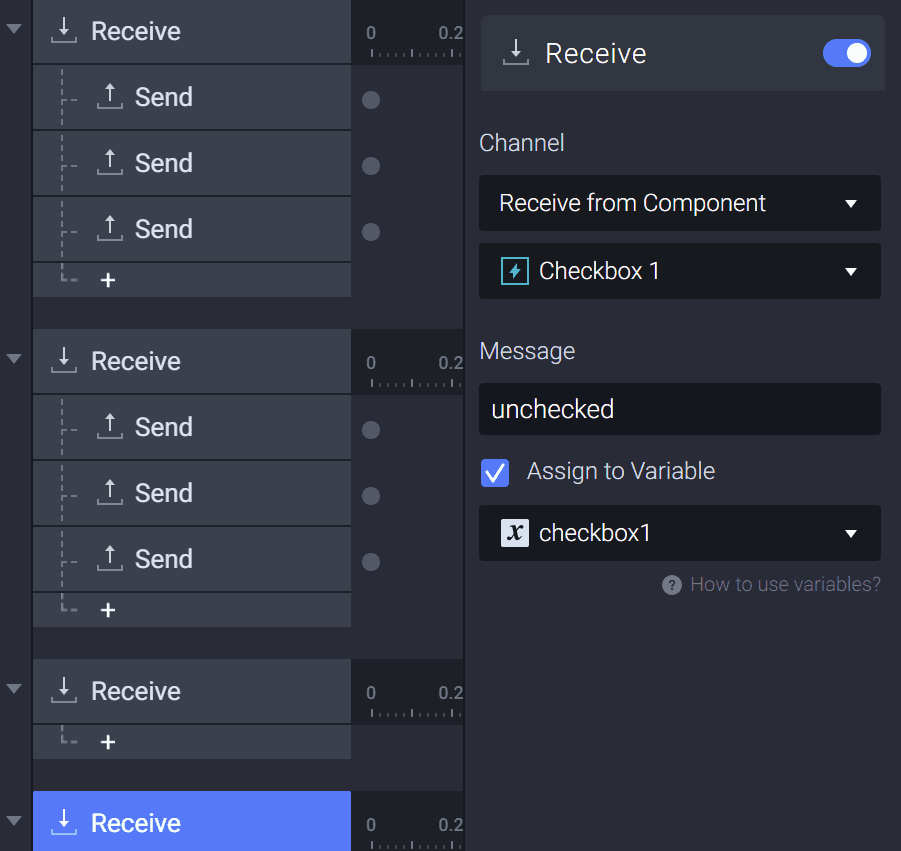
Store the "unchecked" state in the variable "checkbox1"
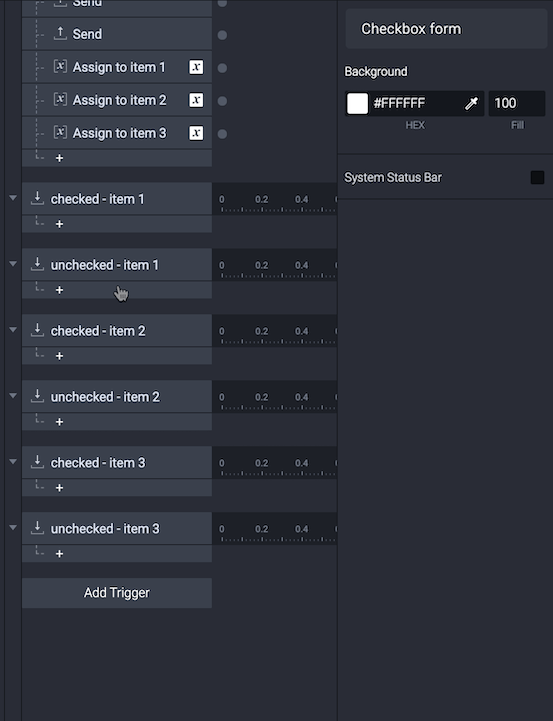
2. Using the same method, we can apply this to the other 2 items. All together we need 3 variables and 6 receives to store the check items' states.
When selecting multiple Triggers, we can press ctrl/command + G to group these Triggers
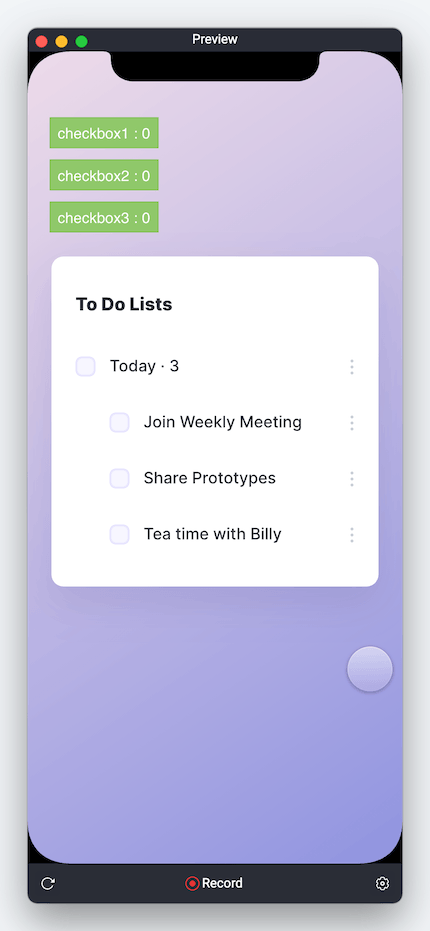
3. Let's check in the preview window. You can notice that with every check and uncheck the variable value changes. If any sub-item is checked, then the corresponding checkbox item's variable value updates to 1.

4. However using this method, when we try to use the **Today **item to check or uncheck all, the value stored in the variables won't change. To fix this, we need to manually assign values to each variable.

5. Using the same method, we have to assign values to 3 items individually. Now the variables match the states of variables.
6. Let's check in the preview window. Now if the check all item is checked, then all sub-items are checked and return a value of 1. If the check all item is unchecked, then all sub-items are unchecked and return a value of 0.
6. The check all item responds to all sub-items
1. To uncheck the parent item when any sub-item is unchecked, we can send the message to the check all when any sub-items receive an unchecked message.
This means that if we just uncheck any sub-item, then the check all item gets unchecked. To make this happen, we will make every sub-item send an unchecked message to the check all item when it's unchecked.
The following steps will explain how to do:
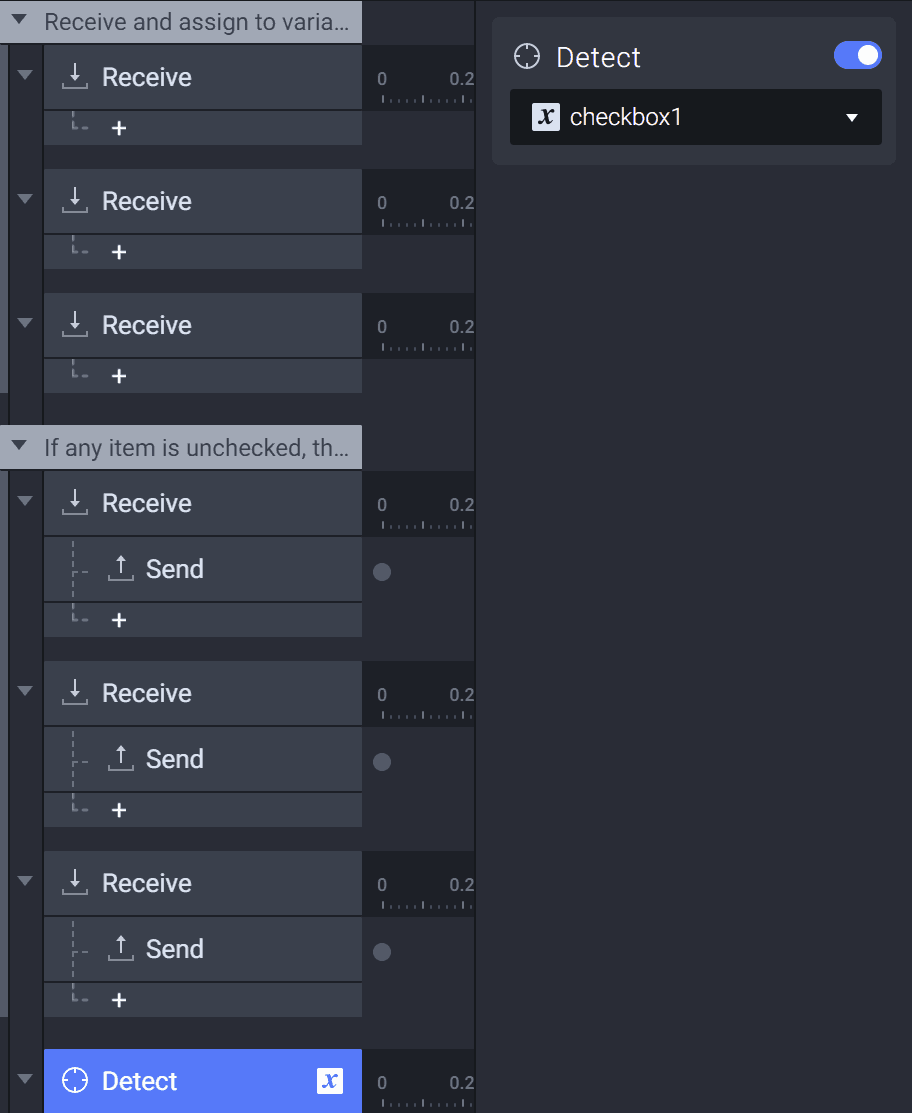
When all sub-items are checked, the check all item will also be checked. Unlike unchecking the check all item with any sub-item, we will check every time if all sub-items are checked whenever any sub-item got its status changed. We will use the Detect trigger so that every sub-item has the potential to check the check all item. To do this, we need to monitor the value of every variable. We will use the Detect trigger to monitor the changing value. (In the Detect trigger, a response is activated when a layer property or variable changes.)
1. Add a **Detect **trigger to variable checkbox1.
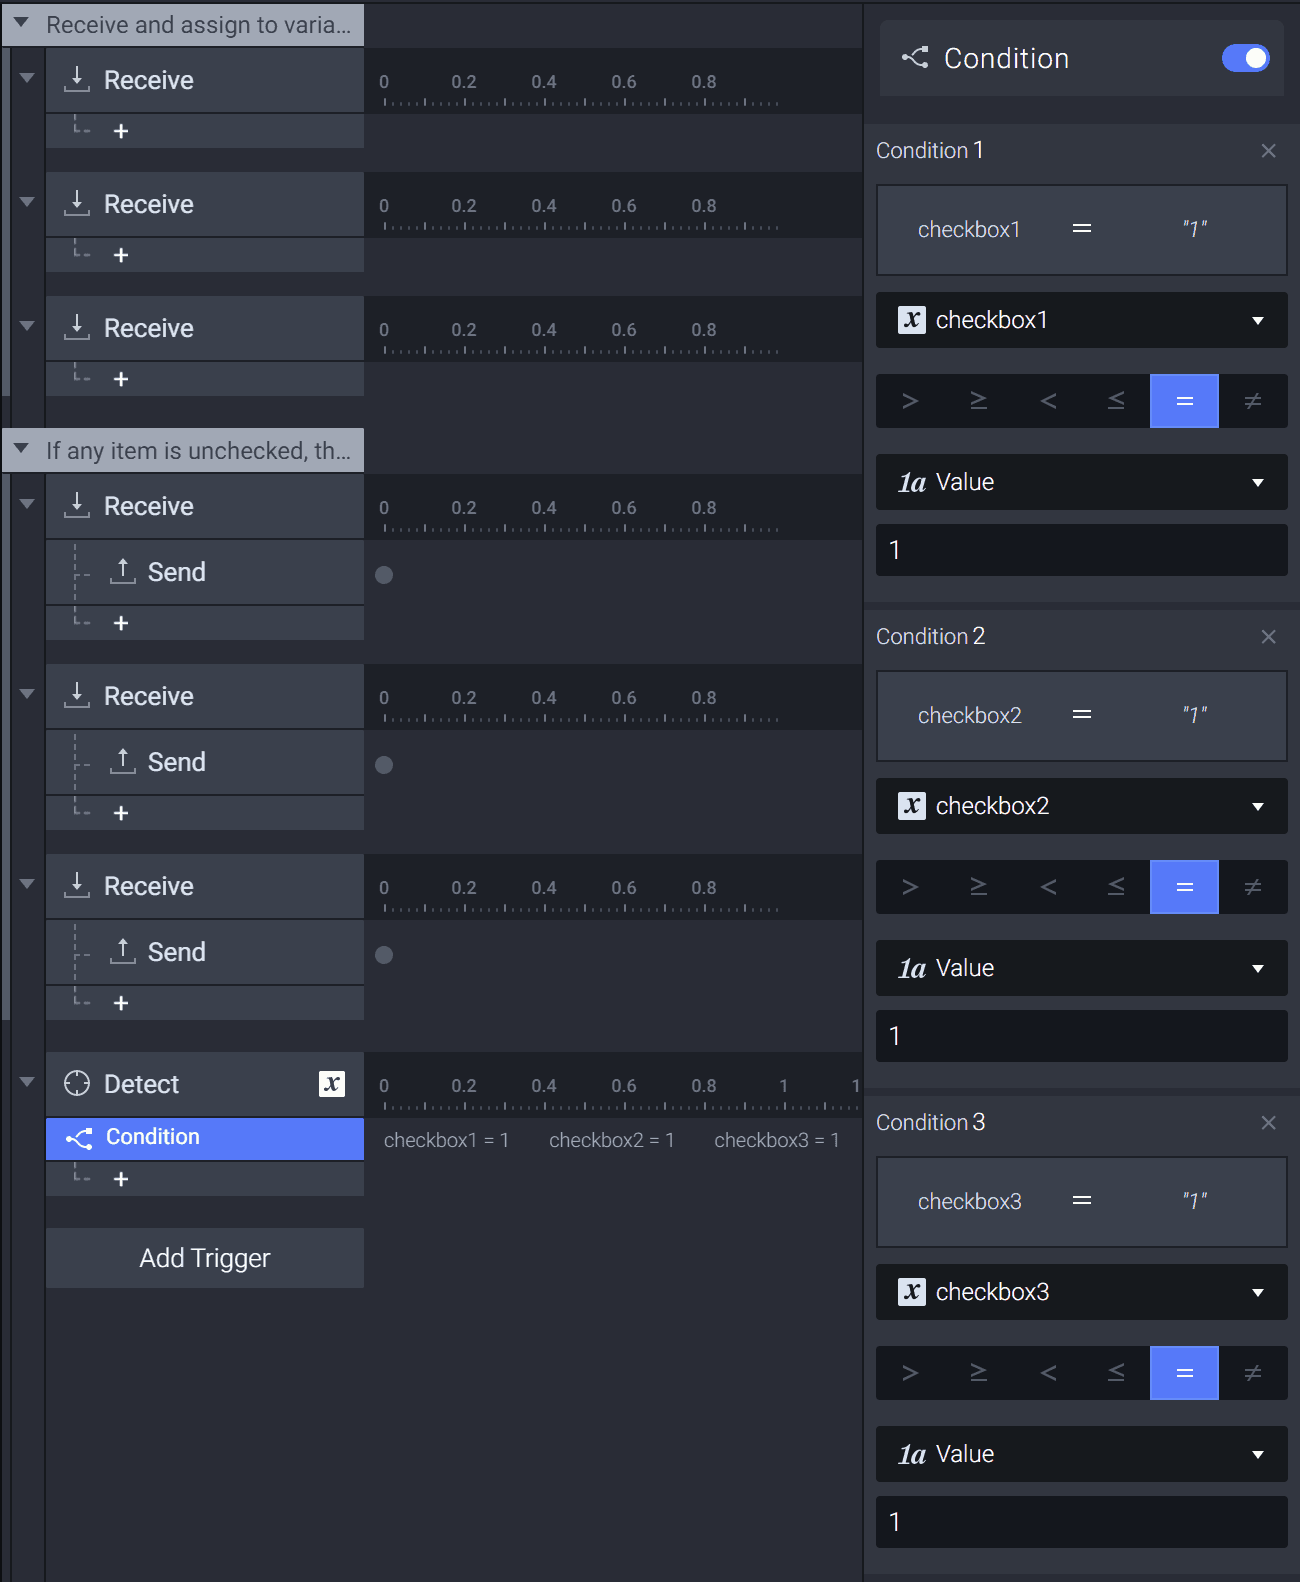
2. Add a condition to when all the variables are equal to 1.
3. Send a checked message to the checked item.
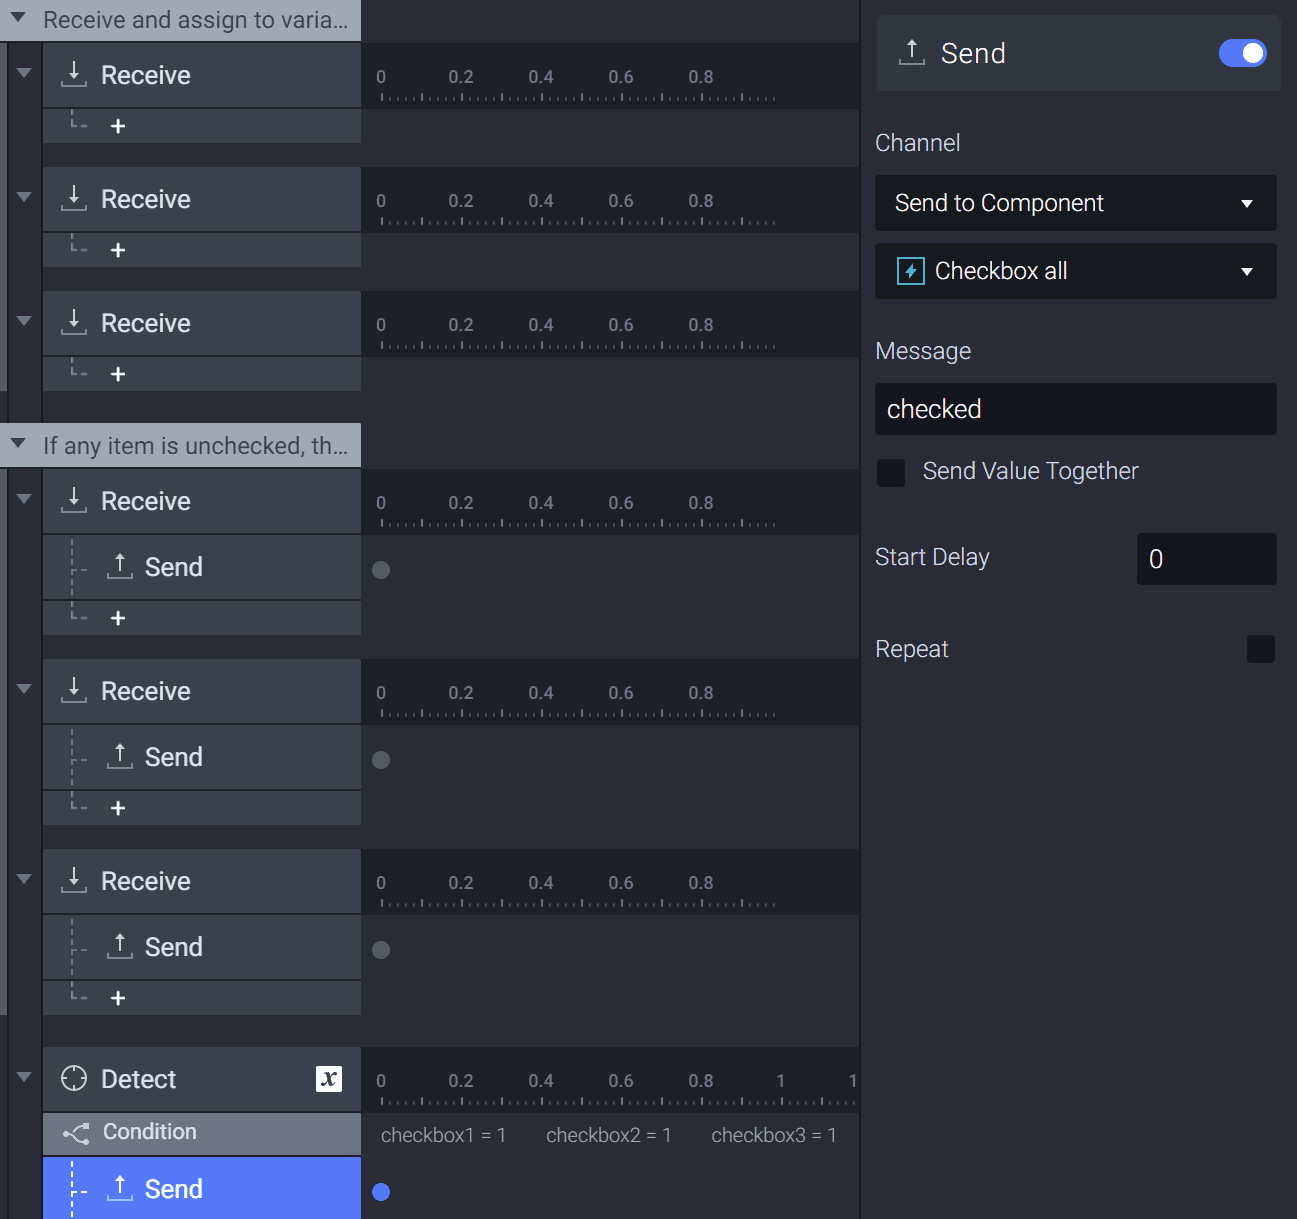
4. We also need to repeat the step 3 times to apply to each item.
When any sub-checkbox state variable changes, it would check if all 3 sub-checkbox state variables are equal to 1 (all 3 sub-checkboxes are checked). If they are, then we have to send a message to check the check-all checkbox.
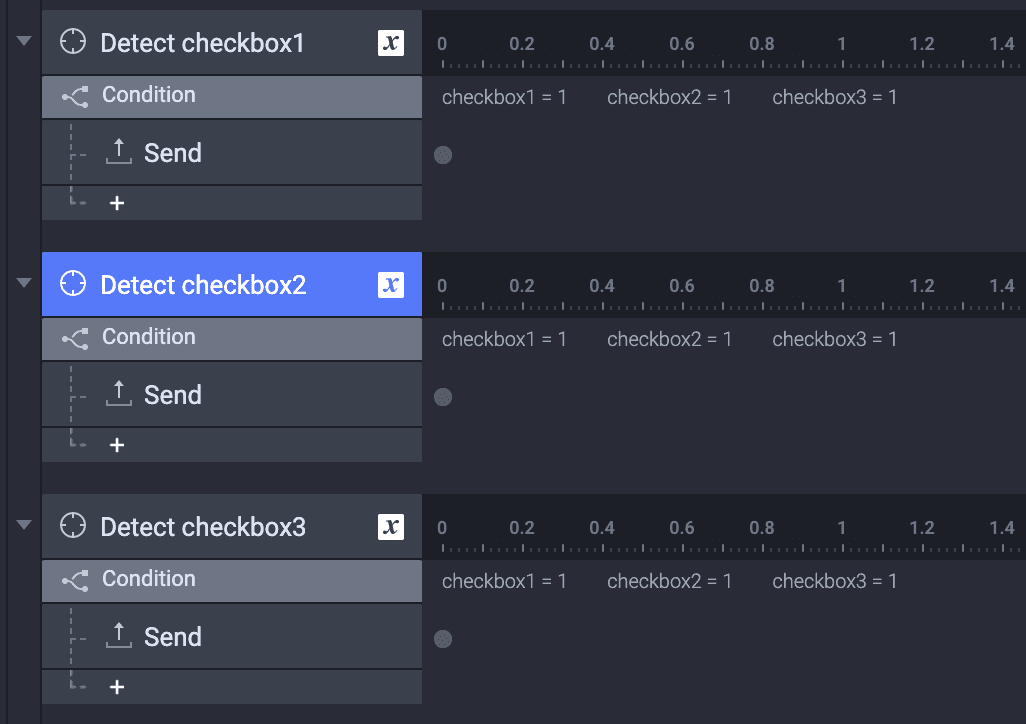
These three triggers have the same response. The only difference is the object of Detect trigger
5. Let's check in the preview window. You can notice that when you check Today all the sub-items under it get checked. If you uncheck any of the sub-items, then Today is unchecked as well.
Congratulations!
Hurrah! Now you've learned how to check/uncheck items in a checkbox form.


