

Overview
What's the typewriter effect?
What you'll learn today
Before you start
Step-by-step instructions for the typewriter effect
Unlock more prototyping skills
What's the typewriter effect?
The typewriter effect gives an illusion of the text being typed onto the screen which can make the app or website more engaging to users. It is used for various purposes such as making landing pages, call-to-action elements, personal websites/apps, and code demonstrations.
With ProtoPie, this effect can be easily achieved using predefined formulas, variables, and text functions such as “left” and “length”. By the end of this tutorial, you'll master your ways around the typewriter effect.
Follow the written tutorial for the basic steps, or watch the video tutorial below for an enhanced version with cursor blinks that will help you achieve an even more realistic feel of the typewriter effect.
Sign up for the latest prototyping tips.
What you'll learn today
In this prototyping lesson, you will:
Understand the formula “left” and “length”
Create variables to store your text string and count characters
Reveal the text gradually to achieve the typewriter effect
In the end, you'll be able to make something like this!

Before you start
Before moving on to the tutorial let’s understand the formula “left” and “length” and why it is used.
“Left” is used to extract a part of a text from the left side based on a specific number of characters.
left(source:TEXT,count:NUMBER)→ TEXT
In the following example, the “left” formula extracts the first 3 characters from the left.
left("hello", 3)→ “hel”
“Length” is used to count the number of characters in a text.
length(source:TEXT)→ NUMBER
In the following example, the “length” formula reflects 5 characters in the text.
length("hello")→ 5
Learn more about formulas.
Step-by-step instructions for the typewriter effect
1. Create variables to store your text string and count characters
💡 Why use variables again?
Think of variables as "baskets" that store values. Store any data that you might want to use later, e.g., a name, password, or account balance.
In this case, creating a variable for text string can help you quickly reuse or change the values in the future. A variable used to count characters can help you understand how many characters have been revealed.
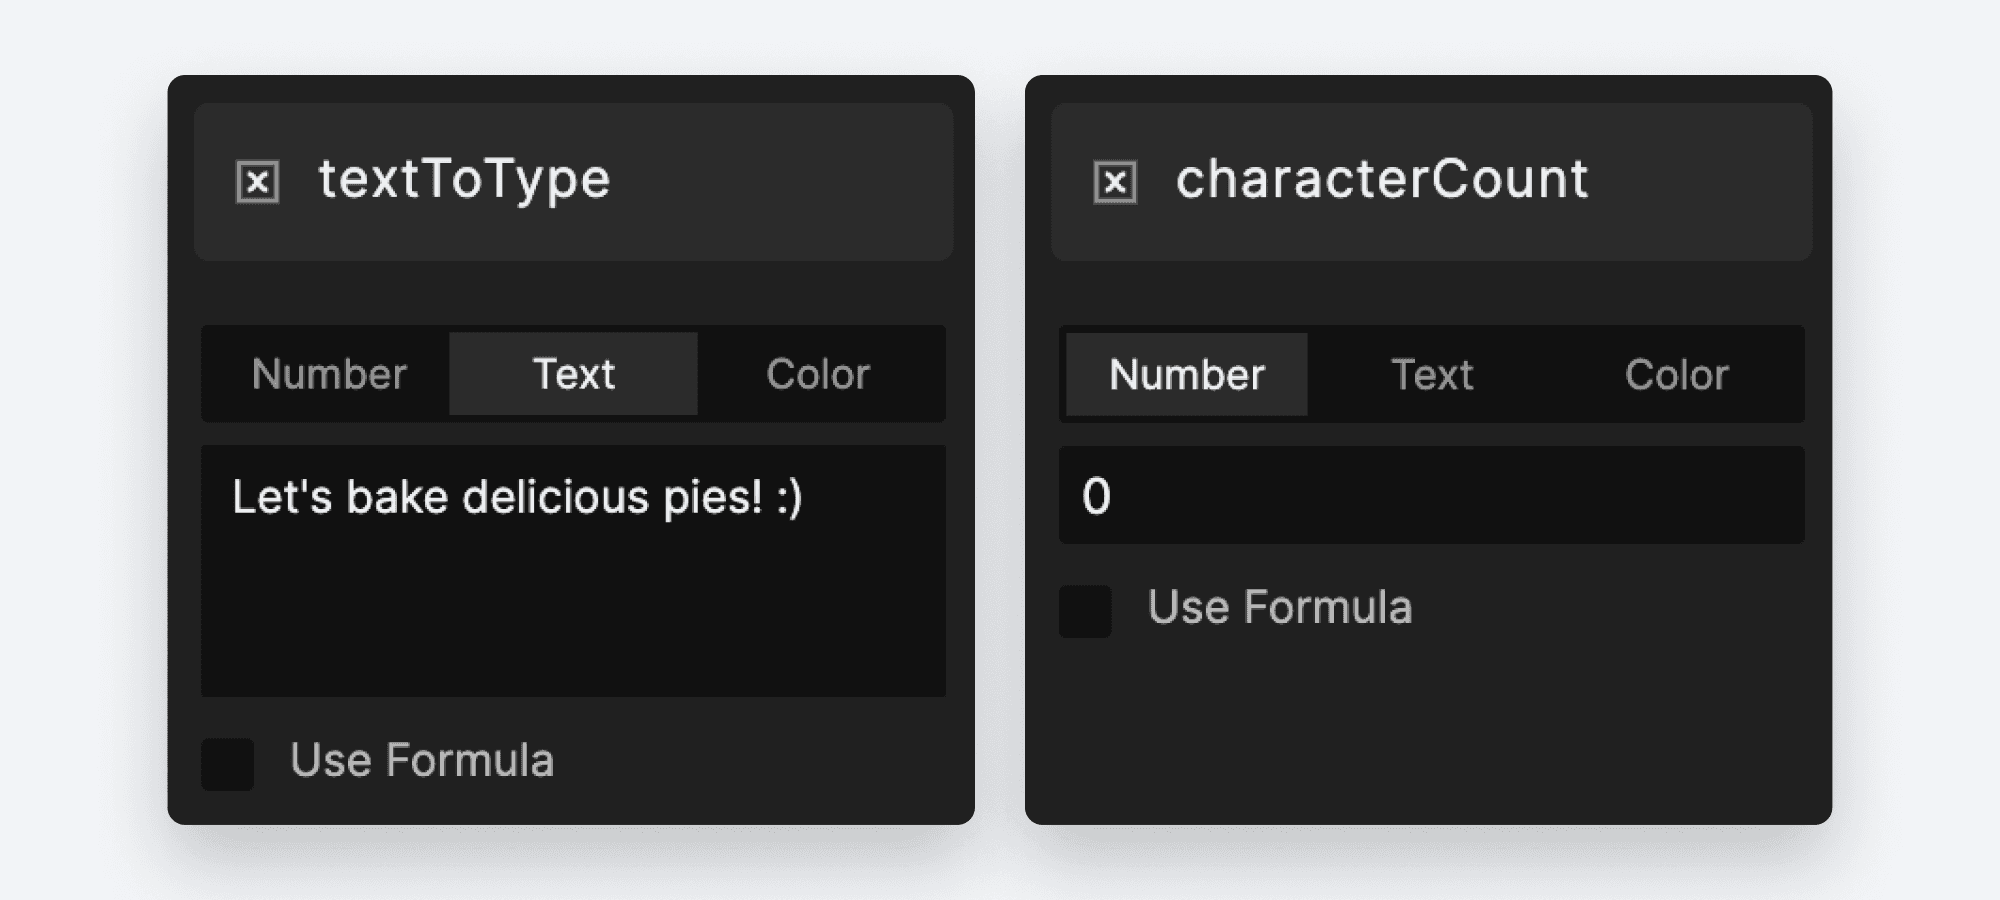
First, create a variable For this Scene called “textToType”. Change the type from Number to Text.
This variable stores the text you are going to type.
Create a variable For this Scene called “characterCount”.
This variable helps you count the characters of your text that have been revealed.
Set the default values for your variables.
textToType: Let's bake delicious pies! :)
(or anything you want as per your prototype)characterCount: 0
💡 We set the characterCount as 0 because we want it to start from 0 and increase by 1 until it reaches the value of the length of textToType.
Learn more about variables.
2. Reveal the text gradually
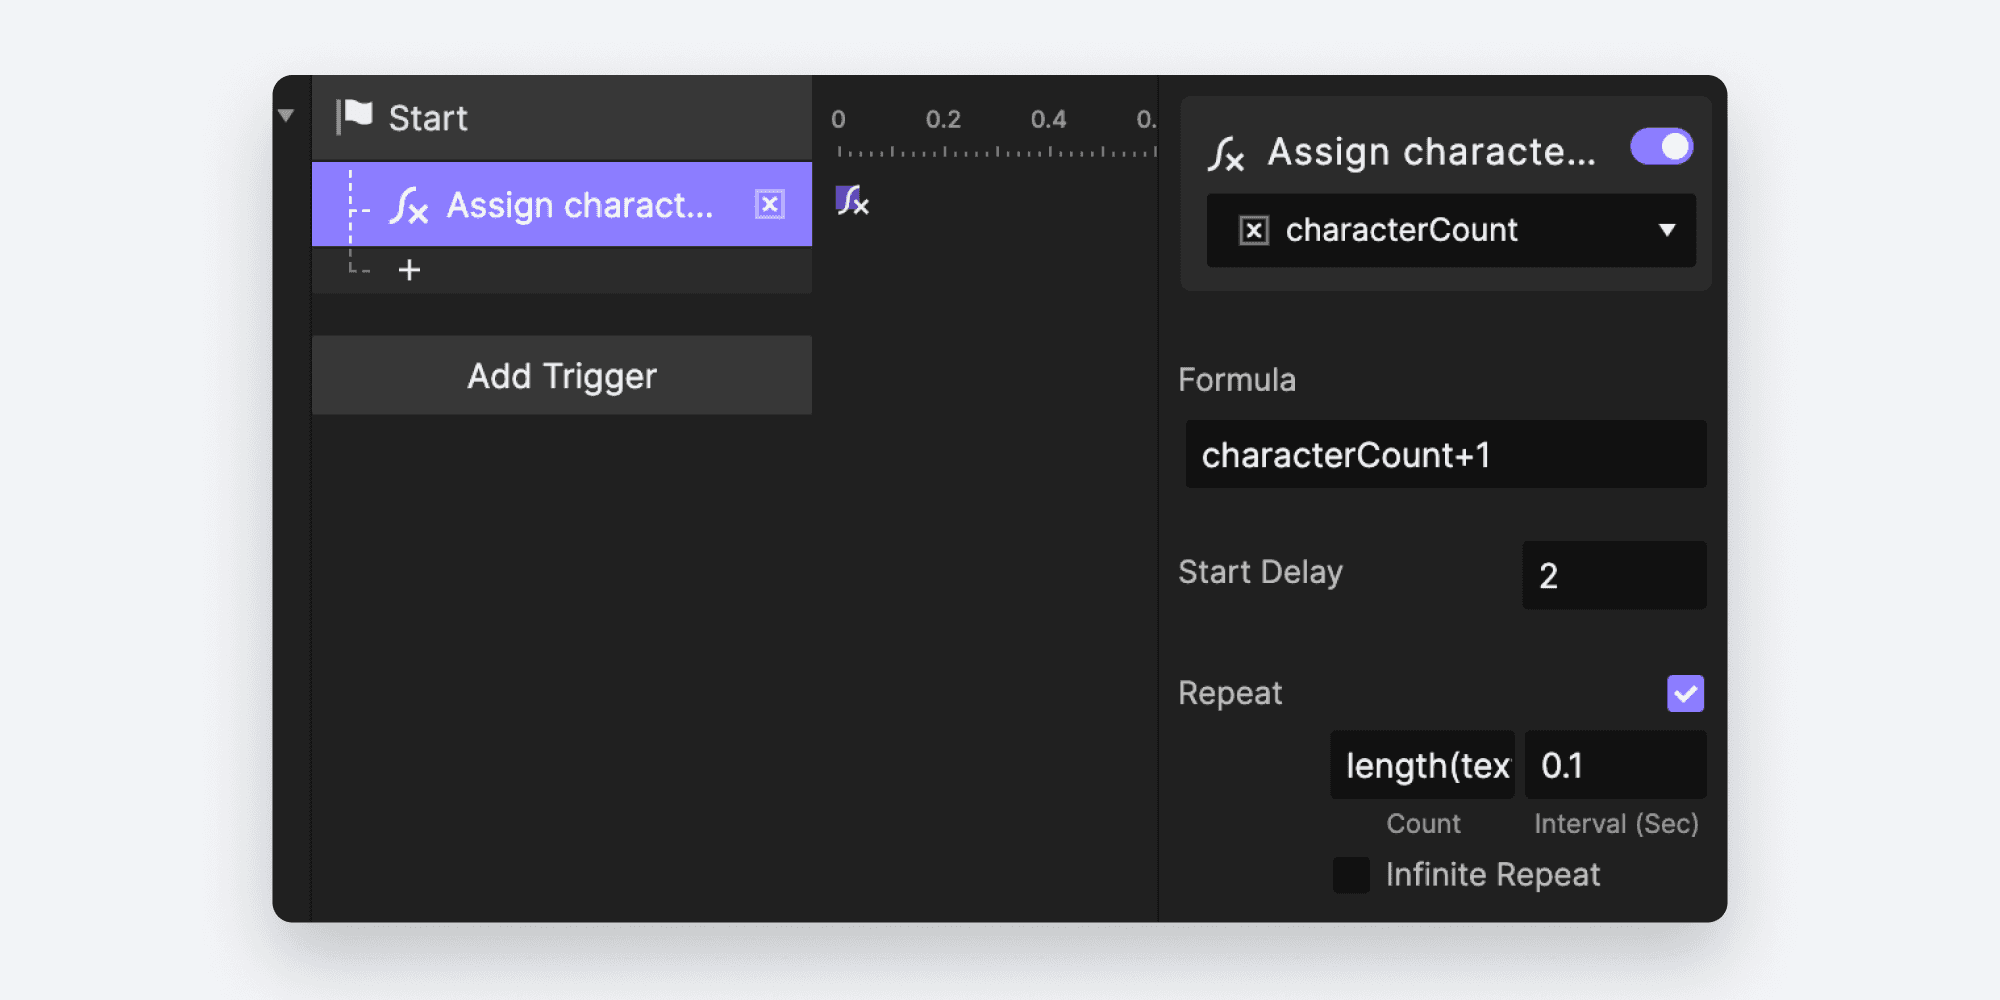
Create a Start trigger. Create an Assign response linked to the variable “characterCount”.
Set the Assign responses with the following properties:
Use formula: characterCount+1
This helps you reveal the next character
Start Delay: 2s
This gives you a small delay before the text is revealed to make it look realistic.
Repeat Count: length(textToType)
This helps you keep revealing the next character until all characters are revealed. Here, the number of characters to be revealed in the text “Let's bake delicious pies! :)” is 29 characters. In other words, the Assign response will repeat 29 times.
Interval: 0.1s
This keeps the revealing interval between every character as 0.1s.
Create a Detect trigger for the variable textCount.
Since the value of textCount is continuously changing, we can use the change to trigger the Detect trigger which changes the text.
Add a Text response to the Text layer. Use formula
left(textToType,characterCount).
Here the formula will be reflected from
left("Let's bake delicious pies! :)", 1),left("Let's bake delicious pies! :)", 2), ...., untilleft("Let's bake delicious pies! :)", 29)
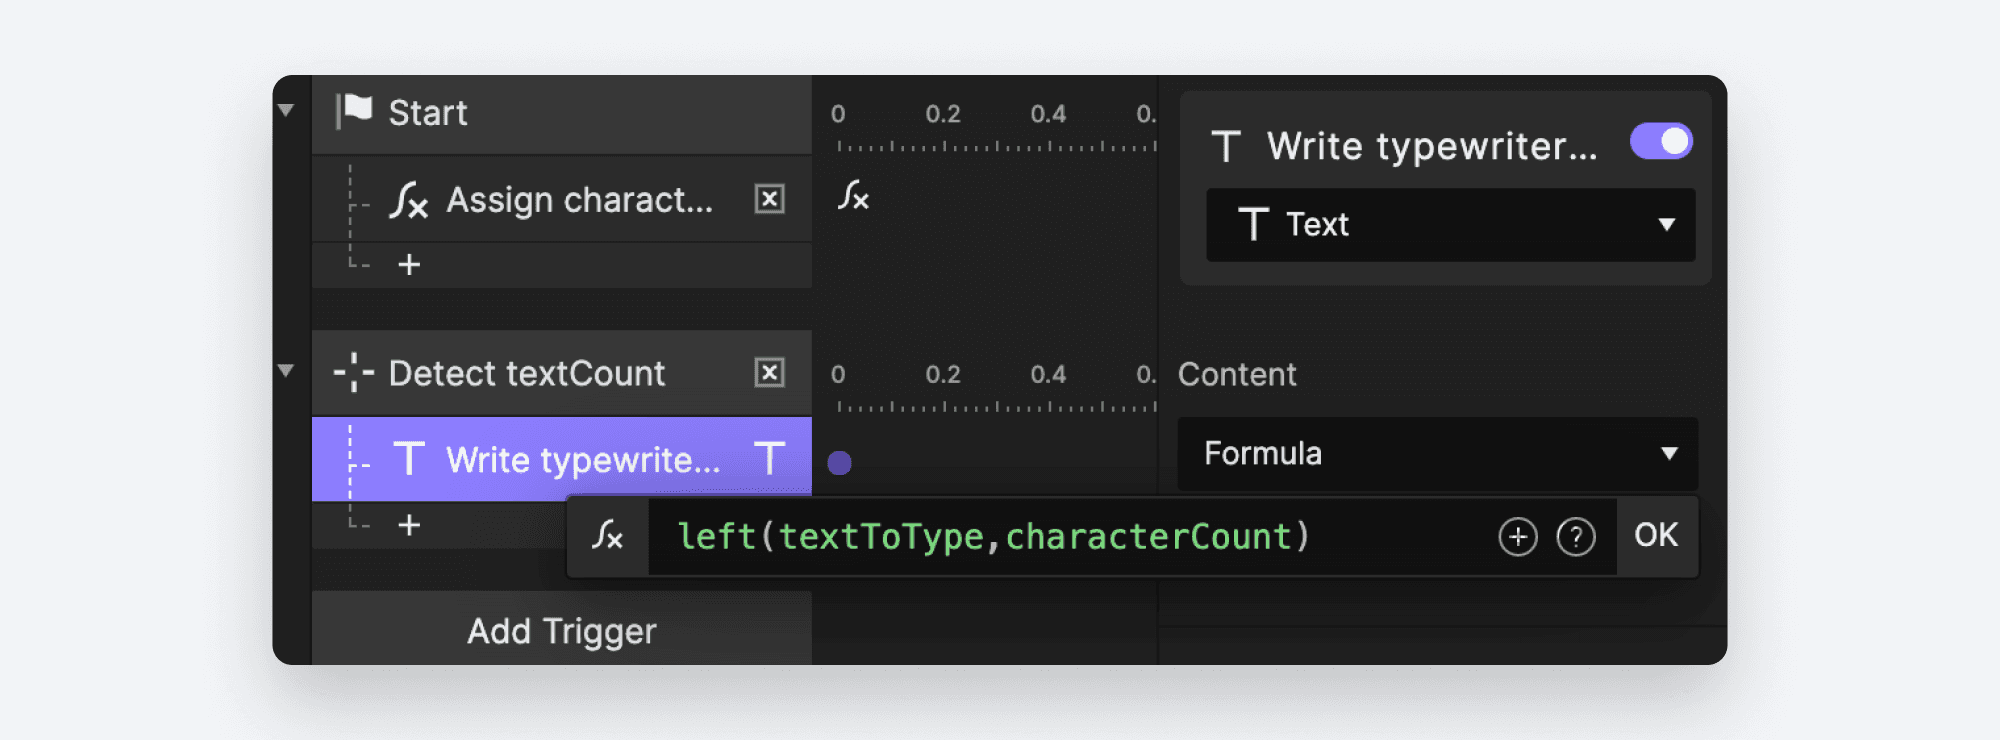
💡 By combining the formula and variable, you extract a part of your text string from the left side based on the value of the characterCount variable. As the value of characterCount changes, your text layer gets repeatedly updated. Thus, you have a typewriter effect! Well done!
Unlock more prototyping skills
Now that you have mastered the typewriter effect using variables and formulas through these simple tricks, it's time to master all the prototyping basics. Sign up for our free classes at ProtoPie School and earn a certificate!


