

Introduction
The advent of reprogrammable and specialized device technology has blurred the line between how software and hardware work together. This had a transformative impact on interface designs and how they redefine consumers’ digital experiences in the modern era.
Here at ProtoPie, one of our missions is to help bring time- and cost-savings not only to product designers, but also the creatives within the Maker community. That’s why we’ve joined forces with blokdots to develop our brand new collaboration feature. This guide will help you get started on how to create your first software and hardware implementation in a prototype without needing a single line of code!
Protopie and Blokdots: Same Philosophy (But for Different Applications)
ProtoPie is a hi-fi prototyping tool for mobile, web, dashboard, digital screens, etc. blokdots, on the other hand, is a no-code tool for prototyping with Arduino. Both are similar in their no-code approach when prototyping complex, high-quality hardware interactions in a short amount of time. By using ProtoPie and blokdots together, you’ll gain the best of both worlds. ProtoPie will take care of the software interactions—while blokdots will handle hardware interactions.
You can easily do this by yourself. But first, let’s get you up to speed with the key tools required for this collaboration:
ProtoPie Studio is for creating interactions.
ProtoPie Player is for running prototypes on smart devices.
blokdots is for hardware prototyping.
Pie and blokdots communicate via socket.IO.
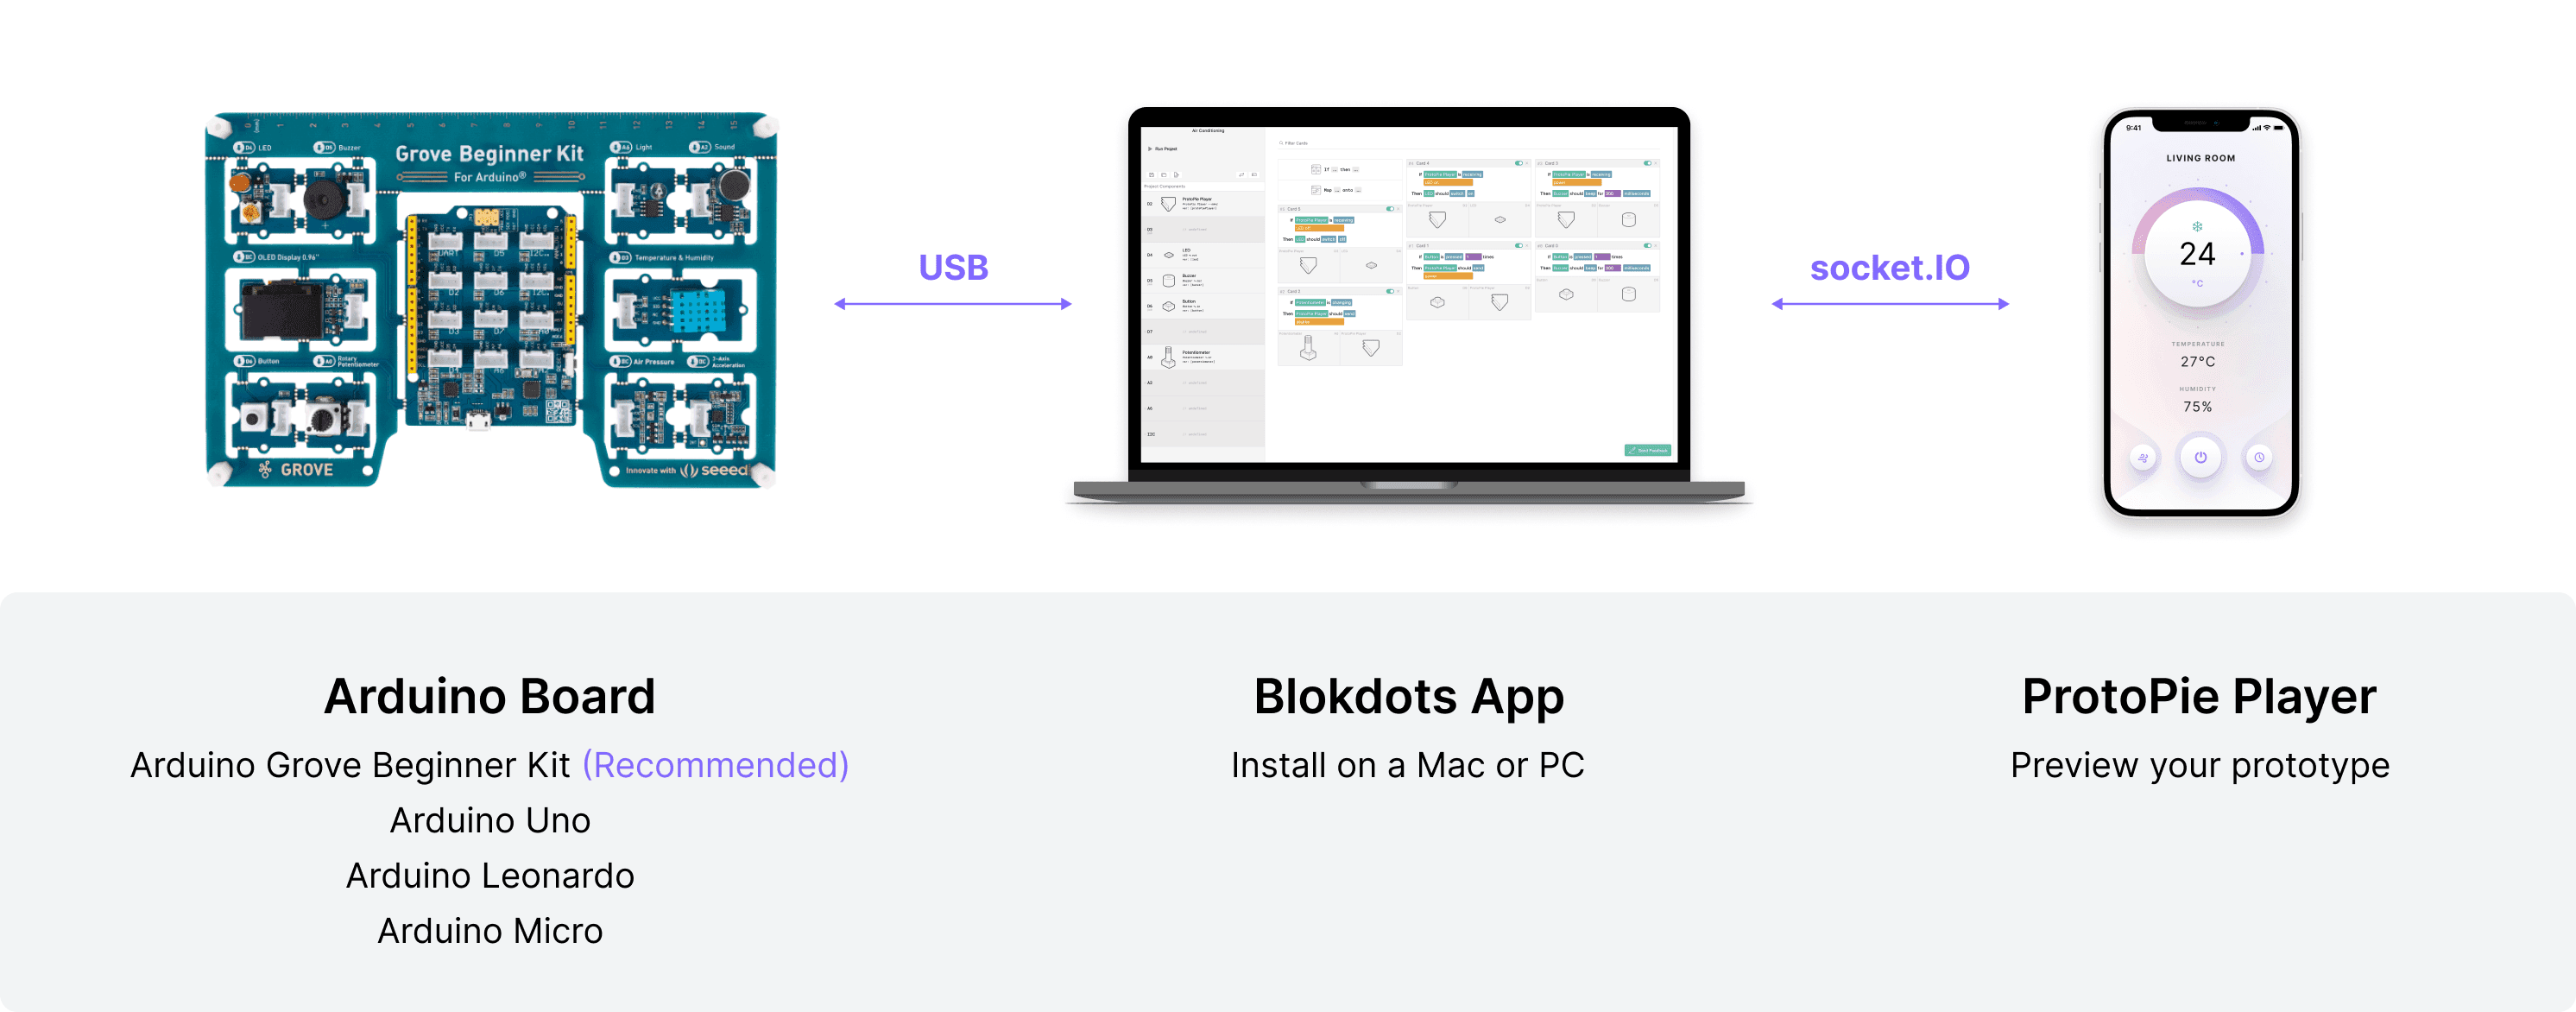
This means that you can have software-hardware connection happen easily and dynamically with something as simple as an Arduino set-up like below.
Carry on reading to see how you can build this set-up yourself using a smart home prototype.
Now Let’s Make Magic
What you’ll need:
Arduino: Find the supported boards list here.
USB cable: To connect the board to your device.
blokdots: Install here.
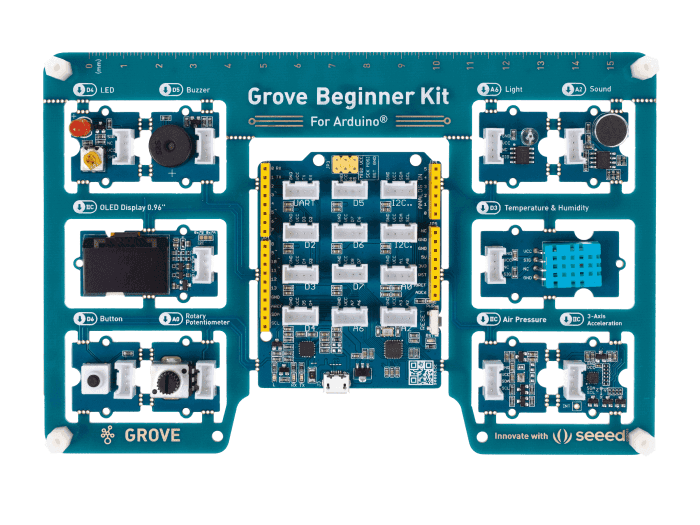
💡 Tip: We’ll use an Arduino Grove board as recommended by blokdots to make this connection happen. It is incredibly simple to use and does not require any wiring for the components. A Grove Arduino board by Seeed Studio has 10 pre-wired modules, most of which are supported by blokdots.
Arduino to Blokdots
Open blokdots and connect your Arduino board to your laptop/PC. In the Live View of blokdots, you will see that your board is ready.
Click the Connect A New Component button on the top of the Live View to open the Wizard, and pick the ones that you want to connect in the list. The modules we are going to use in this example are as follows:
ProtoPie Player
D4: LED
D5: Buzzer
D6: Button
A0: Rotary Potentiometer
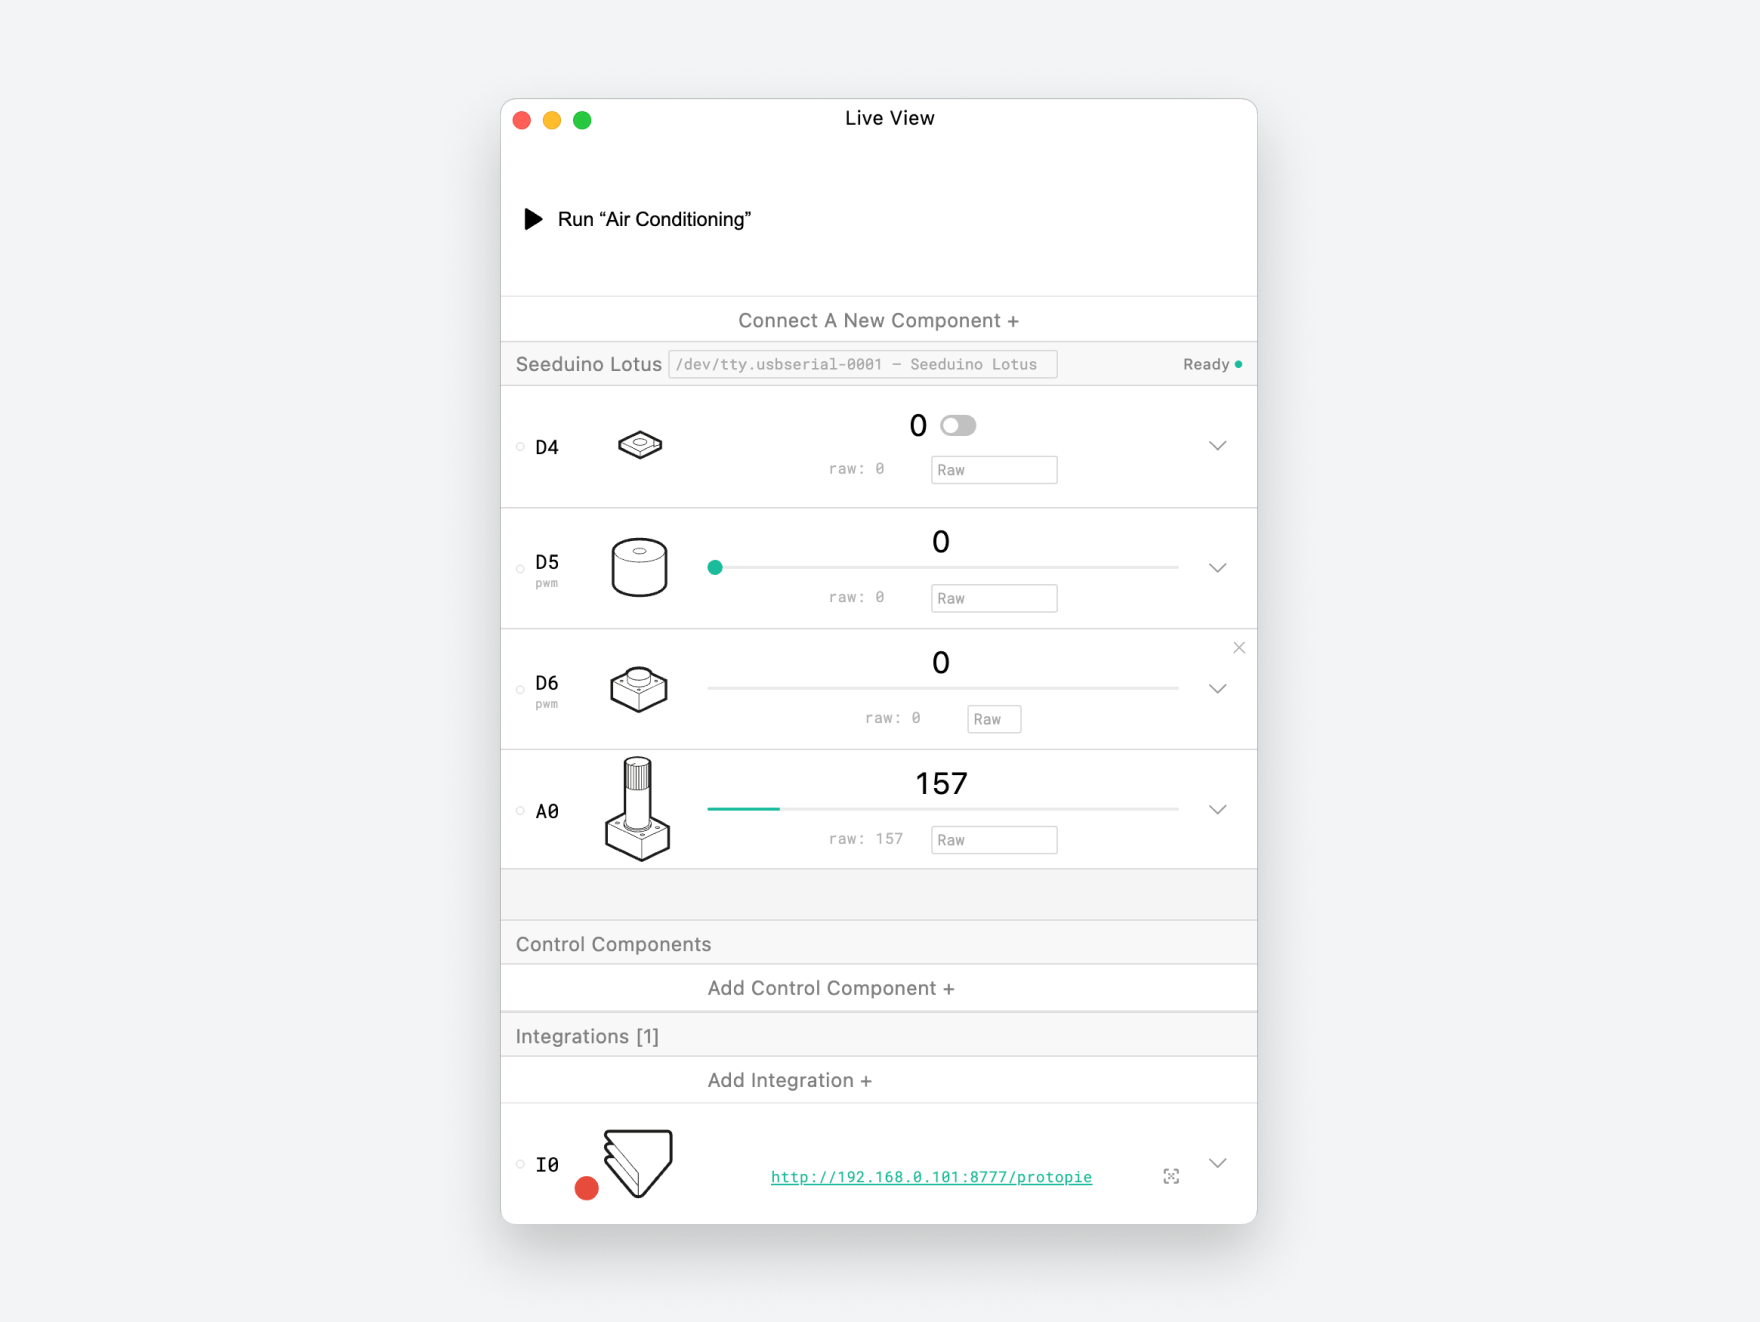
After set-up, you can now test out some components on your board—you should see the number change accordingly in the Line View.
So What’s Going On Here
We know that you’re excited to create your interactions, but before we go ahead, let’s first explain one more thing. In order to allow blokdots to “talk” to ProtoPie, you will need to utilize ProtoPie’s Send / Receive feature. This lets different prototypes send and receive messages, meaning ProtoPie and Arduino will be able to communicate with one another. You will therefore be able to create and experiment with sending/receiving your own messages between ProtoPie Studio and Arduino.
Think of blokdots as the environment where you set the conditions on how the two should communicate with each other.
💡 Remember:
Set up how to
Send&Receivemessages in ProtoPie Studio and blokdots.However, the final interactions take place between ProtoPie Player and Arduino.
Setting up Send and Receive
In ProtoPie Studio, the Receive Trigger and the Send Response will initiate communication between the devices. All you need to do is set the Channel to ProtoPie Studio and set the Message to whatever you wish.
💡 Tip: Best to keep the messages short, i.e. “ToggleLED” is better than “Toggle the LED light on or off”.
And if you want to also keep the value from blokdots for future use, check Assign to Variable and create a variable in ProtoPie to store this value.
Learn more about variables.
Select “ProtoPie Studio” as a channel.
Creating Your First Interaction
Users prototype hardware in blokdots by adding and configuring cards. There are two types of cards in blokdots: If This Then That cards and Mapping cards. In our example, we will only need to use the If This Then That card.
blokdots to ProtoPie
You will see a condition card like this:
If
the action of any input hardware componentThen
ProtoPie Playershouldsendmessage
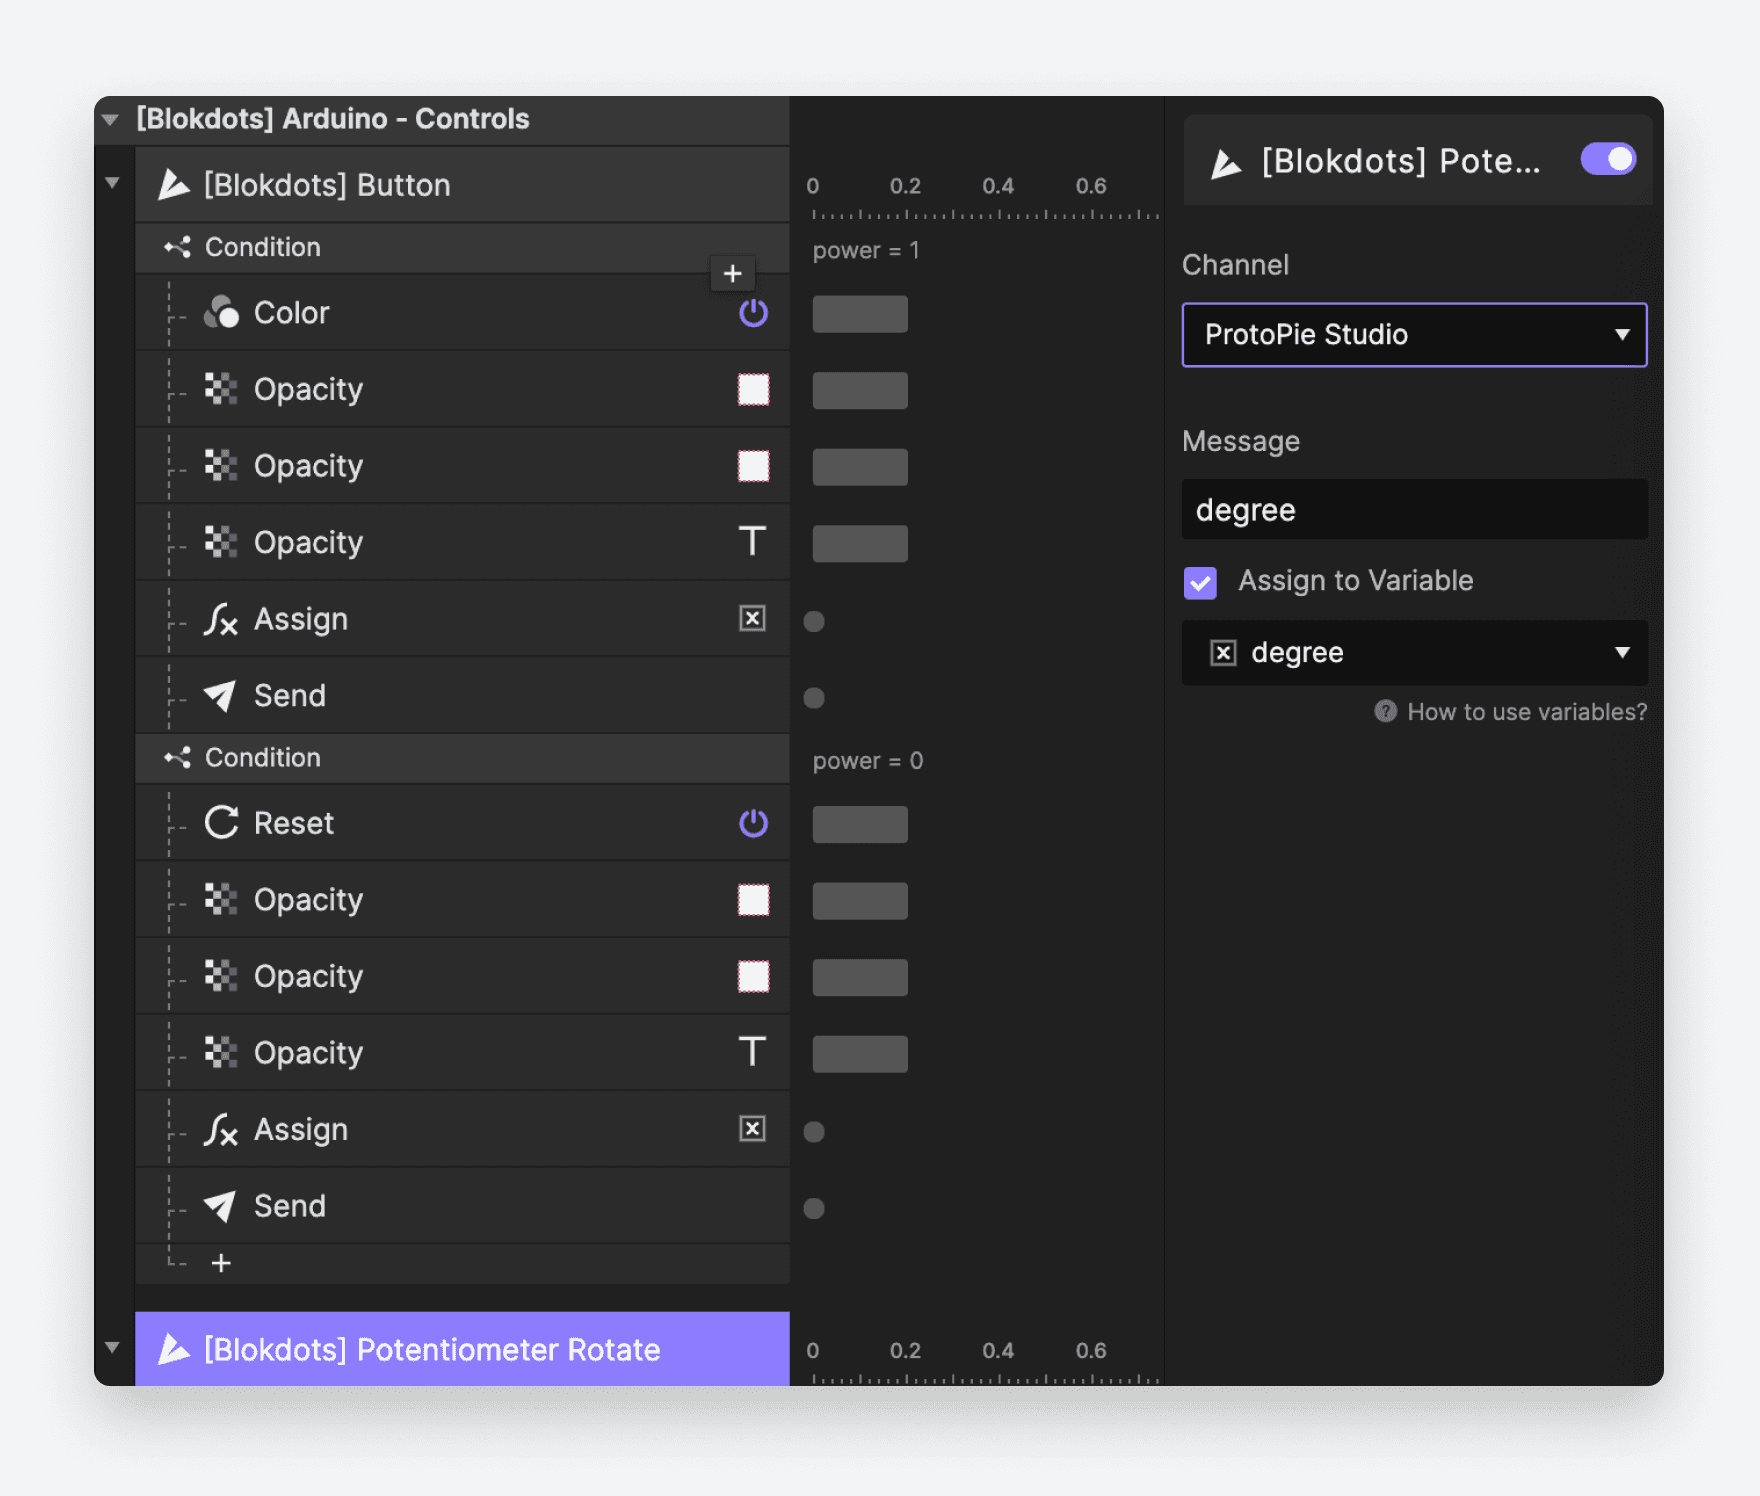
Try following the example card below. If you want to rotate the potentiometer, for example, you will need to send a message from blokdots to ProtoPie with the following details:
Message: degree
Value: 1~1023
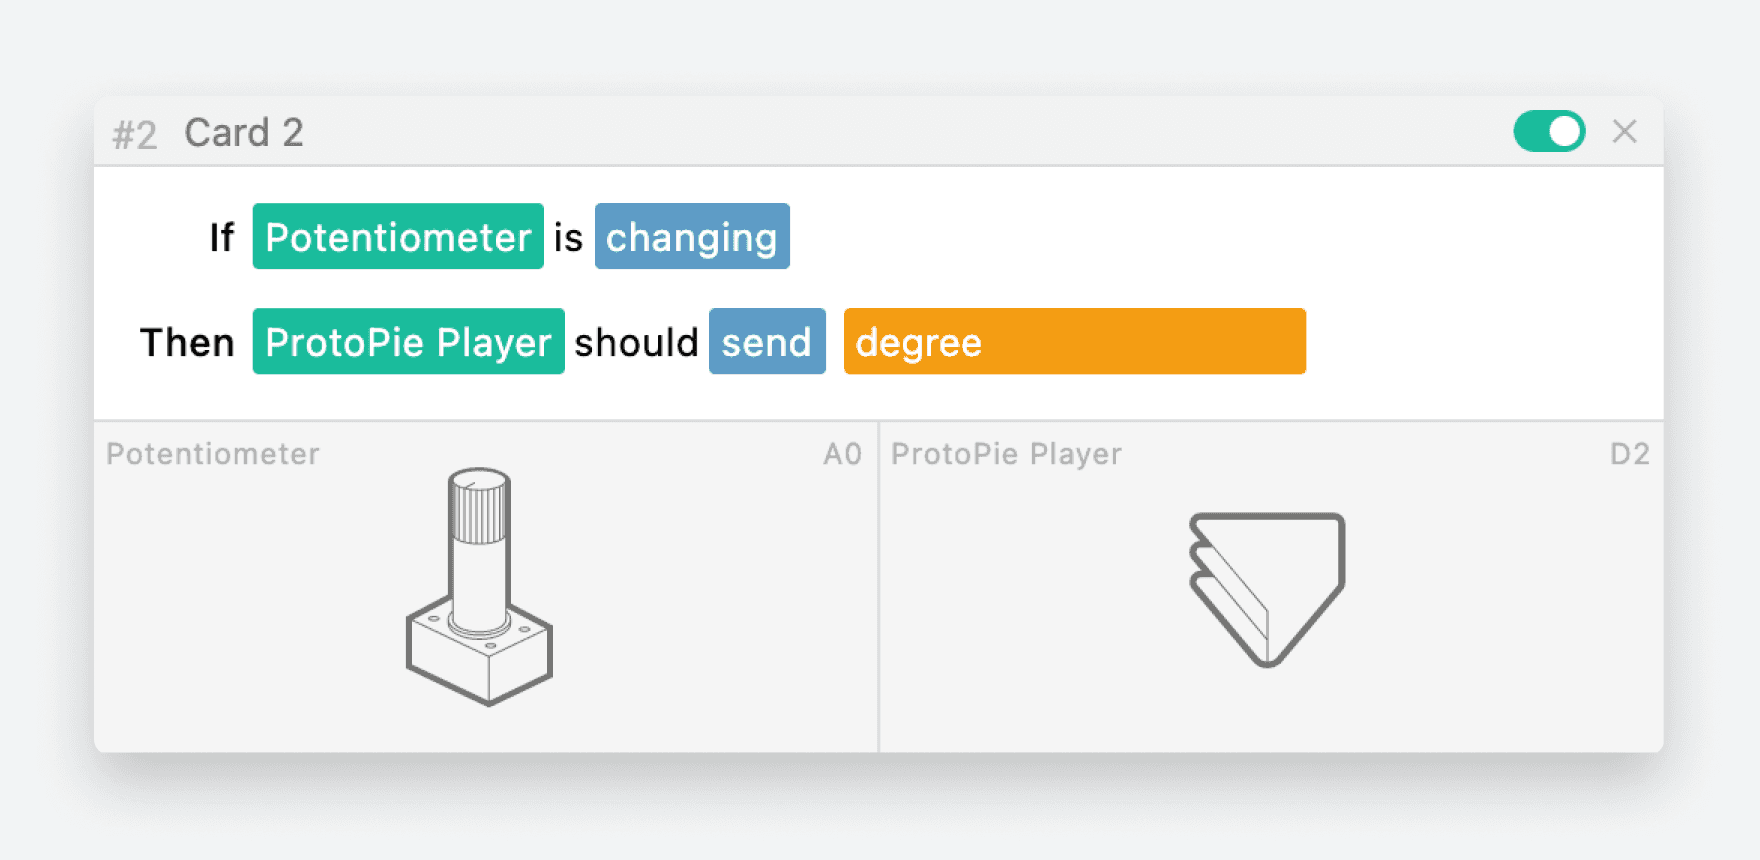
Send messages from blokdots to ProtoPie
To receive the message in Protopie, use the Receive trigger as below.
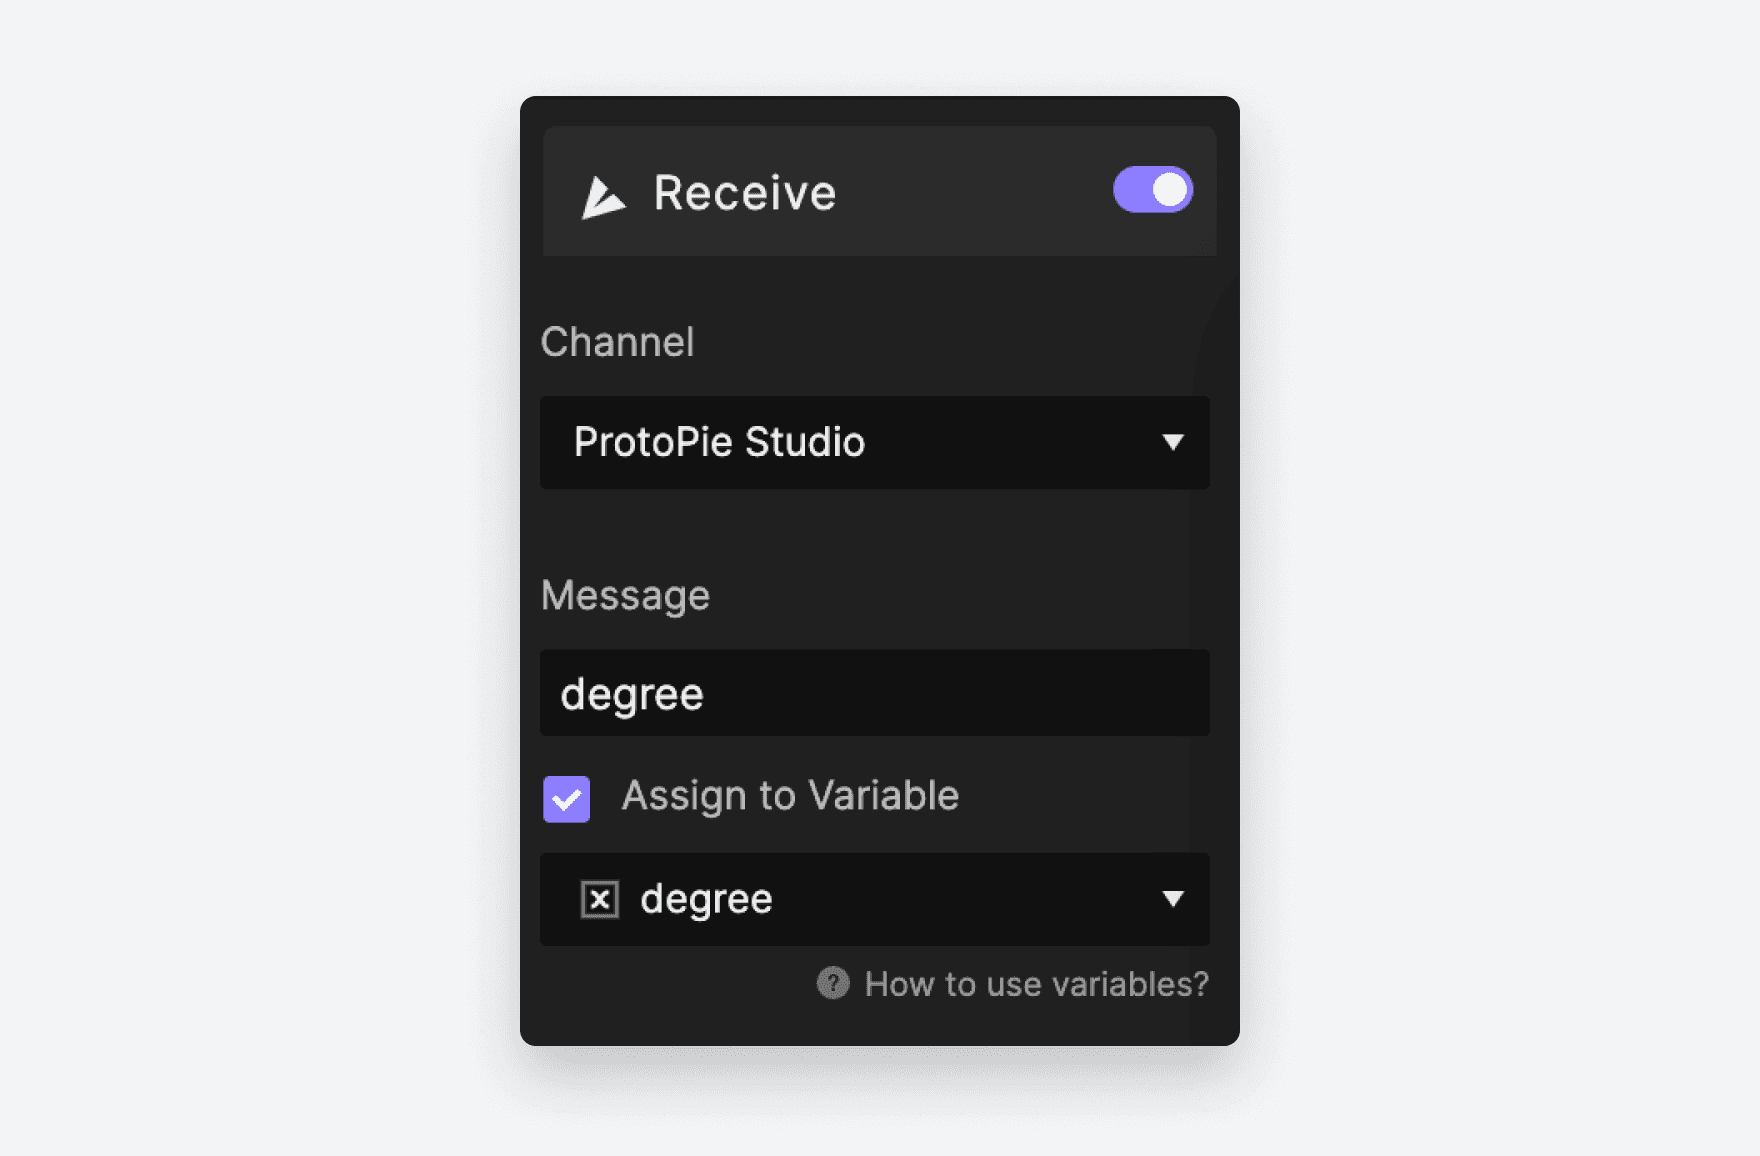
Receive messages in ProtoPie.
Channel: ProtoPie Studio
Message: degree
Create a variable called “degree”. Assign the value to this degree variable.
ProtoPie to blokdots
Use the Send feature in ProtoPie Studio to send your message.
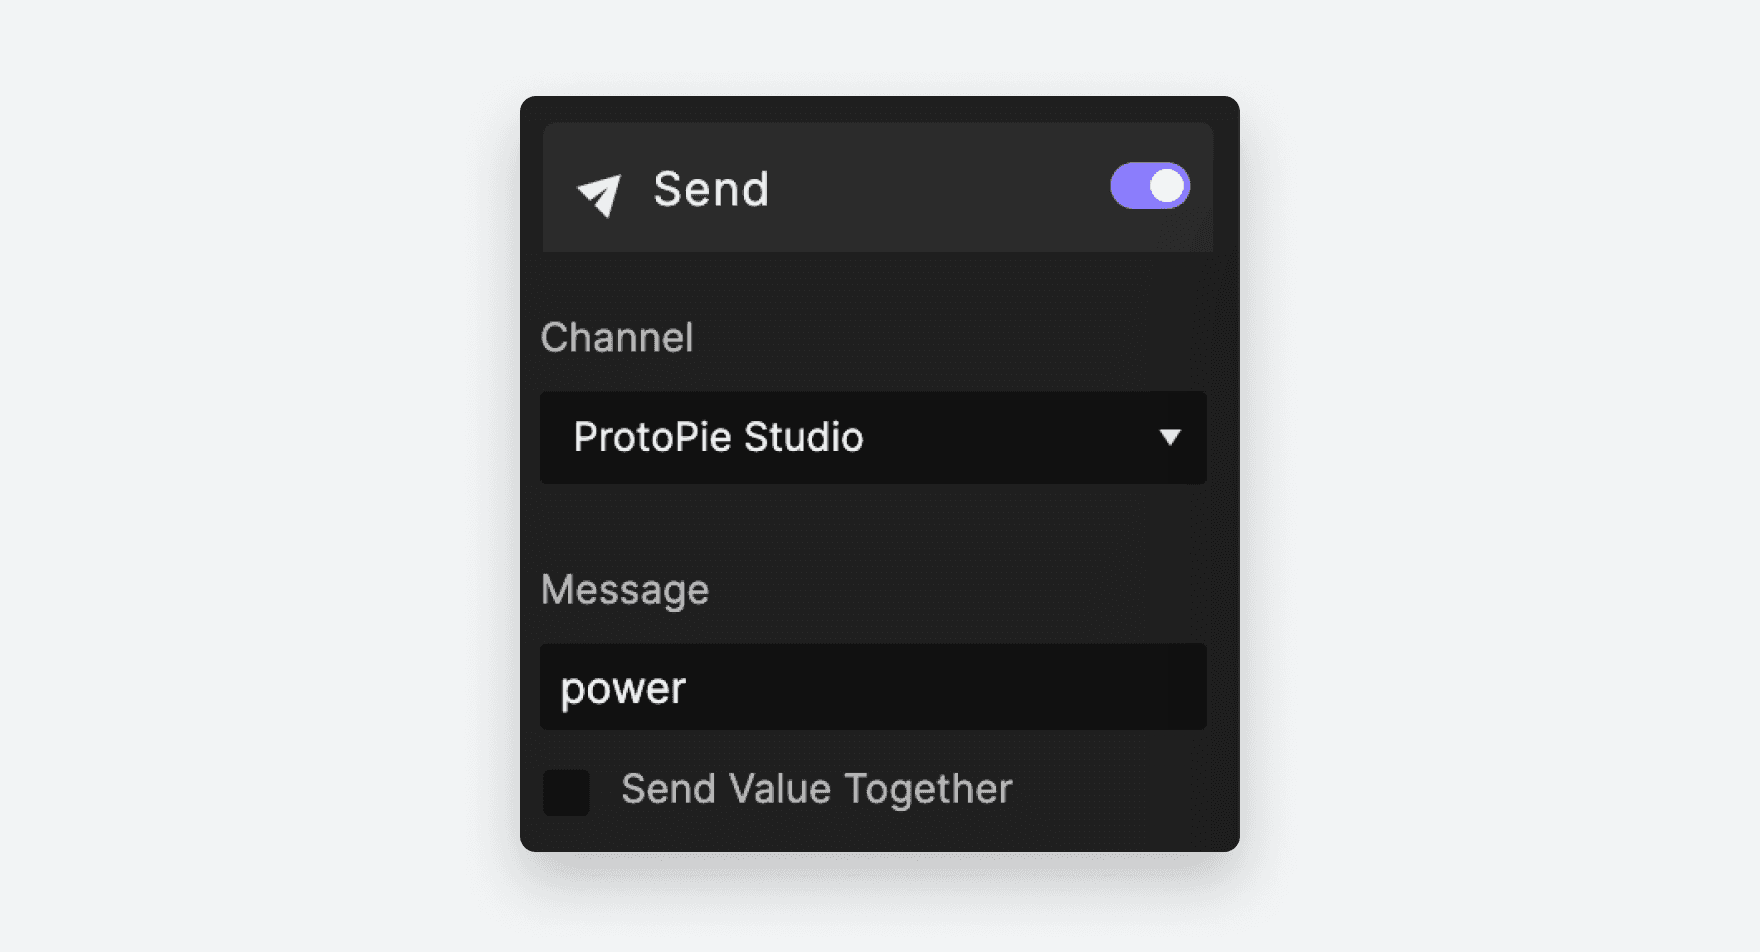
Send messages from ProtoPie
Channel: ProtoPie Studio
Message: power
Optional: You can send a value together
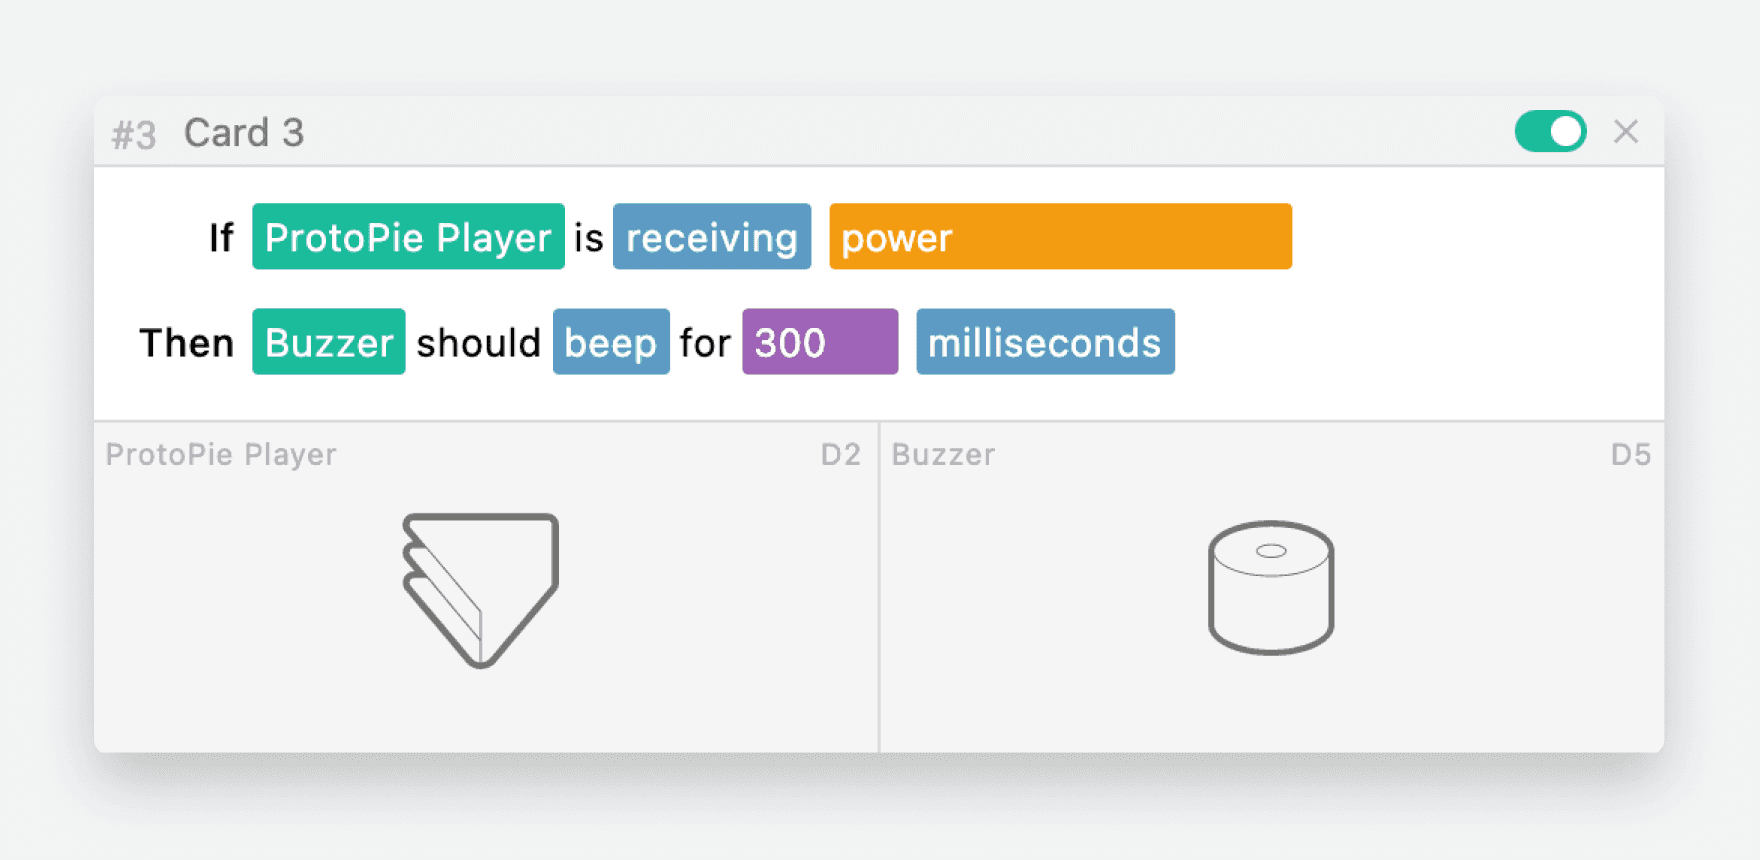
To receive messages, head over to blokdots and add another card. Use an If This Then That card. The general structure is usually as follows:
If
ProtoPie PlayerisreceivingmessageThen [the action of any output hardware component]
You will receive a message together with the value from ProtoPie.
💡 Tip: If you want to use a value from ProtoPie to fade an LED in and out, you can use a Map…onto card to map the incoming value to the hardware component in blokdots.
See the following card as an example. If blokdots receives a message from ProtoPie called “power”, then the buzzer component will be triggered to beep for 300 milliseconds.
blokdots receives messages from ProtoPie
You can also download the blokdots and pie files to make adjustments of your own.
[Download Pie File] [Download blokdots File]
Running Your Project
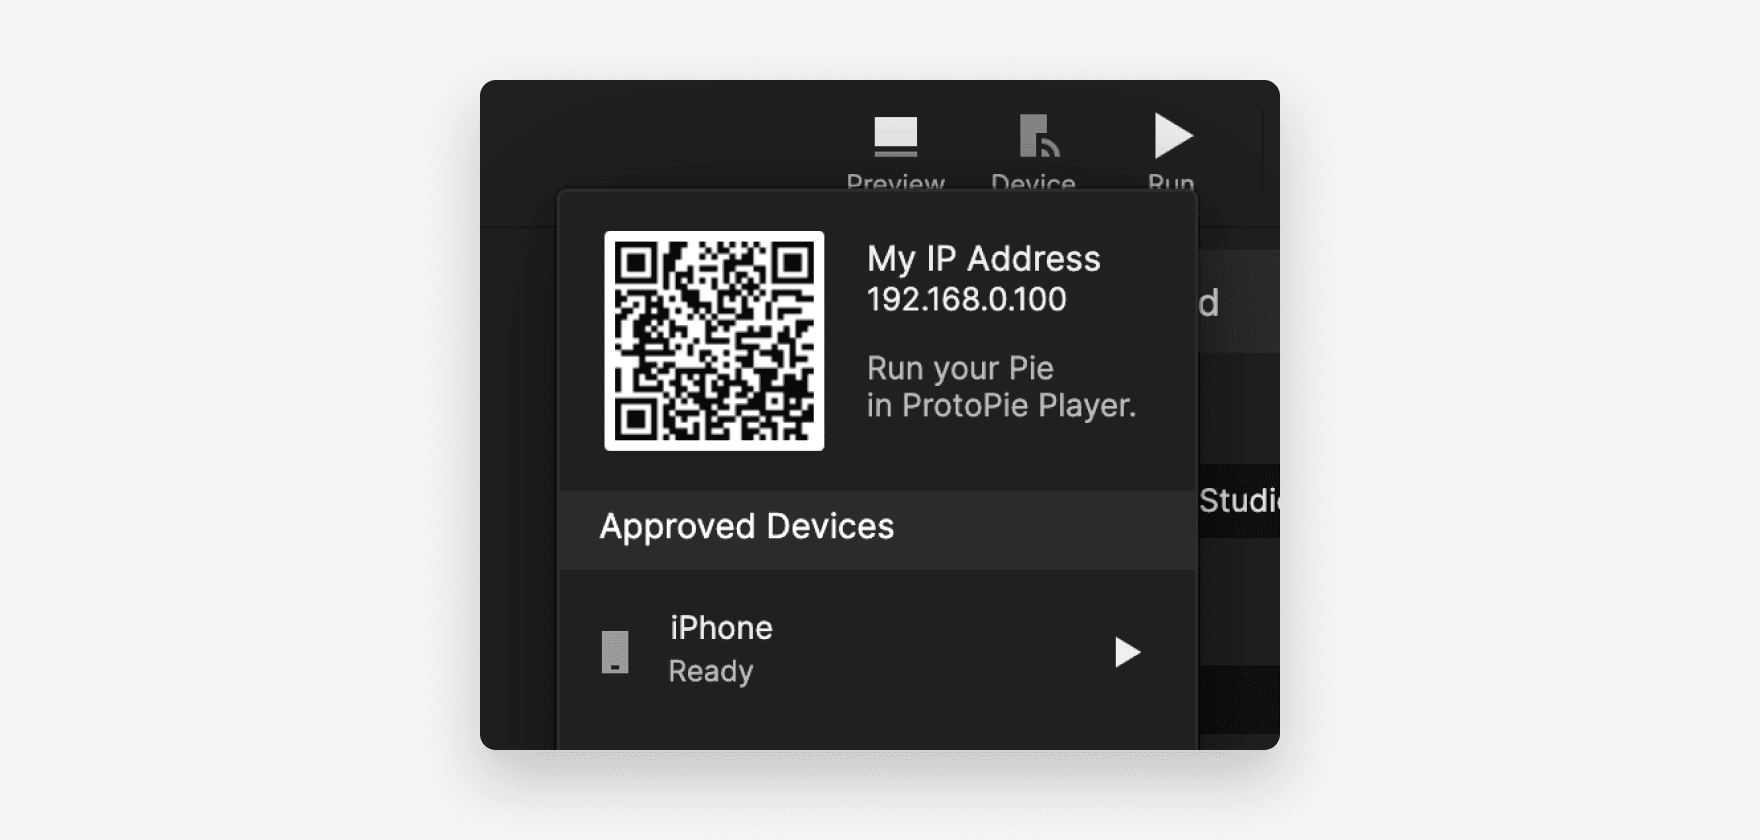
You’re almost there. Connect ProtoPie Player by scanning the QR or manually typing in the address. Once you’ve set this up, your Line View should look like the image below. The little connection indicator at the bottom left of the ProtoPie icon should then turn green.
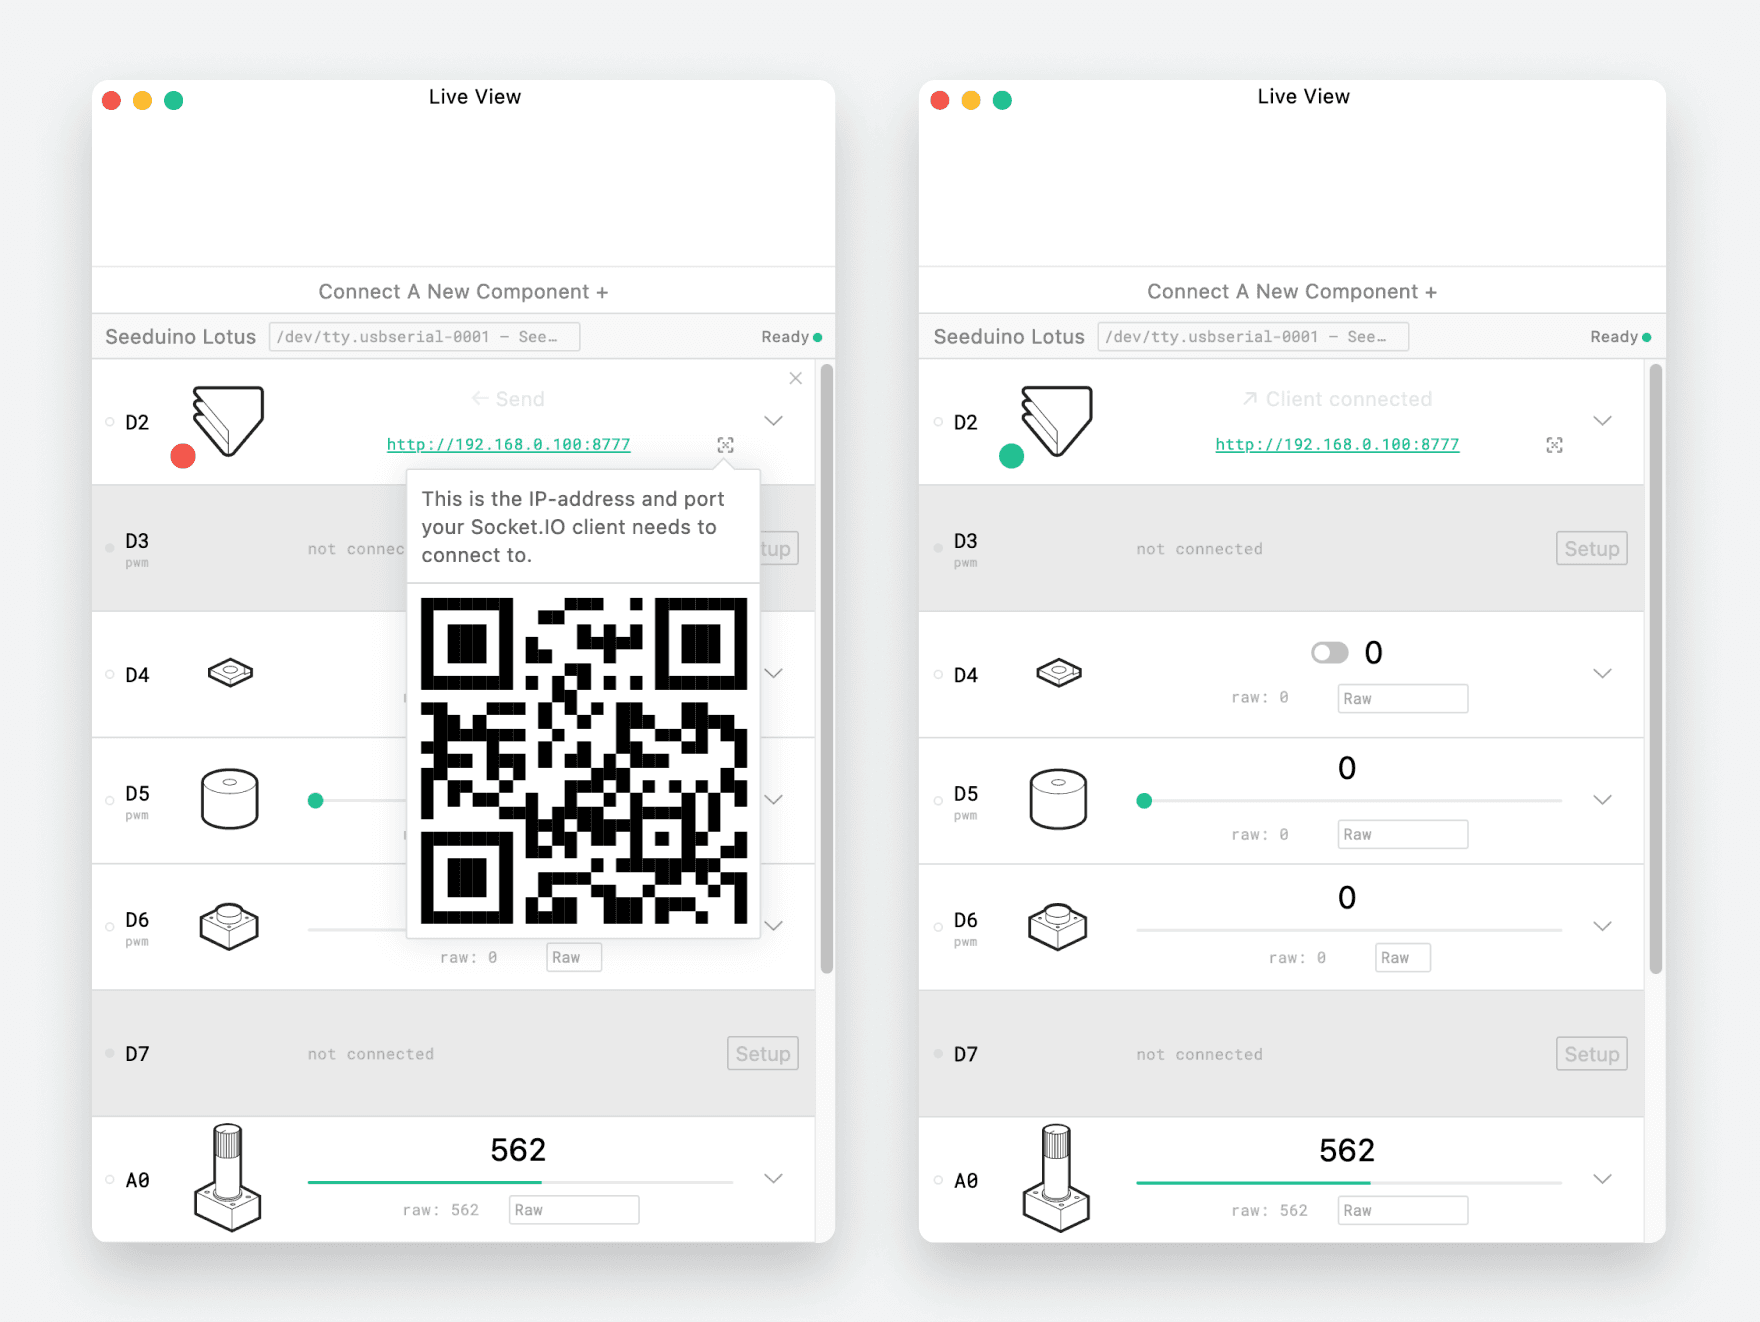
Scan the QR code to connect ProtoPie Player
💡 Tip: If you’re not sure whether it was effective, double-check the connection. You should see a success message in ProtoPie Player.
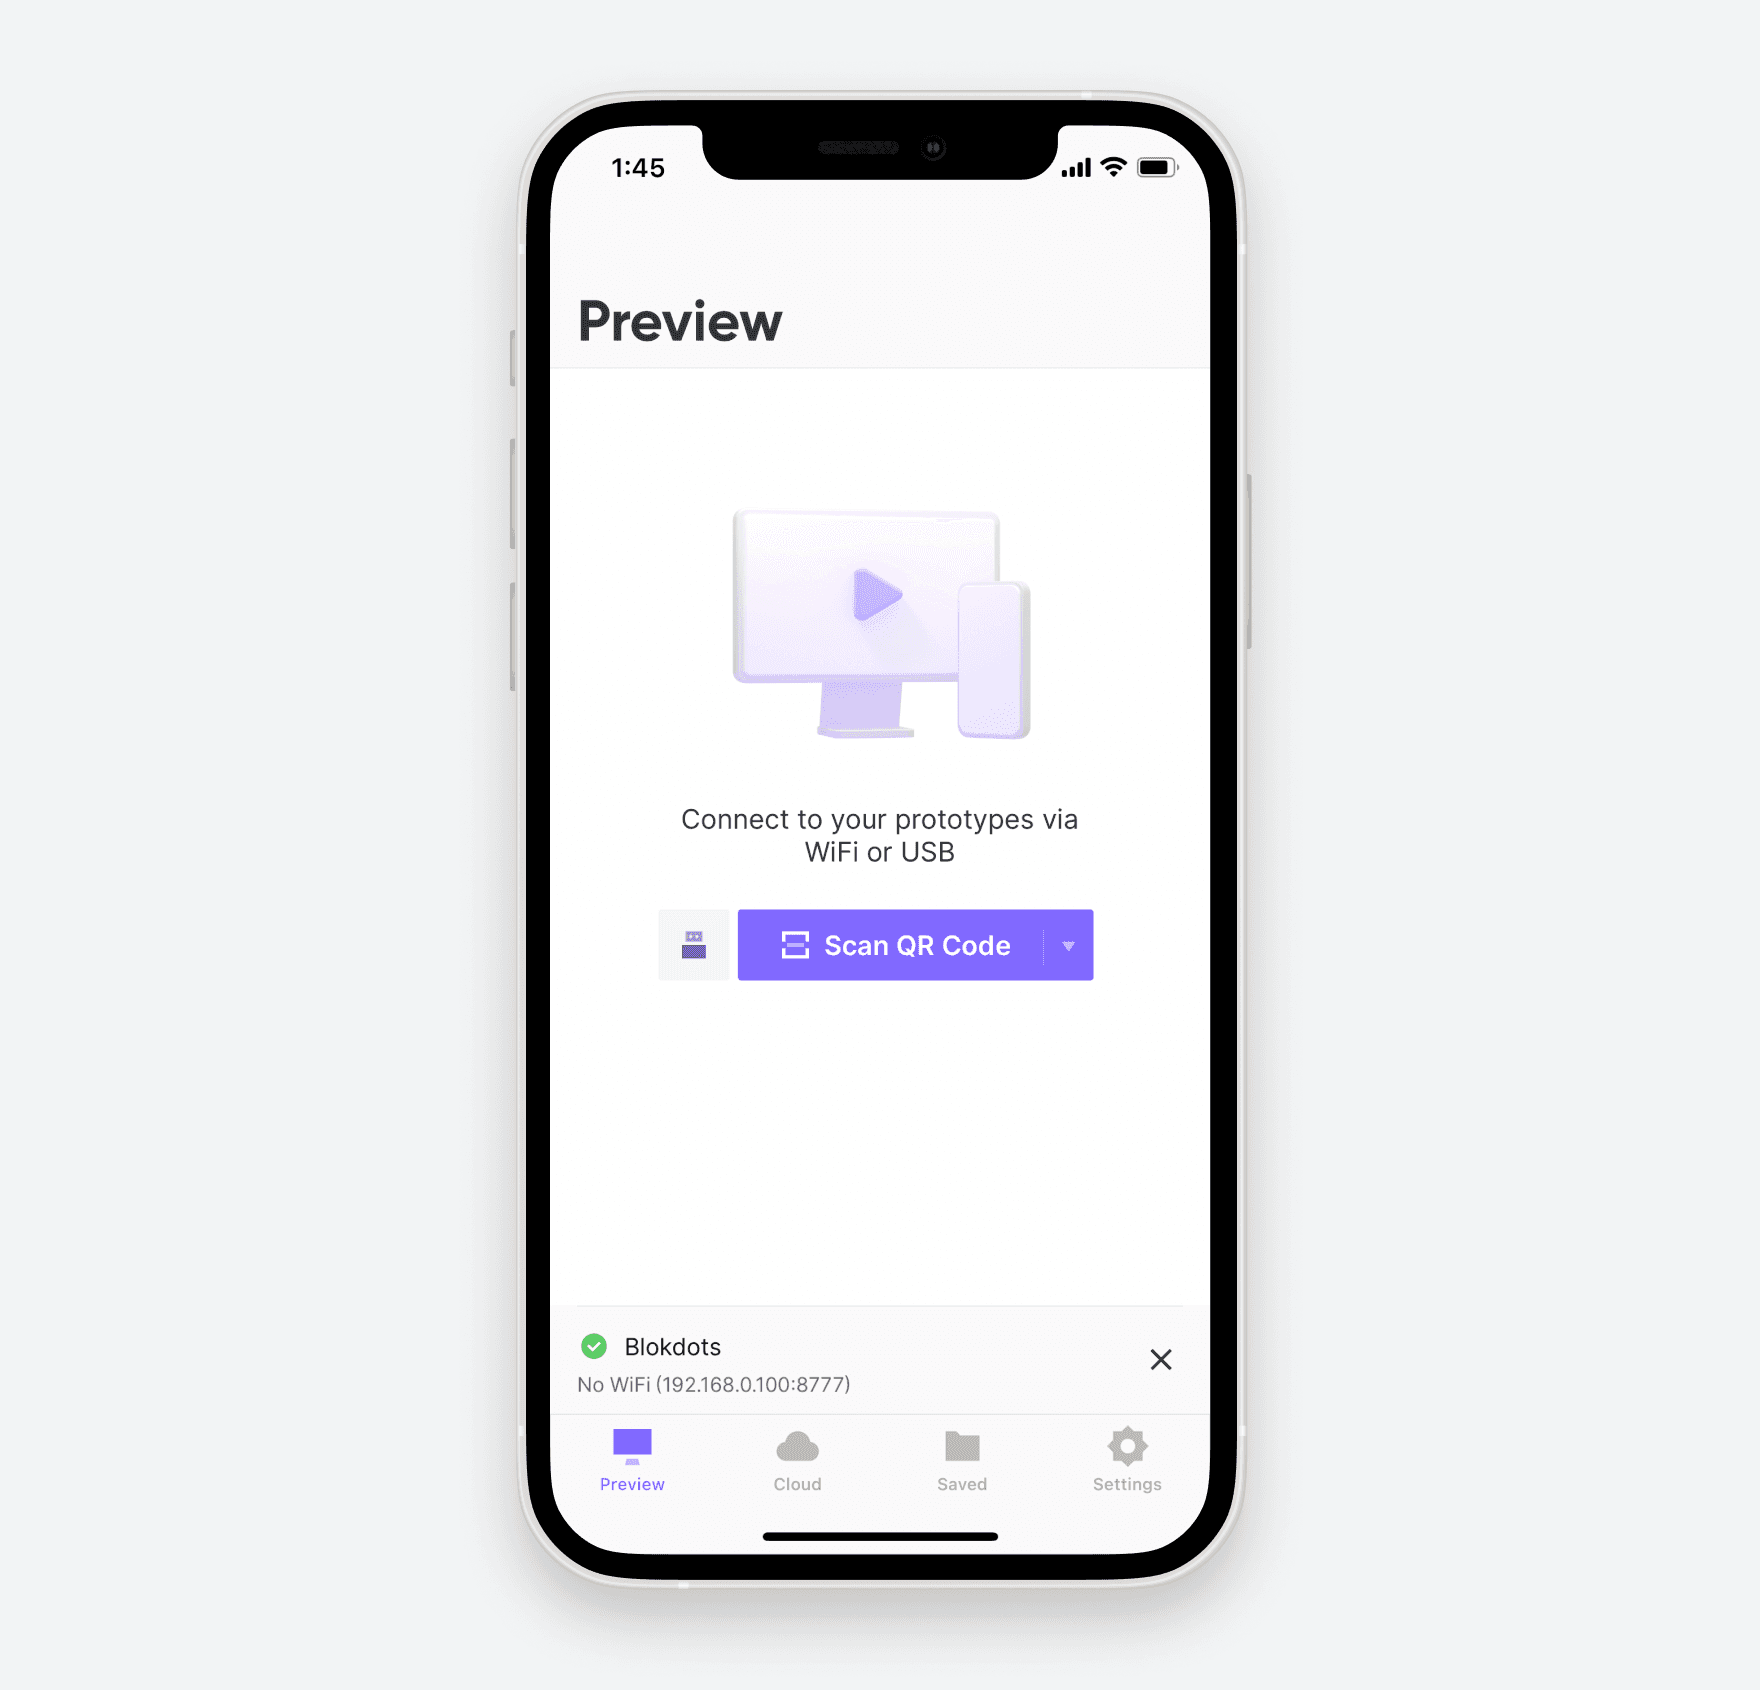
The success message in ProtoPie Player
To preview your prototype in ProtoPie Player, scan the QR code in ProtoPie Studio. Make sure Player and Studio are both connected via the same network. If they are not, you can also use a USB to connect them.
Learn more about connecting ProtoPie Player to ProtoPie Studio.
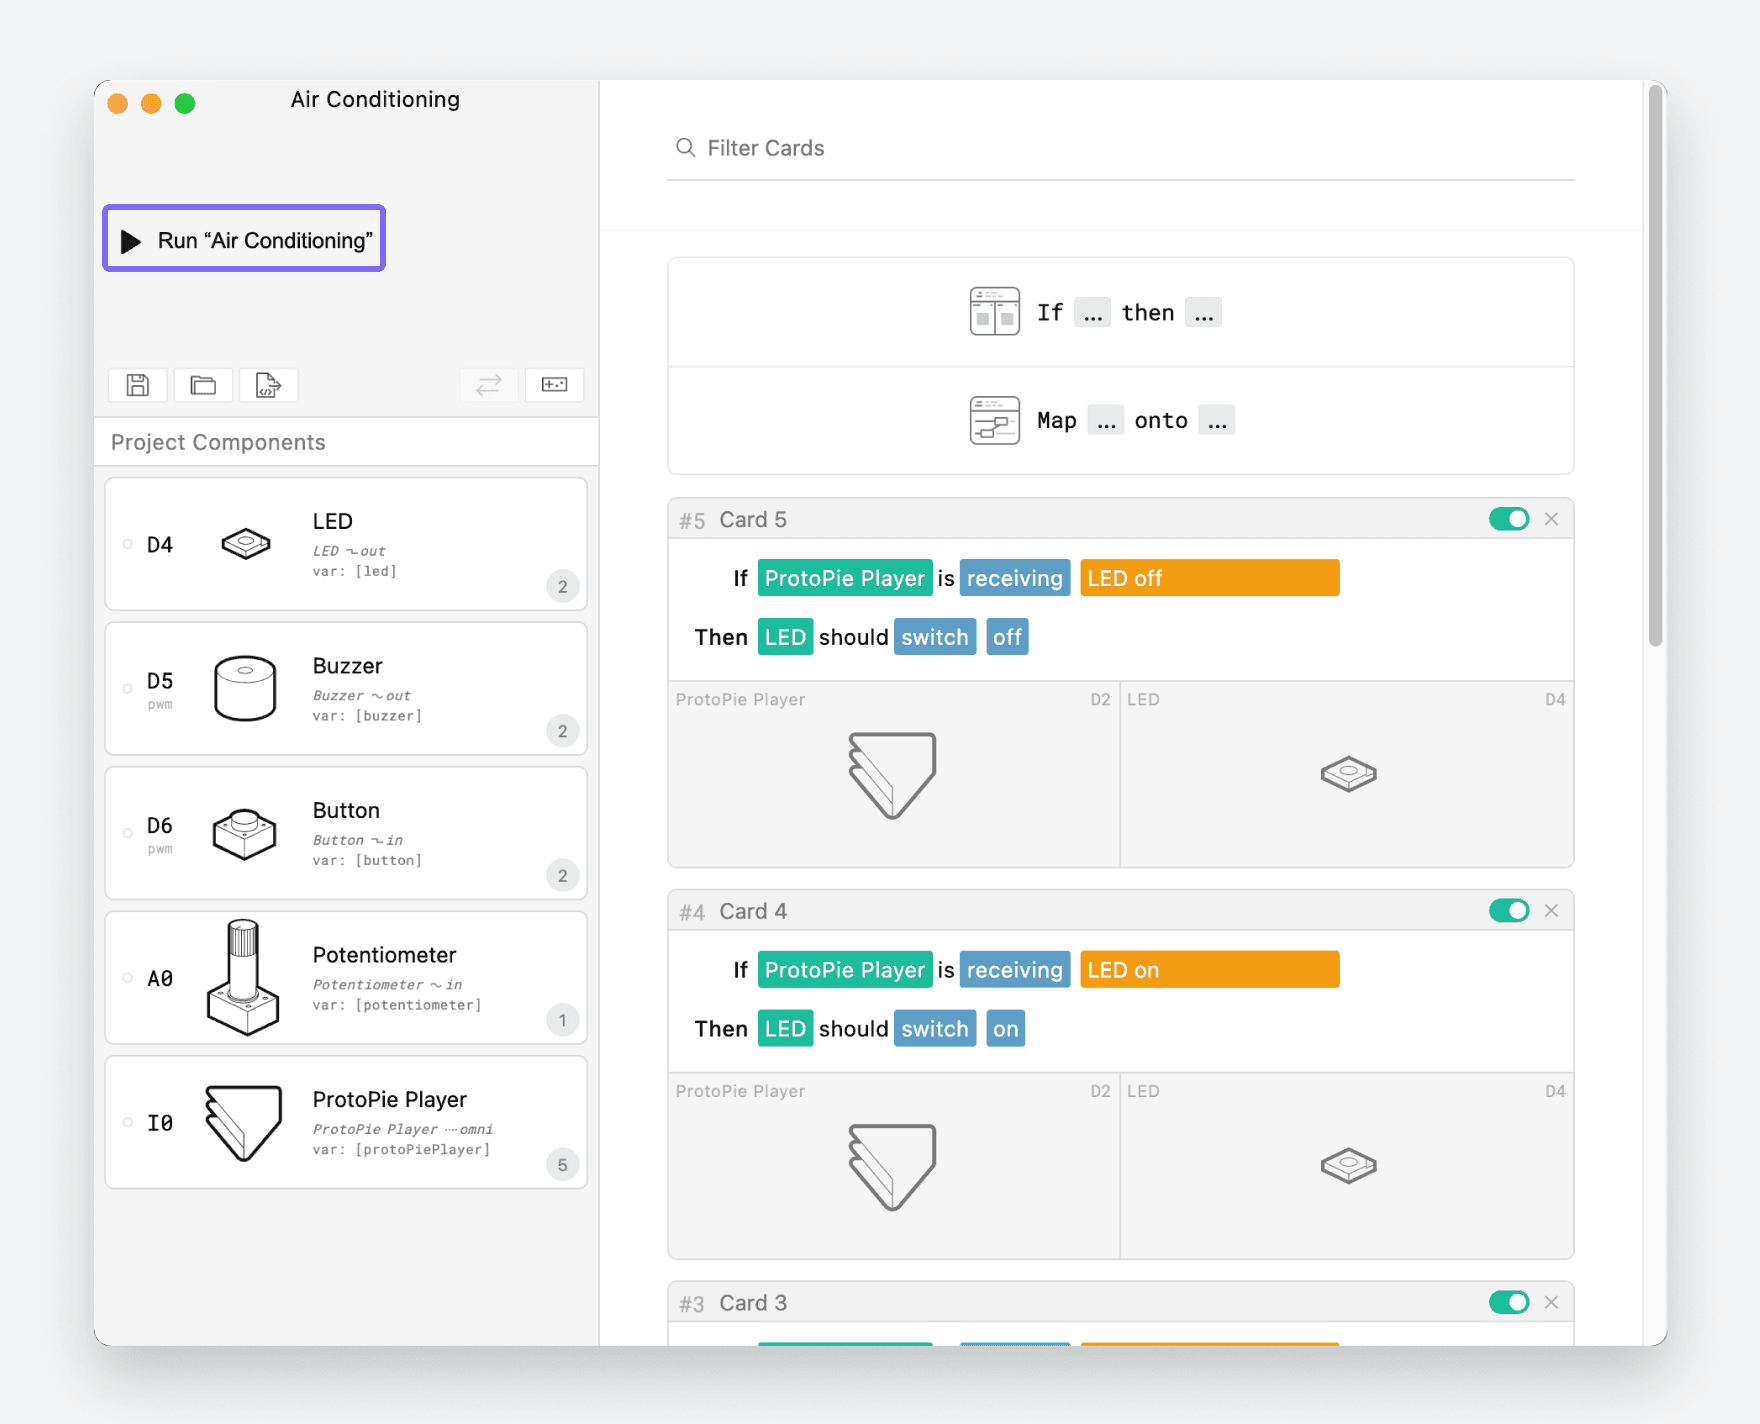
Now that you have everything connected, let’s see what your interaction looks like! In blokdots, press the Run Project button in the top left-hand corner of the Project View.
You Did It
Congrats! Simply by adding step-by-step, drag-and-drop sentences, you just got your first hardware and software-integrated prototype successfully up and running.
Implementing blokdots and ProtoPie in your projects allows you test your designs quickly without being limited by coding knowledge and constraints in programming. ProtoPie and blokdots both passionately believe that anyone should be able to build, test, and refine their ideas to create real-life products and services. Or, to help imaginative makers play around and get their creative juices flowing.
We hope you found this guide helpful! We’re excited to see you experiment and push the boundaries of prototyping.
Learn more about ProtoPie
If you want to learn more about the endless prototyping possibilities ProtoPie has, download ProtoPie for free below and get started.


