

In digital design, the pursuit of captivating user experiences is endless. Scroll-based animations, akin to the ebb and flow of a river, are a transformative force guiding users on a visual journey through immersive designs. When you combine them with the mesmerizing parallax effect and the true-to-life allure of 3D 360-degree product renders, a new exciting world of creative potential unfolds on the horizon.
In this article, we embark on a voyage through the deep sea of prototyping. We will use the Chain and Detect triggers alongside variables, formulas, and components. Prepare to navigate the current of scroll-based animations as we unlock the floodgates of imagination and reveal the secrets to crafting truly captivating experiences in ProtoPie.
1. 3D animation
Currently, ProtoPie does not support 3D formats. However, you can use a video render and manipulate its playback. This technique helps to imitate three-dimensional objects in prototypes.
Let’s say you are designing a website for a luxury furniture manufacturer. The focal point of this design is a high-resolution interactive product image. You can use any video with a camera turning around the object. I am using a quick Blender setup to render a turnaround view.
Object constraint properties
I have the object and a simple three-point lighting setup already in place. There is also a camera and a circular curve.
In the Object Constraint Properties of the camera, add Follow Path and Track To constraints. Set the target path to the circle, and the tracking target to the chair. Now the camera follows the path while always pointing to the chair.
Render the video in mp4 format.
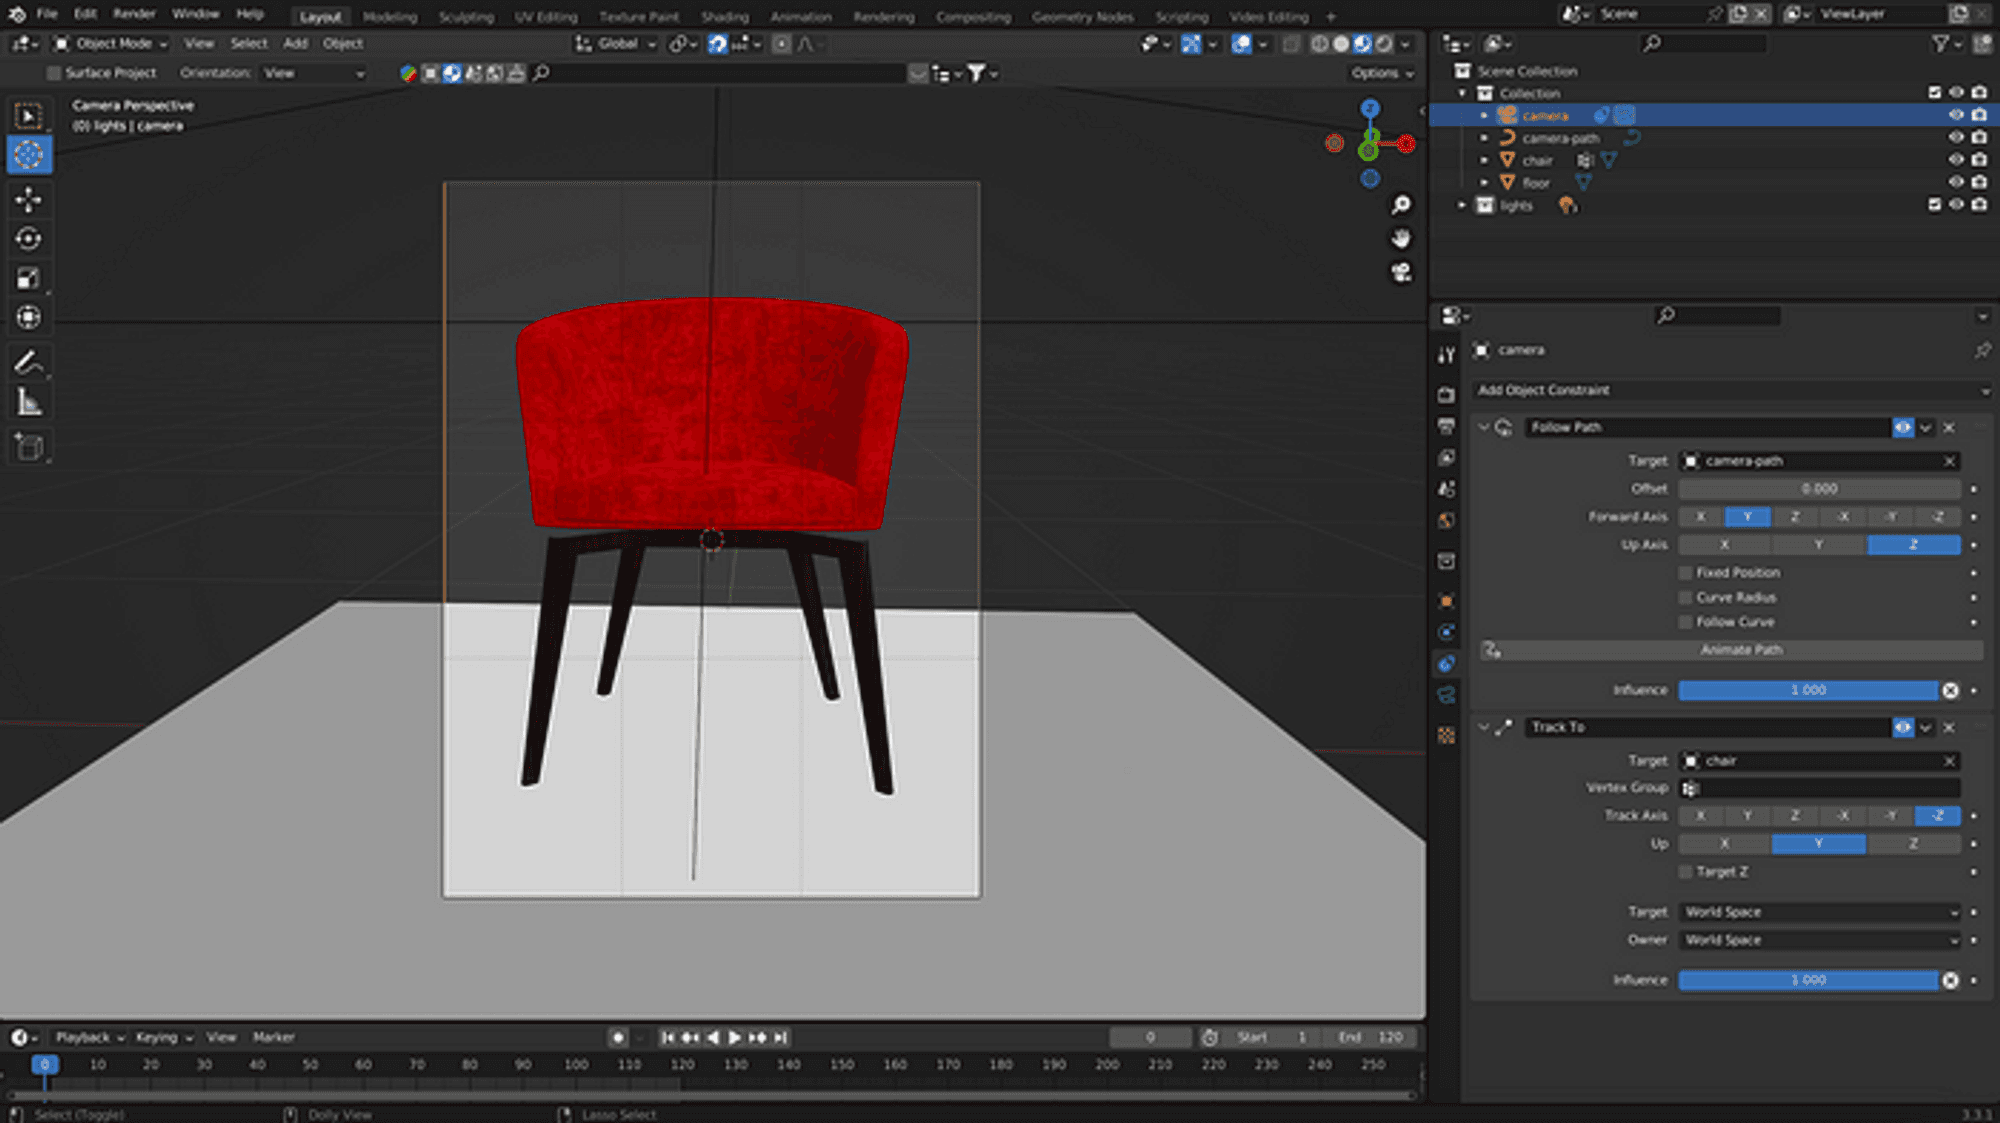
Object Constraints in Blender
2. Layout
Design in Figma
Moving to Figma, create a minimalistic layout for the main page. We need a header with navigation and at least two sections for text.
Next, use the ProtoPie plugin to export your design for prototyping.
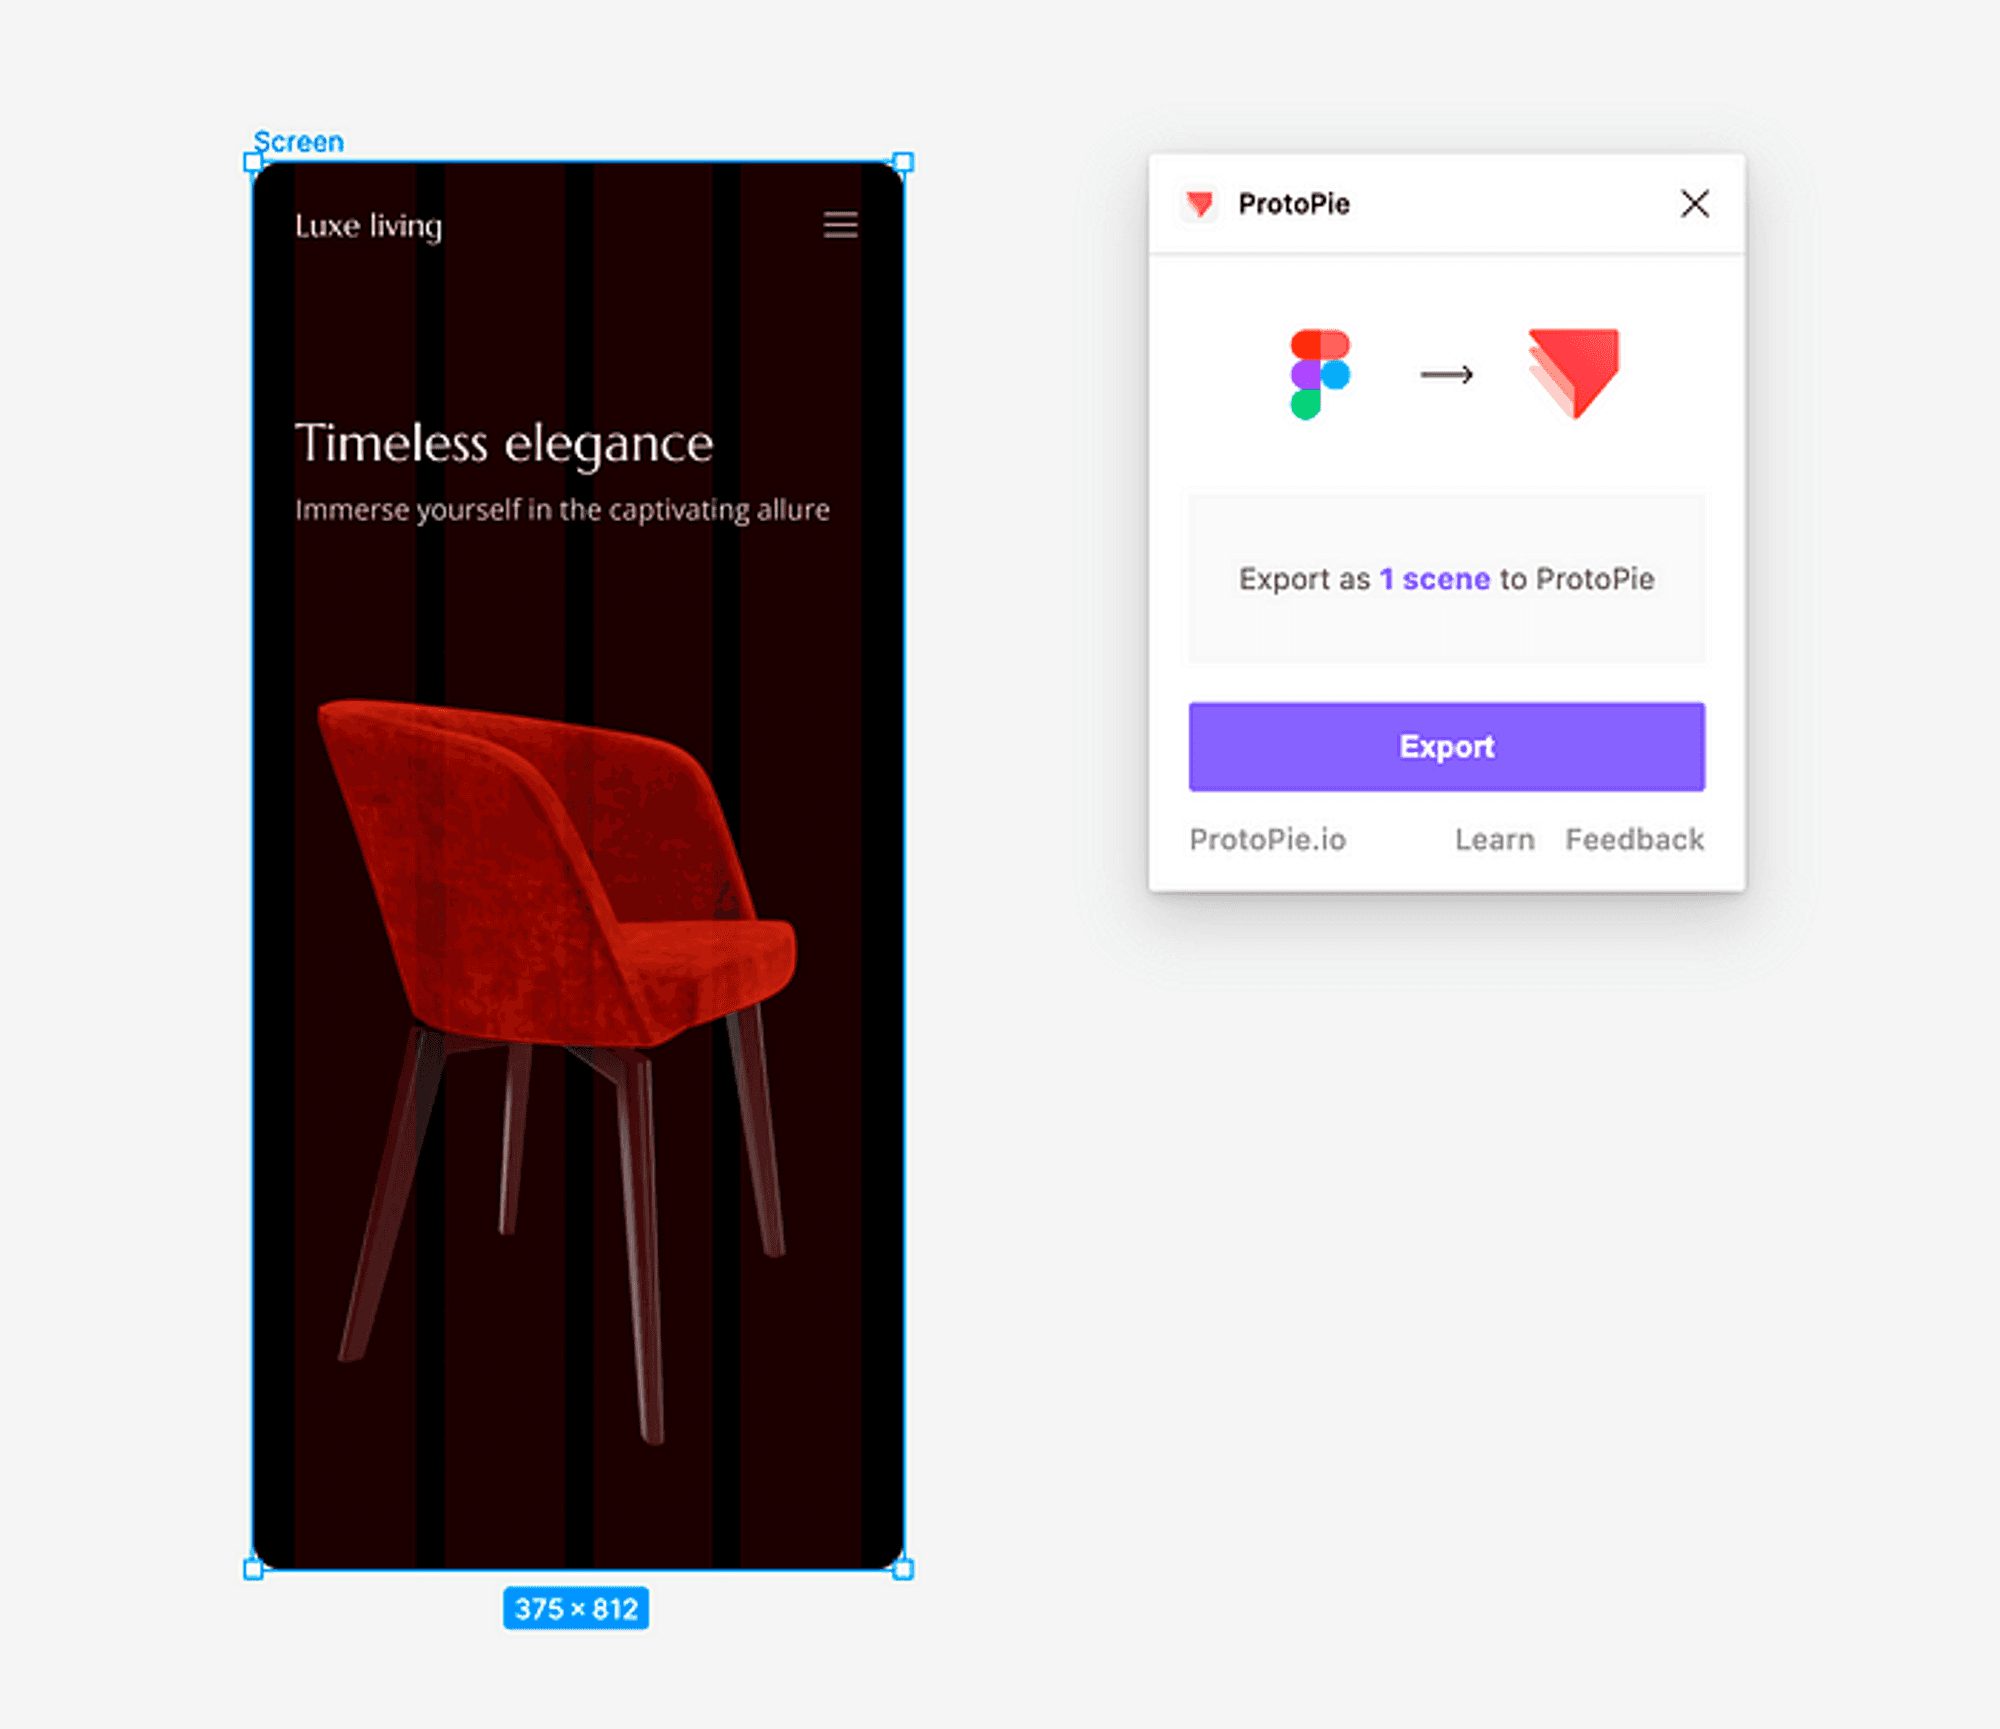
Exporting UI design from Figma to ProtoPie
Set up in ProtoPie
We need to adjust some elements in ProtoPie. First, add the turnaround video. By default, the autoplay option is unchecked. It is exactly what we want.
Scale and position your video on the screen. You can also change the origin to the centre to make it easier to align.
My video starts with the camera facing the front of the chair, but I would like to see the 3/4 view first. If you also want to adjust the first frame, add the Start trigger with a Playback response set to Seek to a particular timestamp (in my case it is: 0:01.0).

Adding video to ProtoPie
To trigger scroll-based animations, you need a scroll container. In the Properties Panel, set the group with text sections to scroll vertically. Now you are ready to prototype!
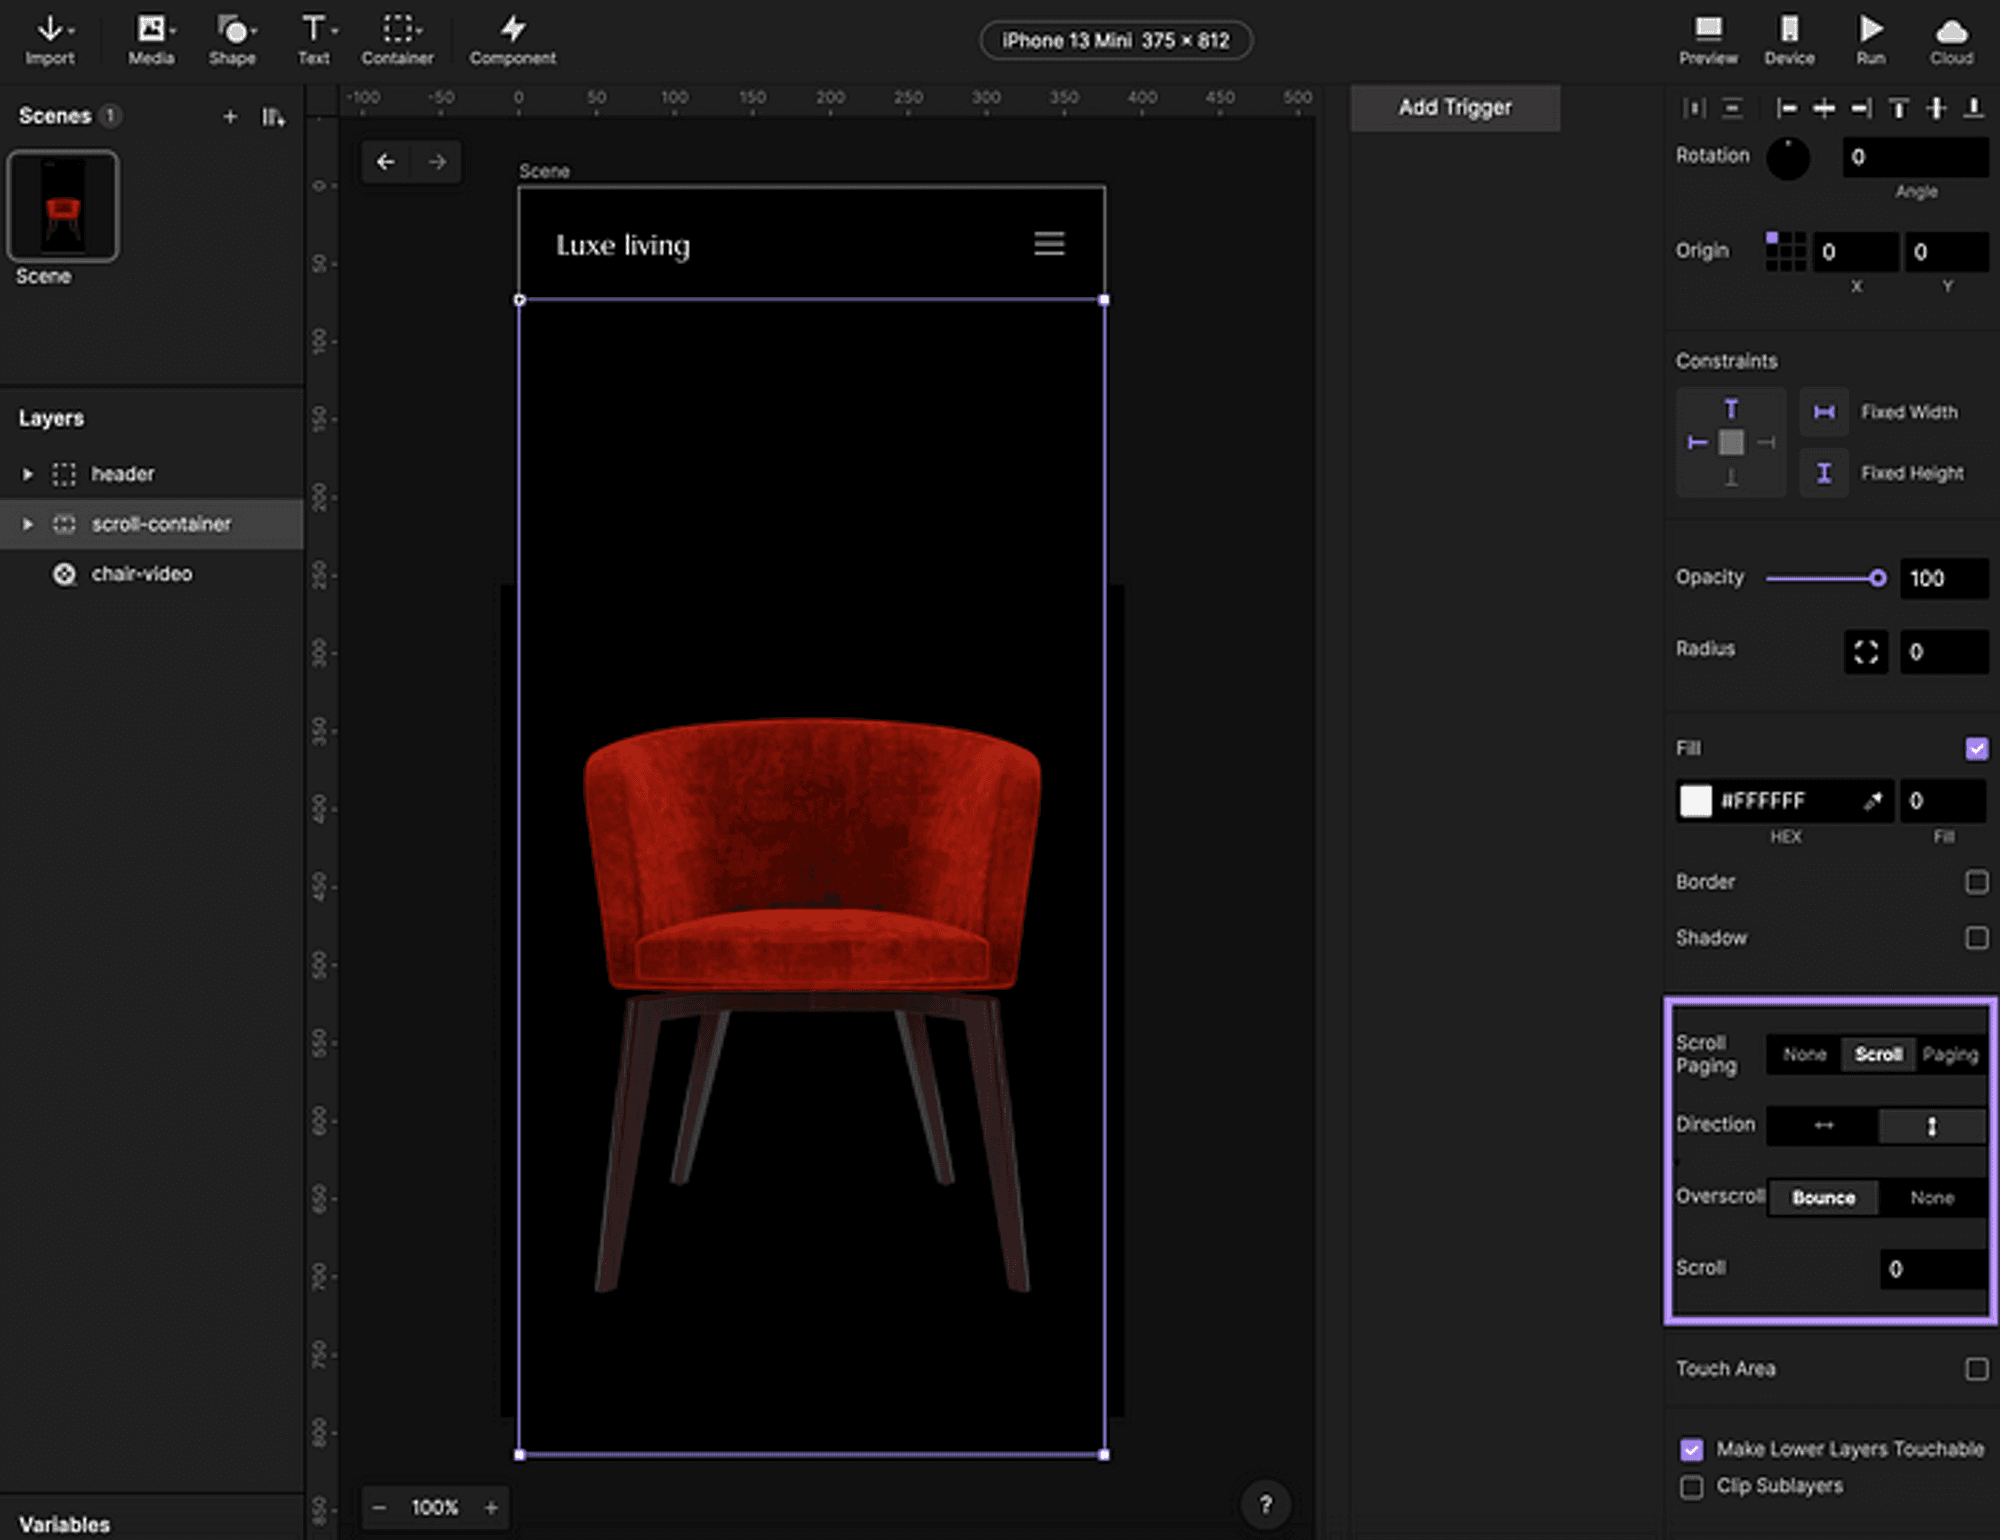
Setting scroll behaviour
3. Chain trigger
Parallax effect
Parallax is a visual effect where objects appear to move at different speeds. In UI design, parallax effects create a sense of depth and immersion by giving the illusion of three-dimensional space within a two-dimensional interface.
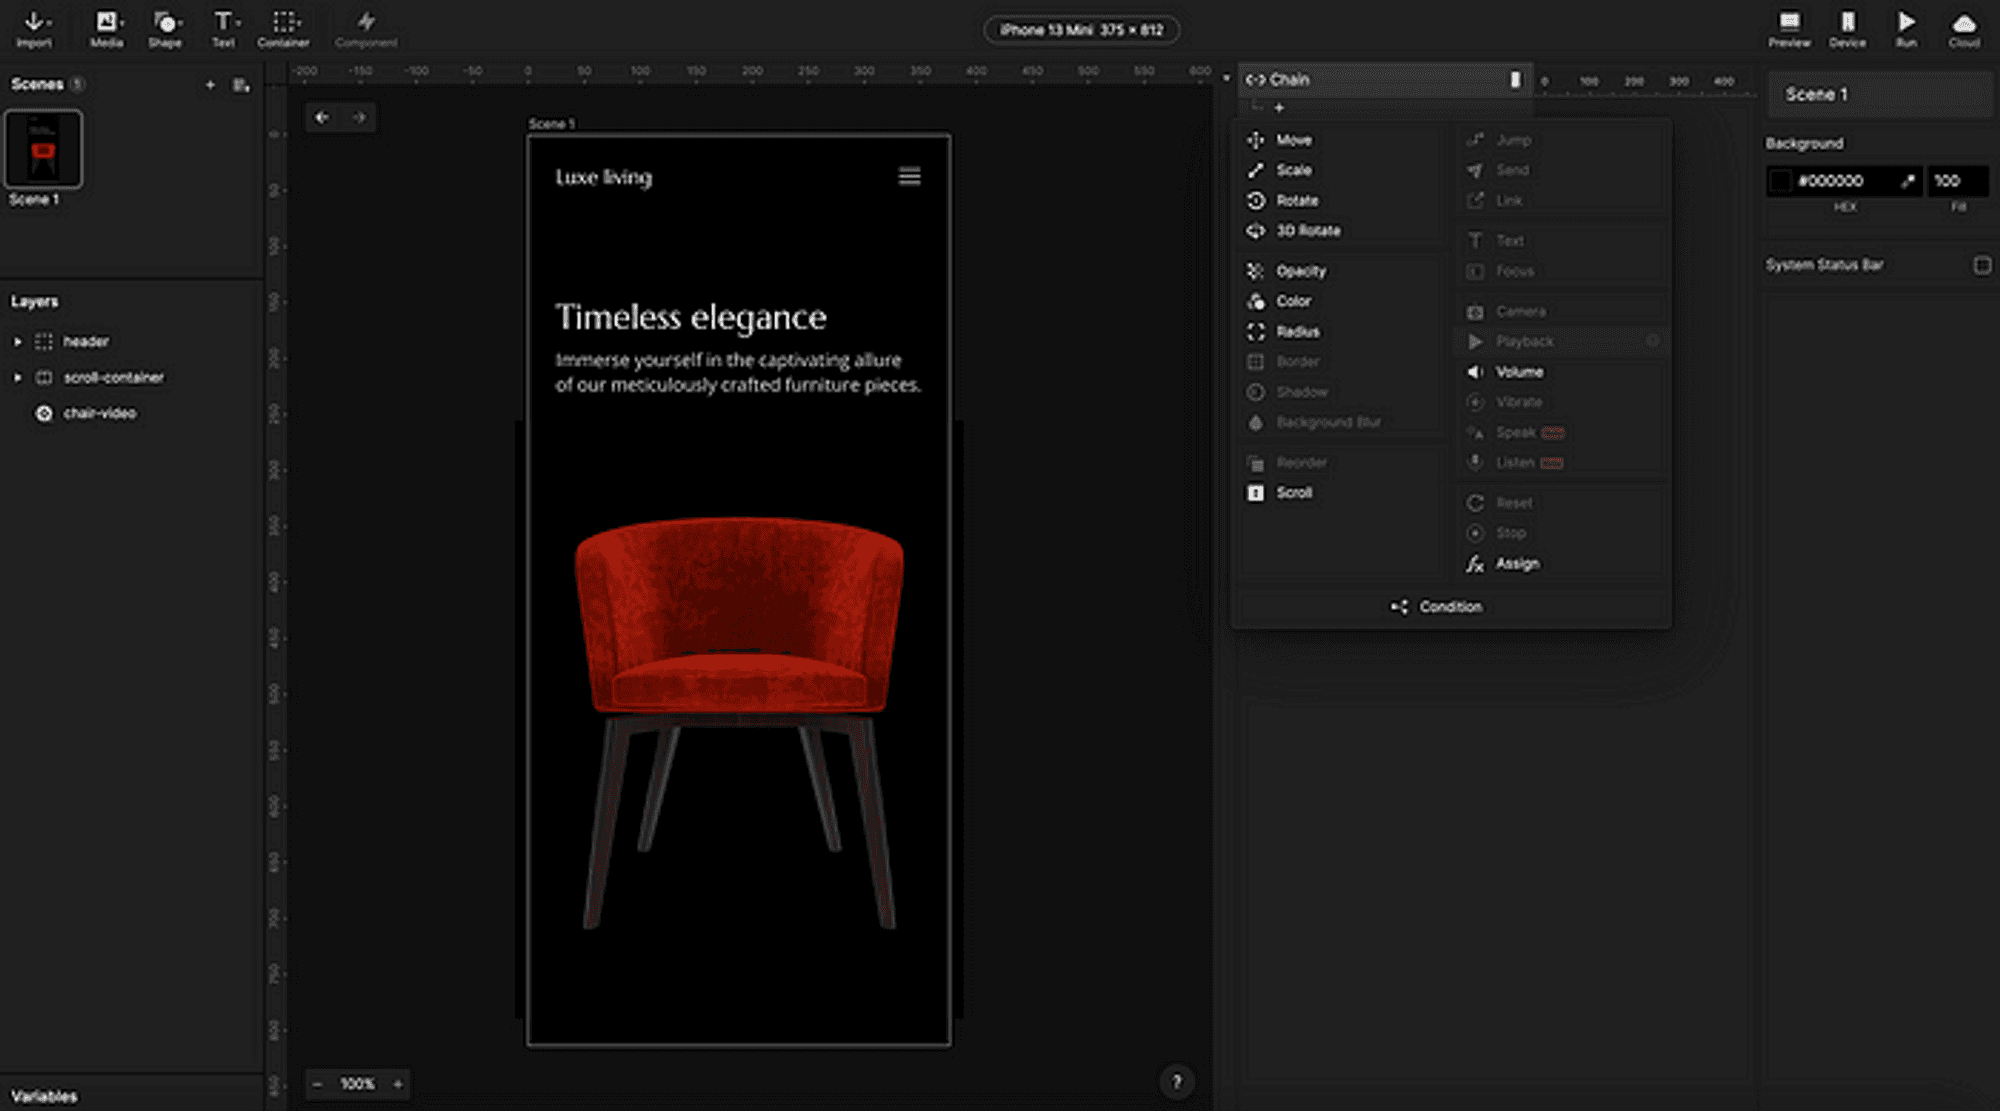
The easiest way to imitate this effect is by using the conditional trigger. Select the header and set the Chain property to scroll-container and its scroll. Then, add the Move response for the header element and adjust the layer mapping ranges. When scrolling from 0 to 48px, move the header from 0 to -72px along the Y axis. This way, the header object moves up a tad quicker than the rest of the content.
Similarly, chain the video position to the container’s scroll offset. In my example, I map the scroll range [0;360] to the Y position range [520;360]. Hence the video moves up slower than the content.

Chain trigger with scroll properties
Video playback
When you try to do the same trick with the video playback, it will not work. The Playback response is not available for the Chain trigger.
So the question is: how to chain the playback to the scroll position without the Chain trigger?
Chain trigger and Playback response
4. Scroll animation
Detect scroll
The Detect trigger comes to the rescue with a lifebelt! Set the trigger to listen for any changes in the Scroll of our scroll container. Then, add a local number variable and click the bug icon next to its name. This way, you can display its value in the preview window.
Within the Detect trigger, add an Assign response and save the current scroll offset to the variable with this formula: scroll-container****.scrollOffset
The variable value should update automatically in the preview.

Detecting scroll offset
Playback response
Create a Condition to the Detect trigger. For the scroll variable value less than 320, add a Playback response with the Seek action. I use the formula: 1+scroll/60. Now we have a video playback fully controlled by the scroll offset.

Connecting video playback and scroll offset
Text component
One last thing that can add a little extra flair is text animation. Create a component for the text section with a header and a paragraph. Add a Receivetrigger and listen for a start message from the Parent Channel. Animate the opacity from 0 to 100 and slightly move the texts upwards.
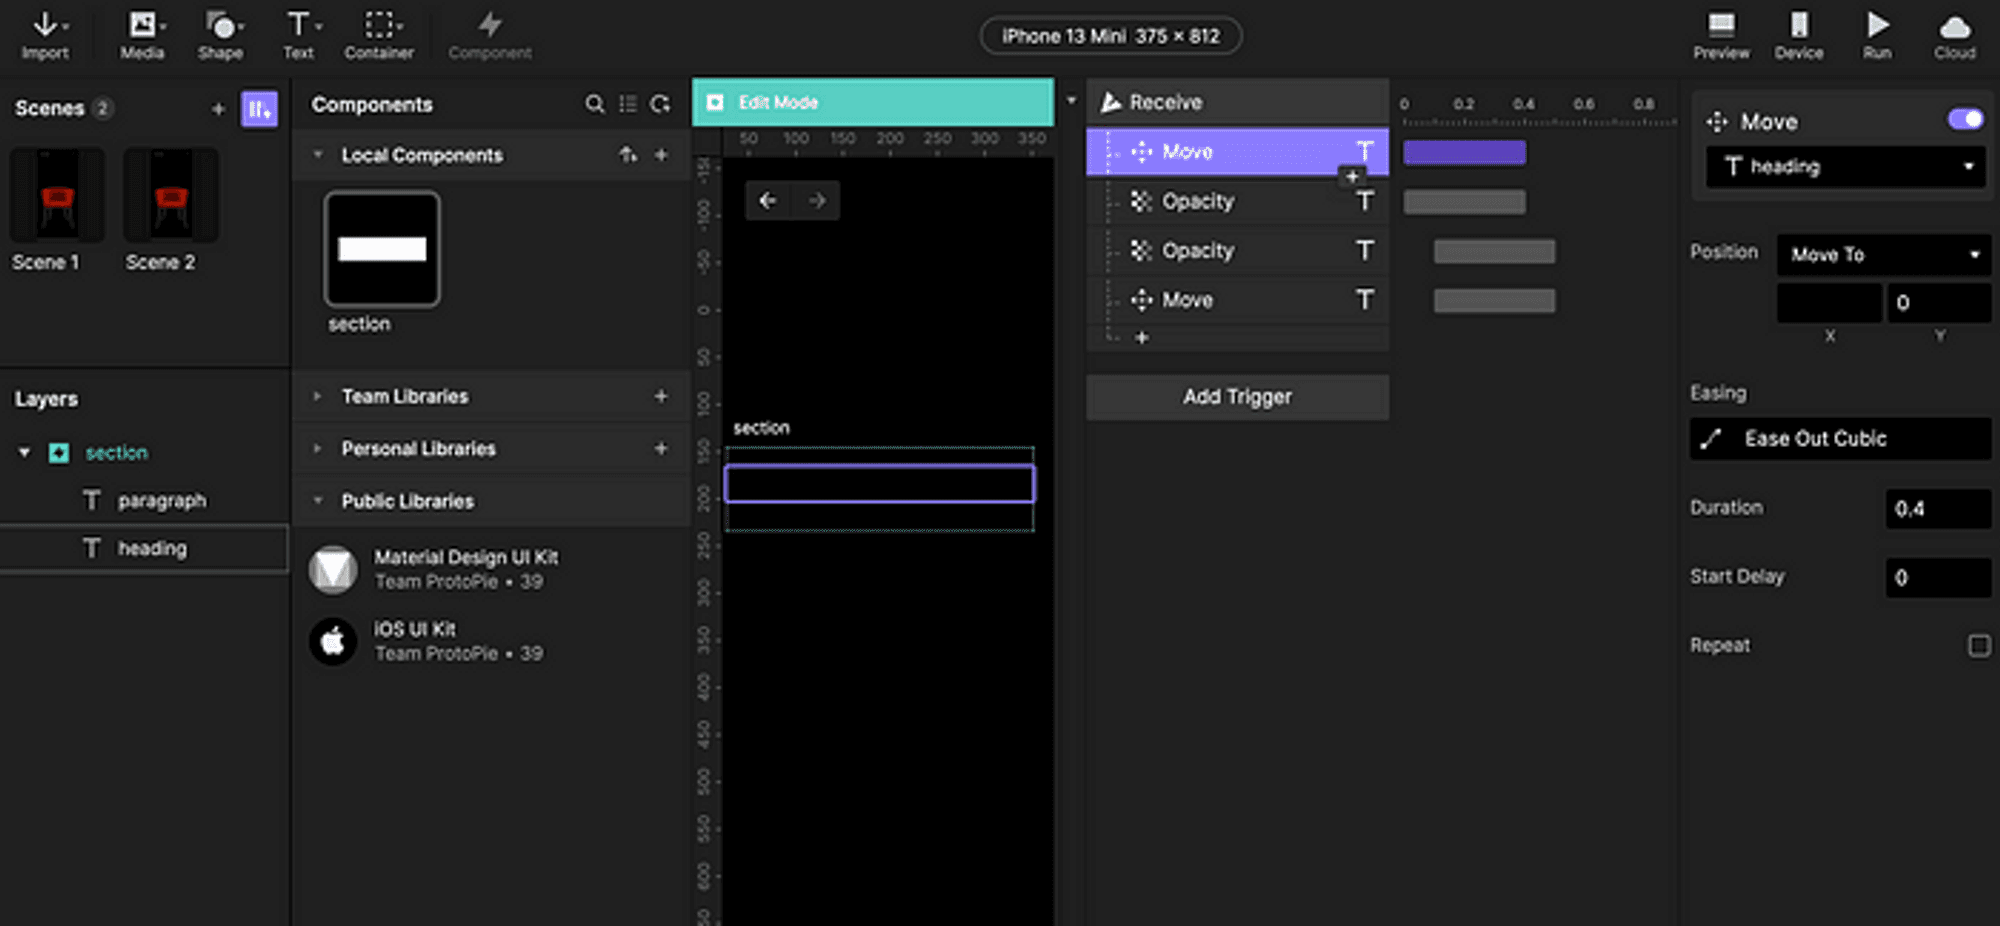
Animating the text component
Send response
Tie everything together with the Send response. On Start, send the startmessage to the first section component. In the Detect, send the same message to the second section component when the scroll variable is at least 240.

Triggering component animation
4. Final result
We arrived at our destination. You can roll up the sails and enjoy the paradise island of scroll animation ;)

Final result
Get started with your UX journey and Prototyping
Take the first step towards mastering high-fidelity prototyping with ProtoPie and ProtoPie School.


