

In Part 1, you learned how to use Formulas to join text together. Now we're going to delve deeper and do some more complex calculations.
What you'll need
To follow along with this tutorial, download this example Pie and open it in Studio.
What you'll learn
By the end of this tutorial you'll have learned:
How to create a Formula to perform mathematical calculations
An introduction to Functions
Time to complete: ≤15 minutes
From Text to Mathematical Calculations
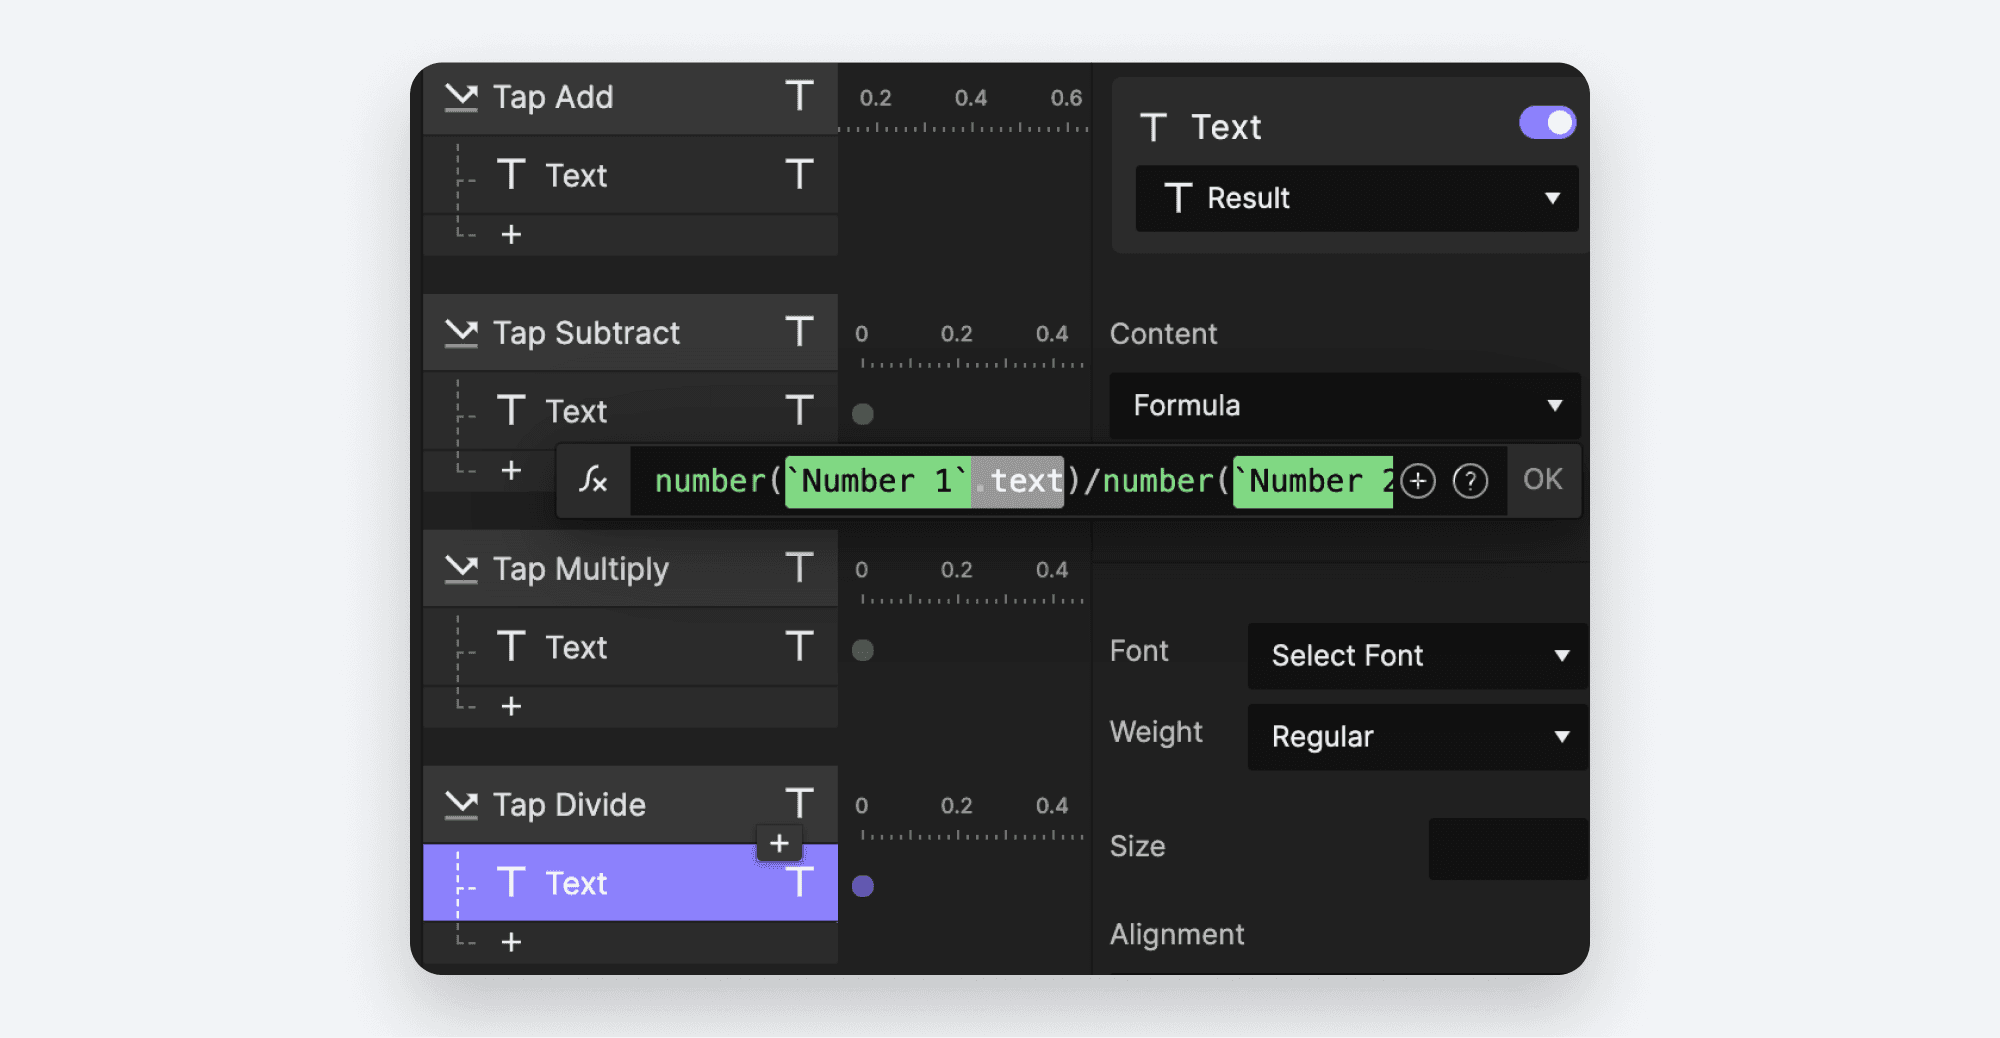
Using the same Pie, open Scene 3 - Calculate. This Scene has two input fields and four buttons. What we'd like is for the user to input a number in each field, and then select the calculation they'd like to perform — in our case, Addition, Subtraction, Multiplication or Division. We're going to have our Pie make the desired calculation and display the result below the buttons.
Add a Tap Trigger to the Add Layer.

Add a Text Response to the Result Layer.

Since we are once again working with input that we don't yet know, we'll want to use a Formula. Choose Formula in the drop down below Content.
Click the box below it and you'll see our familiar ∫x icon. Click it to expand the Formula input box.
Like we did previously, click the ⊕ icon that appears near the right end of the Formula box and choose the
Number 1layer.
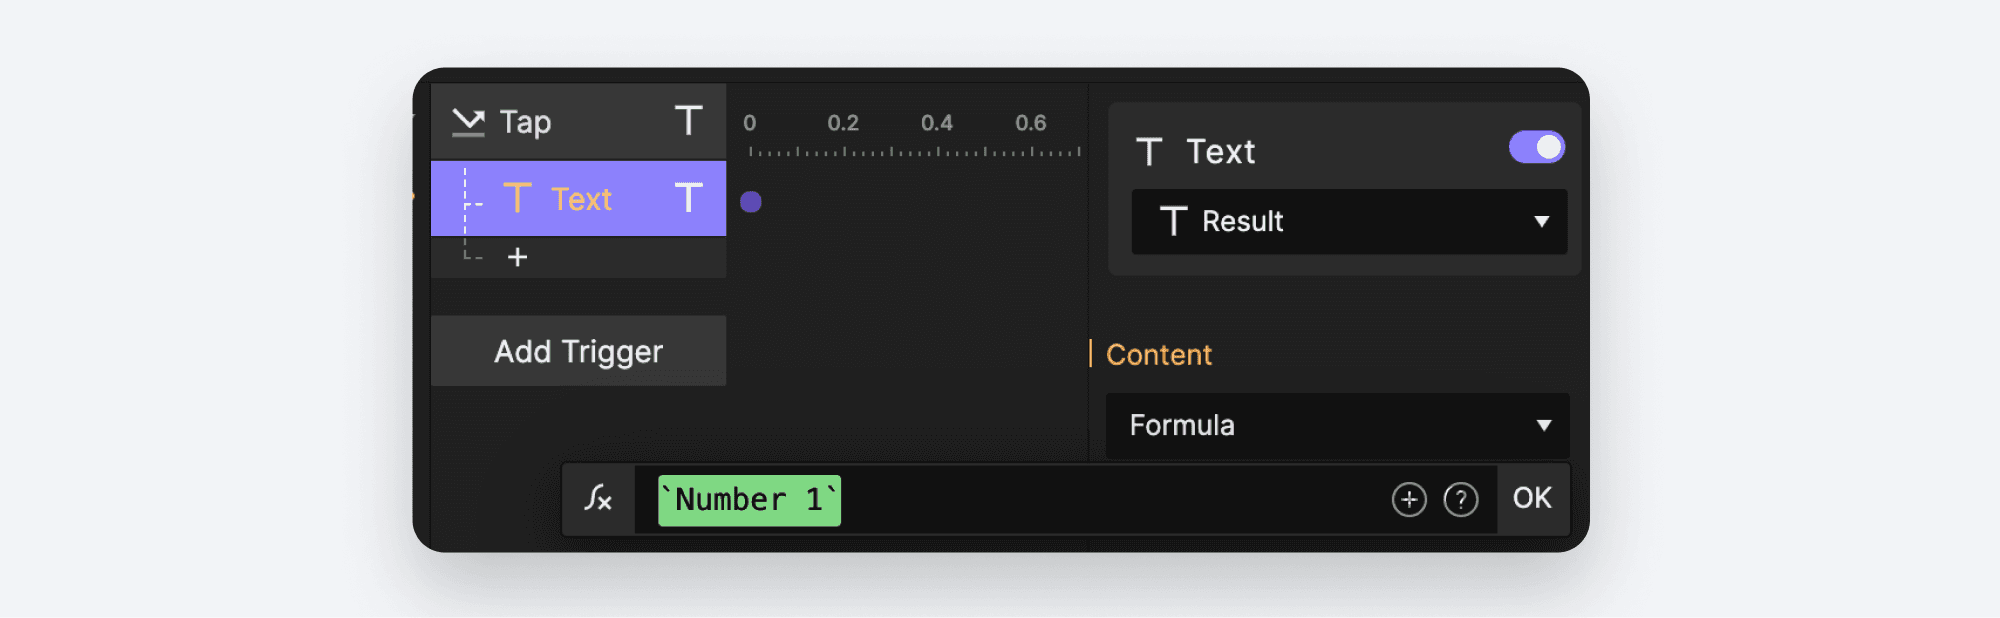
We'd like to access the
textproperty of this layer. Type the dot.character to reveal all of the properties for theNumber 1Layer. Scroll down and choose text. Type+to tell ProtoPie you want to do some addition. Click the ⊕ icon again and this time pick theNumber 2layer. Type.and pick thetextproperty.
Click OK to commit your Formula.
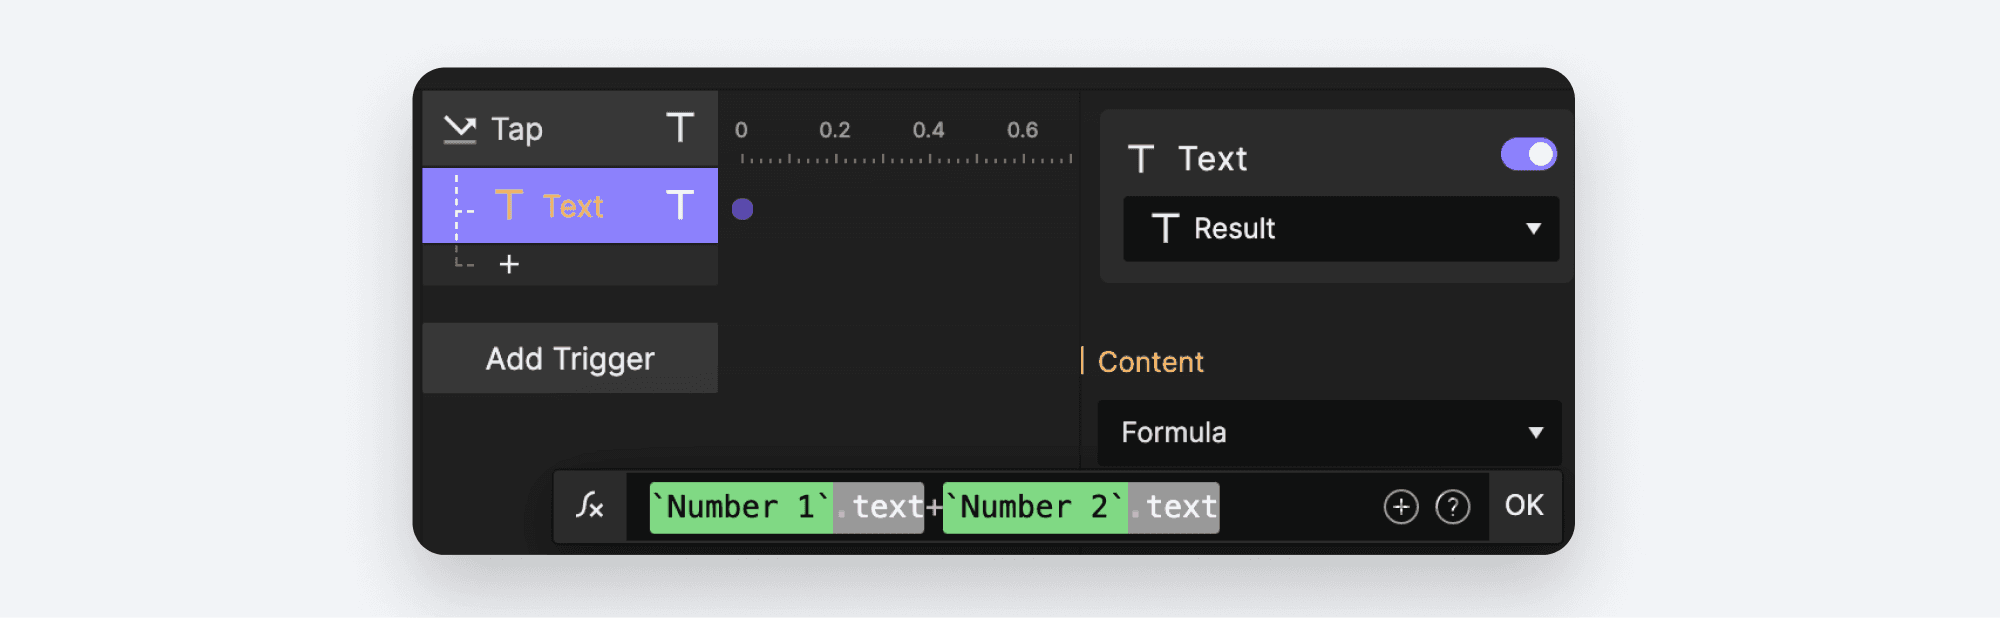
Let's Preview this. Enter a number in both input fields and click the + action button.
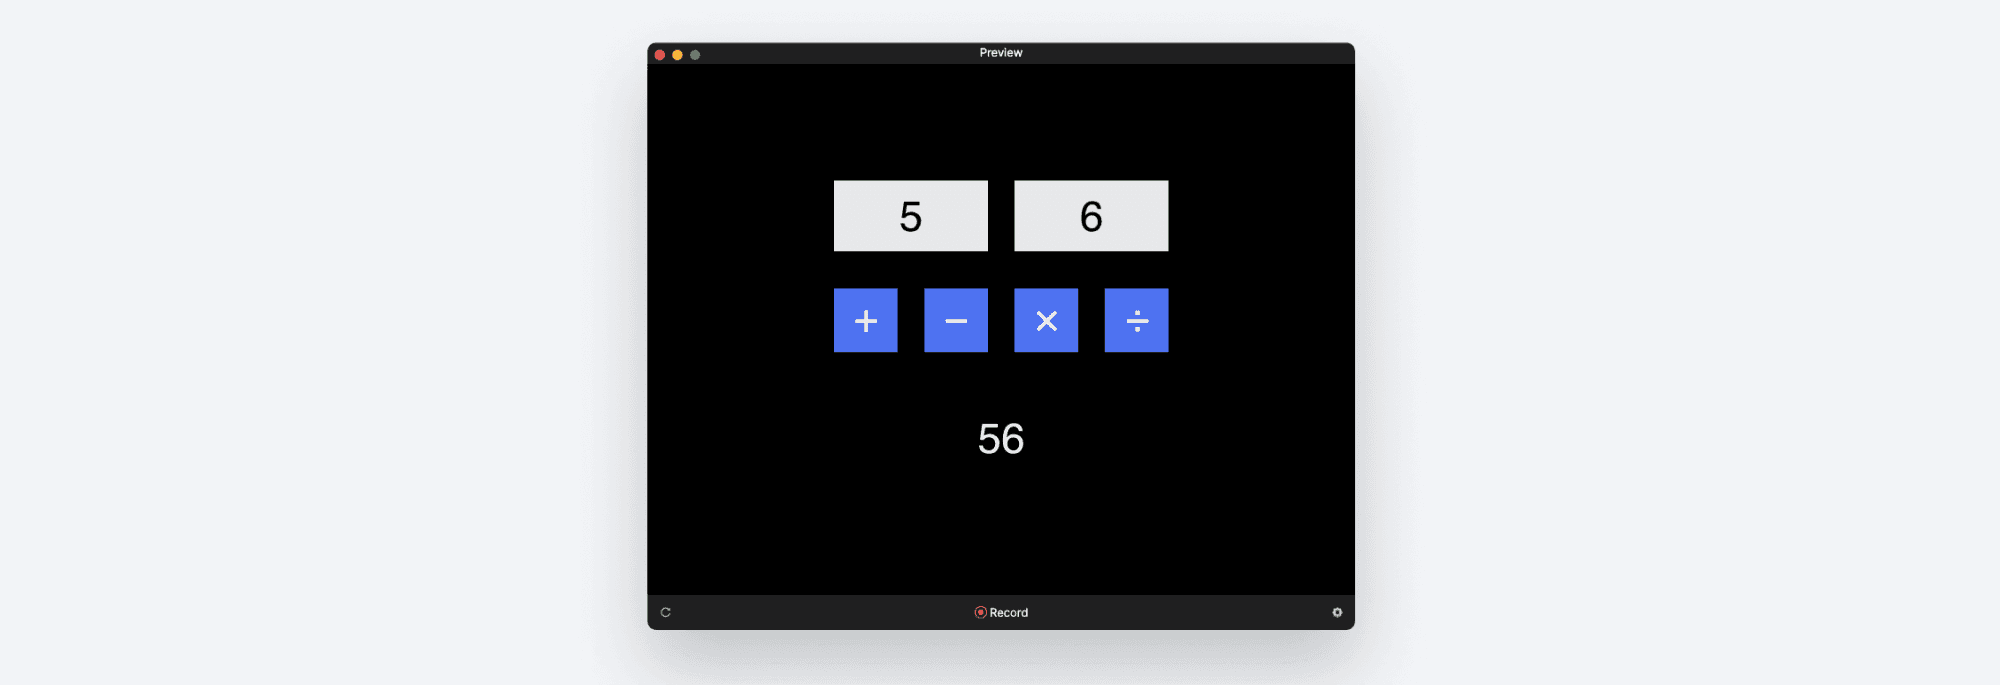
That... didn't work, did it? Instead of adding or two numbers and giving us the sum, ProtoPie instead joined the two numbers together. In my example, 5 + 6 gave me 56, not 11!
Why did this happen?
If you recall from Part 1, the + character in your Formula was used to tell ProtoPie you'd like to join some text together. Confusingly, it is also used when you'd like to add two numbers arithmetically. ProtoPie is intelligently trying to guess what type of operation you'd like to do, but in this case ProtoPie got it wrong. As the name might suggest, ProtoPie is treating the text property of the Number 1 and Number 2 fields as text, not as numbers, and therefore assumes you're trying to join two pieces of text together.
We can fix this by explicitly telling ProtoPie how to treat the text properties. We can use something called a Function to do this. A Function is a fancy name for a predefined set of instructions. We'd like one that Tells ProtoPie that the text properties should be treated as numbers.
Click the ∫x icon to modify your formula. Click the
?icon at the right end of the Formula entry box to open the documentation for Formulas in your browser.
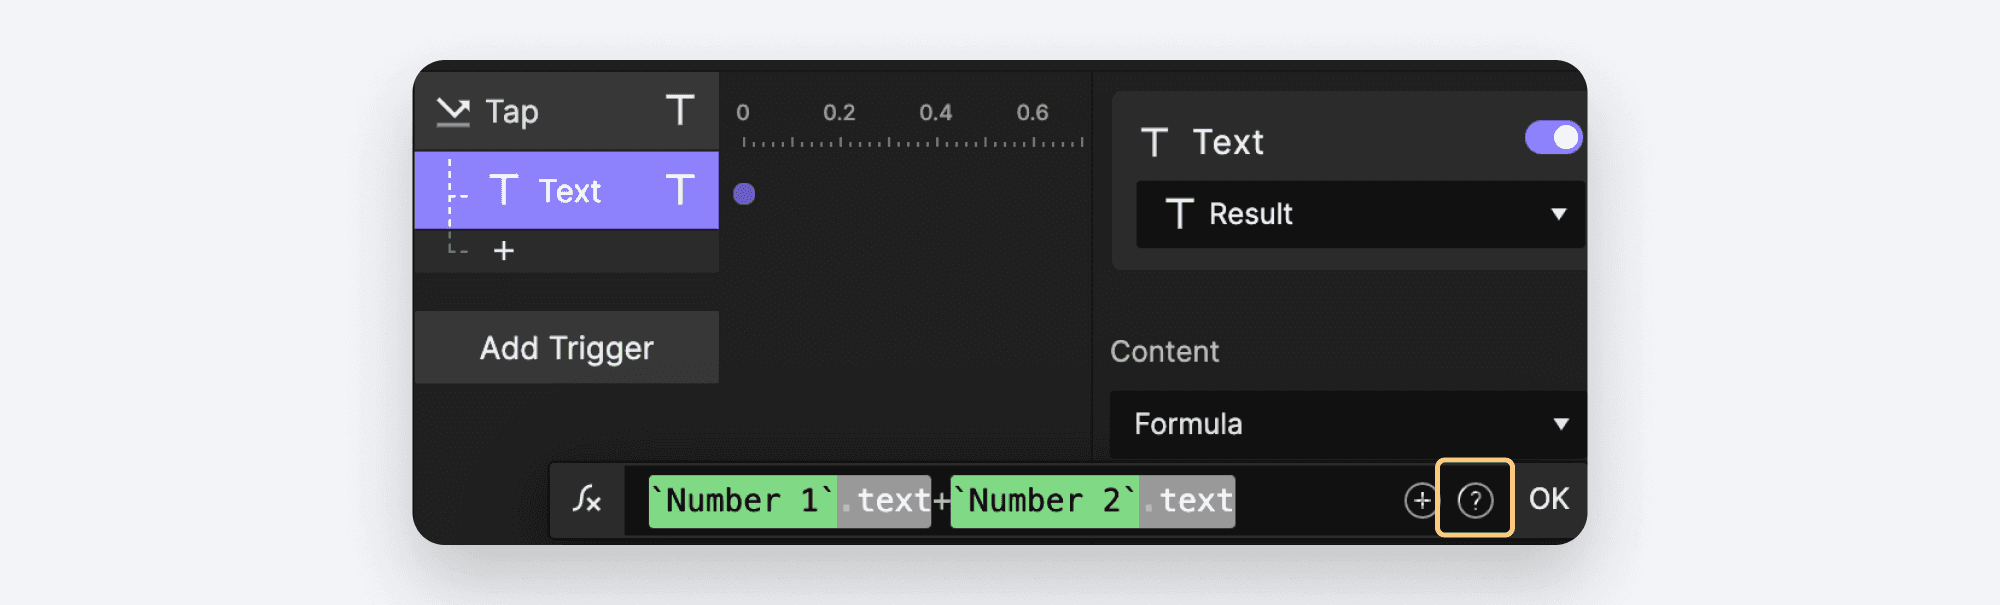
In the left-hand panel navigate to Formulas → Functions.
These are all of the Functions available in ProtoPie. When you're done this tutorial, take some time to explore all of the available Functions you can use in your Formulas.
Scroll down to the Type Conversion section and look for the
number(source:TEXT)function.
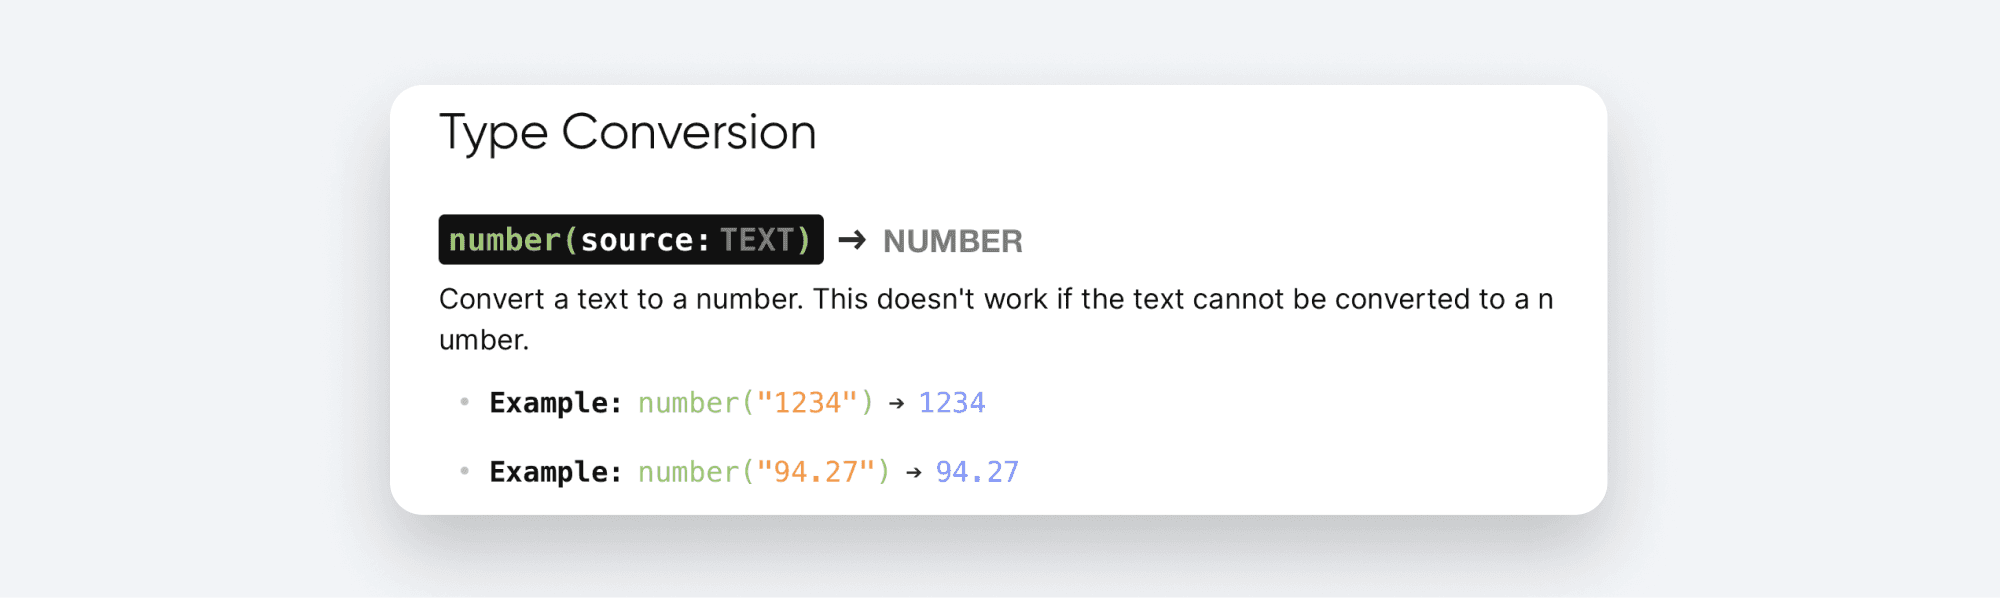
All functions have a similar format:
The name of the function, in this case
numberOne or more parameters you supply to the function as input, enclosed in brackets (e.g.,
(source:TEXT)). What this means is that this function takes in a single parameter, and that parameter must be in text format. If a function takes multiple parameters, they are separated by a comma (e.g.,format(value:NUMBER,format:TEXT)take two parameters, a number and some text).What type of information the function will give you back after it executes (e.g.
-> NUMBER).
Since we have text and we'd like to convert it to a number, this function does exactly what we need! It takes in some text, and converts it to a number.

Modify your formula this way.
Let's Preview this again, and see it it fixed our problem.
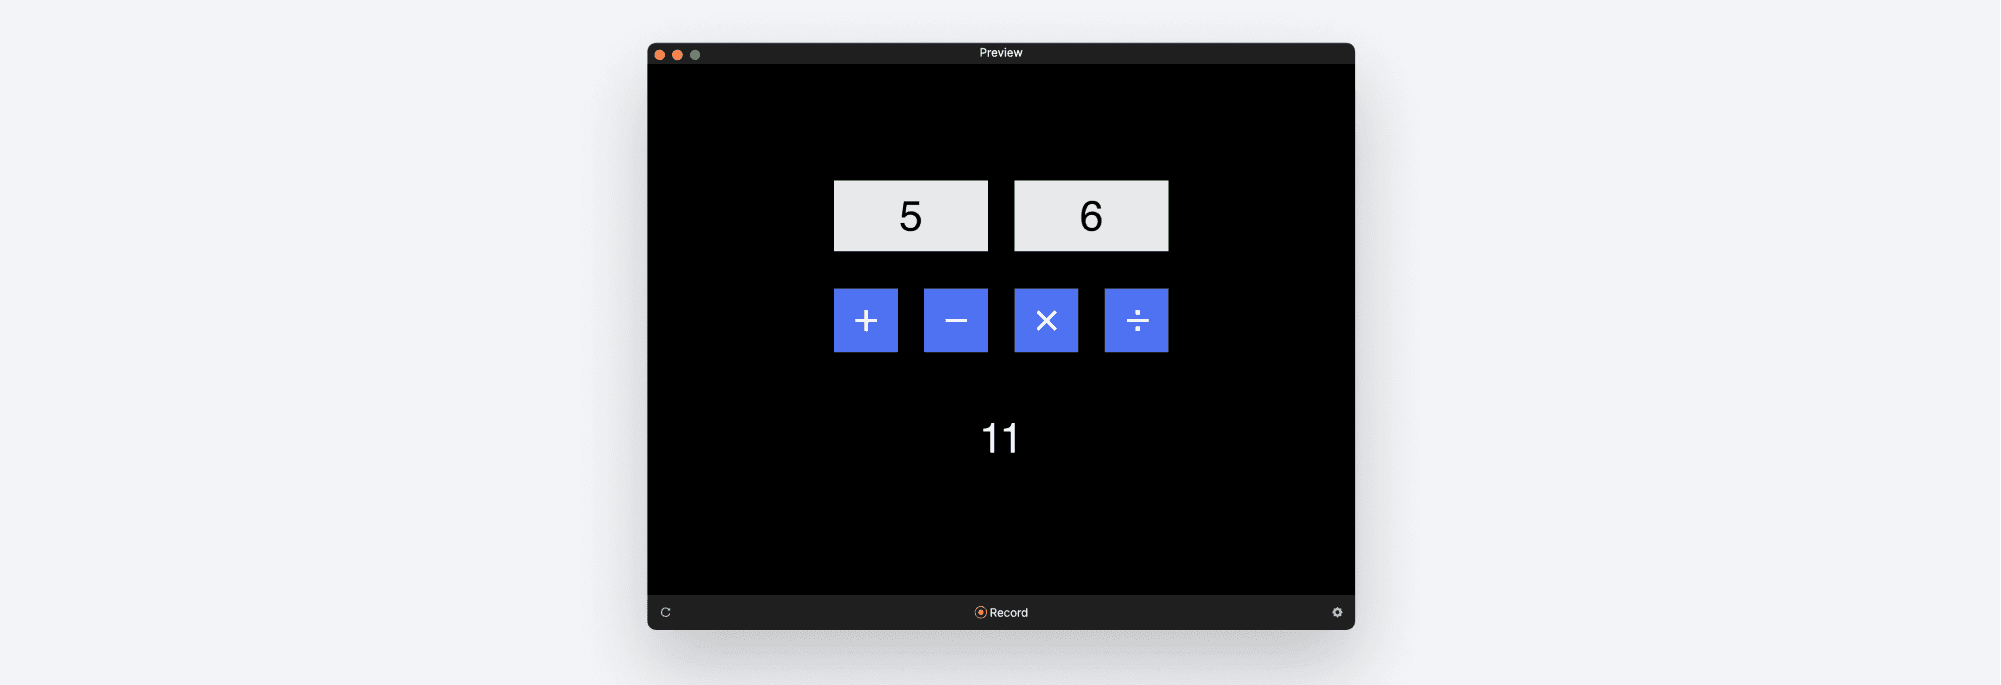
Bingo!
All we need to do now is make similar interactions for our remaining buttons. You could go the long way and repeat all of the above steps again, but a faster way is to duplicate the work we've already done, and just modify it for the specific action.
Click the Tap trigger in order select it. Right-click and choose Duplicate.
💡 Pro-tip: cmd + D on Mac or ctrl + D on Windows does the same thing.
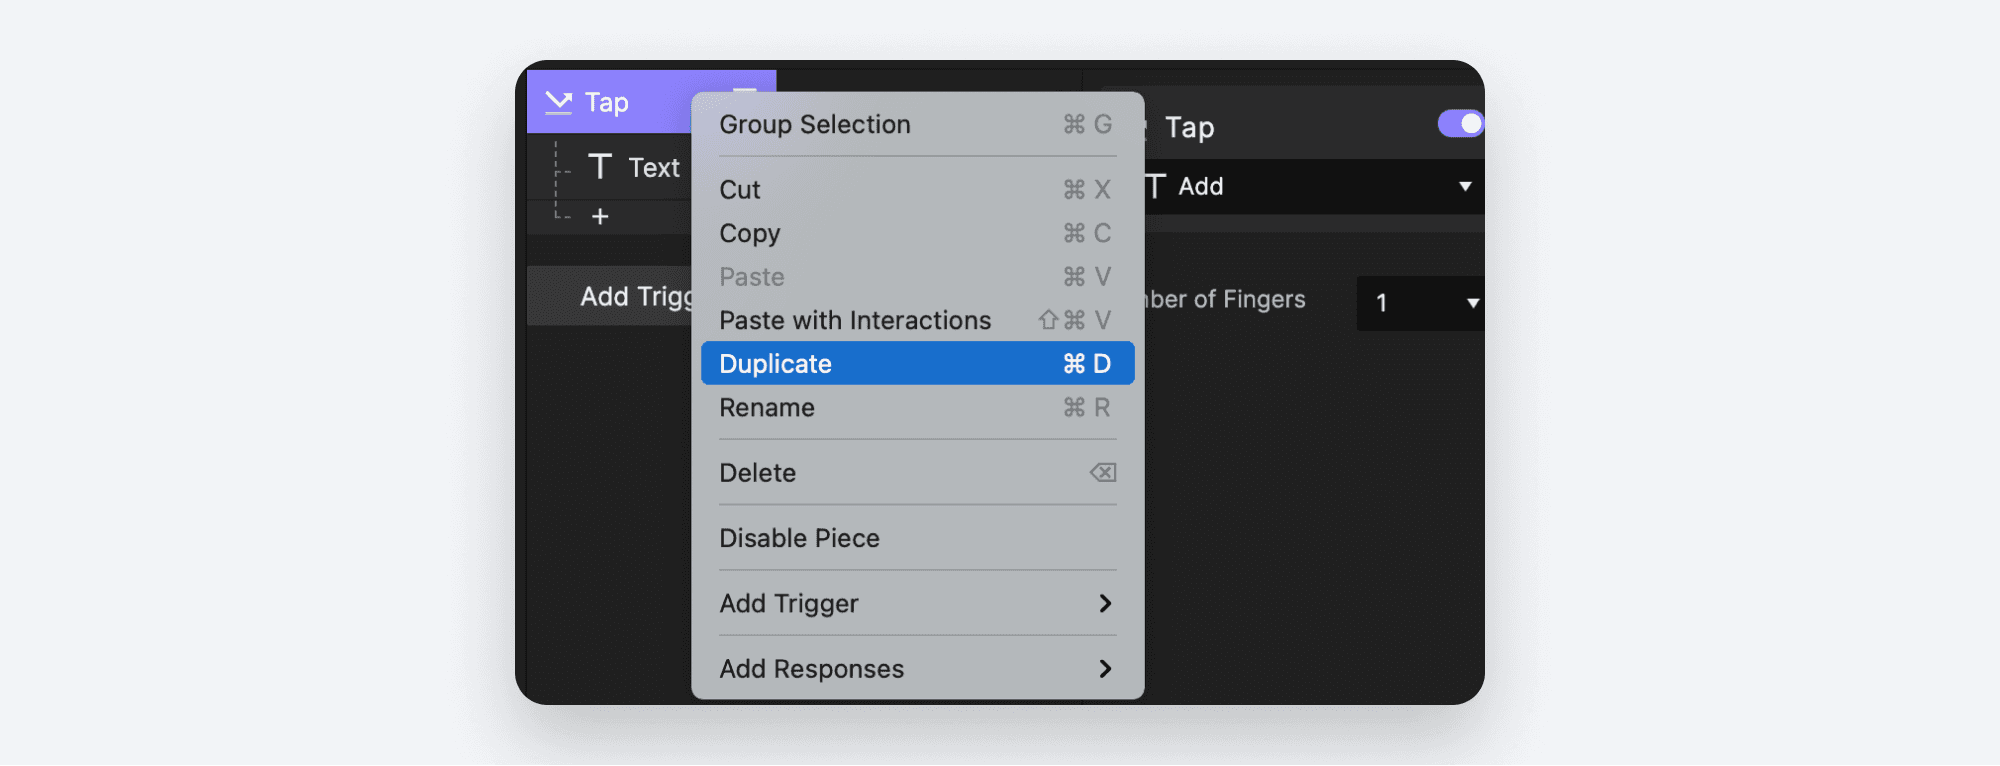
Before we move on, we now have two Tap Triggers that are named the same thing. Let's rename then so that they are easier to understand. Double click the Trigger's label to rename the first one to Tap Add and the second one to Tap Subtract.
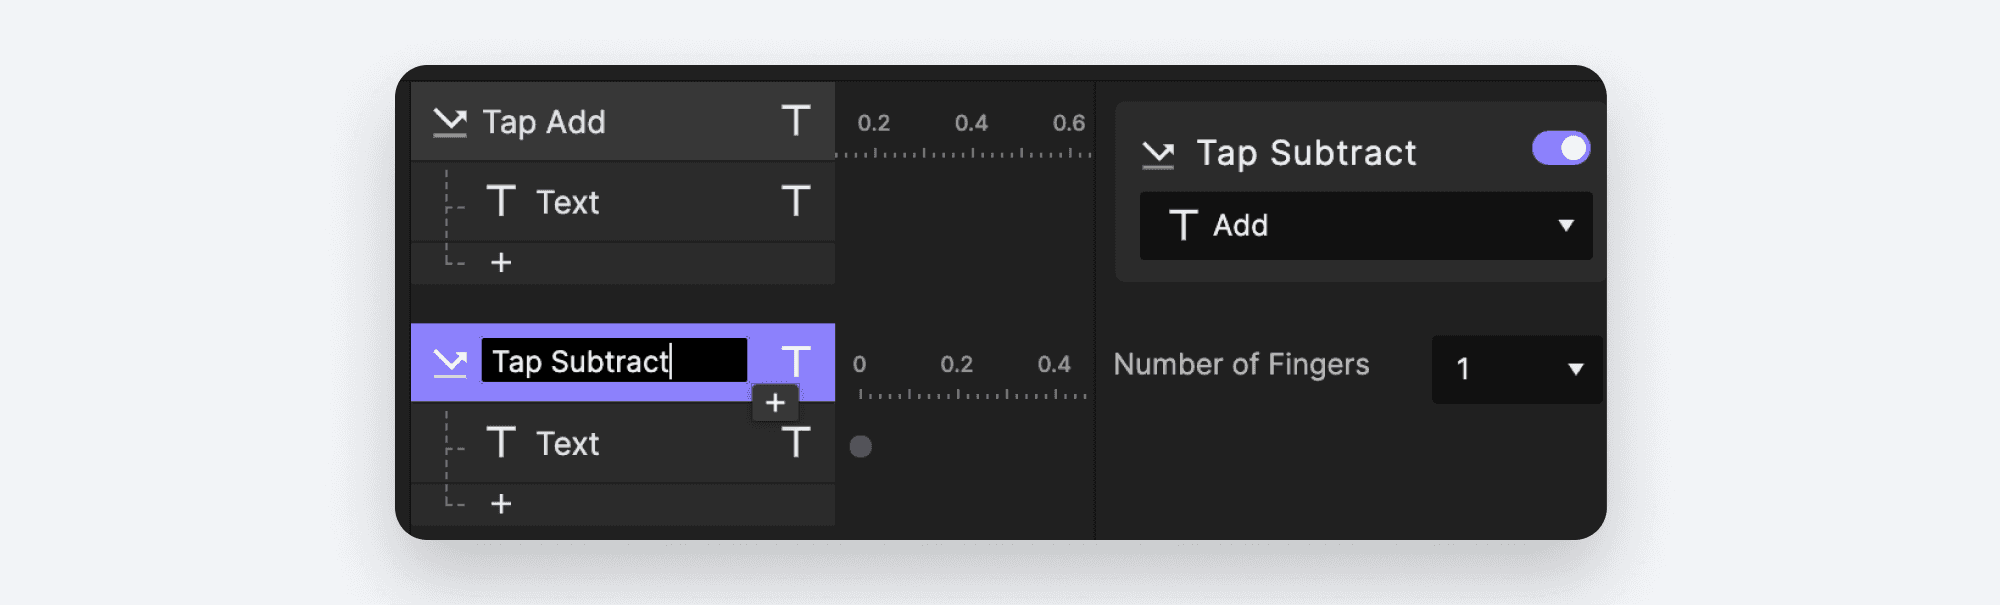
Let's modify our duplicated Trigger to work with the Subtract button and perform a subtraction action.
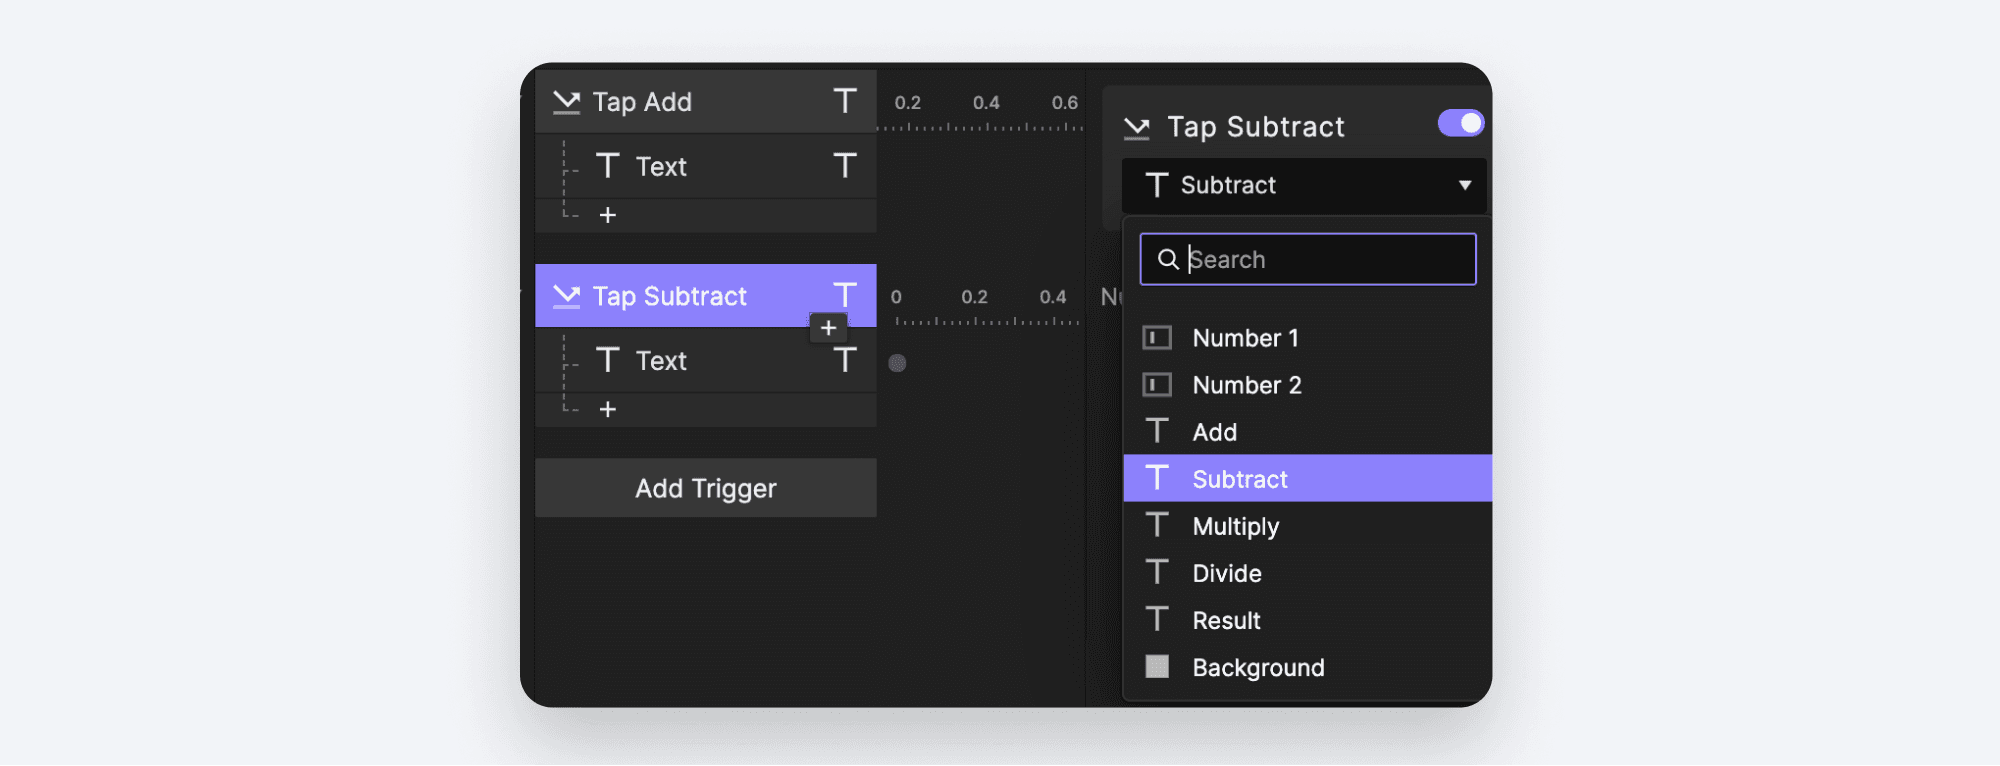
Click the Tap Subtract Trigger to select it, and re-associate it with the Subtract Layer.
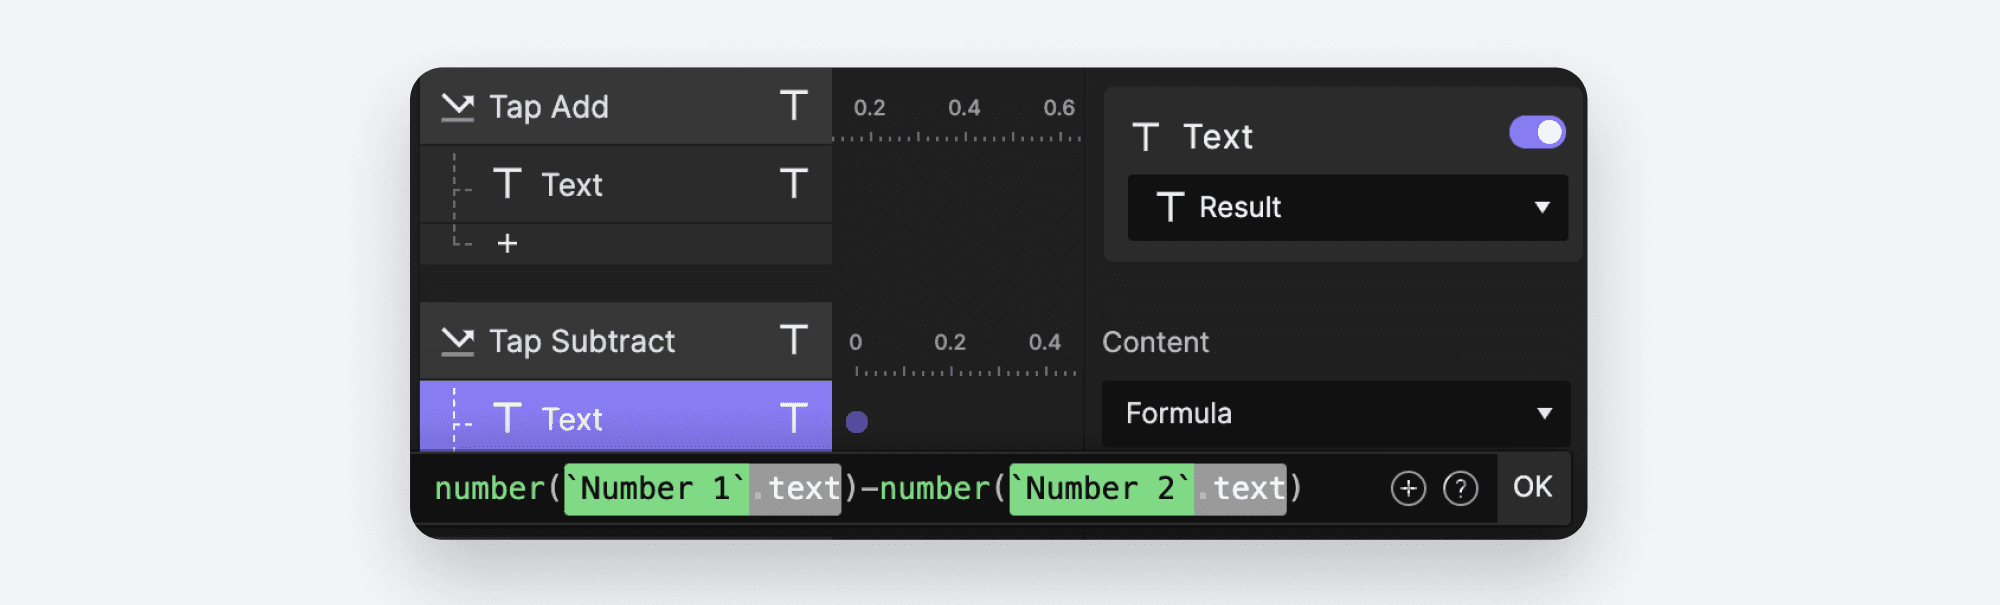
Click the Text Response underneath it, and modify the formula to subtract instead of add. Change the
+character to-
Do this two more times for the multiplication and division actions. By now you've likely realized that there is no multiply character on your keyboard, nor is there a divide character. Programmers solved this a long time ago by using * to represent multiplication, and / for division. Your Formulas should look like these respectively:
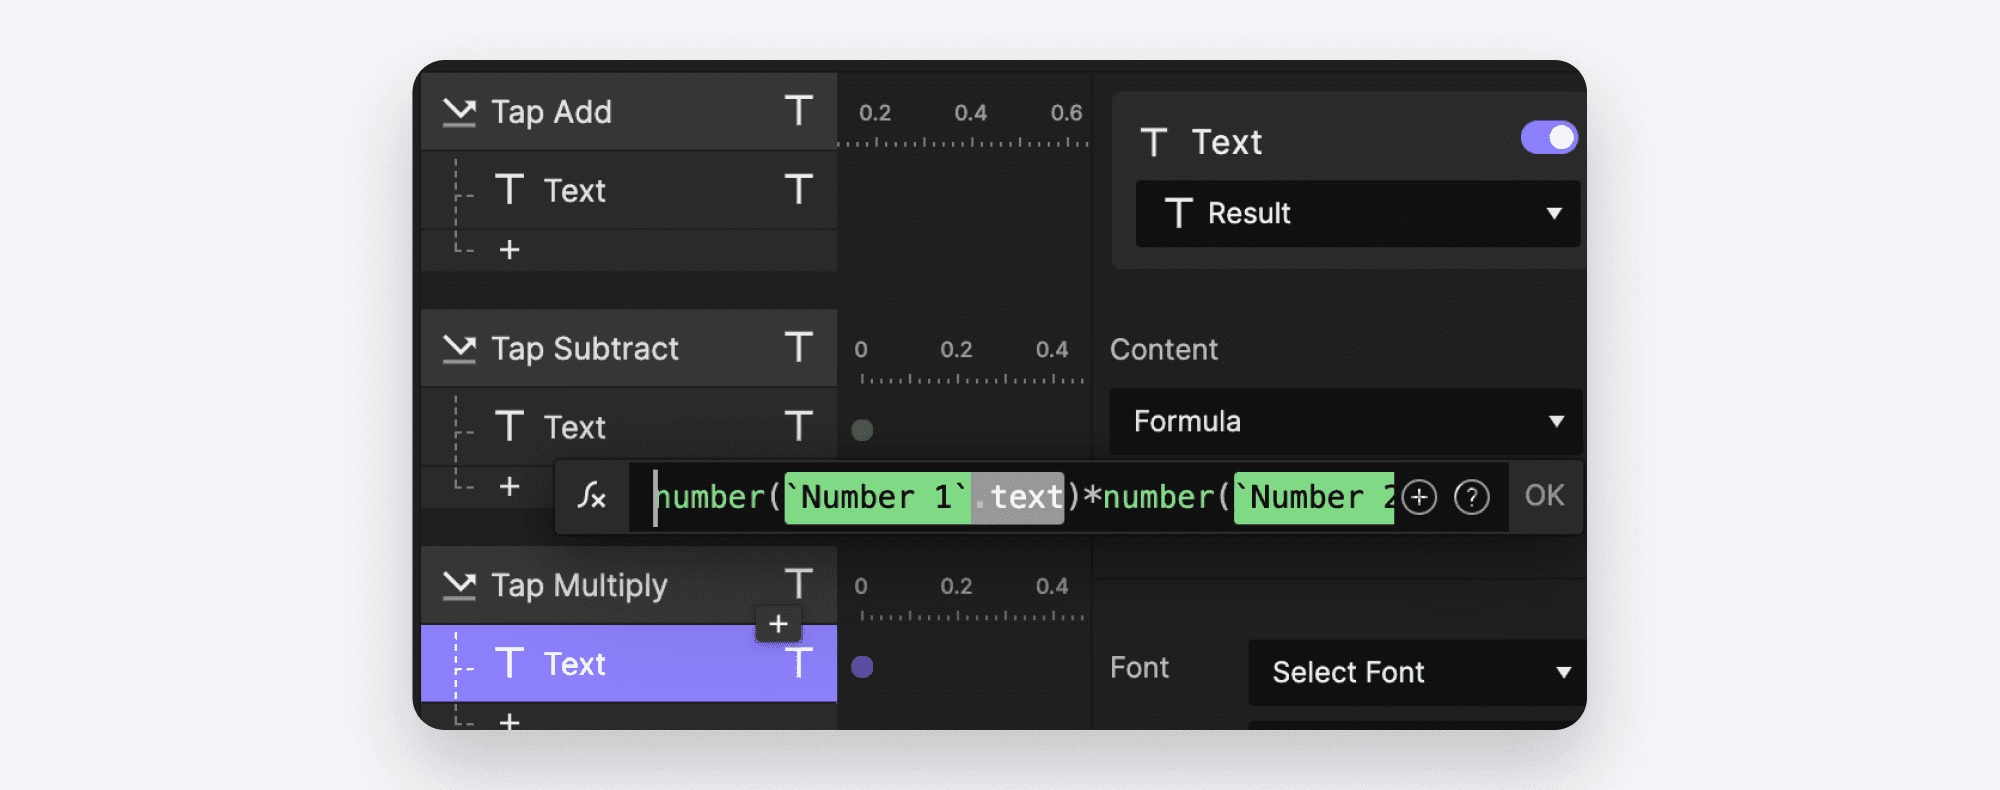
Formula: Multiplication
Formula: Division
If you Preview this, you should be able to execute all four actions against your numbers. And if you change your numbers to something else, your math will still work. That's the power of using Formulas!
A note on white space
In our formulas above we didn't use spaces around our operators (+, -, *, and / are all called operators). As your formulas get more complicated, this can make them harder to read. It's perfectly fine to rewrite a formula that looks like this:

like this (notice the spaces around the * character):

Both will do exactly the same thing, but the second one is a little easier to read. In fact you can add white space in many other places. Nothing wrong with this, for example:

ProtoPie is even smart enough to figure out what you mean by this:

There are a few places where white space does matter, though. We already covered the difference between "Hello," and "Hello, ". Also, if you try to do this:

ProtoPie will not like this. Variable names can't have spaces in them. ProtoPie interprets this thinking that you are trying to use three different variables, none of which can be found. ProtoPie tries to help you by underlining the problem areas with a red zig-zag. Whenever you run into problems with your Formulas, checking for the red zig-zag underline is a great place to start.
"There you go! Easy as " + Type of Pie``.text + " Pie!"
You should now have a good grasp on how you can use formulas to make your Pies incredibly lifelike. You do not need to stick to static values, as the ability to use Formulas can be found almost anywhere in ProtoPie — just look for the ∫x icon. Take some time to explore all the ways you can use Formulas to take your experiences to the next level!
Related content
Create an Expanding Image Overlay Using Long Press and Formulas This tutorial will teach you how to create expanding image previews using the relevant ProtoPie formulas and triggers.
Prototype an Input Stepper with ProtoPie's Formula Feature Learn how to easily prototype an input stepper with ProtoPie. We will walkthrough all of the elements, formulas, and conditions to make it happen.
The Easiest Way to Create a Sticky Header that Responds to Scrolling Ever wanted to show or hide your app's header based on the direction of scrolling? Here's how to do so, using a simple condition and formula.


