

Are you ready to learn about parallax scrolling and create an Apple Vision Pro landing page clone? Let's dive right in.
Overview
What's parallax scrolling?
Recreating Apple Vision Pro's landing page with ProtoPie
What you’ll need
Tips and tricks
Craft the hero section with scroll animations
Enhance engagement with video slideshows
Add an immersive touch with scroll to playback
Parallax scrolling made easy with ProtoPie
Learn web design with ProtoPie School
What is parallax scrolling?
Parallax scrolling has been a game changer in web design since its inception in 2011, offering a dynamic and immersive user experience. With time, it has become a foundational element of contemporary web design.
The technique creates an illusion of depth by making the background move slower than the foreground elements as users scroll through a webpage. This not only enhances the visual appeal but also improves user engagement. It also creates a compelling narrative that unfolds as users scroll through the vast information you want to share, encouraging users to explore further.
Recreating Apple Vision Pro's landing page with ProtoPie
This article delves into web design, offering actionable tips and tricks. We’ll guide you in replicating the state-of-the-art Apple Vision Pro landing page design using ProtoPie. Given the vastness of the Apple website, our focus will be honed in on fundamental techniques to replicate its essence.
What you’ll need
Before we begin, take a moment to gather the necessary assets to prepare yourself for this creative expedition.
Tips and tricks for a seamless scrolling experience
With ProtoPie in your toolkit, getting a handle on the subtleties of parallax design is about to get a whole lot easier compared to wrangling with other design tools. We’ll lay out some handy tips and tricks to set you up for web design mastery. Before you know it, you'll be crafting a seamless, eye-catching scrolling experience on your web projects like a pro!
Let’s get started.
Craft the hero section with scroll animations

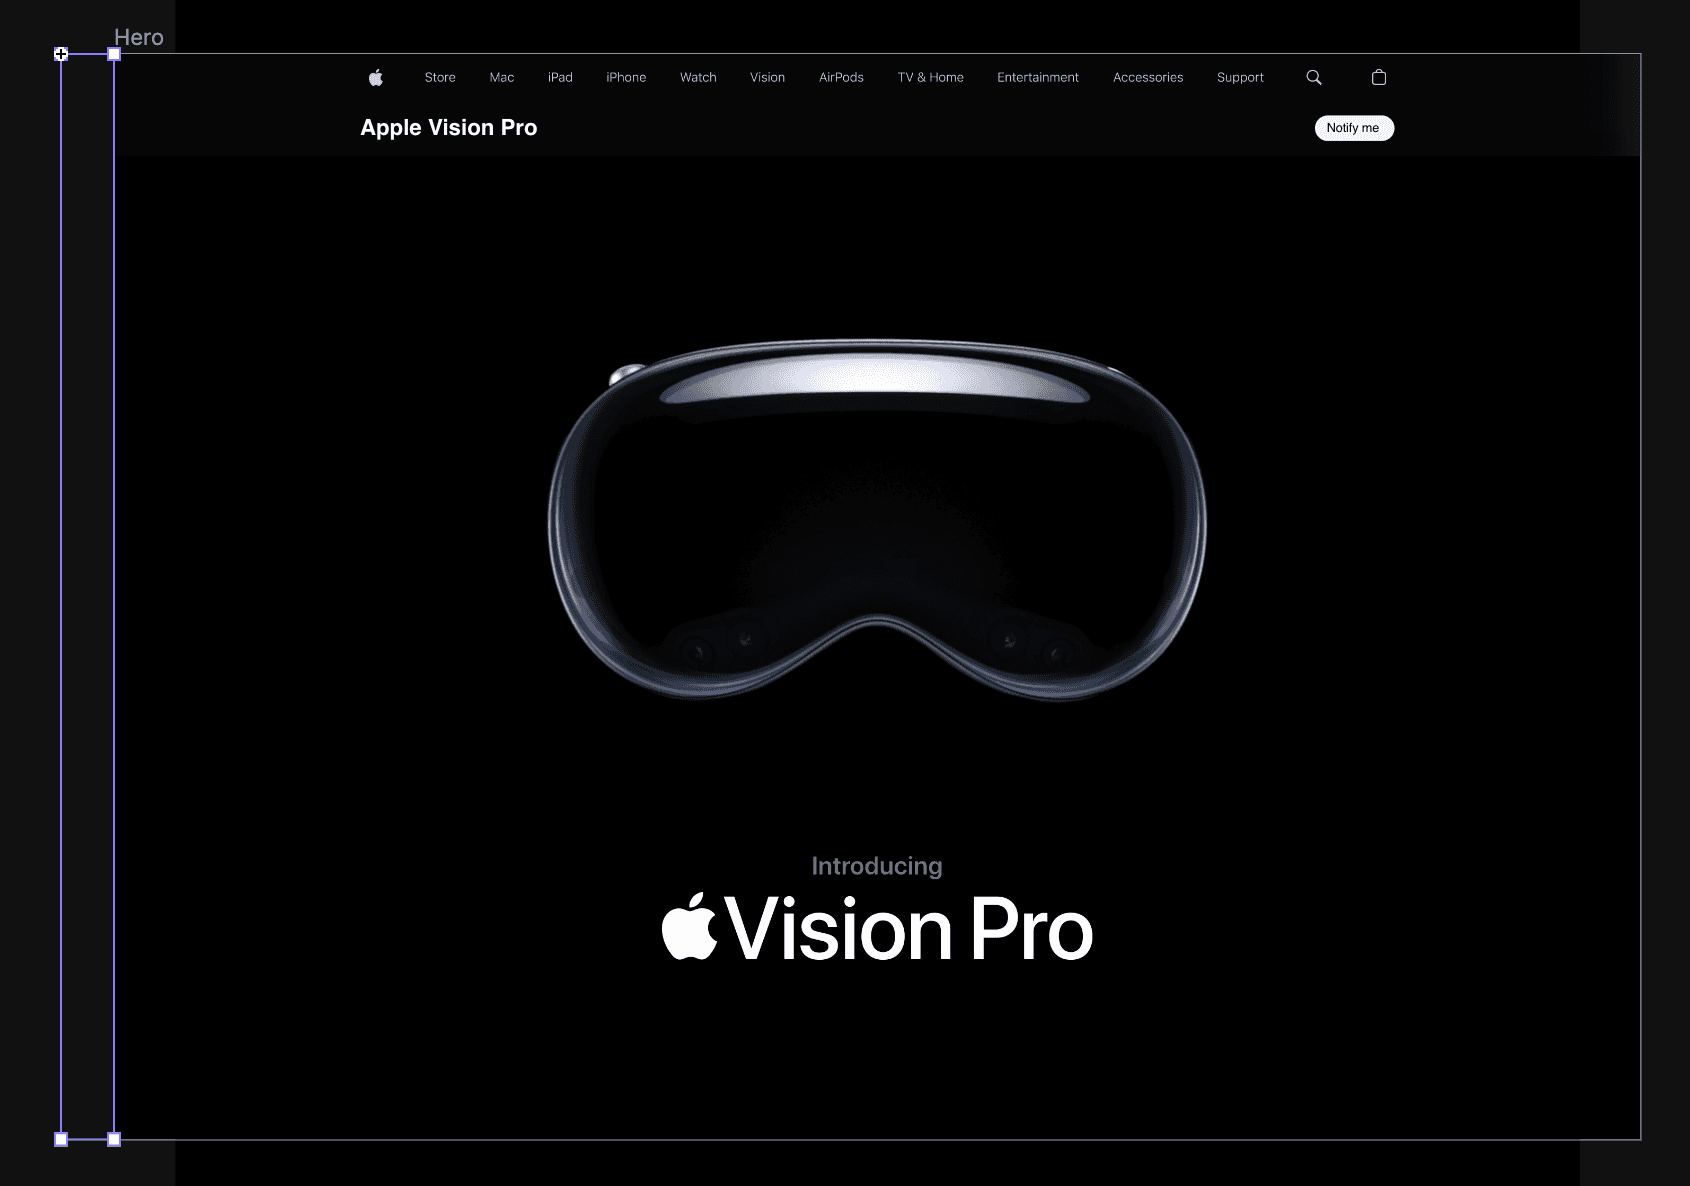
Apple Vision Pro scroll animation.
The hero section is your website's forefront, and here we have a captivating video that covers nearly the entire screen. As you begin to scroll, some exciting transitions take place:
The navigation bar partially hides itself
The Apple Vision Pro component gracefully fades away.
The hero video smoothly starts playing.
Open our Starting Pie. Let’s pinpoint the "Hero" scene. This will serve as our designated area for crafting these captivating hero animations.
Did you notice that as you scroll on the Vision Pro landing page, the elements subtly transform in appearance without significant vertical movement? If you observe the scroll indicator in your browser, the progress bar does indeed shift, indicating the depth of the scroll.
Our challenge is to replicate this effect while keeping the elements anchored in place within ProtoPie. We'll walk you through a technique involving the creation of a dummy scroll element to regulate the scroll depth. Simultaneously, we'll employ scroll distance to precisely dictate how we want the elements to transform based on the scroll progress.
Let’s create a scroll container called “Dummy Scroll”. The scroll container should have the same height as your screen. In terms of its width, you can pick whatever you like. For the scroll direction, let’s use vertical.
Apple Vision Pro Scrolling Effect.
Inside the “Dummy Scroll” container, let’s draw a rectangle called “Depth”. The rectangle has the same width as the “Dummy Scroll” container. For the height of this rectangle, let’s use 2000 pixels.
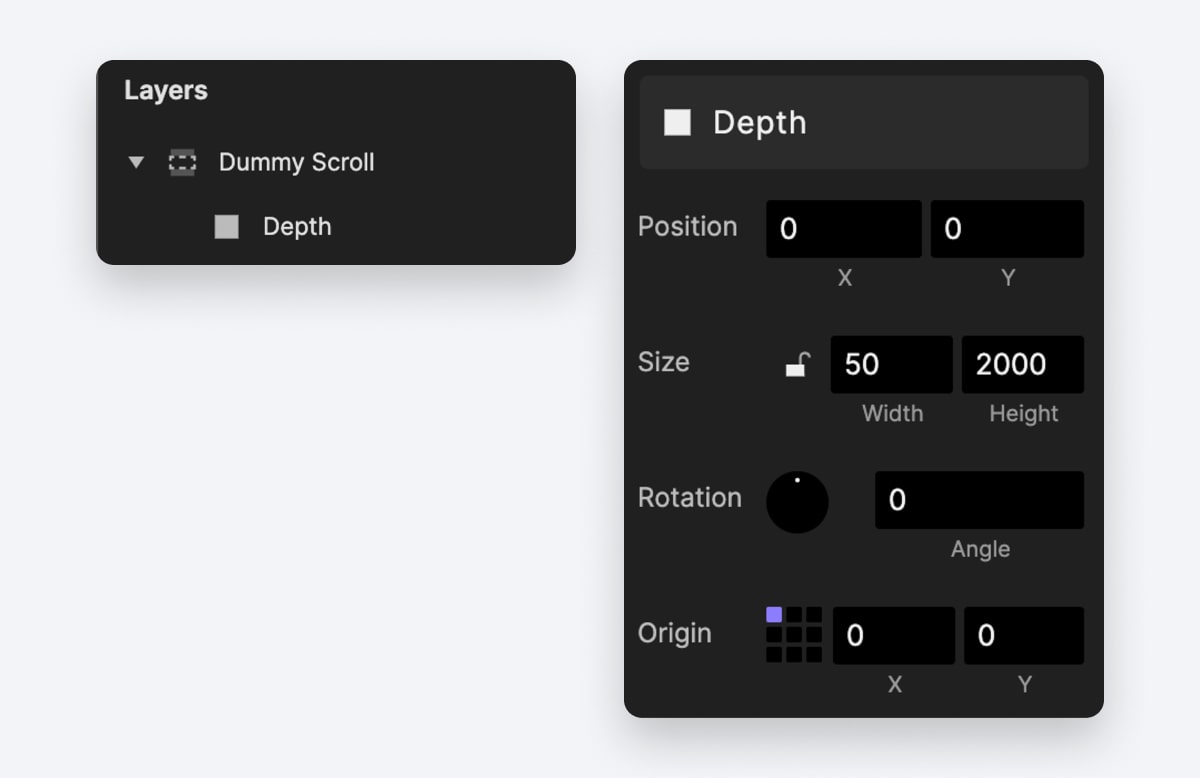
Add depth indicator for dummy scroll.
Now, we’d prefer to move the “Dummy Scroll” container outside of the scene since it shouldn’t be a visible element.
Next, turn on its touch area on its right side, and have this touch area cover the entire screen.
Touch area.
Lastly, for our own convenience to check the scroll distance in real-time, let’s create a variable for it.
Create a variable “For This Scene”
Let’s call it “scrollDistance”
Inside the variable, use a formula directly and write in
`Dummy Scroll`.scrollOffsetTurn on the debug mode by clicking the ladybug icon in the variable panel
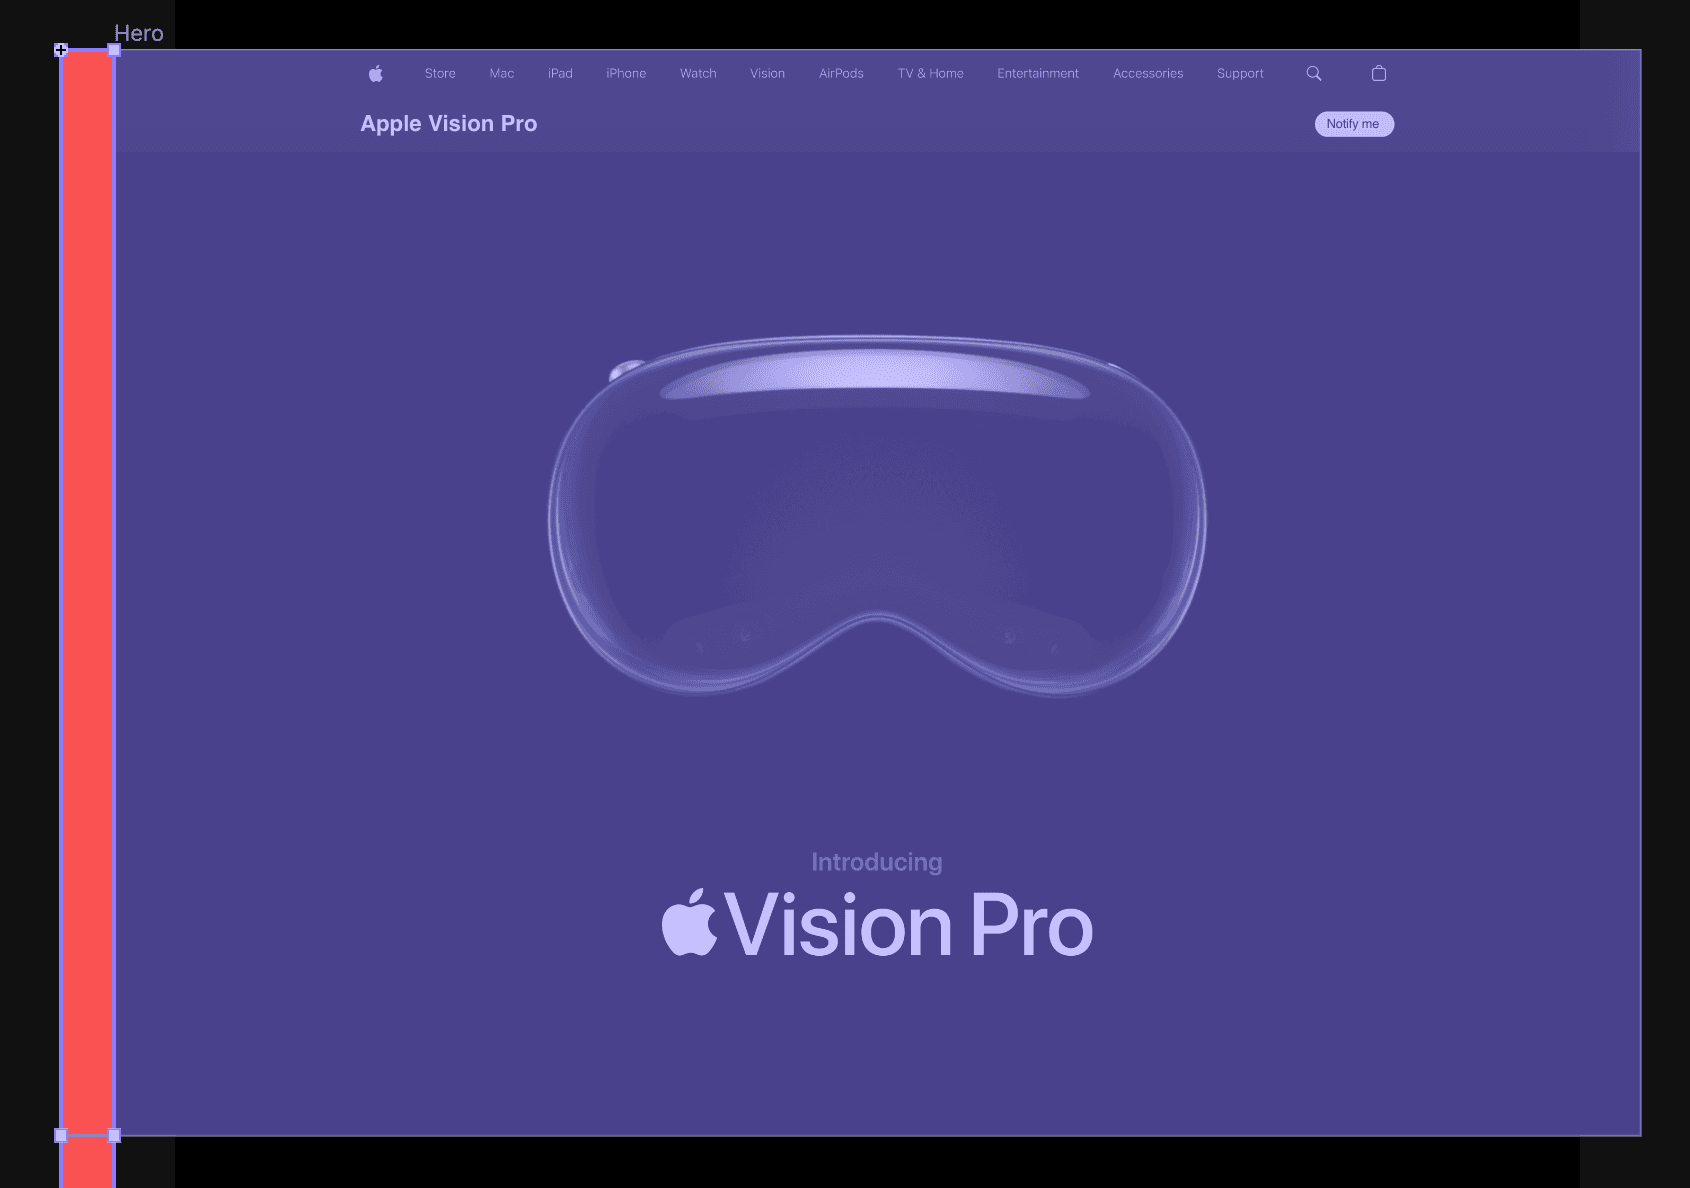
Let’s preview. Now when we scroll the website, even if nothing is visually changing, we can see the variable is getting its value. This is our scroll distance and we will use this value to make our elements change.

Scroll distance preview.
Now let’s animate a few things when we start to scroll the website
Add a Range trigger to the “Dummy Scroll” container’s Scroll property.
When we start to scroll, the scroll distance should no longer be 0. So for the Range let’s use
Scroll of Dummy Scroll ≥ 1Now, our objectives are to make the navigation bar move upwards, hide the logo, and kickstart the video playback.
Add a Move response to the “Nav” container, and move it to Y = -44
Add an Opacity response to the “Hero copy” container and turn it down to 0.
Add a Playback response to the “Hero Video” and make it Play.
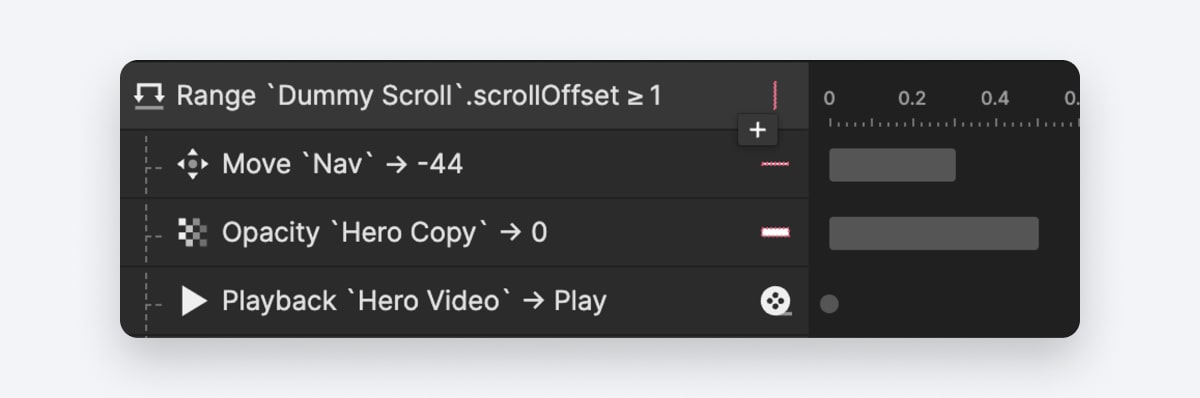
Configure range trigger.
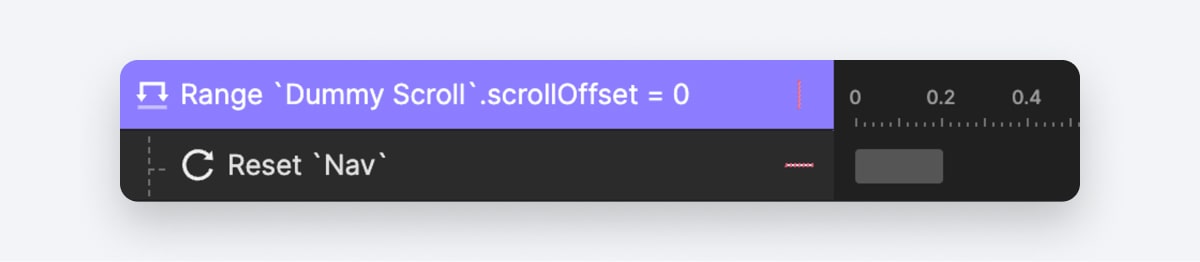
When we scroll the website back to the top, the entire navigation bar will be revealed.
Add a Range trigger to the “Dummy Scroll” container’s Scroll property. And for the Range, let’s use
Scroll of Dummy Scroll = 0To make the navigation bar reveal, simply add a Reset response to the “Nav” container.
Reset response.
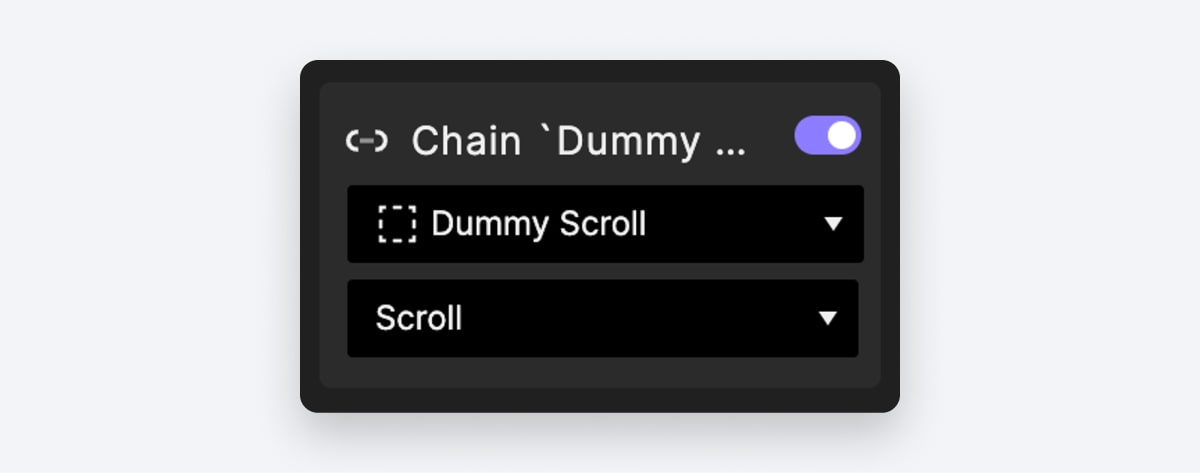
As we continue scrolling further down, the video will gradually reduce in size and slightly dim.
Add a Chain trigger to the “Dummy Scroll” container’s Scroll property.
Add a chain trigger.
Then add a Scale response to the “Hero Video”.
When the scroll distance ranges from 0 to 976 pixels, the video's scale factor will smoothly transition from 100% to 90%
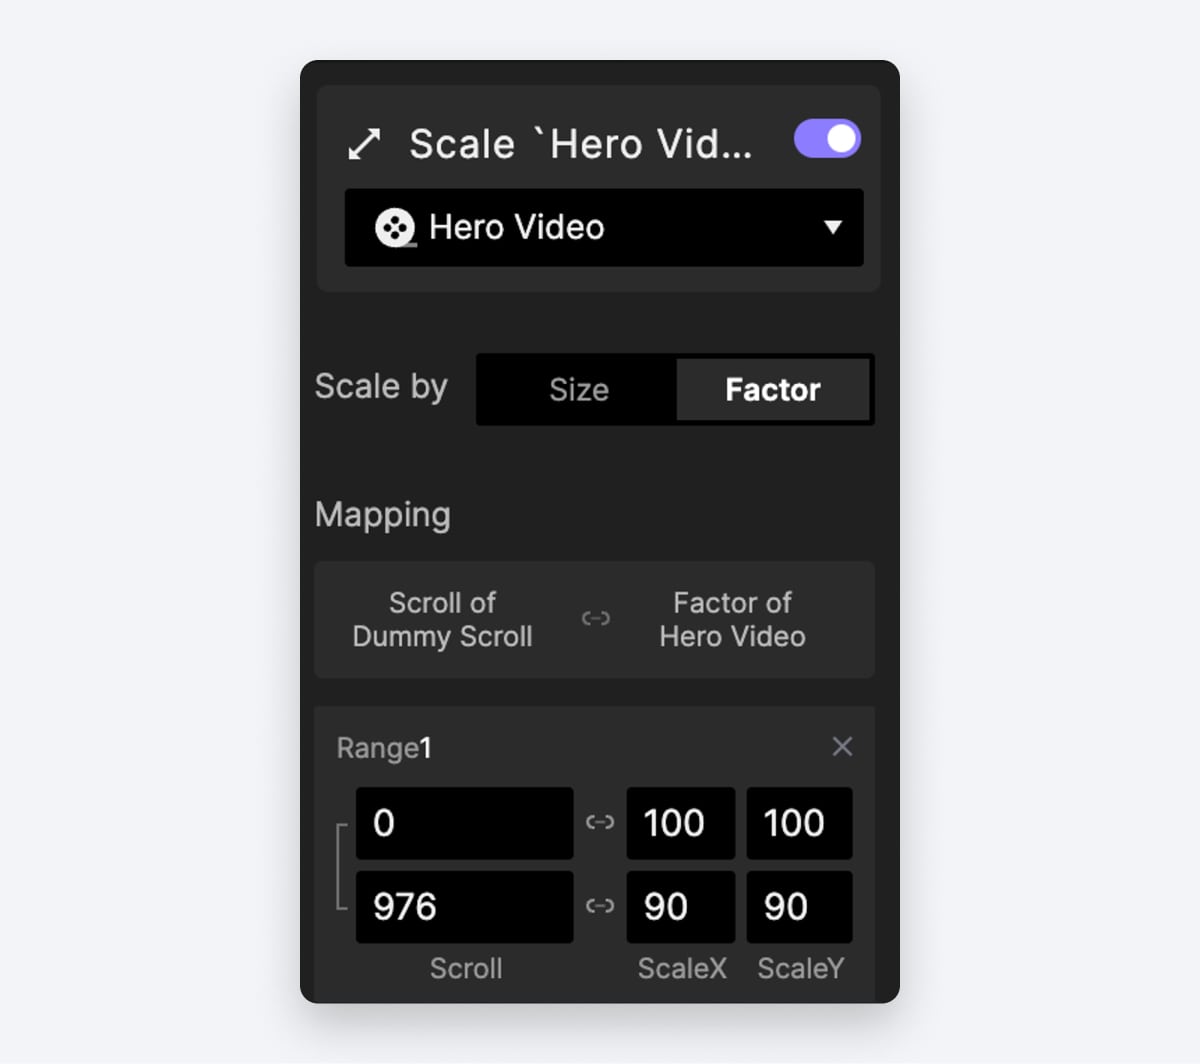
Scale response.
Let’s add an Opacity response to the “Hero Video”
When the scroll distance ranges from 512 to 976 pixels, we'll gradually adjust the video's opacity from 100 to 30
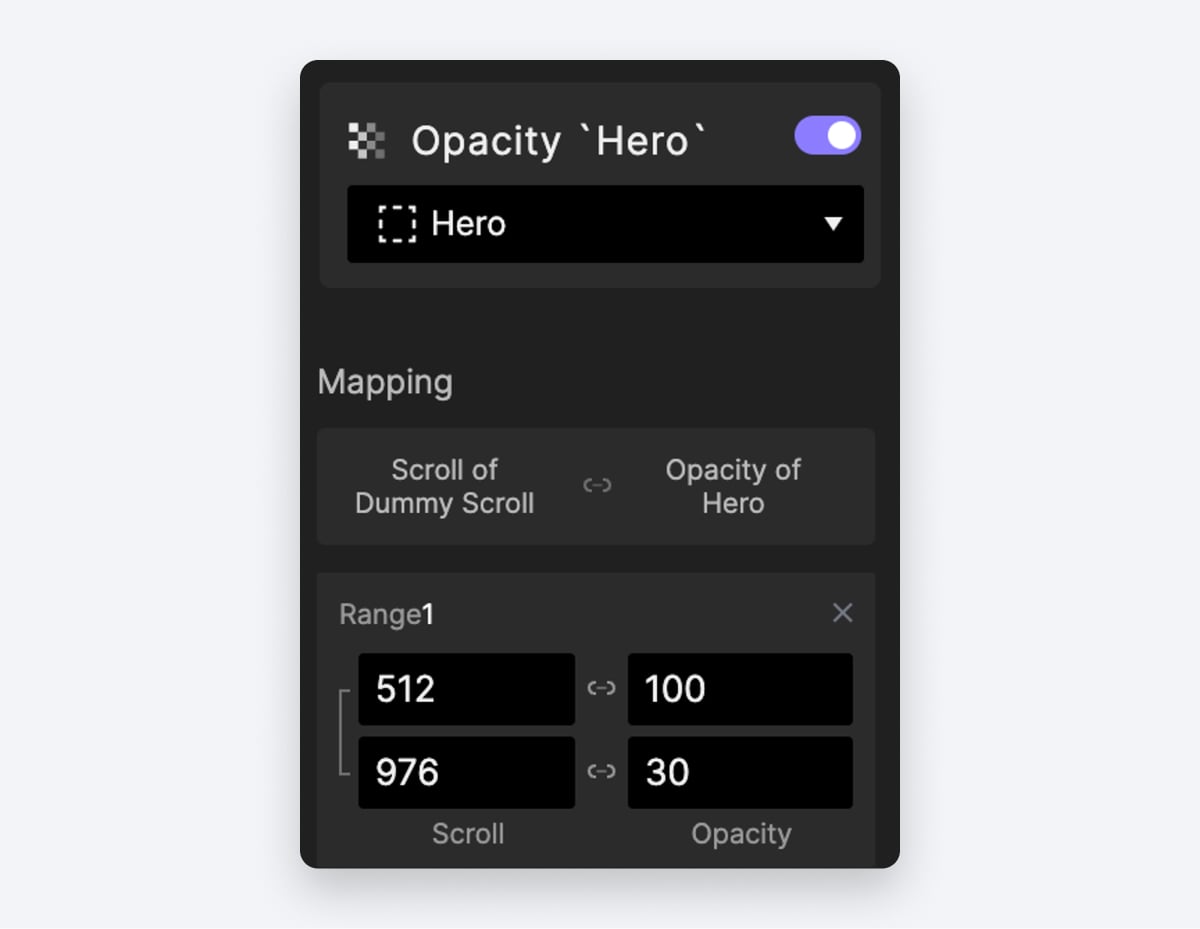
Opacity response.
Great job! Now you’ve learned how to use the dummy scroll technique to achieve the Apple Vision hero section. We have a Quick Start video lesson for you to practice this even more. Check it out on ProtoPie School.
Enhance engagement with video slideshows
Video slideshow.
Next, let's delve into the realm of video slideshows, situated just below our captivating hero section.
Within this section, a series of videos elegantly present themselves one after another as we scroll down. Accompanying each video is a brief one-liner that gracefully appears and moves in sync with our scrolling actions.
In our starting pie, let’s jump to the second scene called “Video Slideshows”. Here, we have a few things prepared for you.
The “Dummy Scroll” container — Same as what we discussed in the first part of this article, this will be your scroll event control.
A variable called “scrollDistance” — This displays the real-time scroll distance.
We also have a few visual assets prepared.
The “Text Area” container — Inside it, you can find four different text layers, which we’ll make show up on each slide
The “Video” container — It houses all the videos we’re going to use.
Let’s focus on the first slide.
Add a Chain trigger to the “Dummy Scroll” container’s Scroll property.
Chain trigger.
Apply a Move response to the “Text 1” layer, which represents the one-liner on the first slide. Specify that when the scroll distance spans from 0 to 976 pixels, “Text 1” will smoothly move from a Y position of 767 to 0.
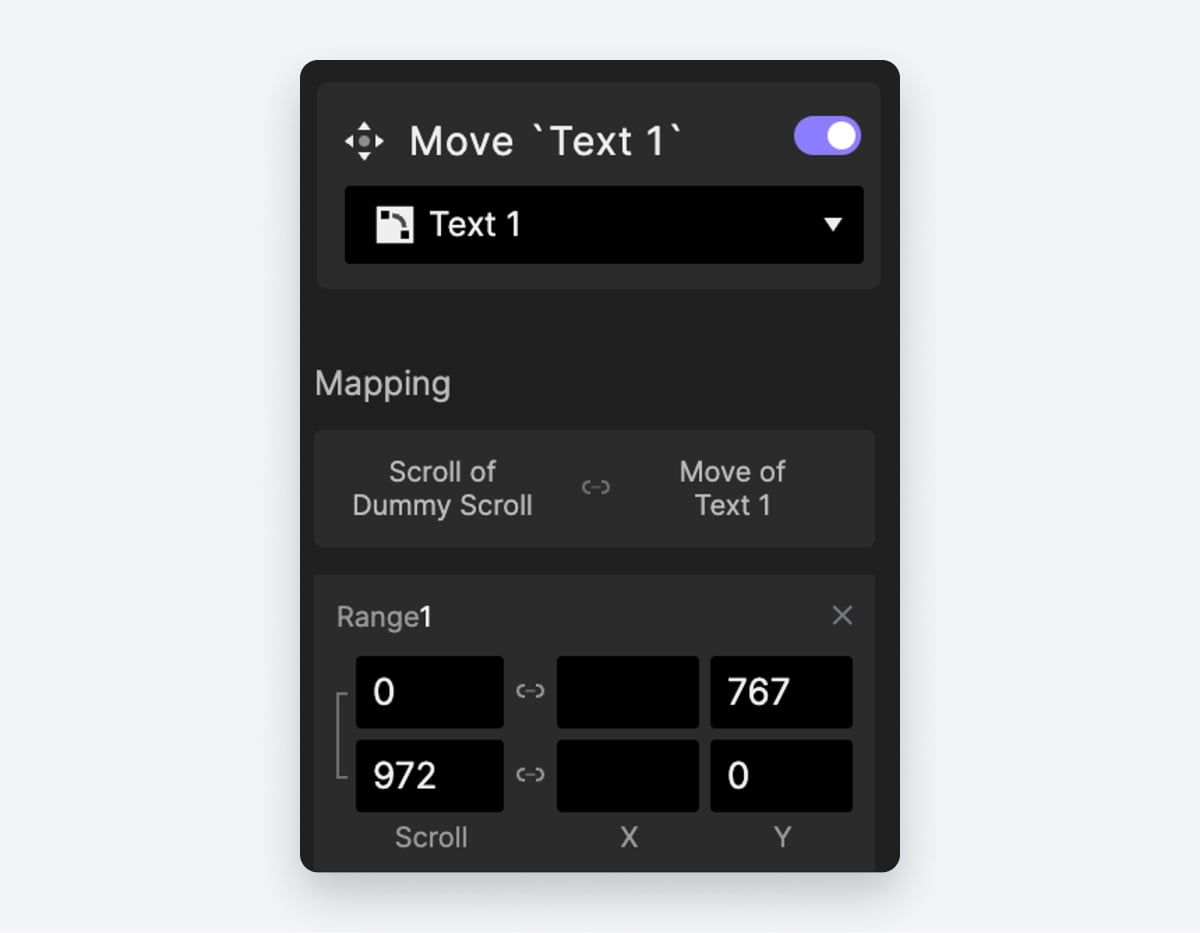
Move response.
Add an Opacity response to the “Text 1” layer, and incorporate the following detailed animations:
When the scroll distance spans from 0 to 50 pixels, transition the text's opacity from 0 to 100, ensuring the text layer becomes visible.
During the range of 50 to 972 pixels, maintain the text's opacity at 100, ensuring it remains visible on the screen.
As we reach the range of 922 to 972 pixels, gradually adjust the text's opacity from 100 to 0, allowing the text layer to gracefully fade away.
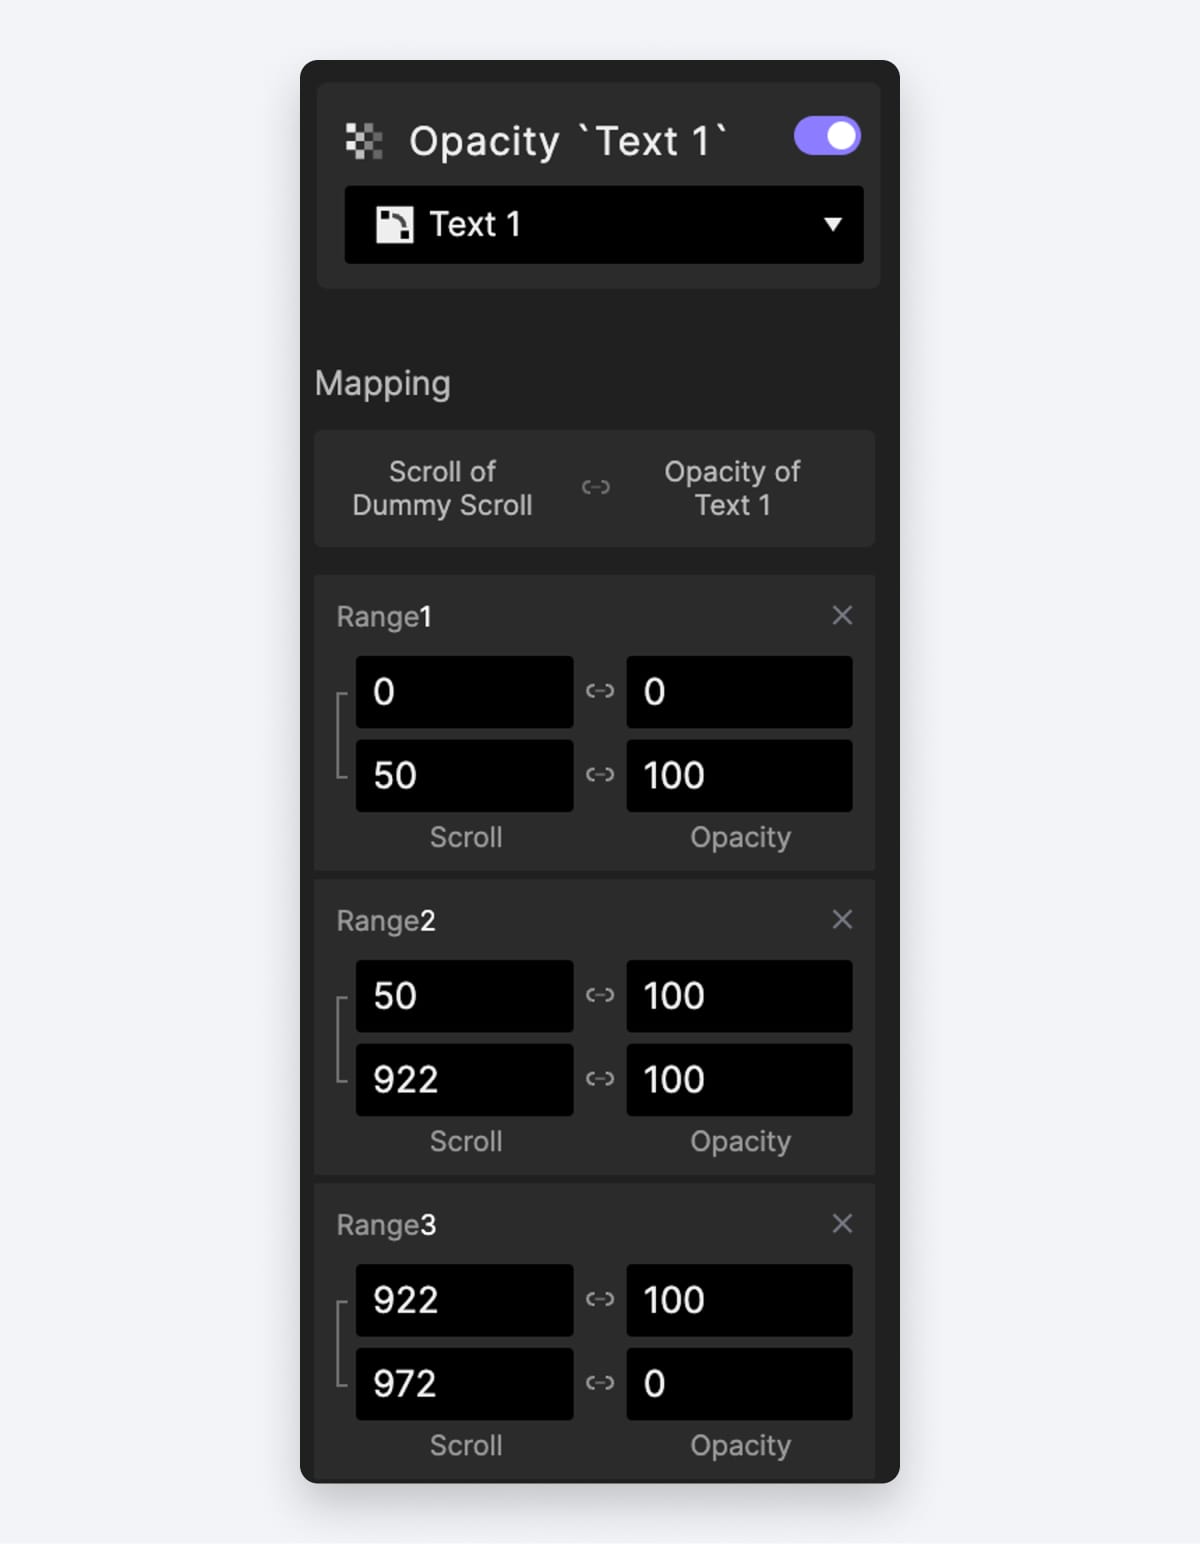
Text opacity.
Add an Opacity response to the “Video Wrapper 1” container, and configure the following ranges.
When the scroll distance ranges from 0 to 871 pixels, ensure the Video Wrapper maintains an opacity of 80.
As the scroll distance ranges from 871 to 972 pixels, smoothly transition the Video Wrapper's opacity from 100 to 0, allowing it to gracefully fade away.
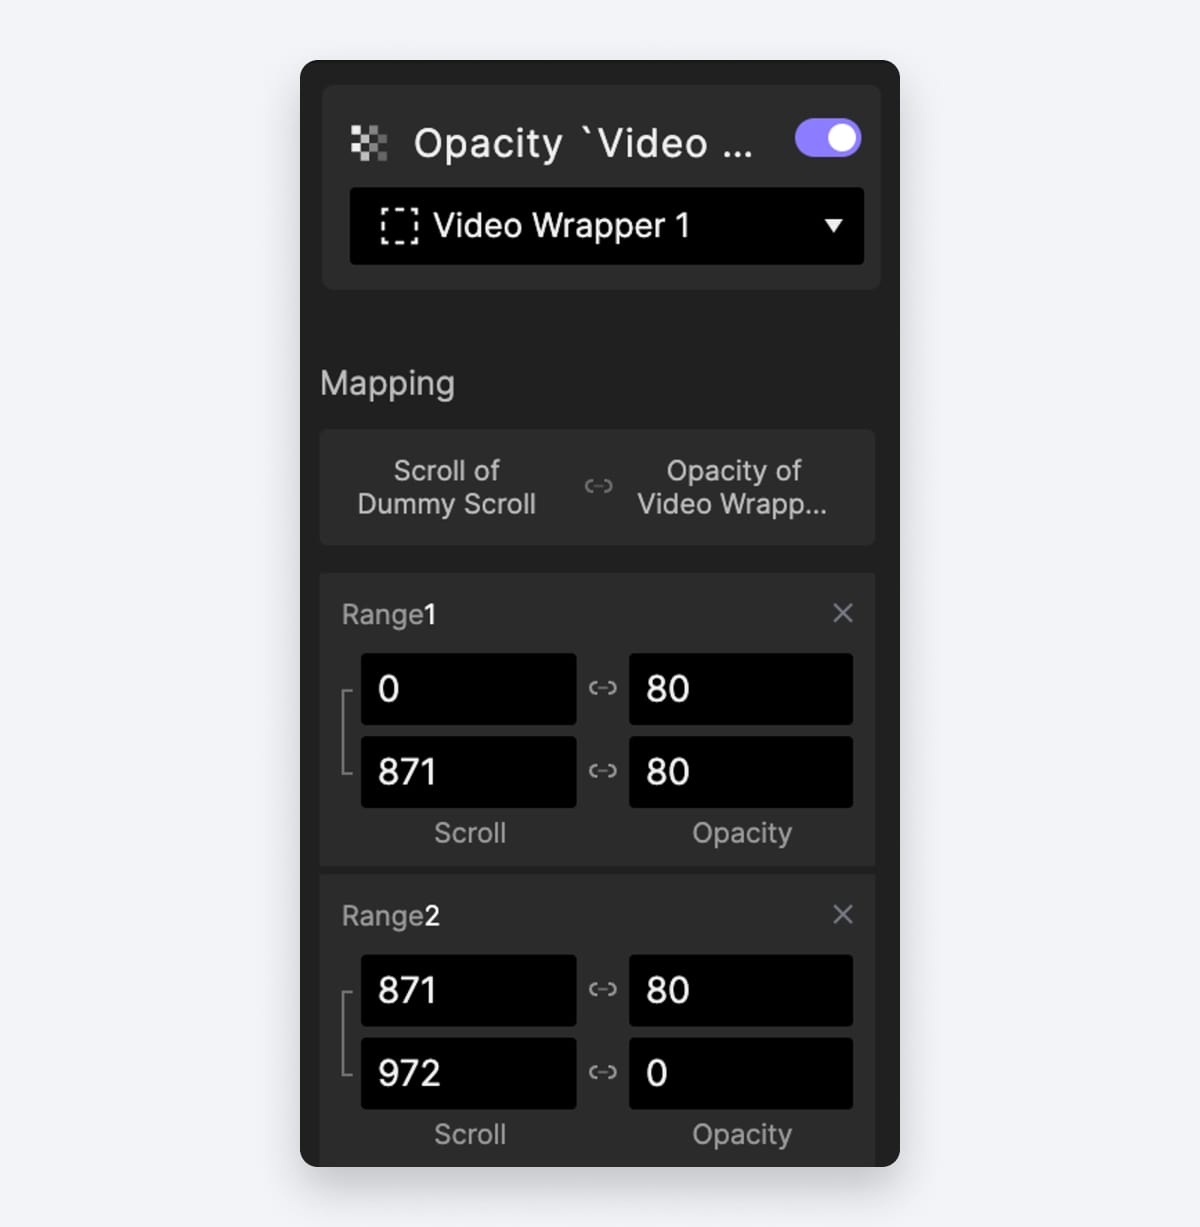
Video wrapper opacity.
Let’s preview the animation for the first slide.
Animation preview.
Now, let's transition to the second slide. The animation remains largely identical, except for being triggered by a different scroll distance. We can streamline our work by duplicating the interaction from the first slide and then making the necessary modifications.
Let’s duplicate the three responses we have so far
Then we change the linked object. For example:
If the original responses were linked to "Text 1", update it to "Text 2".
If the original responses were associated with "Video Wrapper 1", change it to "Video Wrapper 2".
Leverage ProtoPie's timeline feature for efficiency. Select all three of the newly created responses and shift them to the right, aligning their starting points precisely with the endpoint of our initial interactions.
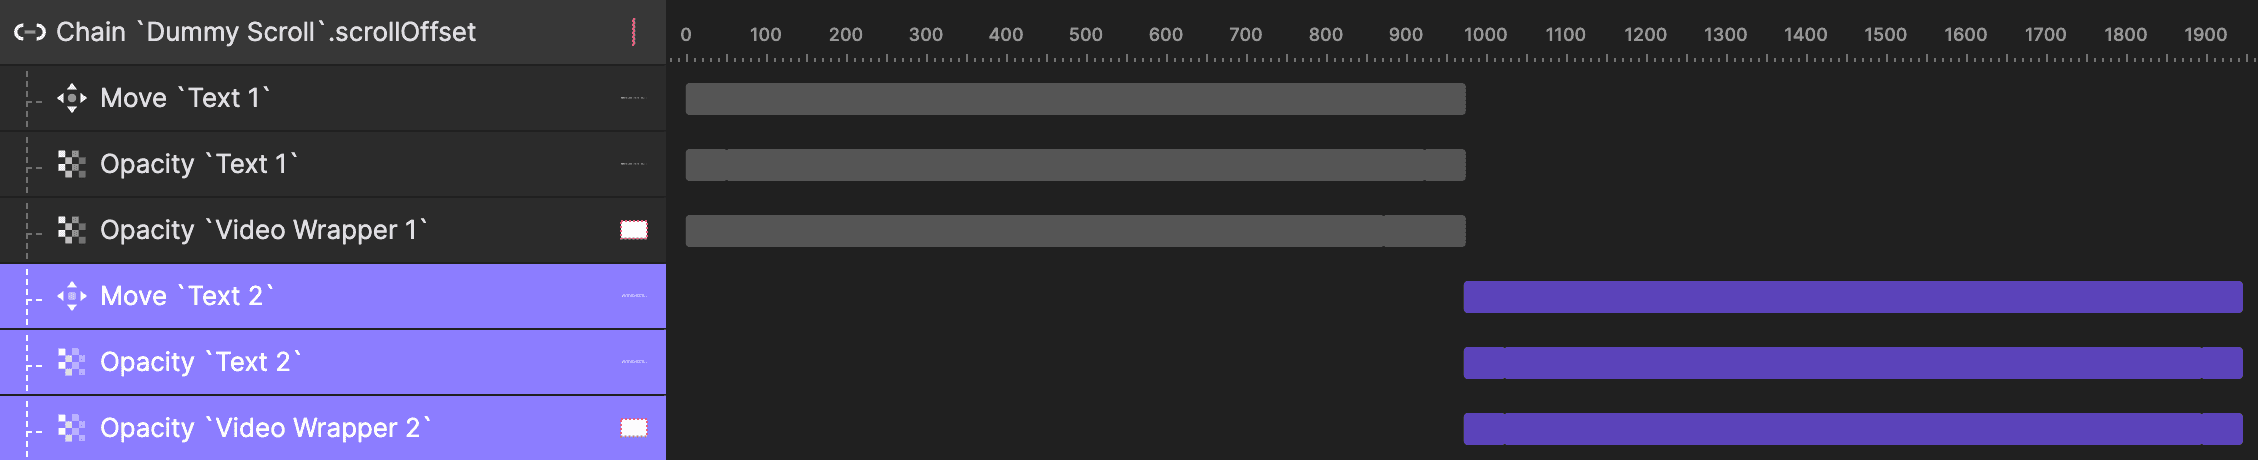
Shift responses to the right.
Let’s preview.

Second slide preview.
Everything functions flawlessly until we attempt to scroll from slide 2 back to slide 1. The second video fails to reset its opacity to 0.
For the Opacity response on "Video Wrapper 2", we need to make a small adjustment.
The current range looks like this — When the scroll distance ranges from 972 to 1894 pixels, the Video Wrapper maintains an opacity of 80.
Let’s change this into
When the scroll distance ranges from 972 to 1022 pixels, adjust the Video Wrapper’s opacity from 0 to 100
When the scroll distance ranges from 1022 to 1894 pixels, ensure the Video Wrapper maintains an opacity of 80.
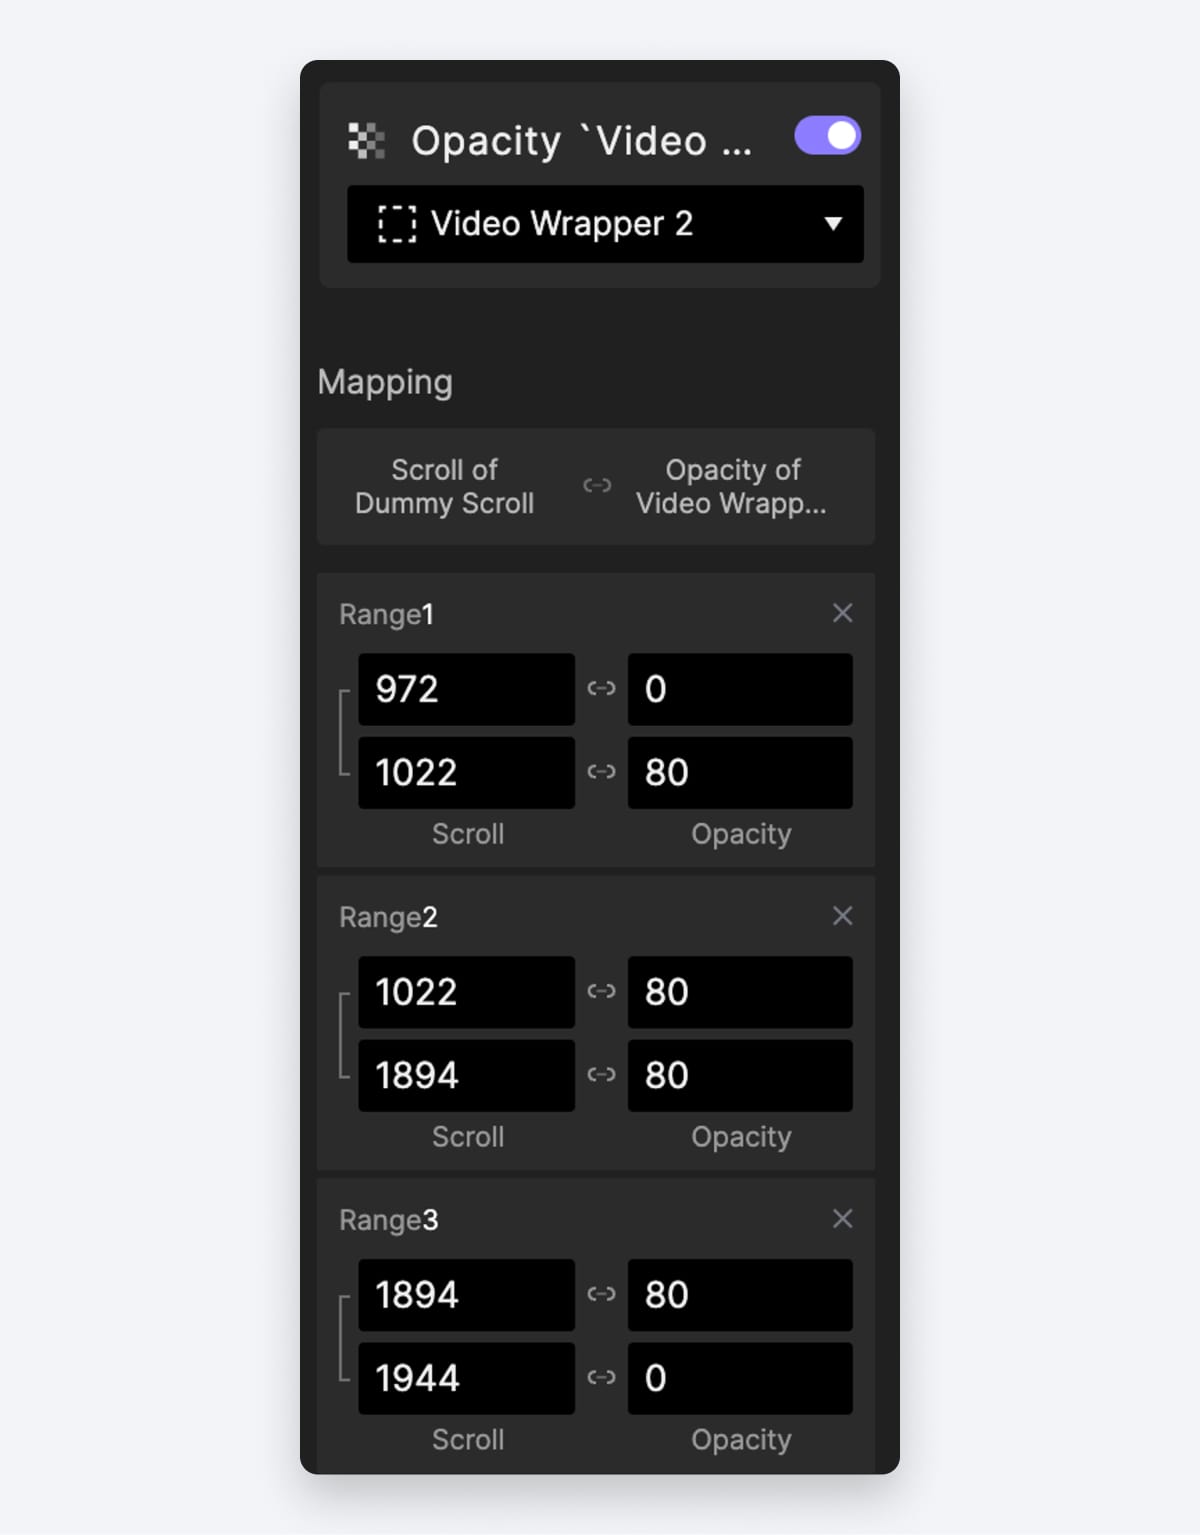
Wrapper Opacity.
With this adjustment, we're now set to effortlessly apply these interactions to subsequent slides by duplicating the responses, assigning them to new objects, and appropriately adjusting the timeline.
Lastly, we need to manage video playback or reset based on the scroll distance. This can be easily achieved using the Range trigger. Given the length of this article, we won't delve into the specifics. The picture below is a reference to guide you in setting up the ranges accurately.
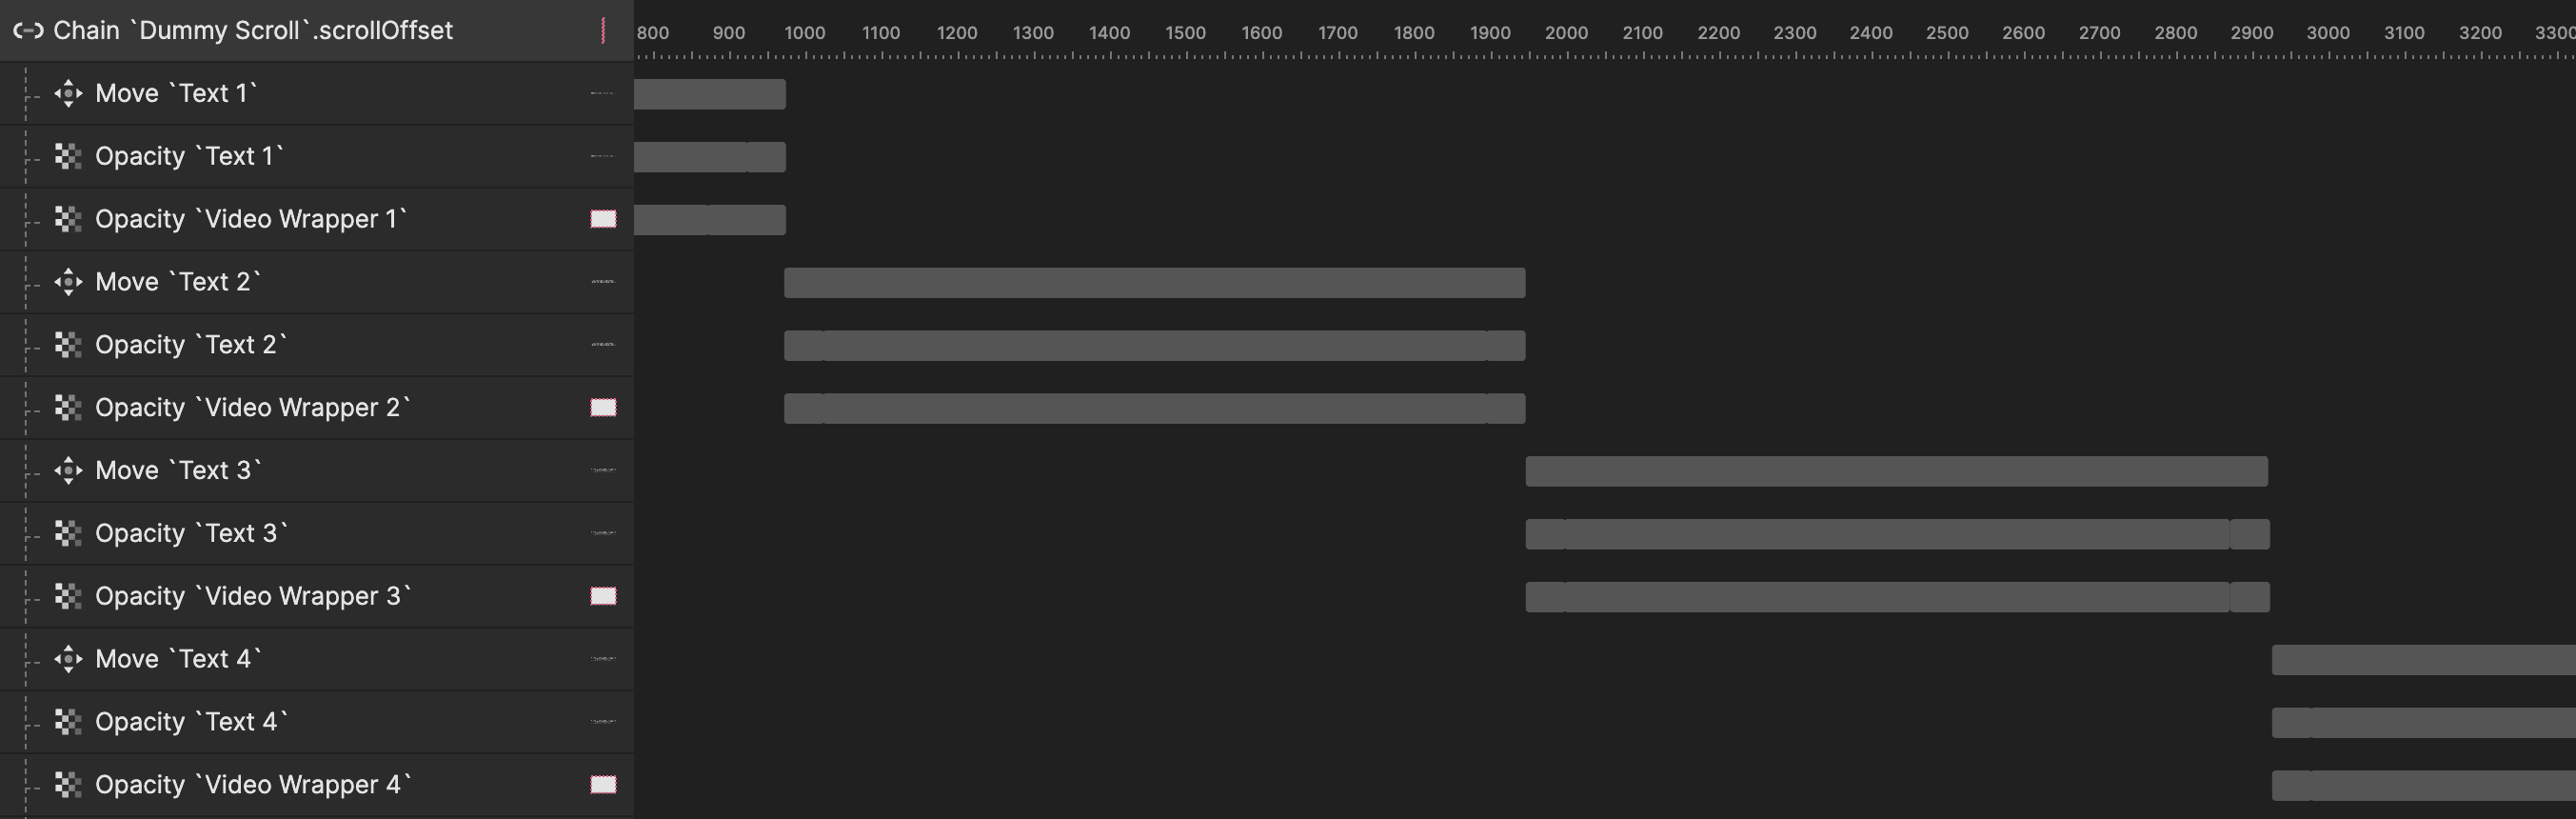
Range trigger.
If you're new to the Range trigger, we have a dedicated lesson on ProtoPie School that provides a step-by-step tutorial on how to play or pause based on a scroll event. Feel free to explore this resource for comprehensive guidance and a deeper understanding.
And you may wonder how to make a horizontally scrollable slideshow. We’ve got you covered. Check out this web design Quick Start lesson on ProtoPie School!
Add an immersive touch with scroll to playback
We've observed that Apple's website often incorporates numerous video and image assets, cleverly triggered as users scroll through the website. It not only enhances the visual appeal of the website but also engages users effectively. It allows for a compelling storytelling approach, enabling users to follow the narrative and absorb important information in an engaging and interactive manner.
In our last example, we’ll focus on the section on the Vision Pro landing page which uses this technique.

Scroll to playback.
In our starting pie, let’s navigate to the last scene called ”Scroll to Playback”.
Just like in our earlier examples, I've set up some foundational elements to kickstart this process—such as the "Dummy Scroll" container to manage scroll events and "scrollDistance" to monitor real-time scroll values. Additionally, I've arranged a set of interactions that utilize Chain triggers to smoothly transition elements as we scroll through the website.
The only thing we need to do here is to make the video play as we scroll. Let's dive into achieving this functionality.
First, add a Chain trigger to the "Dummy Scroll" container and pick its scroll property.
Add a Chain trigger to the "Dummy Scroll".
Then add a **Playback **response to the “Video” layer. For the action, let’s choose “Seek”. And then we’re going to use a formula in it: ``Video
.totalTime/1650*(Dummy Scroll.scrollOffset-798)
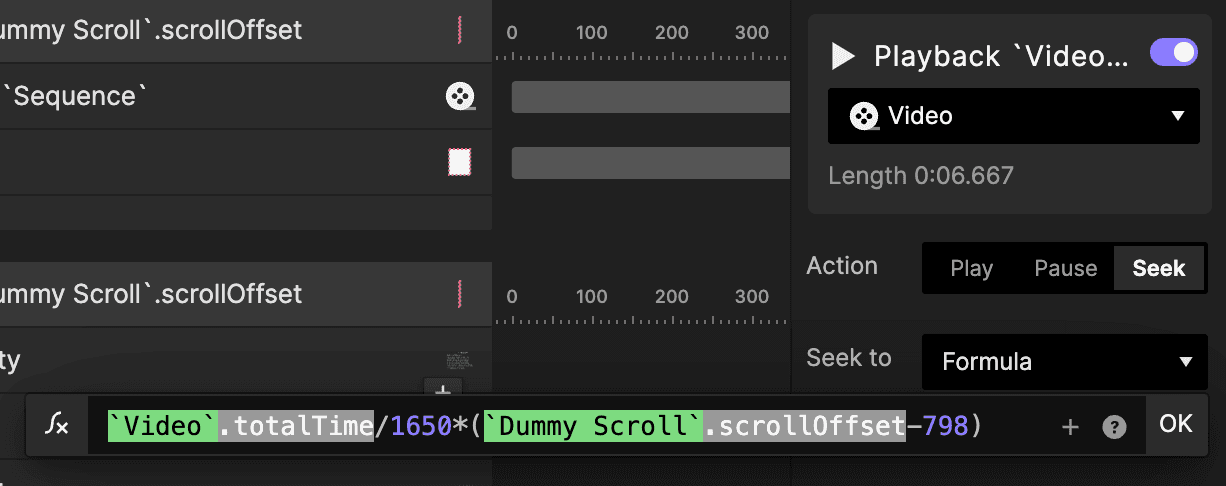
Playback response.
`Video`.totalTime— It retrieves the total duration of our video asset.1650— This value is customizable and represents the span of scroll depth linked to our desired video behavior.``Dummy Scroll.scrollOffset` It retrieves the total scroll distance.
798— This value is also adjustable and marks the starting point of our scroll-to-playback interaction. Specifically, it means the scroll-to-playback interaction is only triggered when we scroll for a distance of 798 from the top of our page. And why is that? Simply because we have other designs before this section.
Parallax scrolling made easy with ProtoPie
As we conclude this tutorial, we've explored key techniques to emulate the captivating user experience found on the Apple website. While replicating the full scope of Apple's website is a vast endeavor, the foundational methods we've discussed serve as a strong starting point.
Feel free to expand upon these techniques, experiment with different scroll triggers, explore additional interactions, and fine-tune the behaviors to suit your specific project.
Learn web design with ProtoPie School
And there's more to discover! For in-depth insights and further exploration of web design techniques, be sure to check out our comprehensive web design series on ProtoPie School. This series delves into a multitude of topics, providing valuable tips, tutorials, and inspiration to elevate your web design skills.
Stay engaged, keep learning, and let your creativity flourish as you embark on your web design journey. Happy prototyping!


