
With the digital age's ever-growing influence, music and video have firmly established themselves as our primary sources of entertainment. When tasked with designing an app centered around audio and video experiences, one pivotal factor emerges: advanced prototyping.
Consider the apps that dominate our screens daily: Netflix, Spotify, TikTok, and Facebook. At their core lies a dependable media player, with fundamental functions such as play, pause, seamless progress control, and precise volume adjustments.
Especially with ProtoPie as your trusty companion, advanced prototyping becomes more approachable than you might think. In this tutorial, we encourage you to step into the shoes of leading app designers. We'll demonstrate just how easy it can be to shape multimedia experiences that are both captivating and attainable for starting designers.
Overview
How does the media player work
Before you start
Create an interactive media player using ProtoPie
Use a video in your prototype
Start with hover effects
Add basic play and pause control
Track video progress
Adjust video volume
That’s it! Your prototype is complete
Join our masterclass for TV and video streaming
How does the media player prototype work
While our demonstration focuses on a video player, the steps we'll cover apply equally to an audio player. Before we dive into the details, let's take a quick look at the interactions you'll be able to create:
Basic Play / Pause Control — You can simply click the play/pause button to initiate or halt playback. Alternatively, a click anywhere on the video will achieve the same play/pause action.
Track Video Progress — To navigate the video's progress, you can either click any point on the progress bar or drag the bar itself.
Volume Control — Adjusting the volume is as easy as dragging the volume slider. Notably, the volume icon will adapt its appearance based on the volume level. Alternatively, you can mute the video by clicking the volume button directly.
Before you start
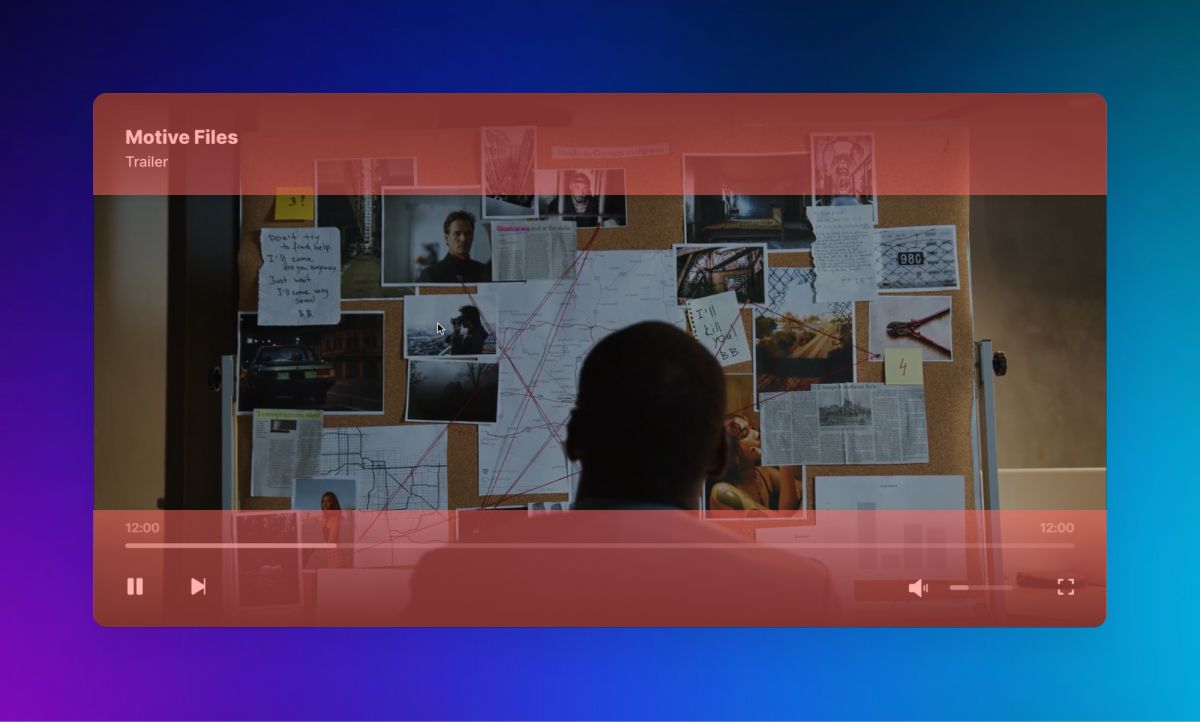
Here’s a preview of what you’ll learn. But before we dive in, let's amp up the excitement. Make sure you've got the ProtoPie Player app all set up on your smartphone. This app is your key to testing and validating the impressive media player controls you're about to bring to life!
Download the starting Pie file below, and open up our media player prototype in ProtoPie Studio.
Media player prototype preview
[Starting Pie file] [Completed Pie file]
Ready? Let the learning begin!
Create an interactive video player using ProtoPie
1. Use a video in your prototype
With ProtoPie’s built-in media layers, you can easily enhance your prototypes with seamless video and audio integration. ProtoPie offers support for various types of media files, including:
.mp4(H.264) up to 100 MB..wav,.mp3and.m4aLottie
JSON
2. Start with hover effects
When you open the starting pie file, you'll notice a set of pre-made interactions within the template. These interactions encompass hover effects for overlays, buttons, and various functions, achieved through the Mouse Over and Mouse Out triggers.
If you're new to these features, ProtoPie School offers a convenient Quick Start lesson to help you become more acquainted.
Let's open the preview window and take a closer look at what's at your disposal:
Hovering over the video player triggers an overlay showcasing different functions.
Each function, such as Play/Pause and Skip Forward, comes with its own hover effect.
Should you move your cursor away from the video player, simply wait for 3 seconds, and the overlay will gracefully fade away.
A preview of the 'Starting Pie' file
3. Add basic play and pause control
Certainly, let's begin by configuring the prototype to automatically start playing the video as soon as it loads. We can achieve this with a single setting adjustment to your video layer.
Select the video layer, and then navigate to its property panel. From here, enable the Play Automatically option.
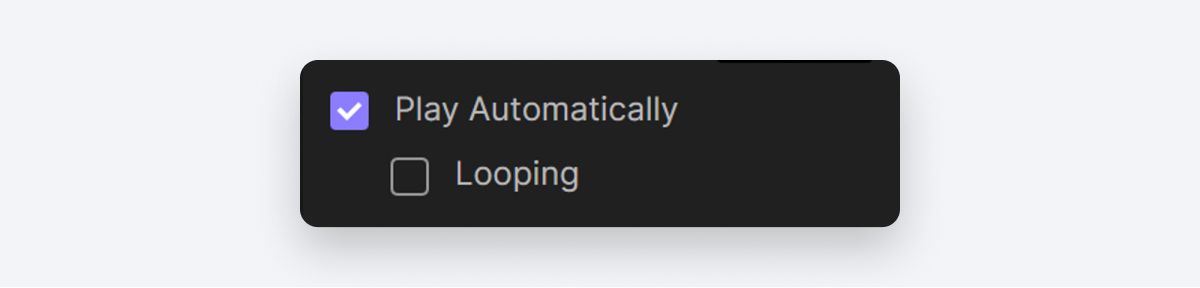
Play automatically option
Now when you open the Preview, you'll notice that the video begins playing automatically as soon as it loads.
💡 Pro-tip! ProtoPie refreshes the preview window whenever you make edits, which is designed to help you check updates conveniently. However, when working with media layers, this can lead to frequent refreshes and sound playing repeatedly. If you prefer a more controlled experience, you can disable the Auto Restart option in your preview window settings.
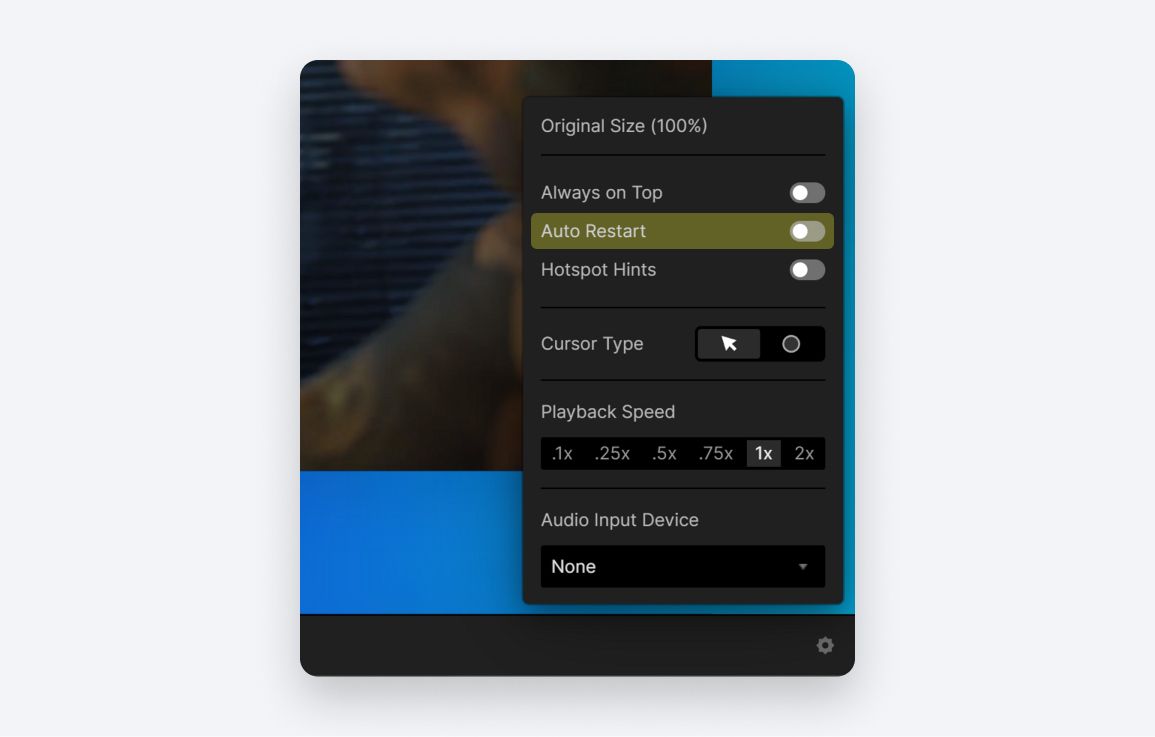
'Auto Restart' option in the preview window settings.
In our example, there are two different methods for playing or pausing the video. The first involves using the dedicated Play/Pause button, while the second allows you to achieve the same action by clicking anywhere on the video.
Let’s start with the first one — using the Play/Pause button.
To simplify the interaction process, let's ensure that the overlay becomes visible. Locate the Overlay Functions Bottom group and set its opacity to 100. This will make it easier to find the layers we need.
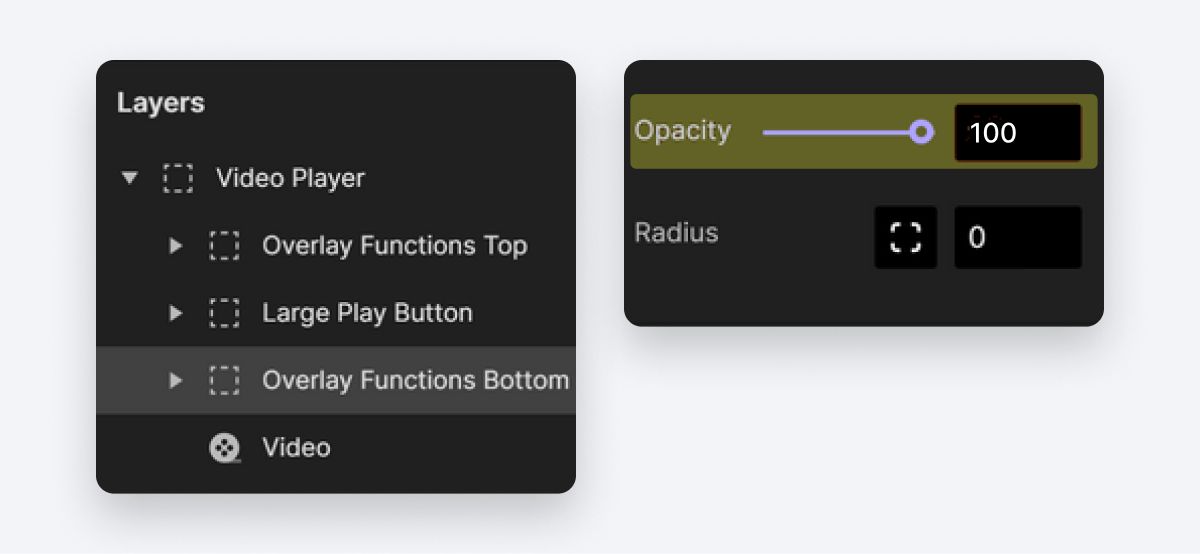
Overlay functions.
In your layers panel, locate a group named Play/Pause. Within this group, you'll find two icons: the Play icon and the Pause icon. Currently, the Play icon is configured to be transparent (Opacity = 0), so in your preview window, only the Pause icon is visible.
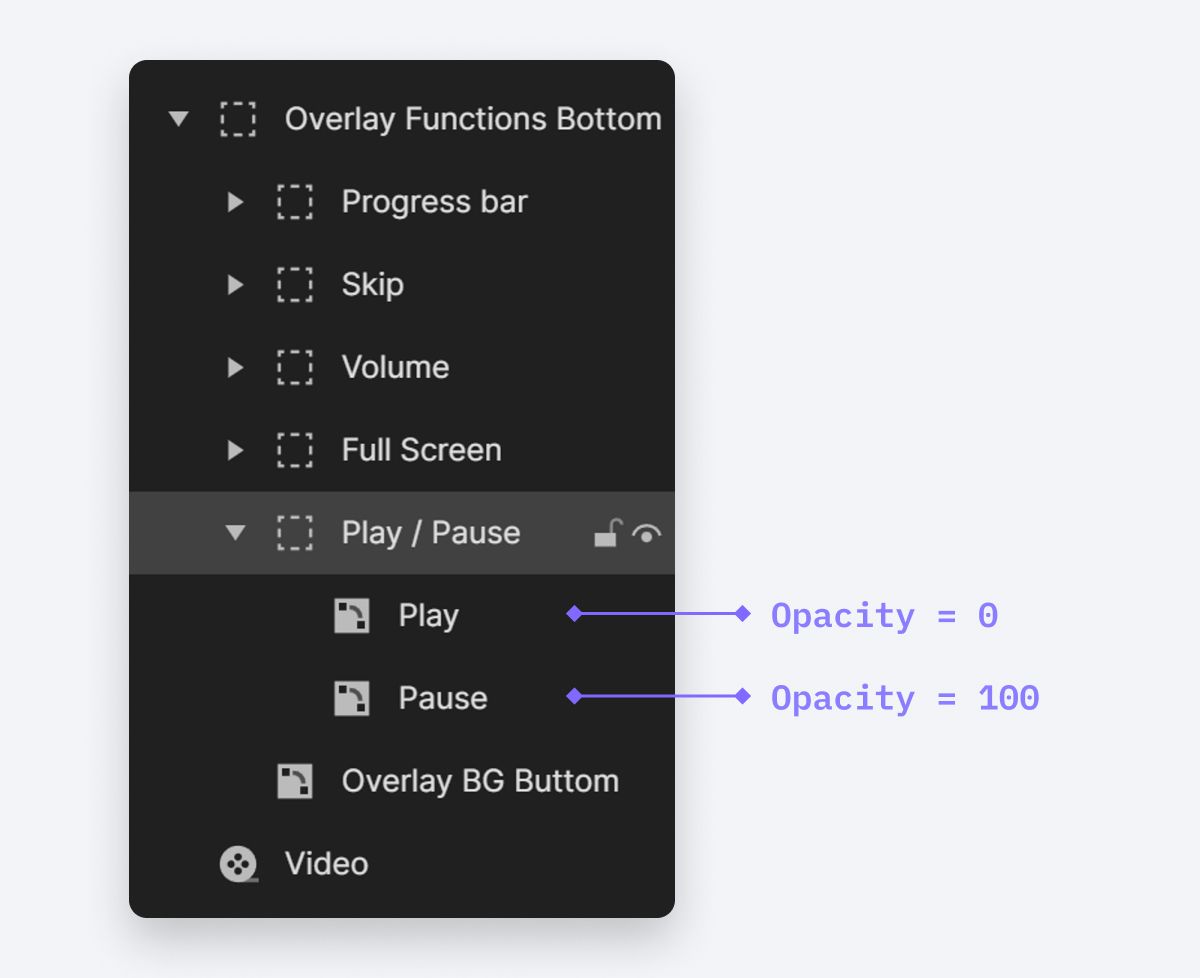
Opacity of play / pause icons.
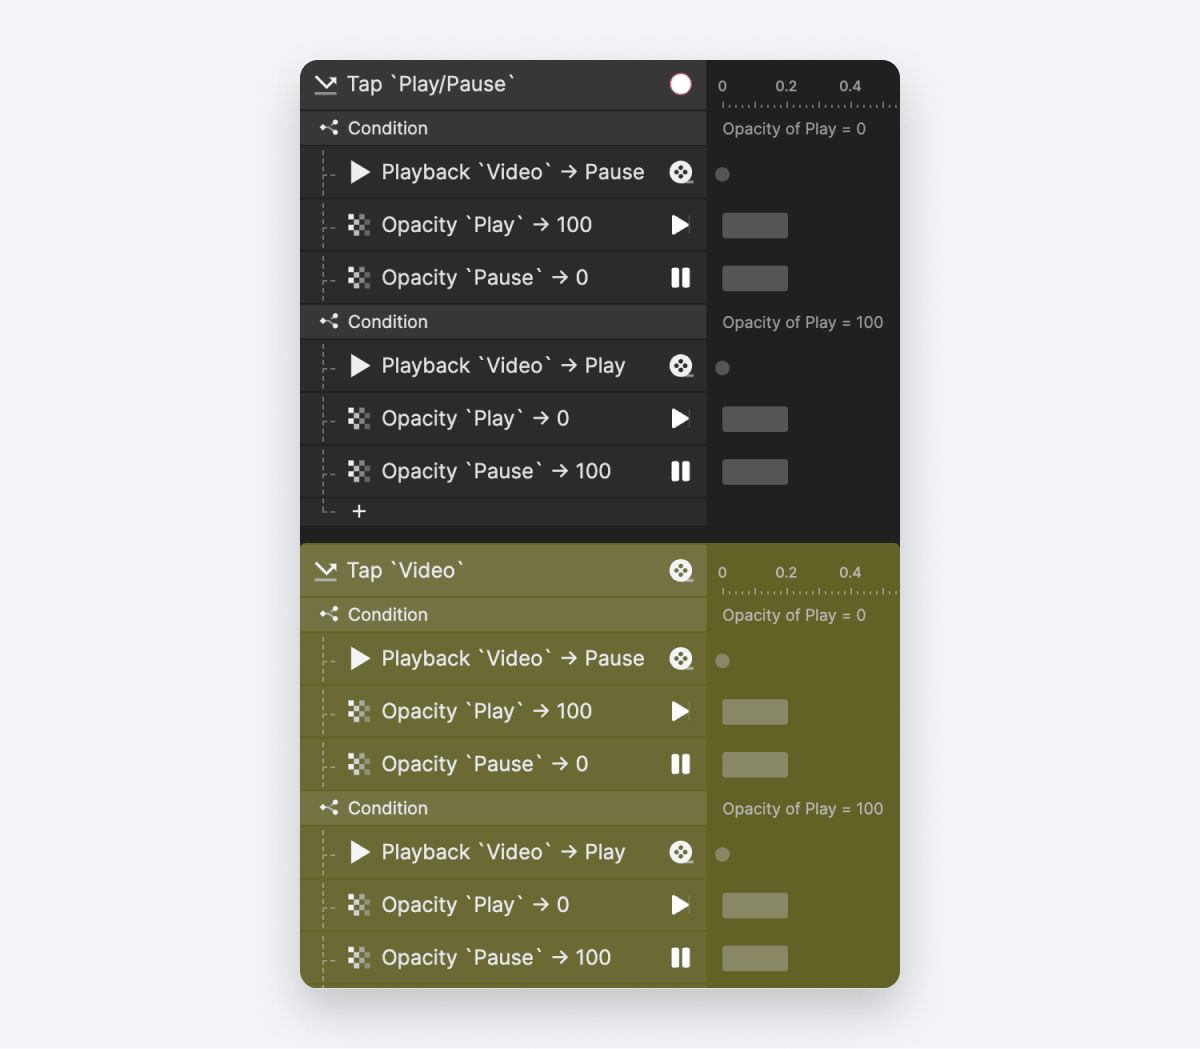
Begin by adding a Tap trigger to the Play/Pause group. Next, we'll create a condition based on the Play icon's opacity being equal to 0. Below this condition, we'll add a Playback response to the Video layer to Pause it.
At the same time, we also need to switch the icons. For the Play icon, set its opacity to 100, and for the Pause icon, set its opacity to 0.
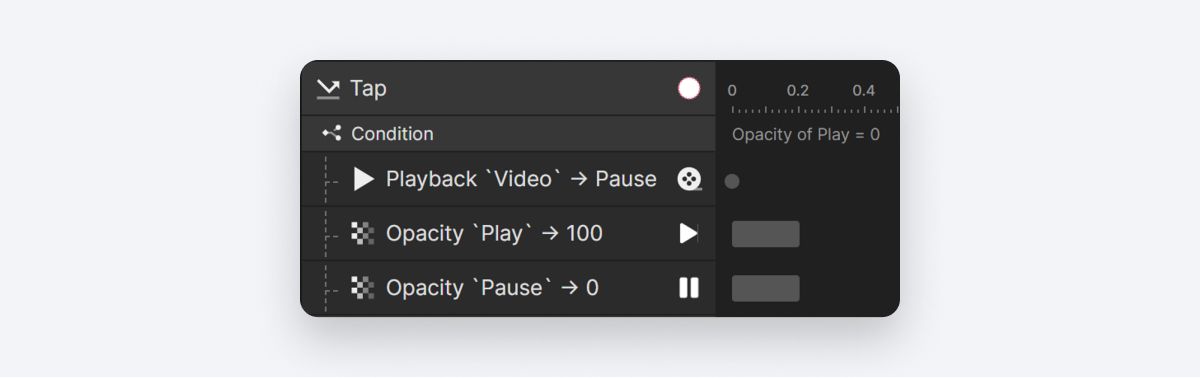
Play / pause button icon opacity.
Similarly, we require a second condition for when the Play icon's opacity is already at 100. To streamline the process, we can simply duplicate the first condition and make the necessary adjustments. Select the first condition and press ⌘ + D (ctrl + D on Windows) on your keyboard.
With the second condition, we'll set the Opacity of Play to 100. The subsequent responses will be to play the video, change the Play icon's opacity to 0, and the Pause icon's opacity to 100.
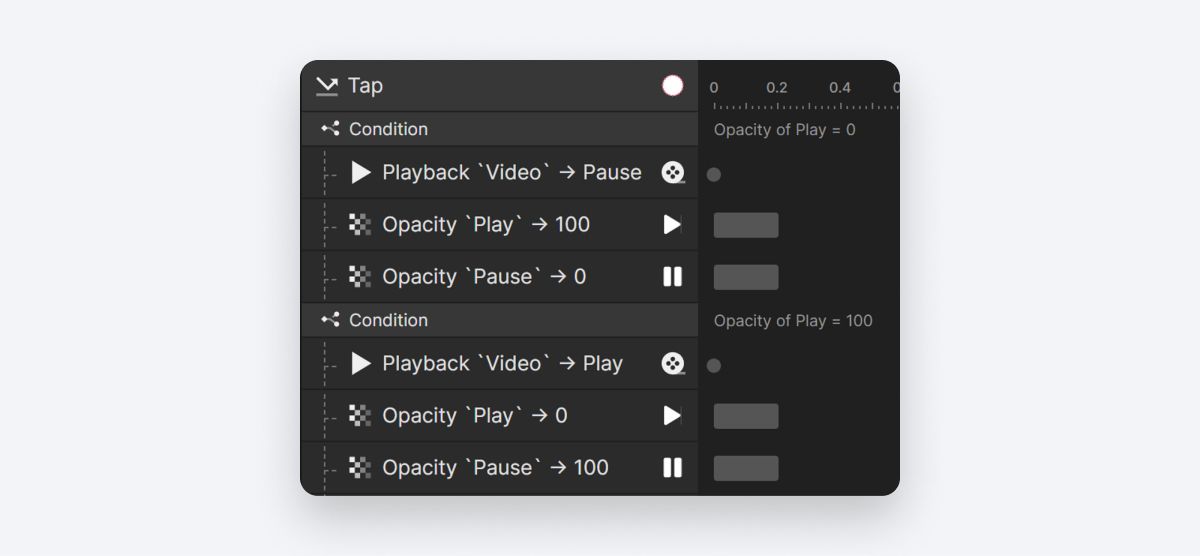
Change the Play icon's opacity to 0, and the Pause icon's opacity to 100.
Now let’s take a look in the preview window. You’ll see the Play/Pause control is working perfectly.
For the second method – clicking anywhere on the video – the interactions will be very similar to the first method we just configured.
The trigger point is when we tap on anywhere on the video. So let’s add a Tap trigger to the Video layer. Then, super easy! Let’s just copy the interactions of the Play/Pause button and paste them here.
Copy the interactions of the Play/Pause button and paste them.
Let’s add a few finishing touches. In your layer panel, you’ll see a group called Large Play Button. We want to ensure it's visible when the video is paused and hidden when the video is playing. We can accomplish this by utilizing Opacity responses to control when it's shown and when it's hidden.

Large Play button.
Finally, there's one more detail to address. Even though we mentioned clicking anywhere on the video, strictly speaking, we still want to avoid the top and bottom function areas.
Avoid the top and bottom function areas.
To do so, let’s select both groups Overlay Functions Top and Overlay Functions Bottom, and in its property panel, disable the Make Lower Layers Touchable option.
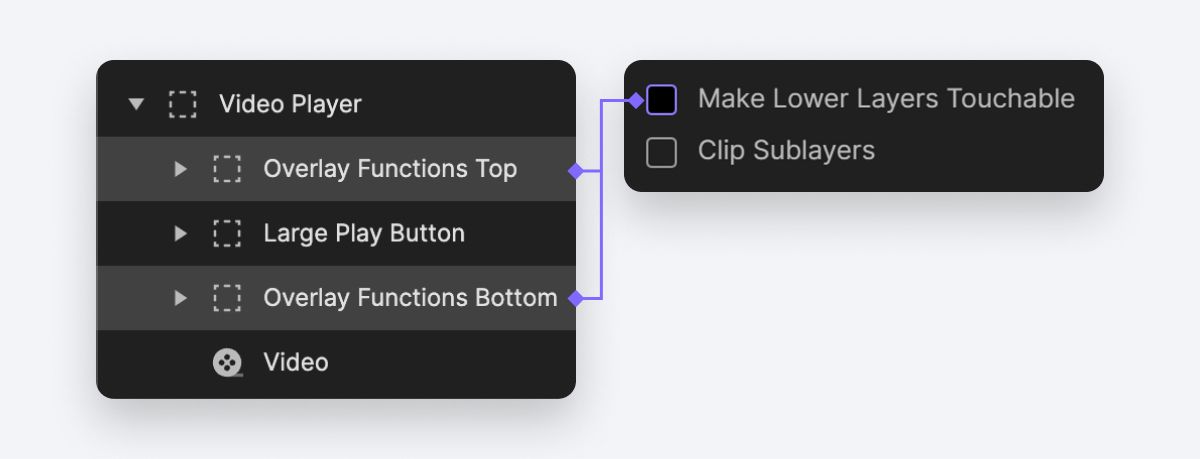
Disable the Make Lower Layers Touchable option.
Congratulations! You've successfully implemented a fully functional Play/Pause control system. Whether you click on the dedicated button or anywhere on the screen, you're all set to enjoy seamless control over your video playback. Great job!
4. Track video progress
Now, let's delve into setting up interactions for the progress bar. This entails a series of actions:
Displaying the current play time and total time based on the video.
Ensuring that when the video is playing, the progress bar moves in sync to reflect the current time.
Allowing users to drag the progress bar to navigate within the video.
Offering an alternative option to navigate by tapping anywhere on the video.
Let’s work on these one by one.
Display Video Time
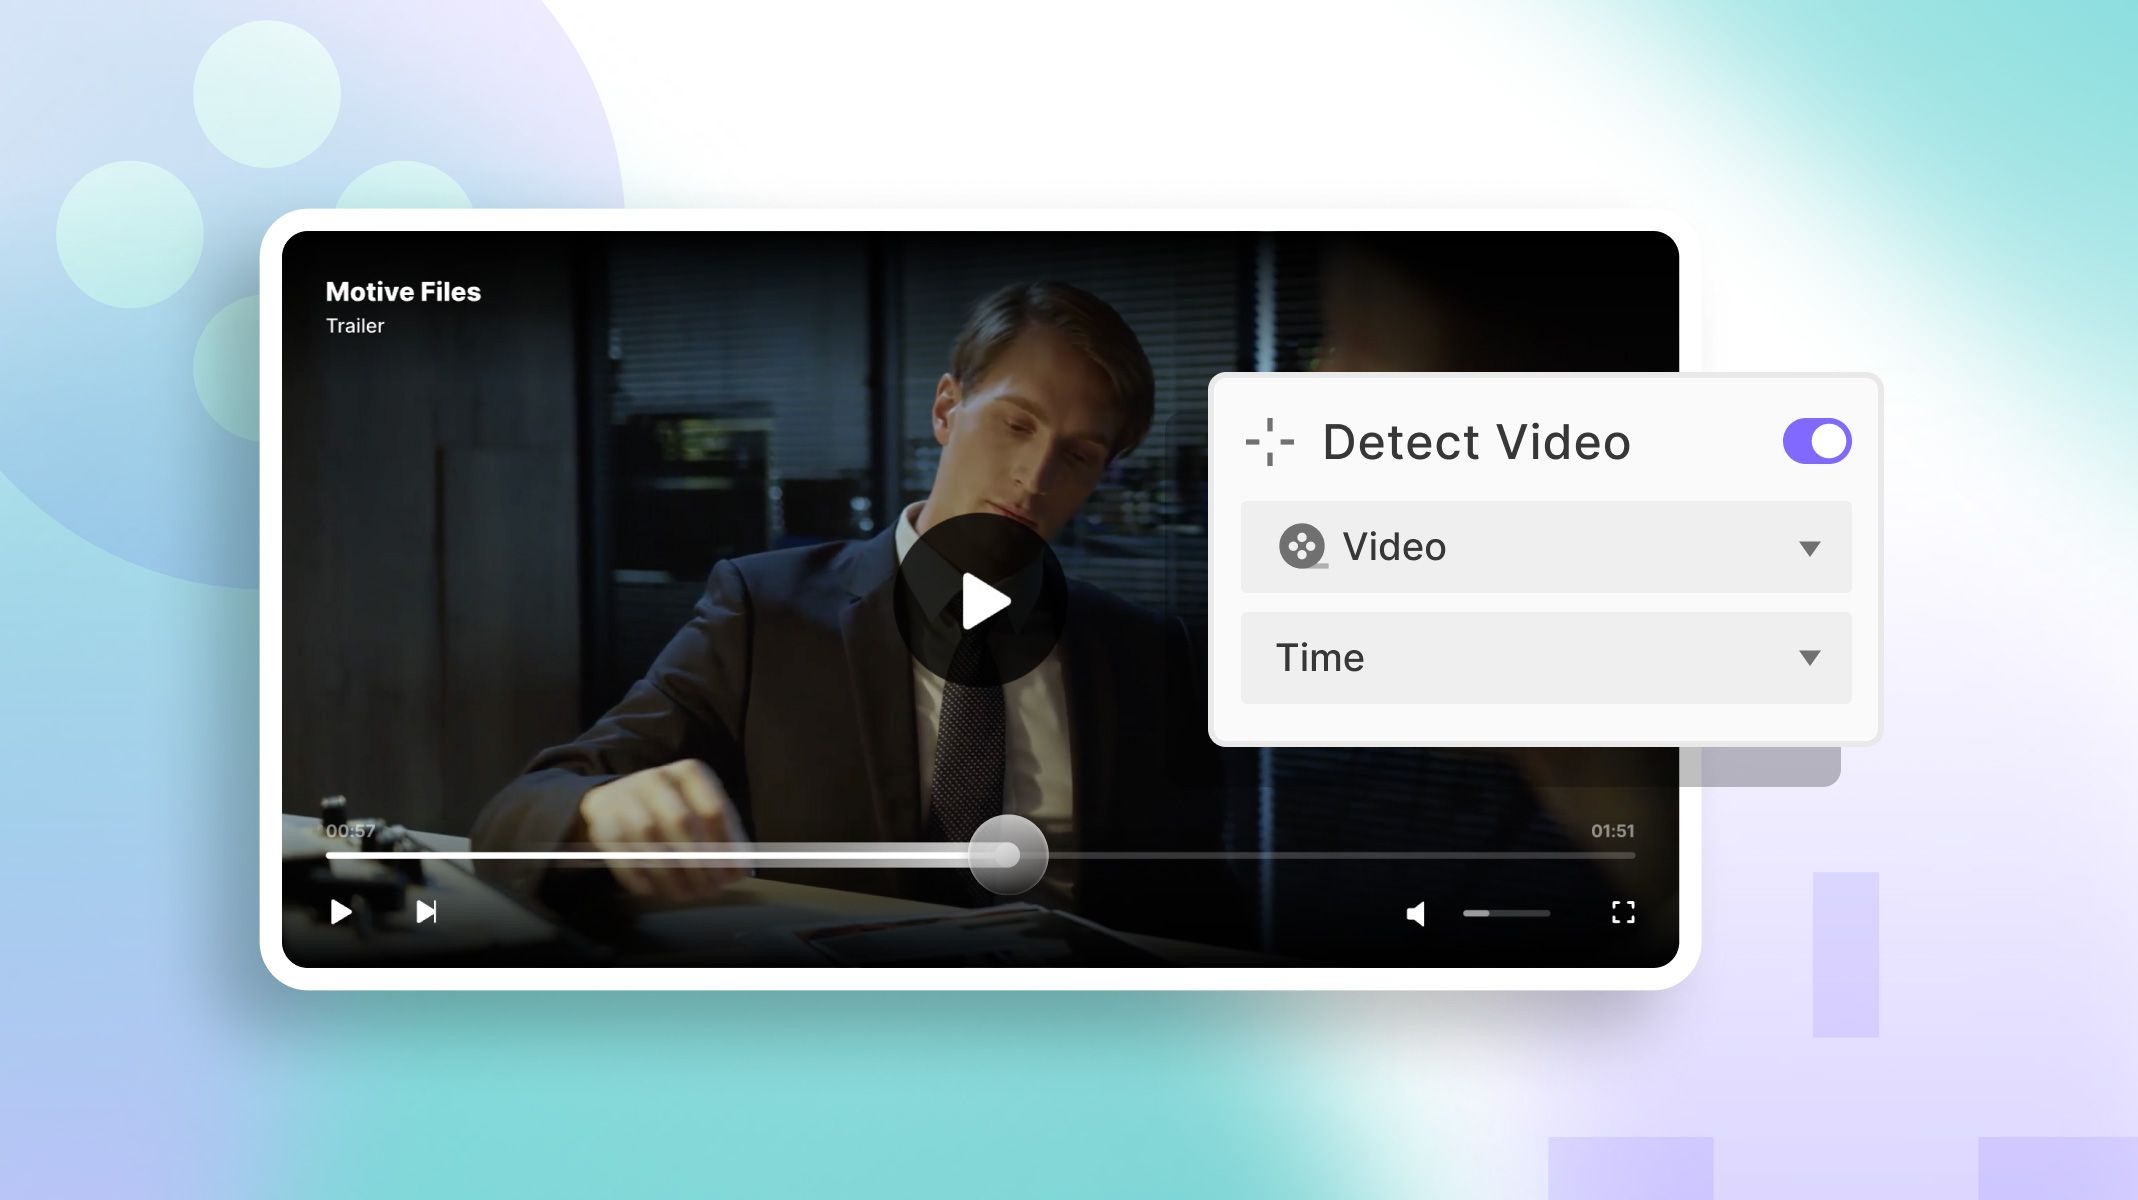
Let's begin by adding a Detect trigger. For the trigger, we'll select the Video layer's Time property. This setup will continuously monitor any changes in the video's current playtime and trigger interactions accordingly when changes occur.
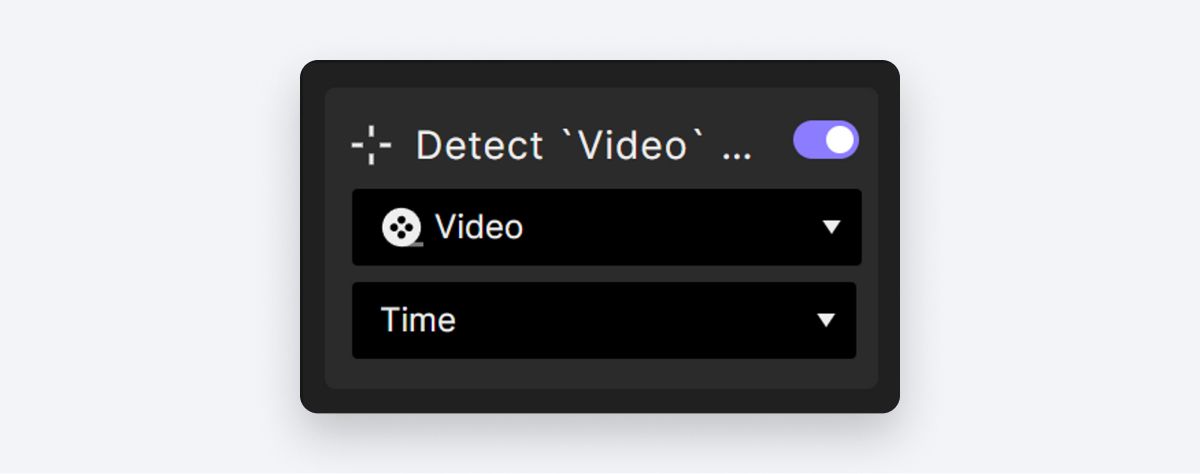
Add a Detect trigger.
Next, we'll assign a Text response to the Play Time layer. We'll utilize a Formula for this response. The formula we'll use is ``Video
.currentTime.This will ensure that the layer accurately reflects the video's current playtime.
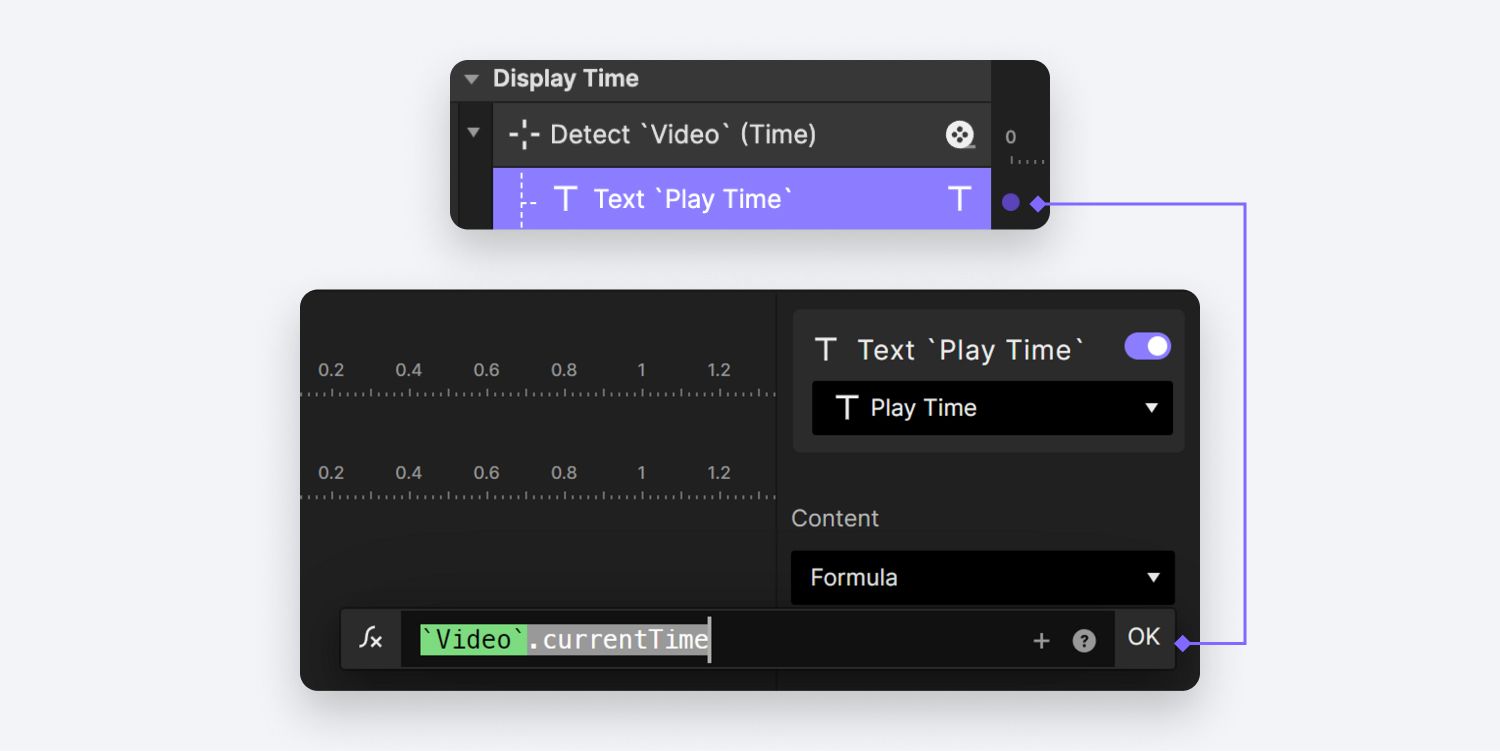
Assign a Text response to the Play Time layer.
When you preview, you'll likely notice the time displayed in seconds with two decimals. This format might not be ideal for your needs. To present the time in a more user-friendly format, we'll format it accordingly.
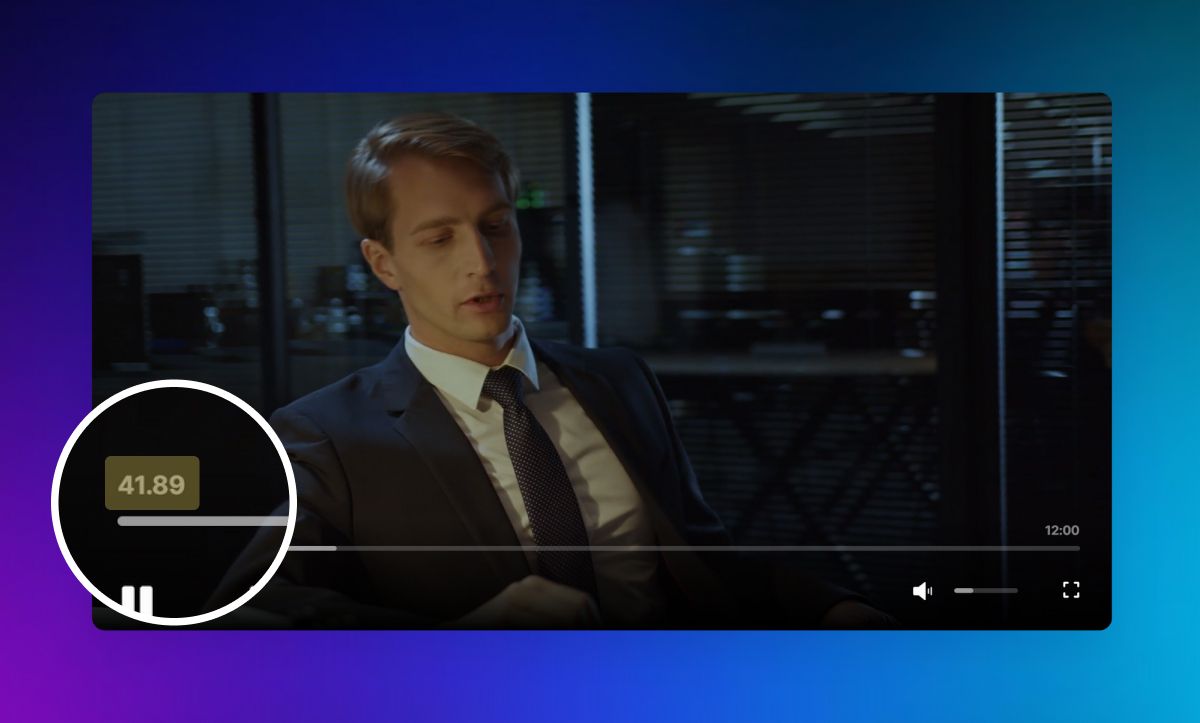
Time displayed in seconds with two decimals.
To achieve the desired time format, we'll create two variables specifically For This Scene. One variable, min, will represent the minute place in the formatted time, while the other, sec, will stand for seconds.
We’ll then check the Use Formula option in both variables. And set up the formula as the following.
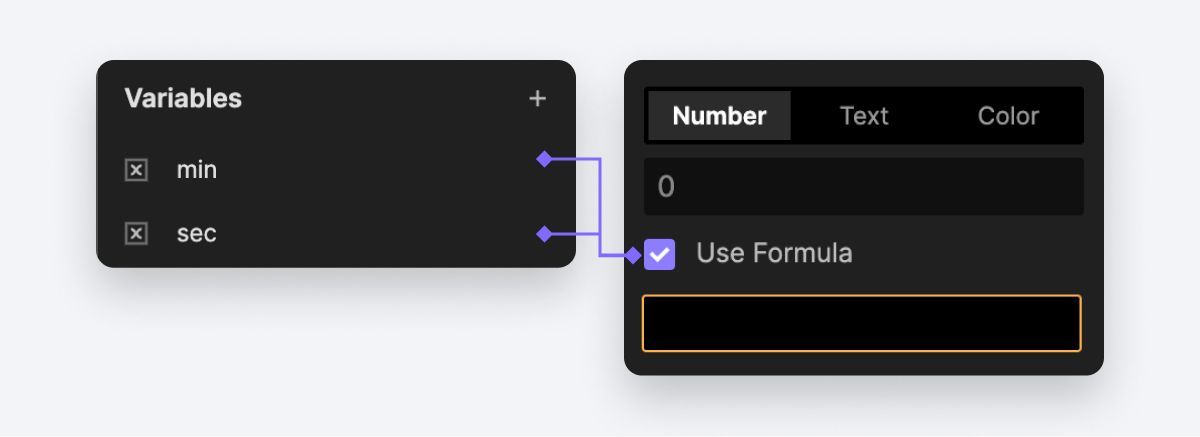
Check 'Use Formula' option in both variables.
For the **min **variable, we’ll use
floor(Video.currentTime/60). This formula calculates the minute place by dividing the video's current playtime by 60 and then rounding it down.
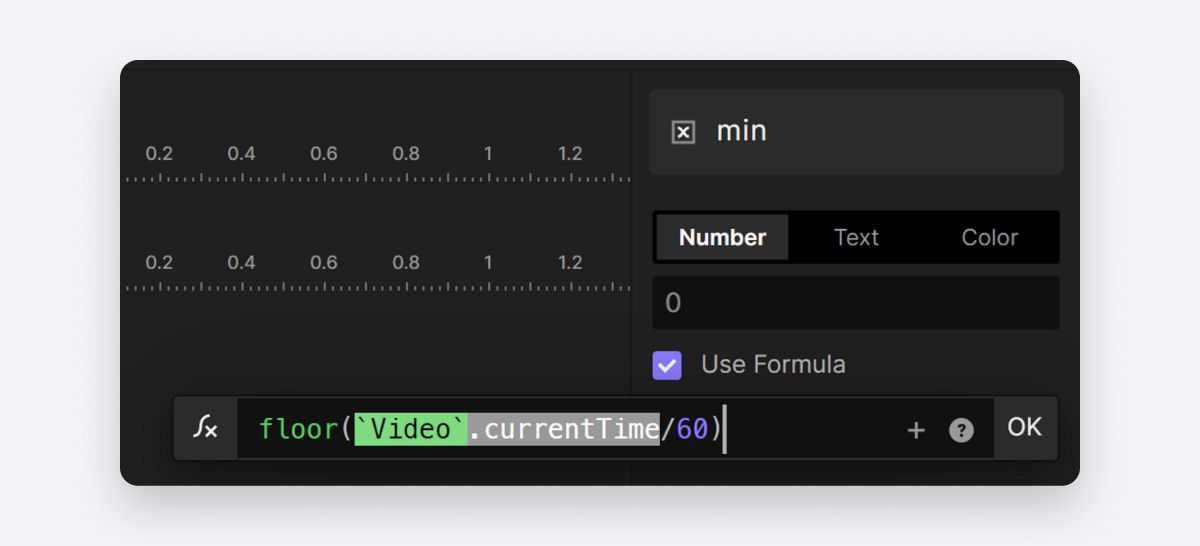
Formula setup for min.
For the sec variable, we’ll use
floor(Video.currentTime-min*60). This formula calculates the seconds place by subtracting the minutes (previously calculated in min variable) multiplied by 60 from the video's current playtime and rounding down.
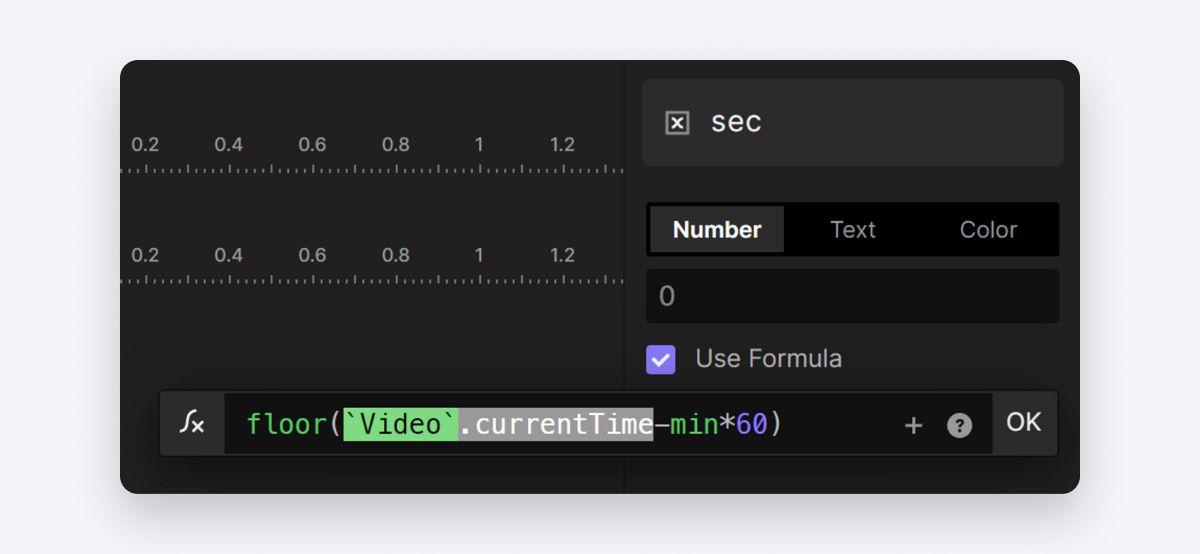
Formula setup for sec.
With the variables properly configured, let's conduct a quick debugging check. You can make the variables appear on the screen by clicking the ladybug icon. In the preview window, you’ll see the variables are shown in the green boxes.
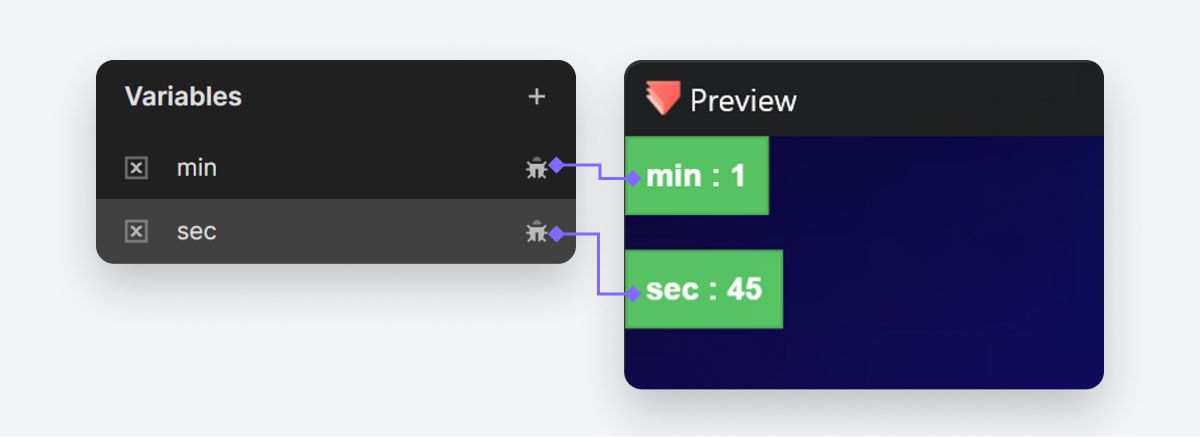
Let's conduct a quick debugging check.
Finally, let's return to the Text response to adjust the formula used there. We will modify the formula to:
lpad(min,2,"0")+":"+lpad(sec,2,"0"). This formula will ensure that the time is displayed in the desired format, with leading zeros if needed for consistency.
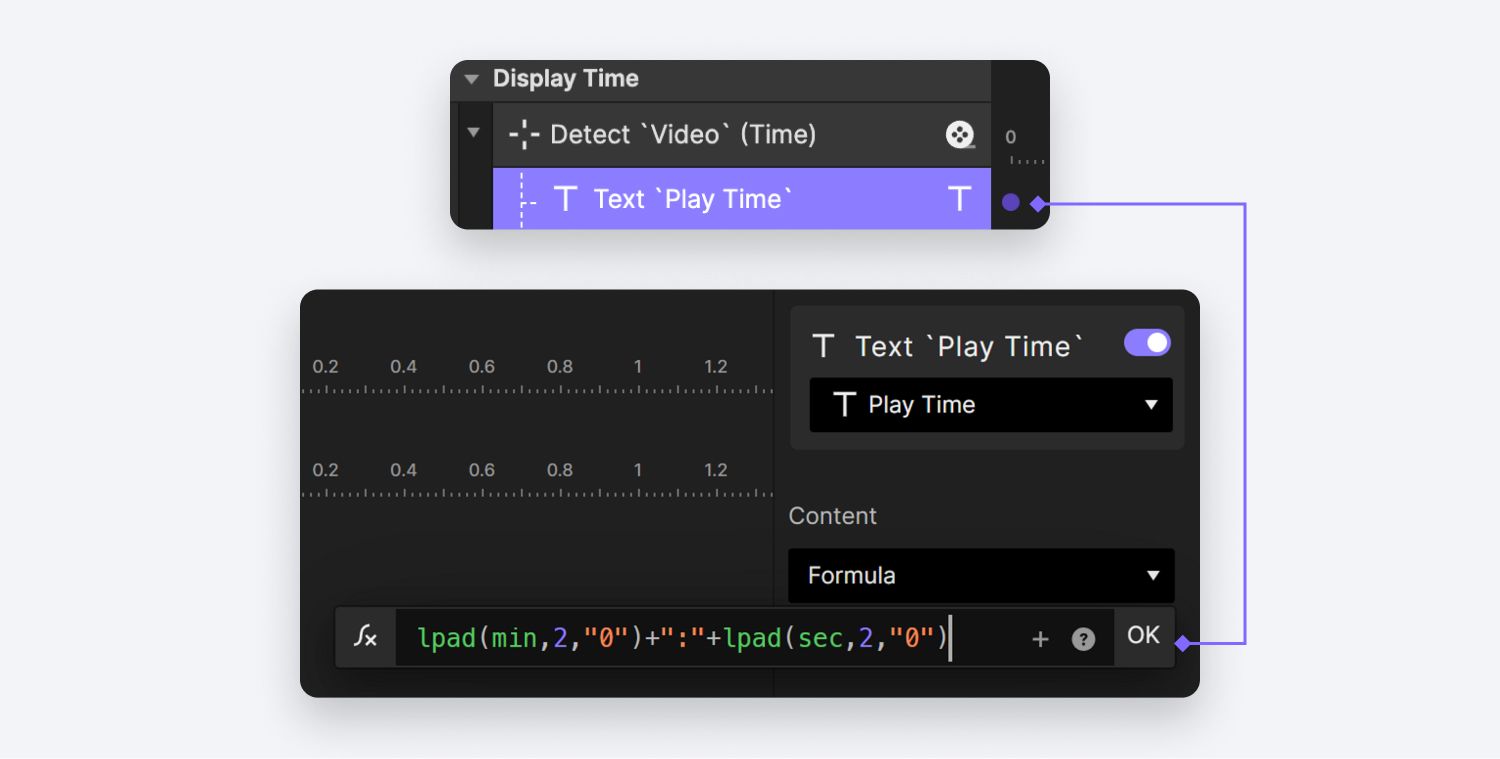
Modify the formula.
To display the total time, you can easily access it by clicking on the video layer and locating its total time in the property panel. With this information, you can adjust your design accordingly to include the total time in the desired format.

You can adjust your design accordingly to include the total time in the desired format.
Great job! You've completed the setup for the time display. Now, let's preview what we have accomplished so far to see how it all works together.
Interact with the Progress Bar
Let’s move on to the progress bar. First, we want the progress bar to reflect the current video progress.
To link the video's time with the progress bar, let's add a **Chain **trigger to the Video layer. For the trigger property, select Time.
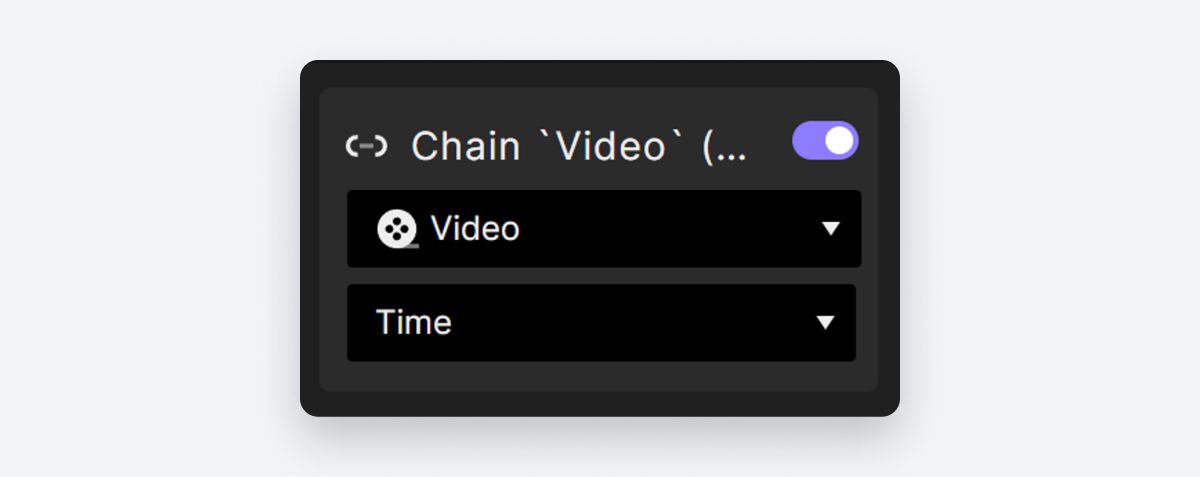
Add a Chain trigger to the Video layer.
Now, we want the video's time to control the progress bar. Add a Move response to the Knob layer, which is the small dot used to drag the progress bar (we'll introduce this in a later part of the tutorial).
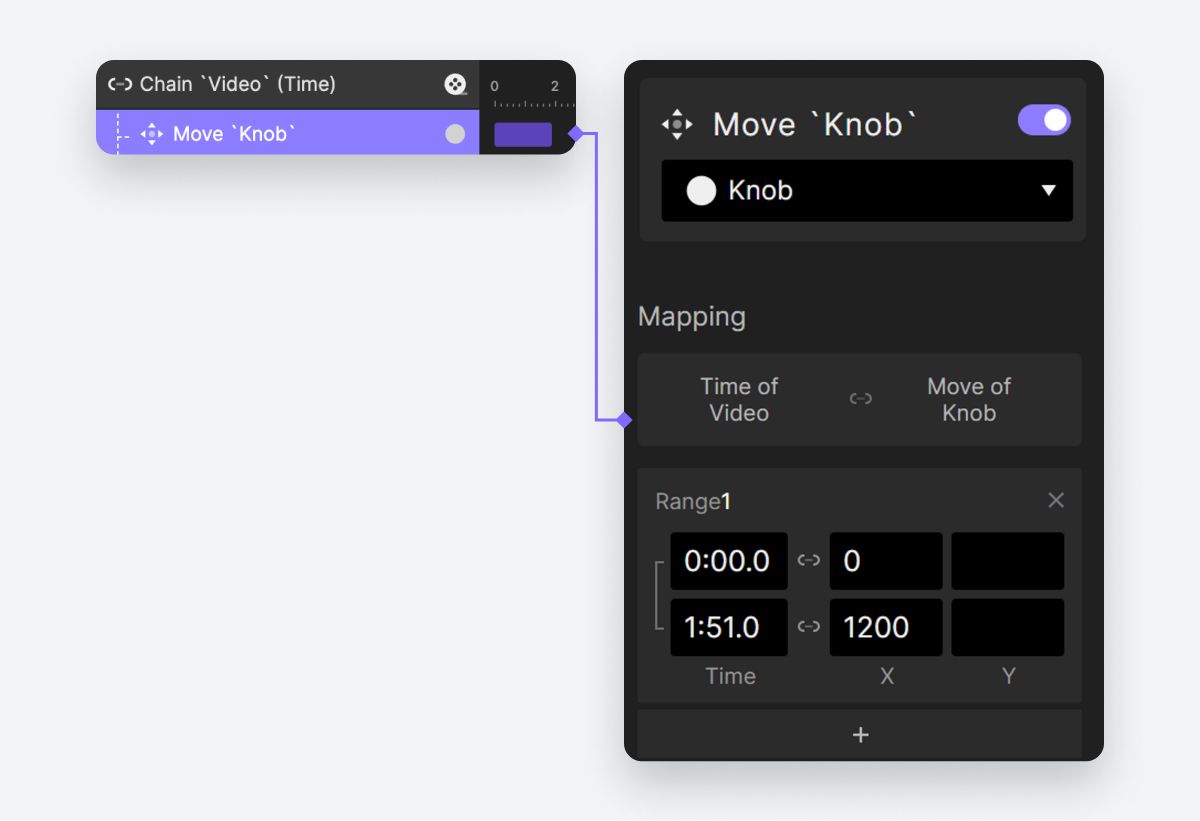
Add a Move response to the Knob layer.
For the Range of the Video, it will span from start to finish time. Regarding the Knob's X position, it should move from far left to far right, so in this case, it will range from 0px to 1200px. This setup will synchronize the progress bar with the video's playback time.
We also want the Active Fill layer to scale along with the Knob’s movement. In this case, let’s do another Chain for ’s X position. And then let’s give the Active Fill a Scale response.
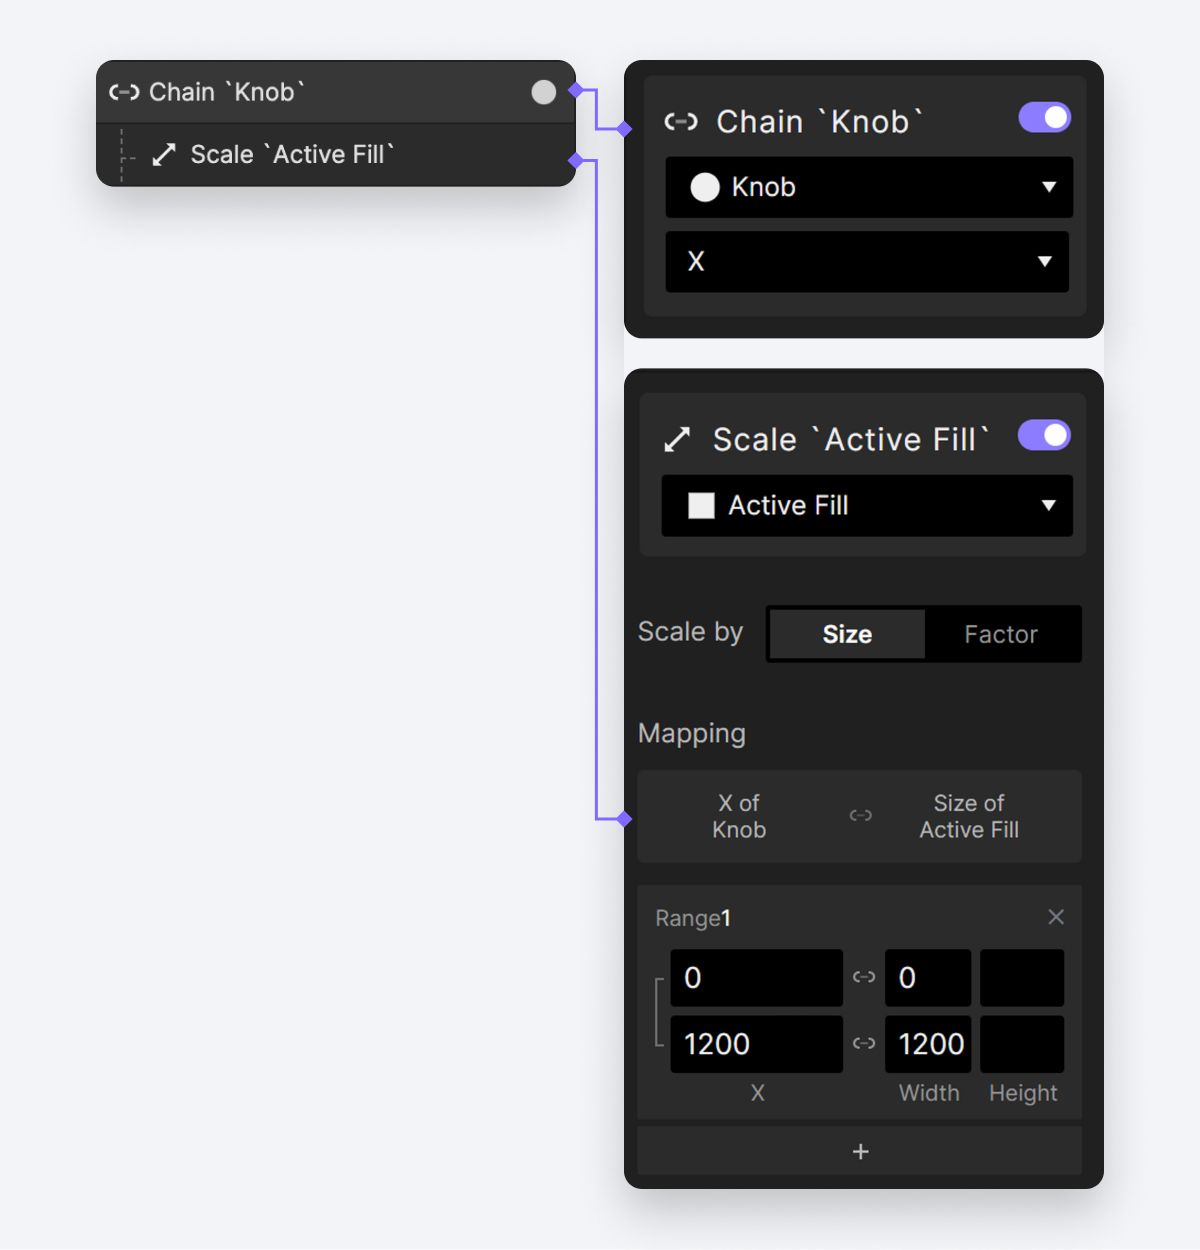
Add another Chain for ’s X position and give the Active Fill a Scale response.
This setup will ensure that the Active Fill layer scales accordingly as the Knob moves along the progress bar.
Let’s take a look in our preview window.
A preview of the playtime display.
Now, let's make the progress bar draggable. The drag interaction will be applied to the Knob of your progress bar, allowing you to seek through the video's progress. Simultaneously, the video will adjust its playback position, and the Active Fill layer will fill up the progress bar accordingly.
Add a Drag trigger to the Knob layer.
Under the Drag interaction, let's configure a Move action for the Knob. For this Move action, we want to restrict the knob's movement to a horizontal direction only. Additionally, we'll set limits to ensure that the Knob won't go outside of your progress bar. Specifically, the limit will be from 0px to 1200px, ensuring it stays within the bounds of the progress bar.
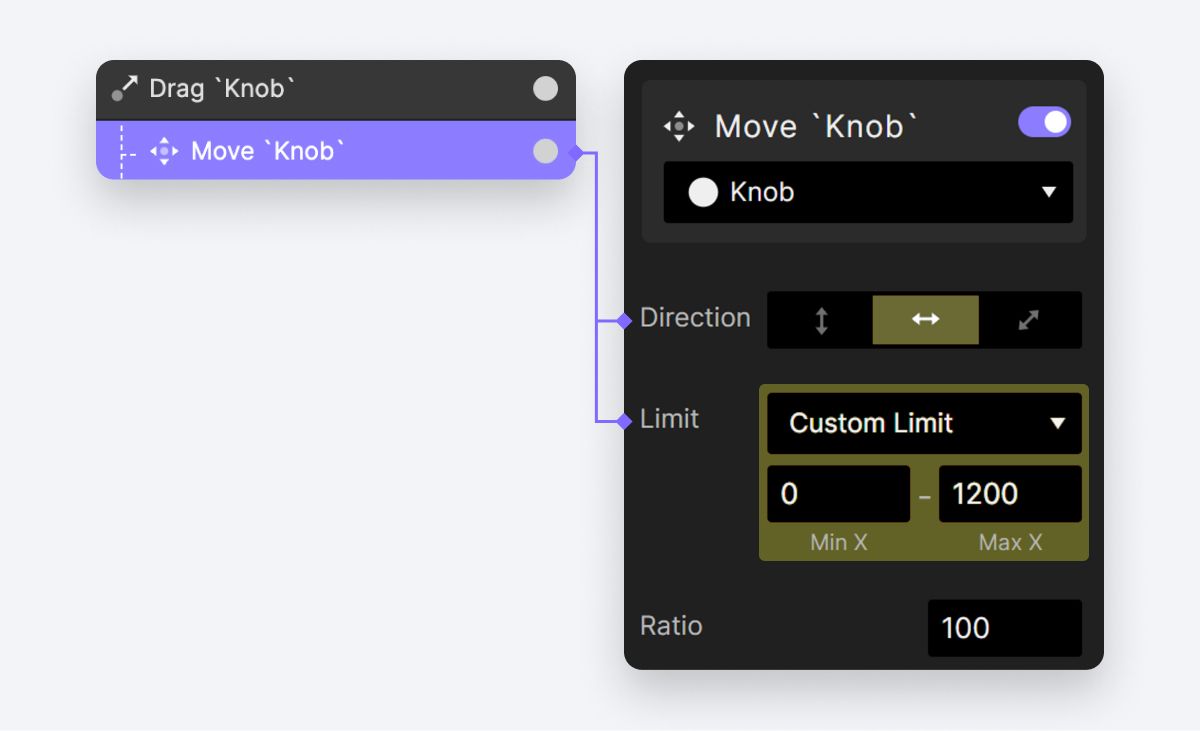
Configure a Move action for the Knob.
As we complete the drag action and release the mouse, we'd like the video to seek its progress to the current point where the knob was dragged to. So let’s add a Touch Up trigger to the Knob layer.
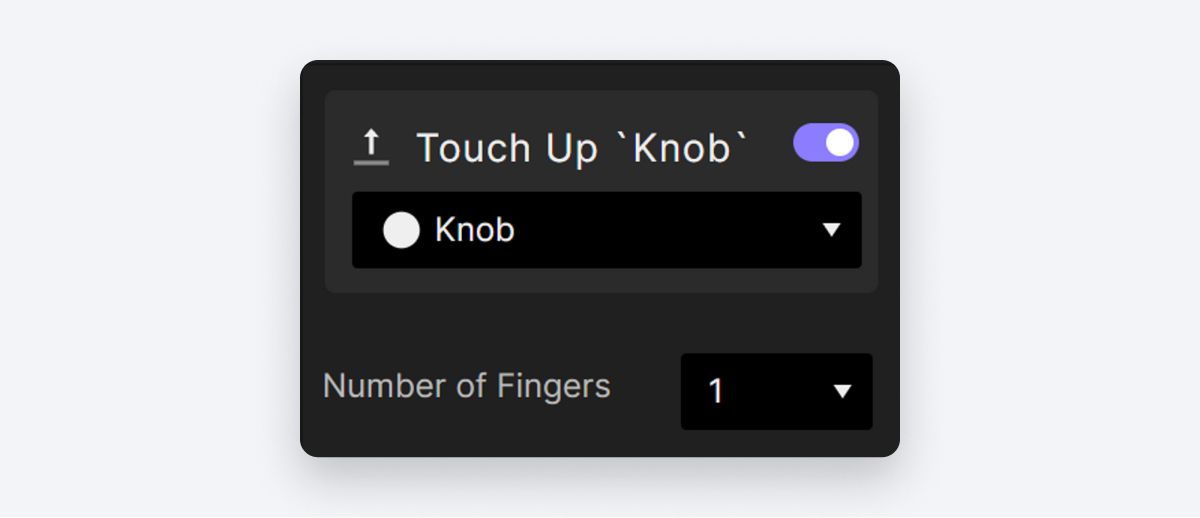
Add a Touch Up trigger to the Knob layer.
For the Touch Up action, we'll set up a Playback response for the Video layer. Within the Playback response, we'll select the Seek option, and we'll utilize a formula for this purpose:
Knob`.x / 1200 * Video.totalTime`

Set up a Playback response for the Video layer.
This formula involves a bit of mathematical calculation. Essentially, it calculates the current progress by taking the ratio of Knob.x / 1200`, which represents the current position of the knob within the progress bar, and then multiplies it by the video's total time.
Let's preview it now. As you can see, you'll be able to drag the small knob on the progress bar to precisely control the video's progress.
A preview of progress bar drag action.
Within the progress bar, we also want the option to simply tap anywhere on it to directly set the video's progress to that point.
Add a Tap trigger to the Progress Bar group followed by a Playback response to the Video layer.
For the Playback, we’ll again use Seek and a formula. The formula will be
toLayerX(Progress bar,$touchX,$touchY) / 1200 *Video`.totalTime```
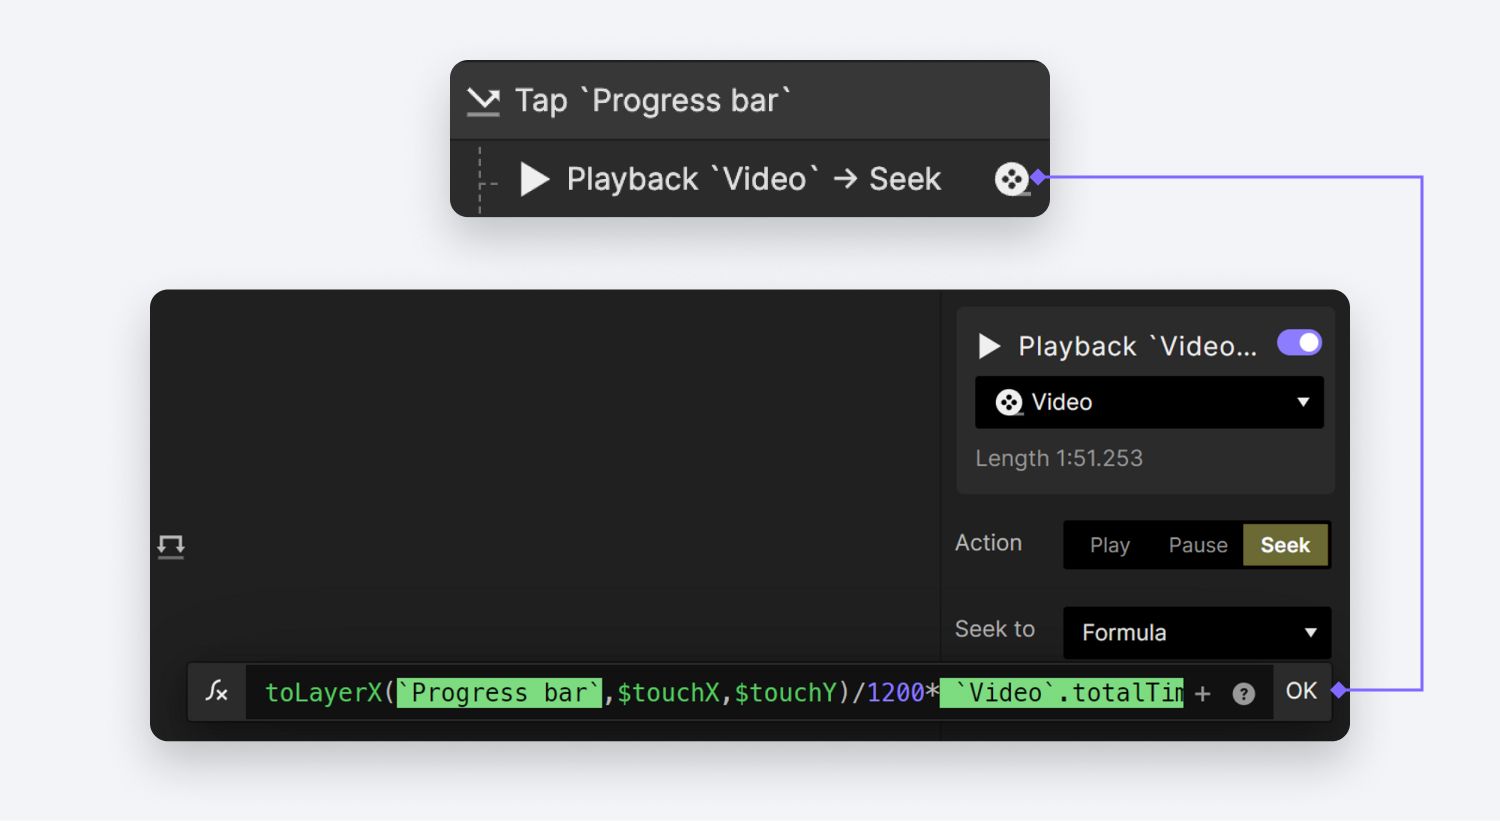
Add a Tap trigger to the Progress Bar group followed by a Playback response to the Video layer.
In this formula, $touchX and $touchX will get the touch position relative to the entire scene. With toLayerX() we convert the X position to relative to the Progress Bar container.
Let's preview what we've accomplished so far. As you can see, tapping anywhere on the progress bar allows you to seek the video's progress with ease.
A preview of progress bar tap action.
So that’s it with the progress bar interaction. Great job! Now you have a functional progress bar just like in any media player.
5. Adjust video volume
To make the experience complete, let’s work on adding our volume controls. Since it involves interactions similar to those we've covered earlier, we'll follow a streamlined approach for this part of the tutorial to keep things simple.
Drag the Volume Slider — This function operates similarly to the drag action we set up for the progress bar. In the starting prototype, you can find this feature within the group labeled Drag Volume Slider.
Tap the Volume Slider — This action functions similarly to the tap action we prototyped for the progress bar. In the starting prototype, you can locate this feature within the group named Tap Volume Slider.
Show Different Volume Icons Based on the Volume Level — We utilize the Range trigger to detect the volume level and show different icons accordingly. Check out this Quick Start lesson on the Range trigger to better understand this feature.
A preview of volume slider interactions.
In this case, we’ll focus on creating a seamless Mute and Unmute experience.
Let’s add a Tap trigger to the Volume Button group.
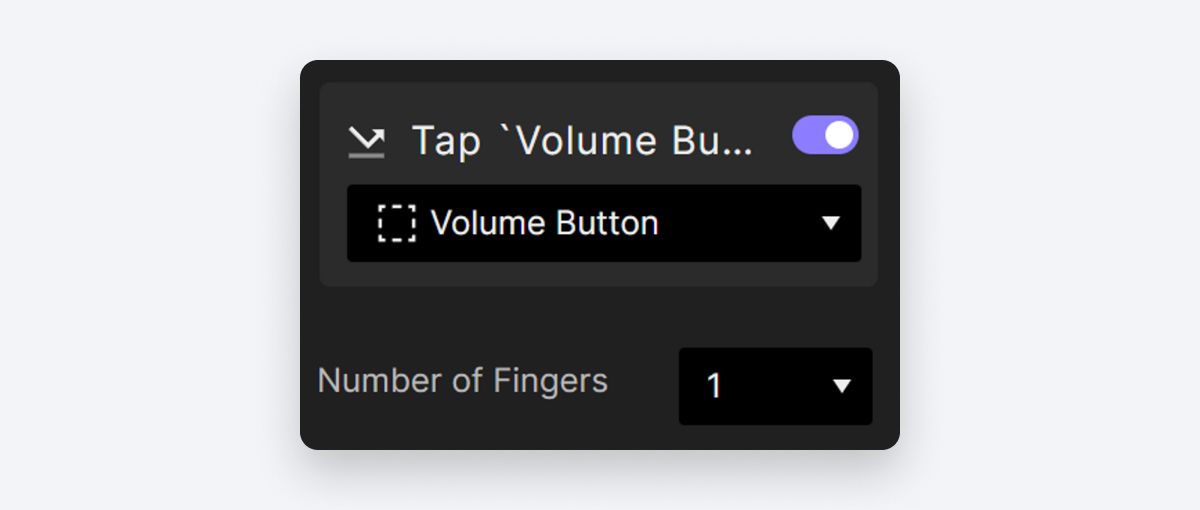
Add a Tap trigger to the Volume Button group.
Much like how we tackled the Play/Pause button, within the Volume Button Group, you'll come across Muted and Unmuted groups. These contain icons representing different states.
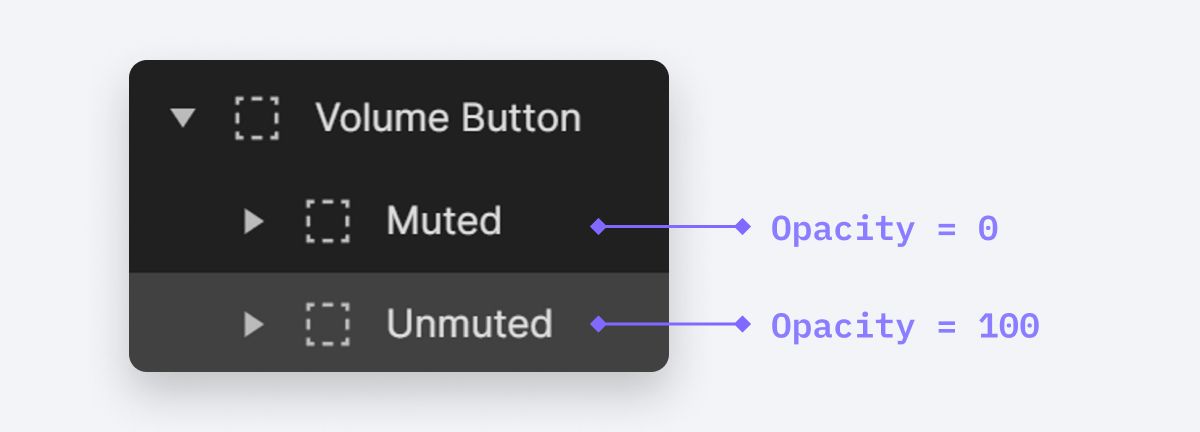
Muted and Unmuted groups.
Let's set up a condition for when the Opacity of the Muted group is 0, indicating that the video now has sound. When this condition is met, we'll configure the Volume Level layer's width to be 0.
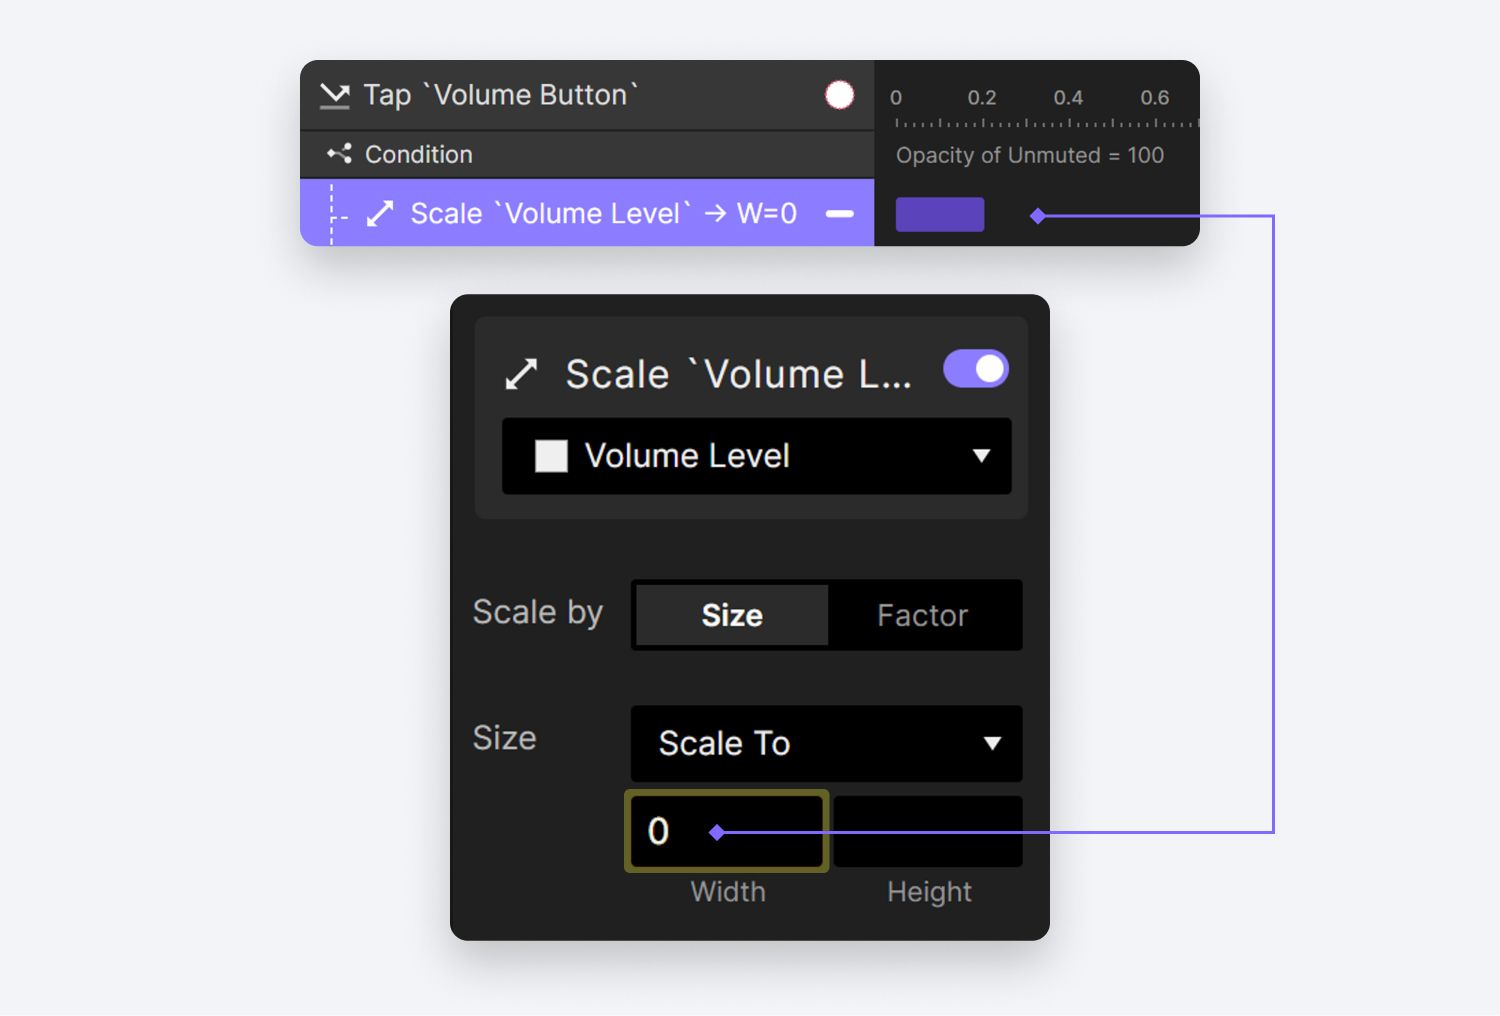
Set up a condition.
In our starting pie, you’ll see the Video volume is chained to the Volume Level’s width, so as a result this is going to turn the volume down to 0.
We'll create an additional condition for when the Opacity of the Muted group is 100, indicating that the video is muted. In this condition, we'll configure the Volume Level layer's width to revert to its previous state before the video was muted.
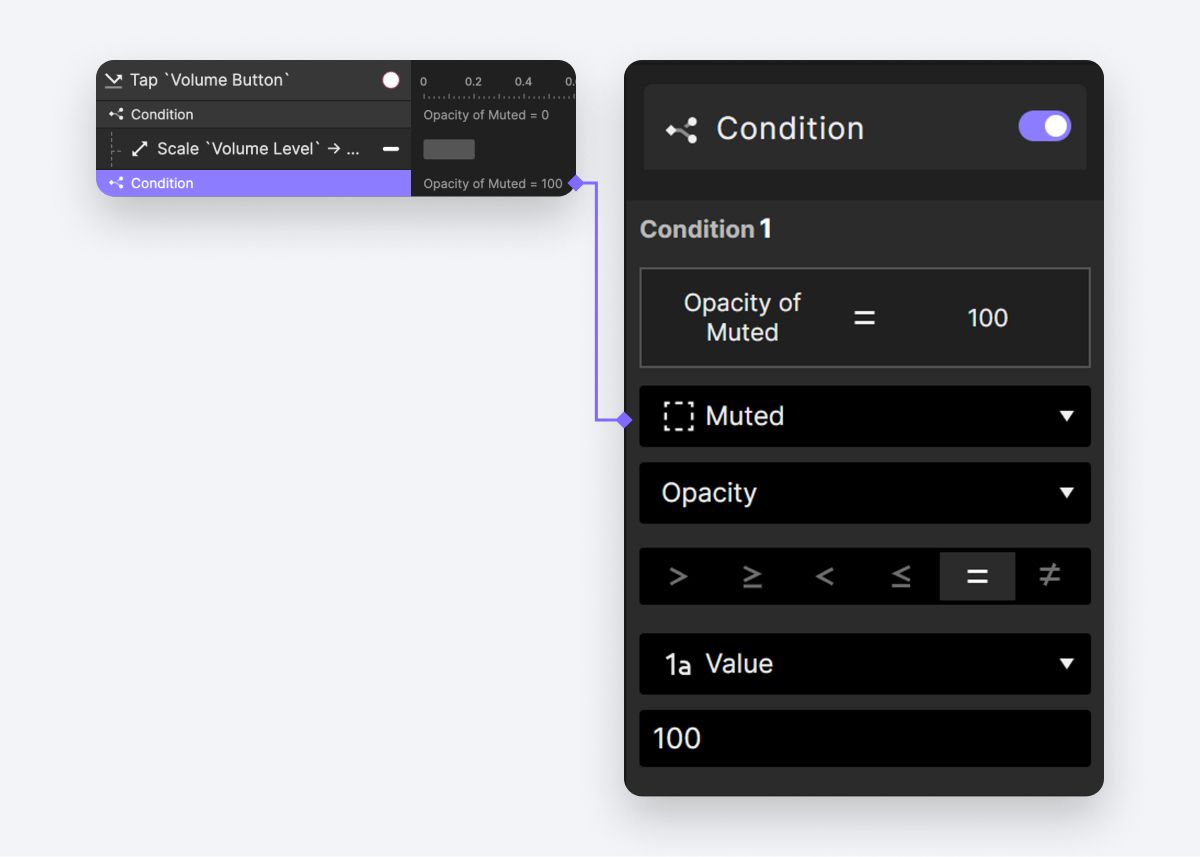
Create an additional condition.
This requires us to find a way to let ProtoPie remember the Volume Level’s width before it’s turned down to 0. A variable can help us. Let’s create a variable called
volumeResumeLevel.Under our first condition (
Opacity of Muted = 0), let’s assign the Width of the Volume Level to our newly created variable.
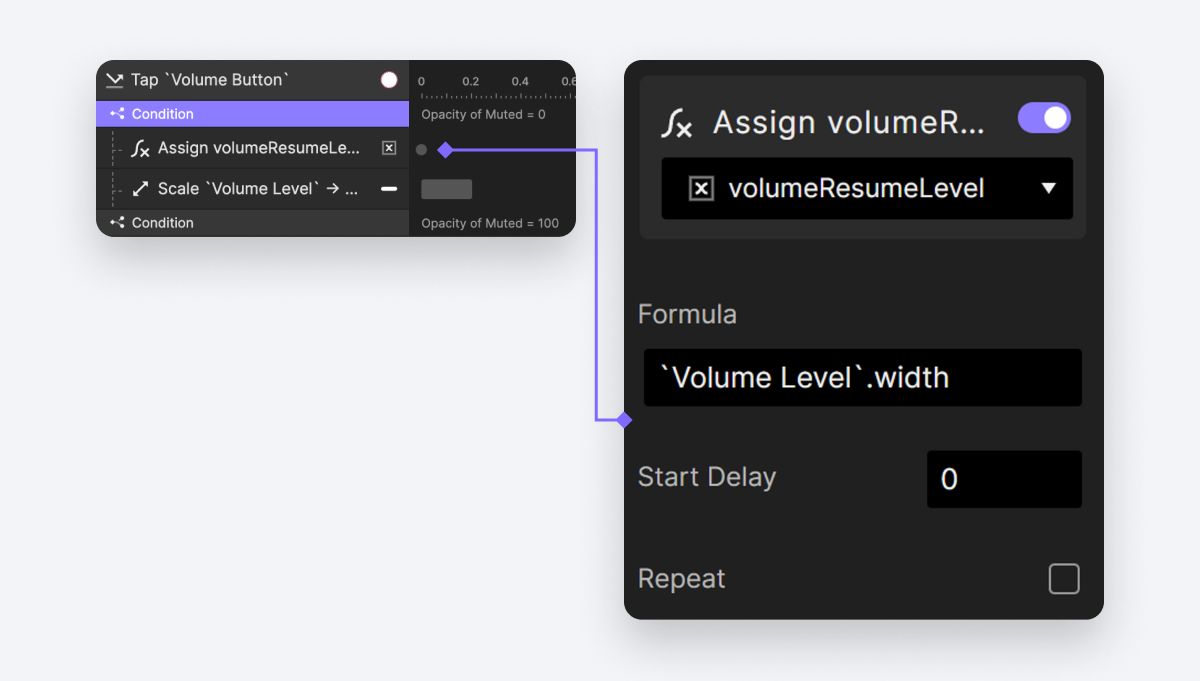
Assign the Width of the Volume Level to our newly created variable.
With this step, when we tap the Volume Button to mute the video, at the very moment of your tap, the Volume Level gets remembered by our volumeResumeLevel variable.
Following the second condition (
Opacity of Muted = 100), we can now implement a Scale action on the Volume Level layer. This action will scale the layer to the value stored involumeResumeLevel, effectively restoring the volume to its original level before it was muted.
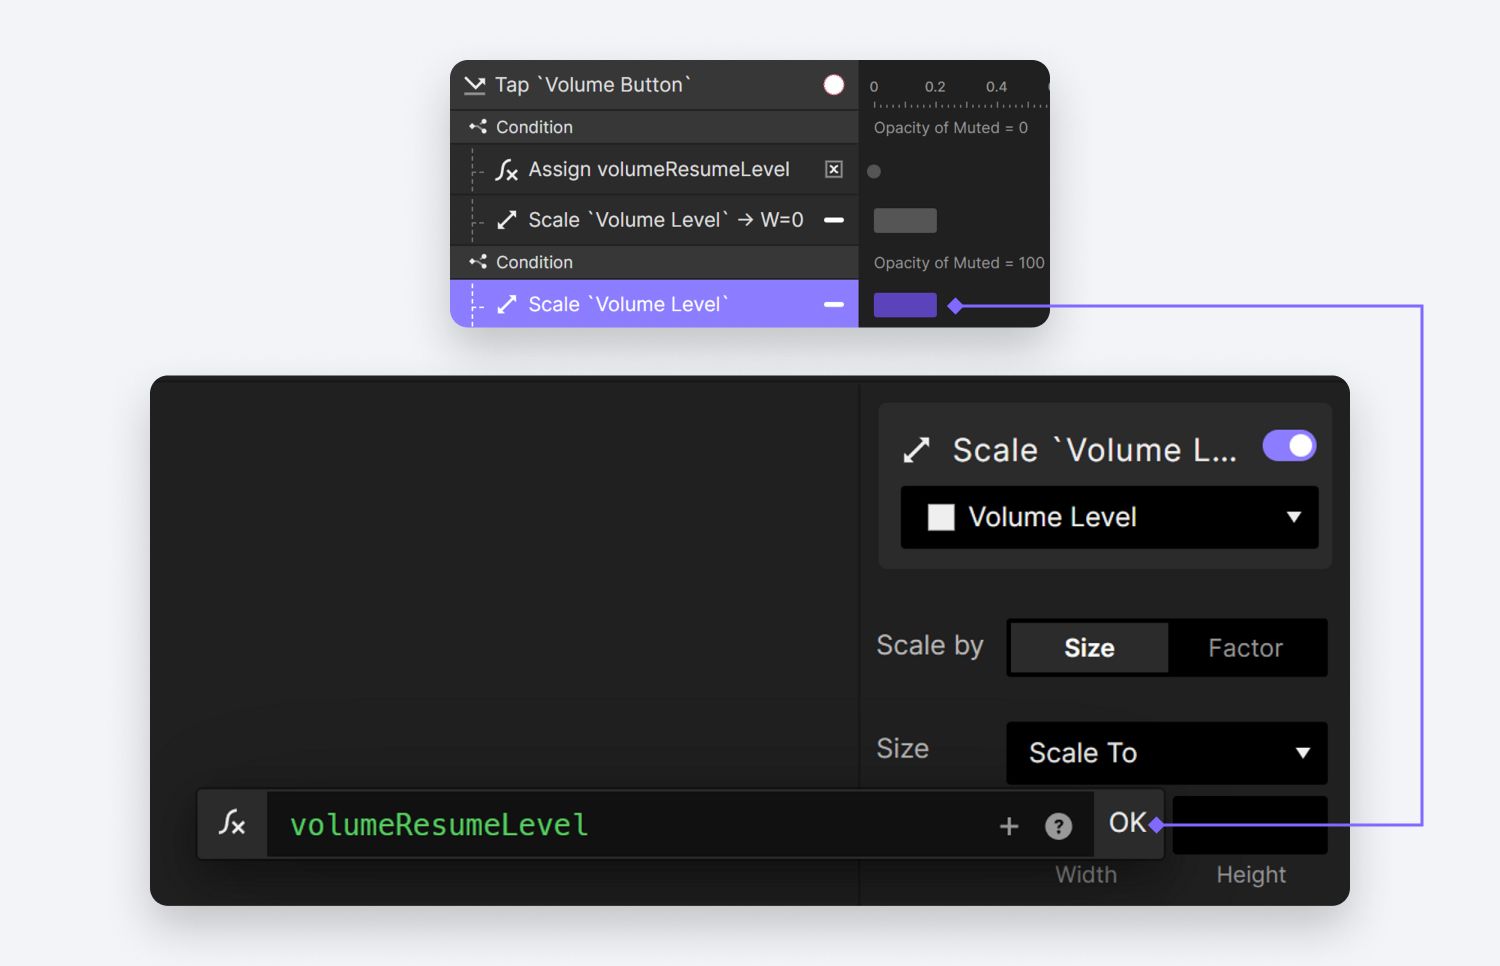
Implement a Scale action on the Volume Level layer.
Let’s have a final review of the Mute/Unmute experience. As you can here, when we unmute the video, the volume level returns back to its original level before it was muted.
Final review of the Mute/Unmute experience.
That’s it! You prototyped a functional video player
Congratulations on successfully implementing interactive controls for a media player in ProtoPie! You've learned how to create a seamless user experience, allowing users to play, pause, adjust progress, control volume, and mute/unmute with ease. These skills can be applied to various design projects, enhancing the interactivity and functionality of your applications.
Elevate your advanced prototyping skills
ProtoPie offers a powerful platform for creating intricate interactions, and there's so much more to explore. If you want to deepen your knowledge and skills further, join us at ProtoPie School and take our comprehensive ProtoPie 101 course with at least 10,000 students enrolled who also want to become a prototyping expert and take your interactive designs to the next level.
Join our masterclass for TV and video streaming
By popular demand, we've finally released a UX Masterclass in TV Prototyping and Video Streaming Apps. Sign up below to start learning in ProtoPie School, and stay in the loop with the latest in Film, TV, and Production related features.
Happy designing and prototyping!


