
Introduction
The aim of this tutorial is to simulate the functioning of a TV controller by using components, variables, and send & receive in ProtoPie. We will also make use of a scroll controller to switch between the TV content and add effects to the selected thumbnails. By the end of this tutorial, we will have a professional-looking TV controller simulation.
What you will learn
Interact with a variable using keyboard keys (left & right arrow keys)
Give each instant component a special number for its unique identity
Make the selected effect for the movie cards and thumbnails
Move selected content into the scene
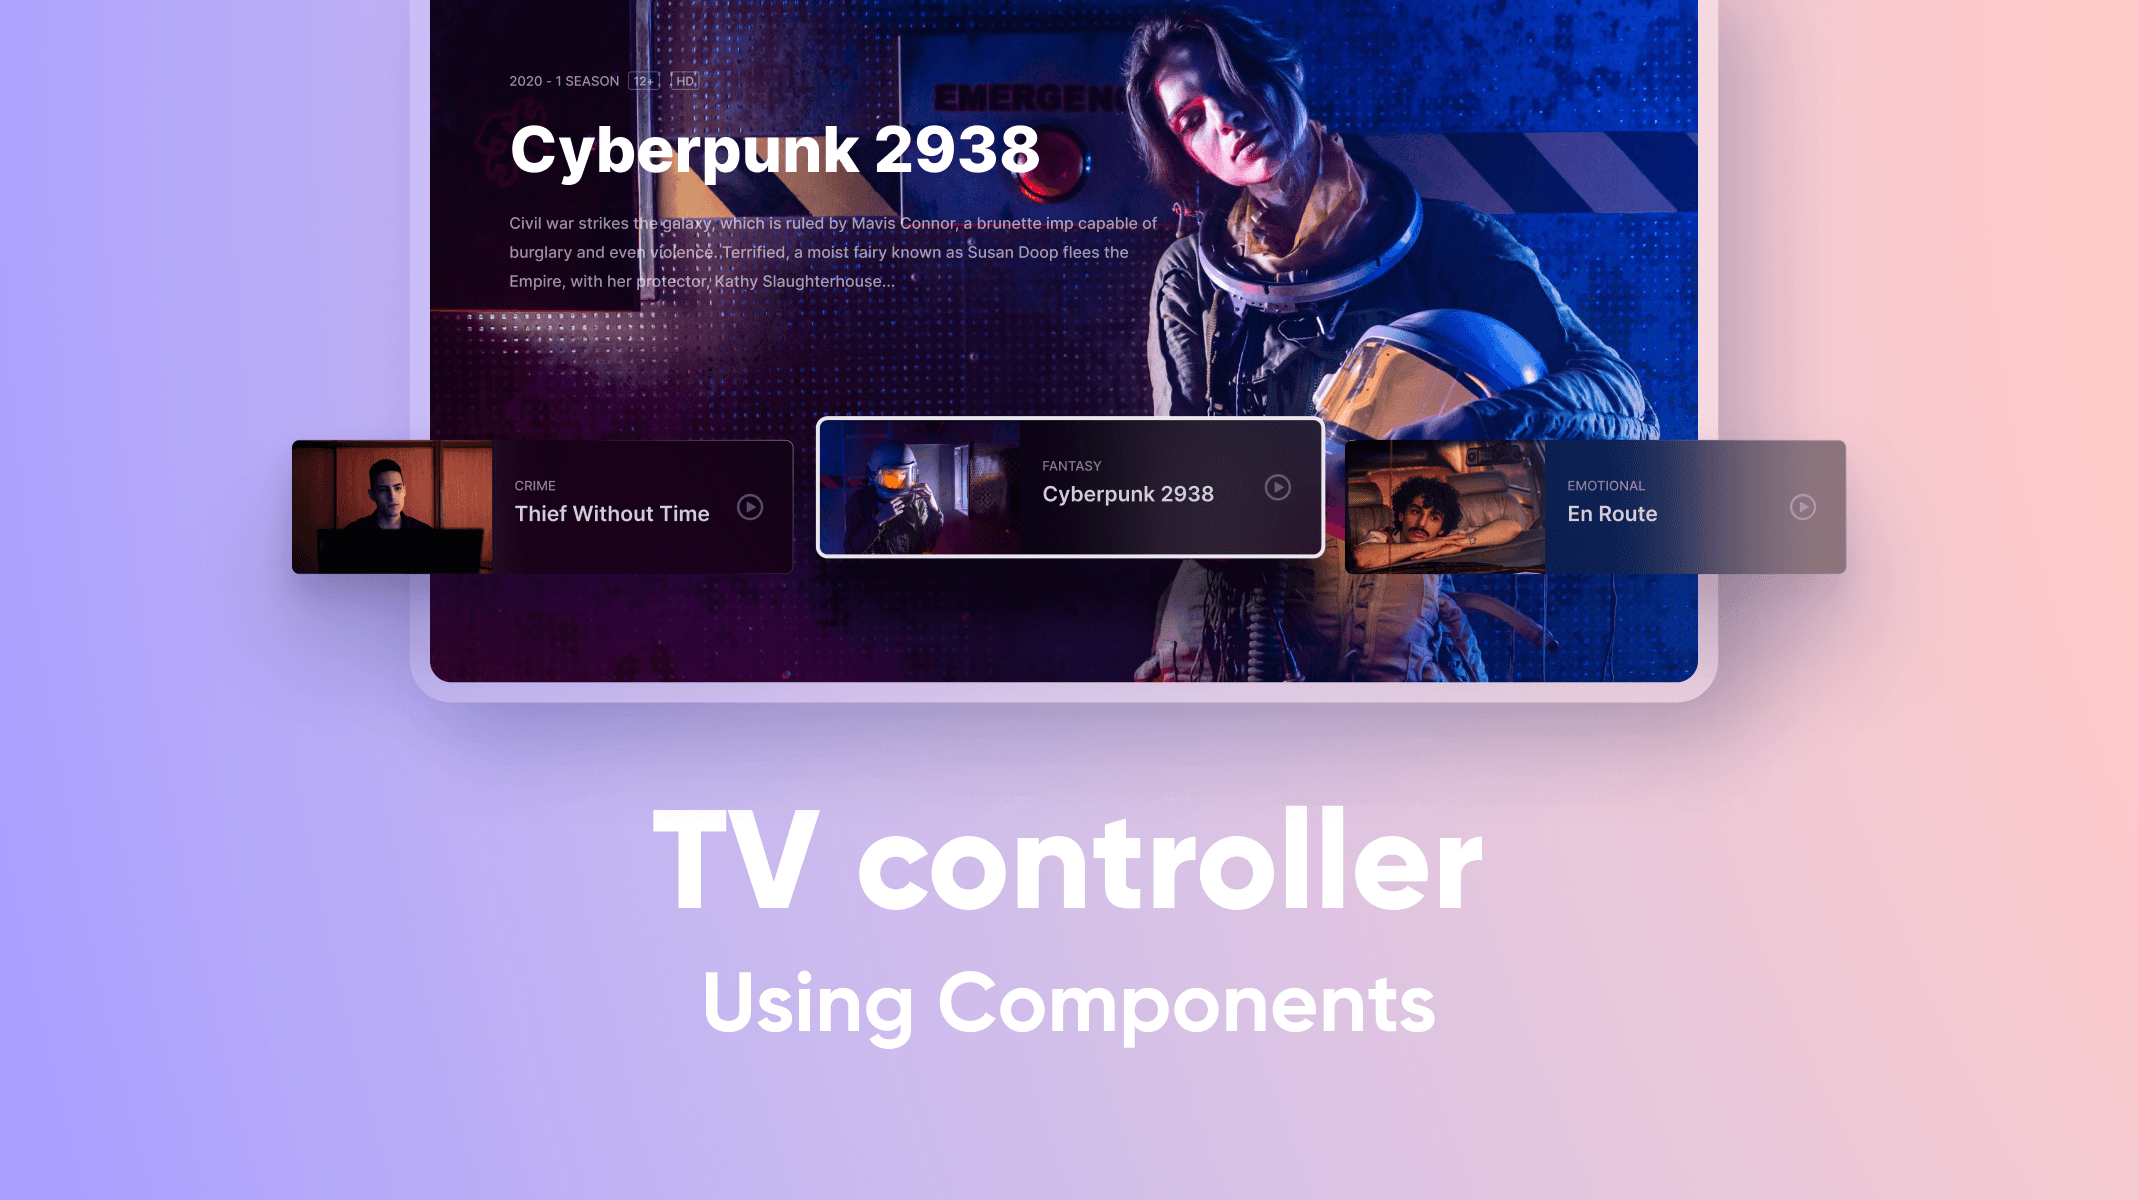
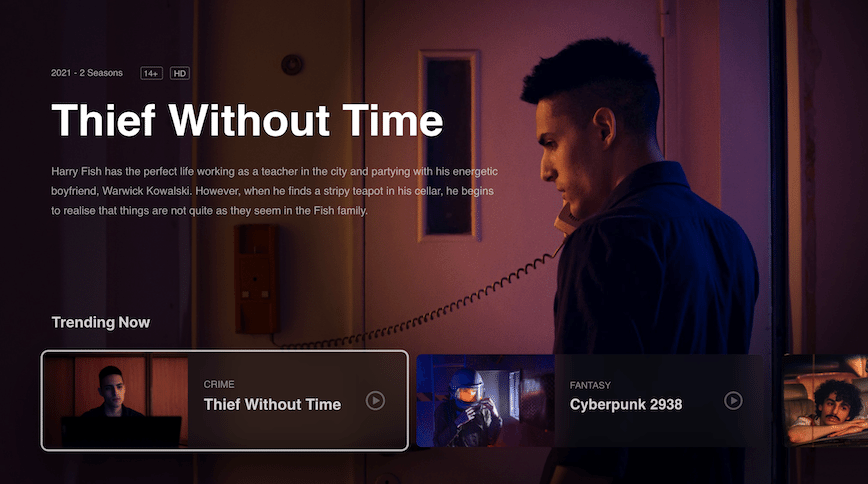
In the end, you’ll be able to make something like this!
[Starting Pie File] [Completed Pie File]
Step by step instructions
1. Interact with a variable using keyboard keys (left & right arrow keys)
In this step, we'll learn how to increase a variable by 1 (using the right arrow key) or decrease by 1 (using the left arrow key). This variable represents the selected movie from the movie content list on the screen.
💡 Why do we use variables instead of making interaction with the element itself?
In this case, we have 5 movies in the scene. And each movie has its corresponding card item and thumbnail image. When we are switching between movies, every movie instance card and thumbnail image will have the same behavior. We can manually add interactions for every card and thumbnail image, but that would just be a lot of repetitive and boring work.
So in this case we're going to use a smarter way to do this. We're going to set one single variable to represent the number of movies that are currently displayed on the screen. And ask every card and thumbnail image to observe this variable and behave correspondingly.
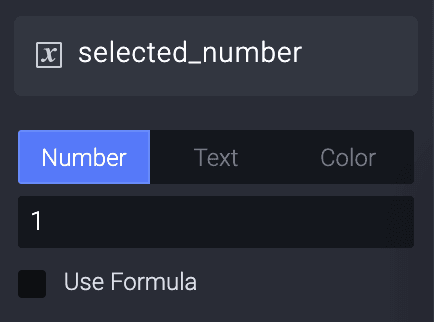
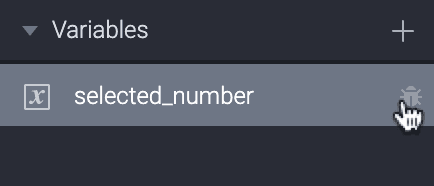
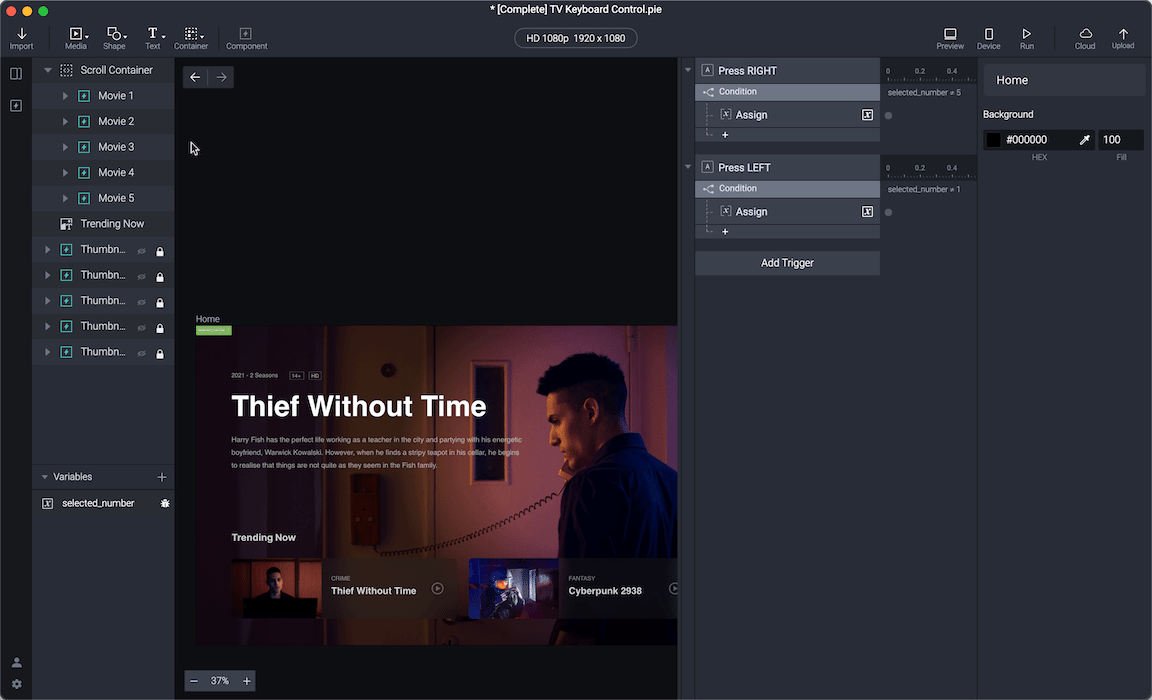
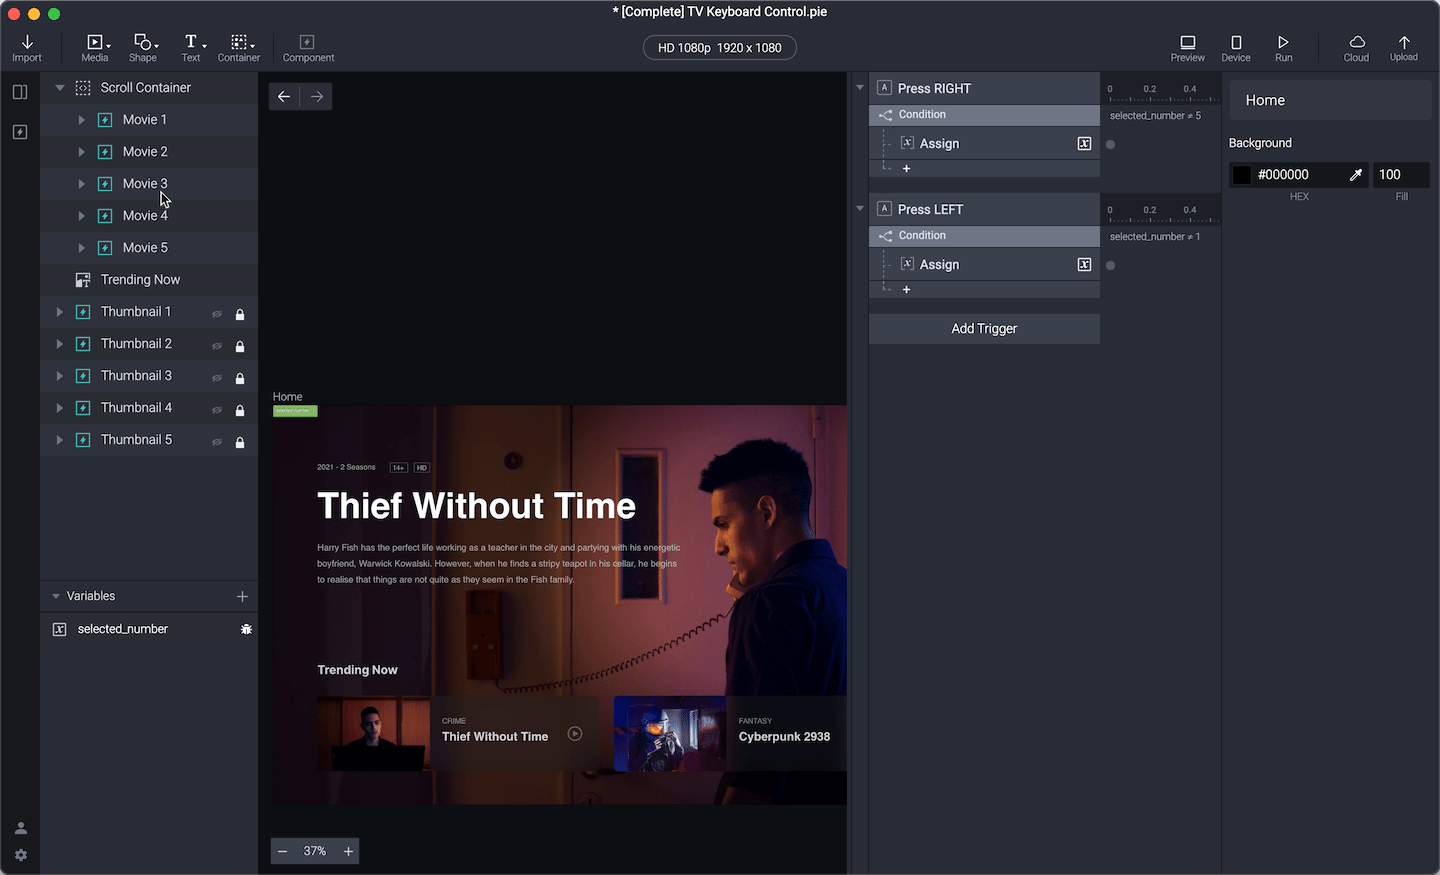
1. Create a new variable in the main scene and name it selected_number. Then set the starting value of the movie to 1 (as we have the movie range from 1 to 5).
2. Increase the value of the variable with the keyboard
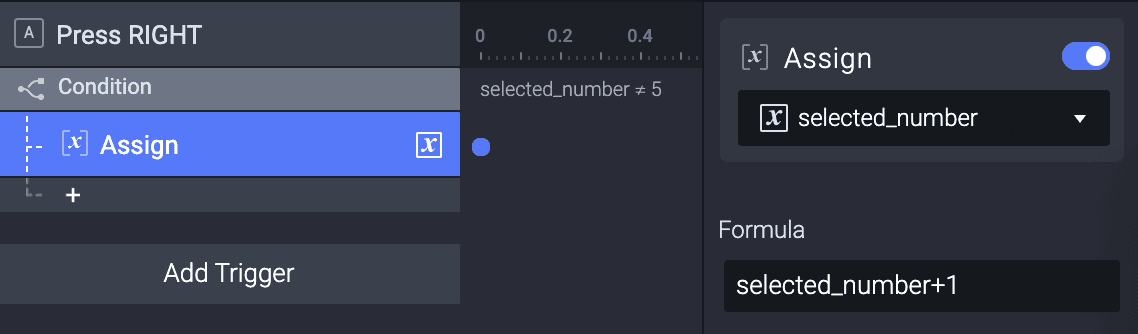
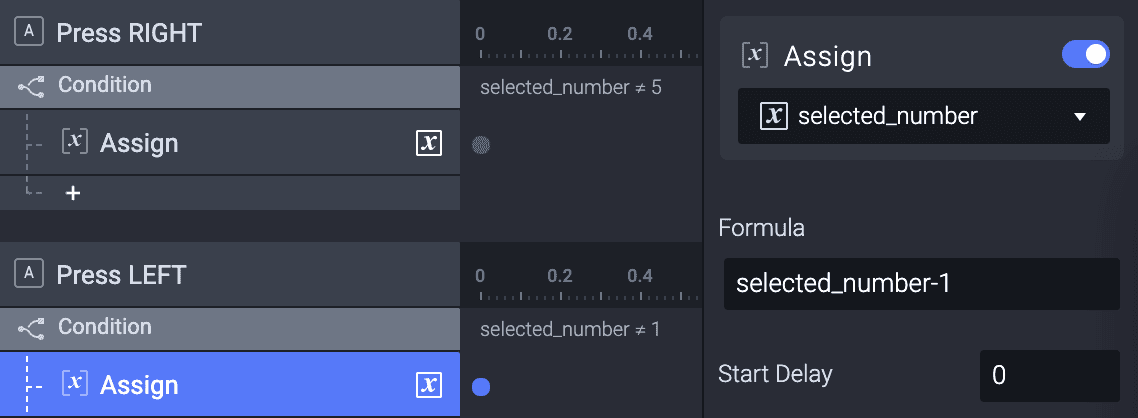
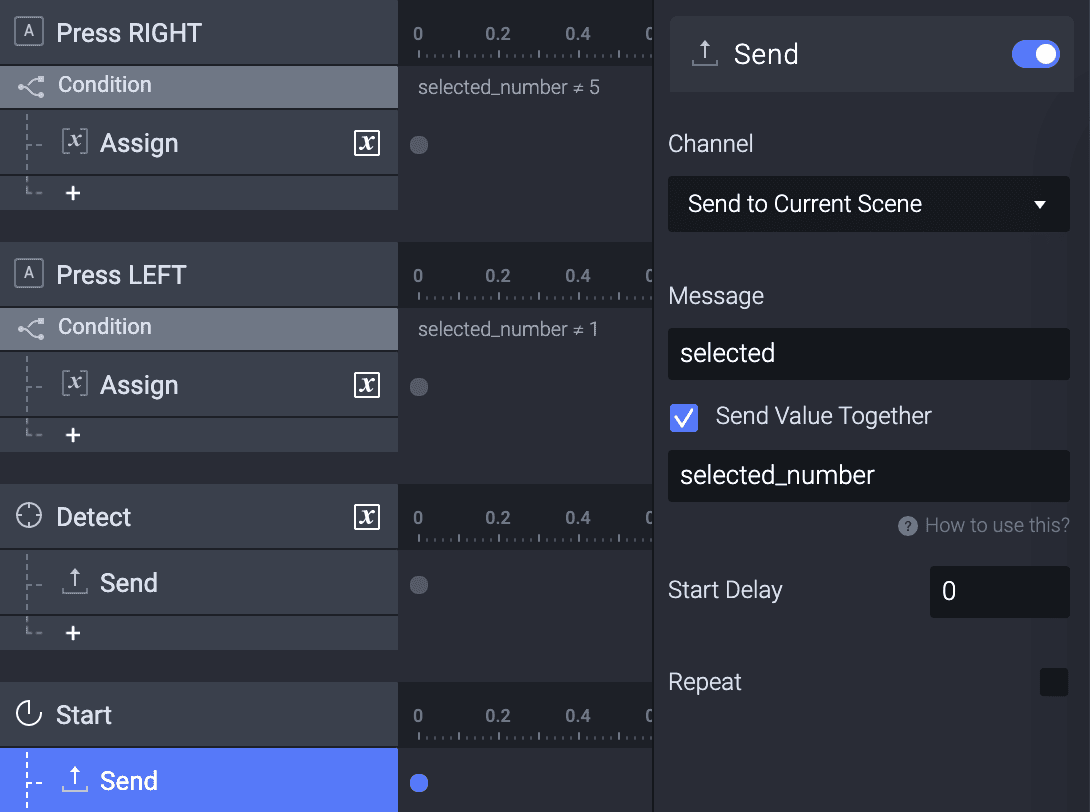
a. Add a Press trigger and set the key to press as the right arrow key of the keyboard
b. Add a condition. Then set the condition as selected_number is not equal to 5
c. Since there are only 5 movies, so we use a condition to make sure the variable won't go beyond 5
d. Add an Assign response under the condition. Then set the Assign response to the selected_number with formula selected_number+1
3. Decrease the value of the variable with the keyboard
a. Add a Press trigger and set the key to press as the left arrow key of the keyboard
b. Add a condition. Then set the condition as selected_number is not equal to 1
c. Add an Assign response under the condition. Then set the Assign response to the selected_number with formula selected_number-1
💡 We use a condition to make sure the variable won't go below 1
4. Now turn on the debug toggle of selected_number and go to preview mode. We should be able to use the right and left arrow keys on the keyboard to change the value of selected_number. And the value won't go beyond 5 or below 1.
2. Give each component instance a special number
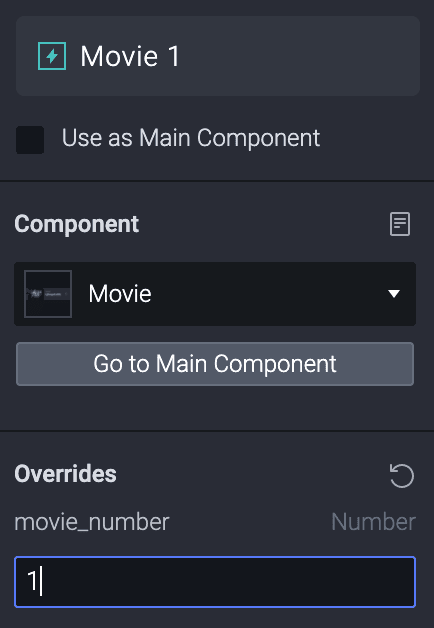
1. Give each Movie instance a special number
a. Open the Movie component
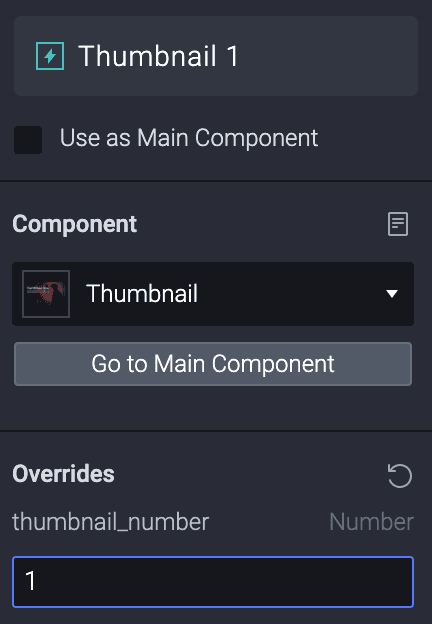
b. Create a new variable in the Movie component and name it movie_number
c. Check the Make Overridable option for the movie_number variable
d. Go to the main scene. Then set the value of movie_number of (movies 1 to 5) to 1, 2, 3, 4, 5 respectively
2. Give each Thumbnail instance a special number (same logic as the movie instance)
a. Open the Thumbnail component
b. Create a new variable in the Thumbnail component and name it thumbnail_number
c. Check the Make Overridable option for the thumbnail_number variable
d. Go to the main scene. Then set the value of (thumbnails 1 to 5) to 1, 2, 3, 4, 5 respectively
💡 Why Create new variables for these two components?
We do this to give a unique identity to every movie and thumbnail instance.
💡 Why Check the "Make Overridable" option?
We do this in order to customize the movie and thumbnail numbers on the main scene.
3. Make the selected effect for the movie cards and thumbnails
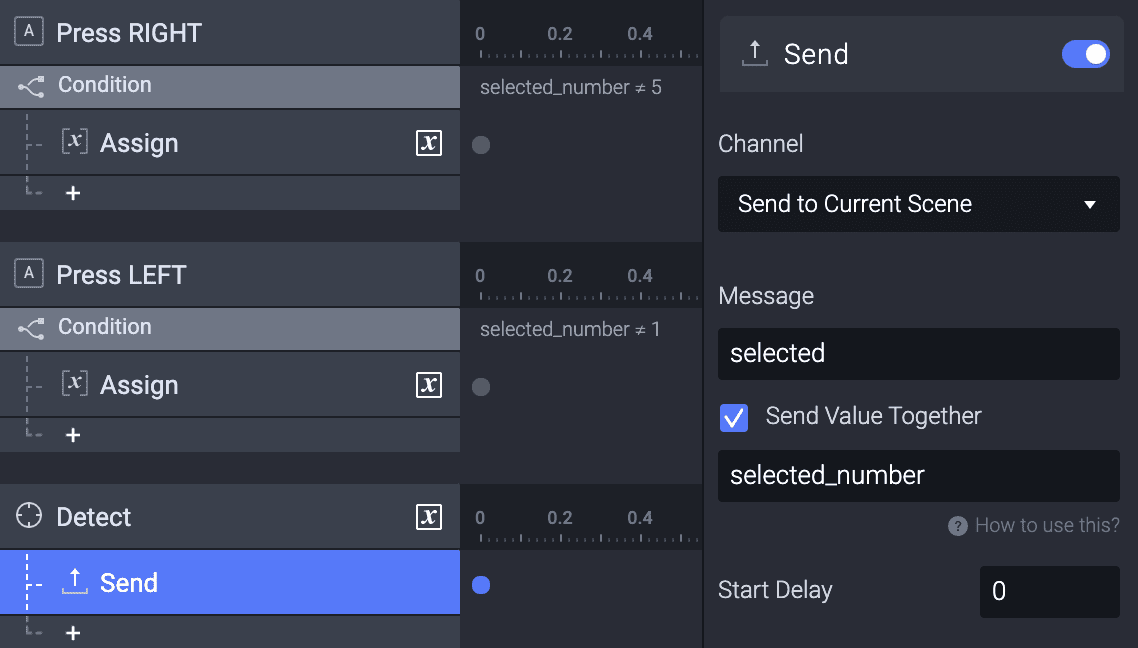
1. Send a message when the selected_number variable in the main scene changes.
a. In the main scene, add a Detect trigger and set it to detect the **selected_number **variable.
b. Add a Send response under the Detect trigger. Set the message as selected. Then check the Send Value Together option and set the value to selected_number.
💡 Why do we use a send and receive trigger in this context?
As we are making use of components, and we cannot make changes in the parent components from the main scene while working with the values stored in the selected_number, hence, we will use send & receive.
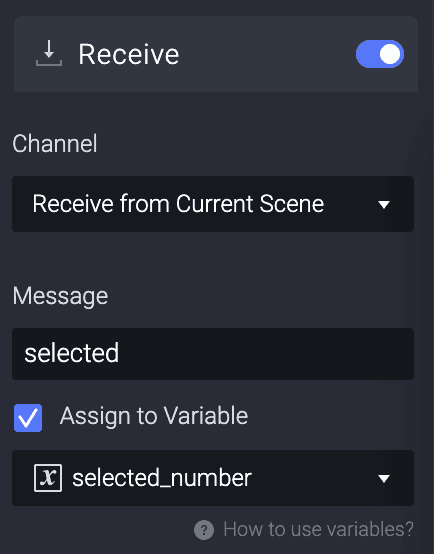
2. Receive the message in the Movie component from the main scene.
a. In the Movie component, create a new variable and name it selected_number
💡 Why did we create a variable with the same name?
Because we can't access the variable of the main scene when we're inside a component. So we create a variable with the same name and use it to receive the value of the selected_number from the main scene.
b. Add a Receive trigger for the Movie component. Set the message as selected. Check the Assign to Variable option. Then set the variable to assign as selected_number
c. Add two conditions under the Receive trigger. Name the two conditions unselected and selected
💡 What is the use of unselected and selected in this context?
We use this to highlight the selected/unselected movie instance. When the values in both the variables match, we can see the selected effect on it. If the values don't match, we see the unselected effect.
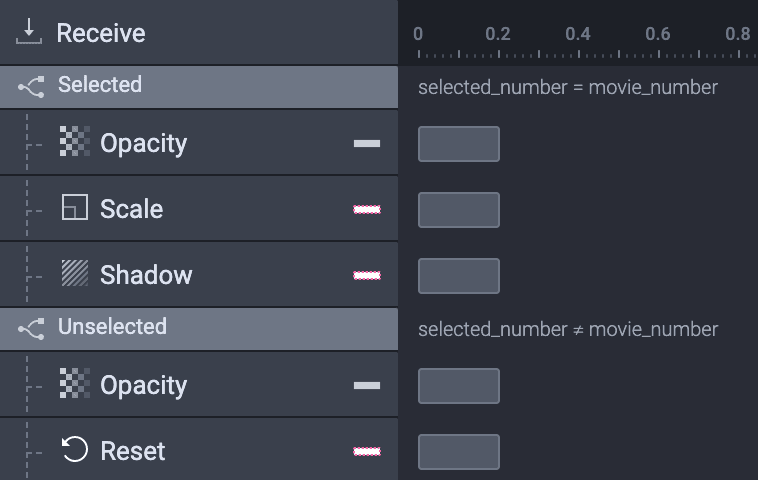
d. Set the selected condition as selected_number = movie_number.** **Then set the unselected condition as **selected_number ≠ movie_number **
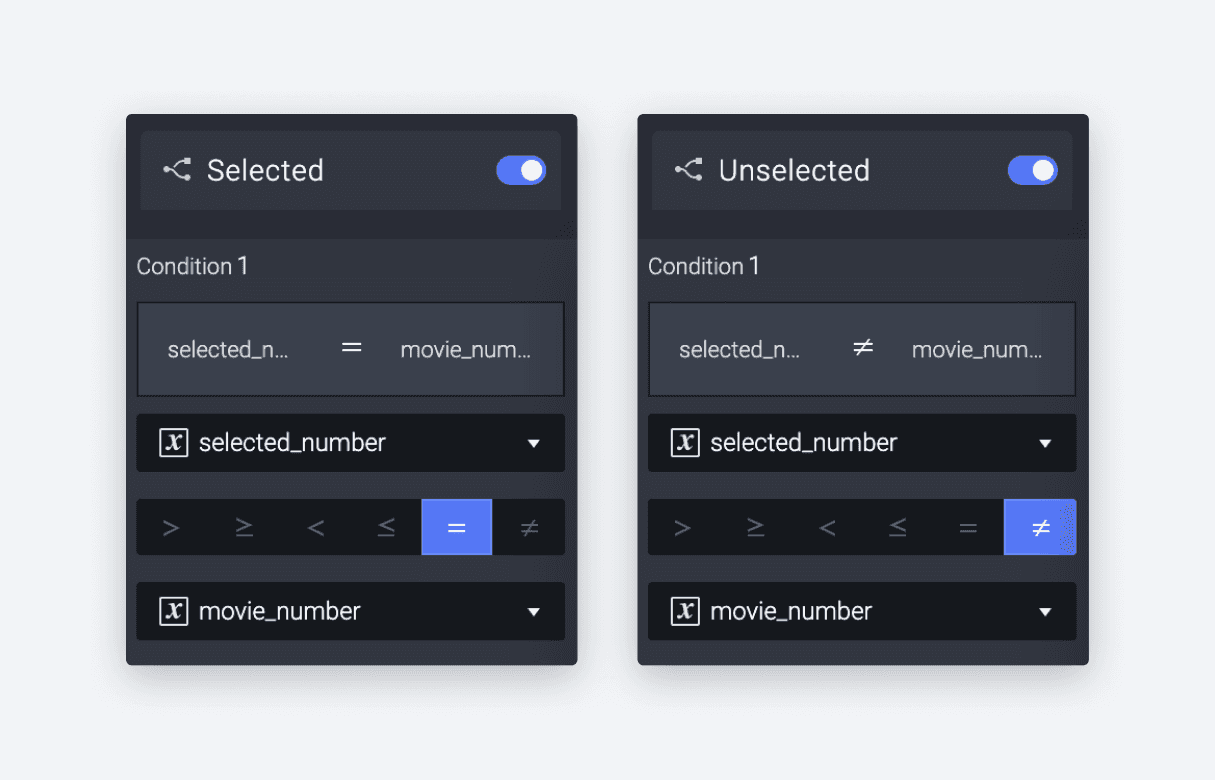
e. Add unselected response under the unselected condition, for example, set the opacity of border stroke to 0. Then add the selected response under the selected condition, for example, set the opacity of border to 100. You can customize the selected and unselected response according to your preference by adding the necessary effects.
f. Now go to the main scene. In the preview mode, if we press the right and left arrow keys, we should be able to see the selected and unselected effects of movie instances. But the movie 1 instance won't be automatically selected when the scene starts.
g. In the main scene, add a Start trigger. Then add the same Send response as the detect trigger under the start trigger. Now the movie 1 instance will be automatically selected when you preview the scene.
3. Receive the message with the Thumbnail component from the main scene. (similar to the movie component)
a. In the Thumbnail component, create a new variable and name it selected_number
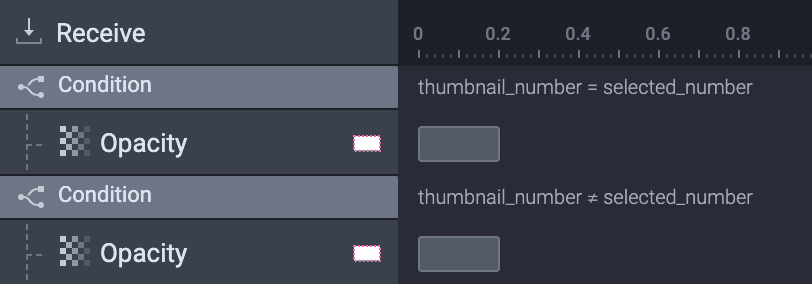
b. Add a Receive trigger for the Thumbnail component. Set the message as selected. Check the Assign to Variable option. Then set the variable to assign as selected_number
c. Add two conditions under the Receive trigger. Name the two conditions unselected and selected
d. Set the **unselected **condition as selected_number ≠ movie_number. Then set the selected condition as selected_number = movie_number
e. Add unselected response under the unselected condition, for example, set the opacity of the Thumbnail component to 0. Then add the selected response under the selected condition, for example, set the opacity of the Thumbnail component to 100.
4. Scroll the selected content into the scene
Before starting, make sure that all the movie instances are inside a scroll container.
1. Add the condition when selected_number ≥ 3
a. In the main scene, under the Detect Trigger, add a new condition. Then set the condition as selected_number ≥ 3
💡 Why ≥ 3?
As the first two movie instances in the list are completely visible on the screen and we want the scroll to happen from the 3rd movie instance.
b. Under the condition, add a **Scroll **trigger. Set the Scroll trigger to scroll the Scroll Container in the main scene
c. Set the scroll mode of the Scroll trigger to Scroll To. Then set the value of the Scroll trigger to the formula: 686+(selected_number-3)*802
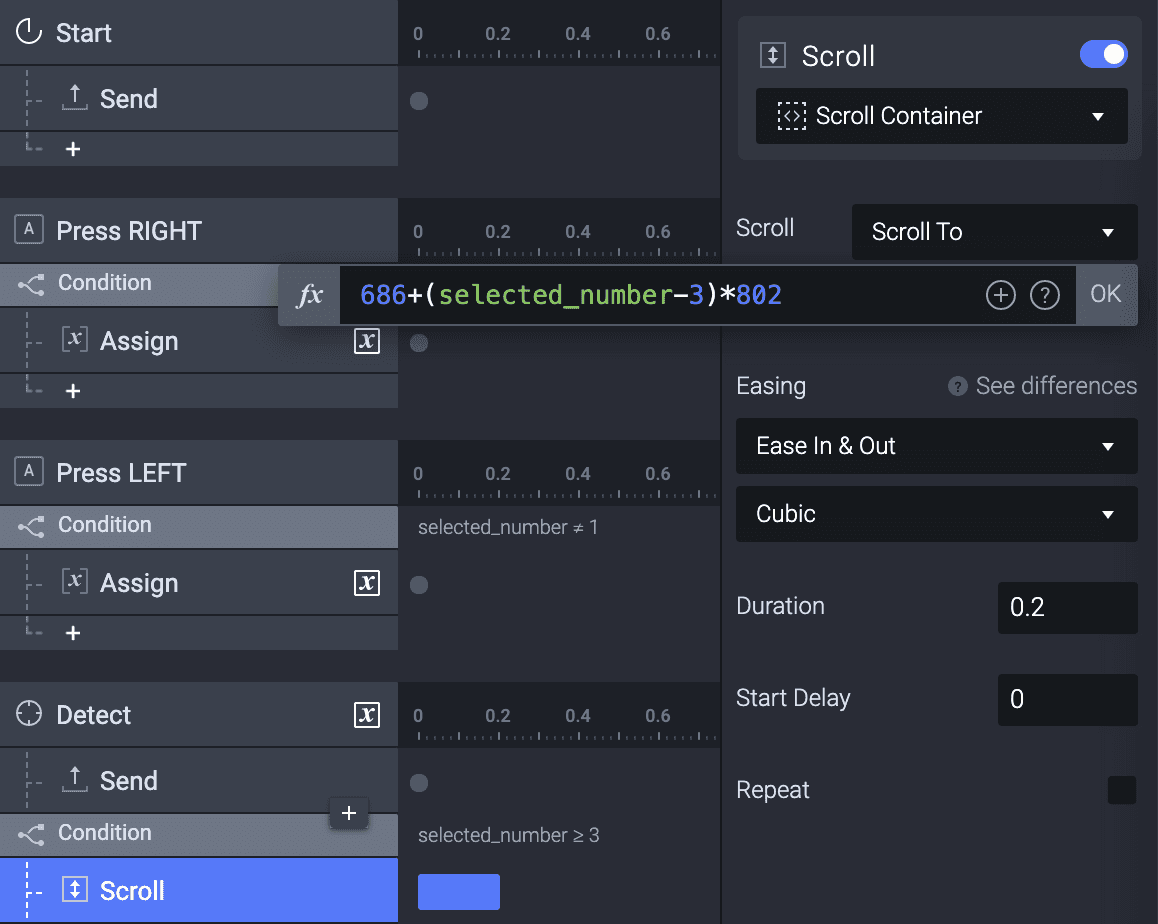
💡 Understanding the formula 686+(selected_number-3)*802
The values will differ according to your prototype.
In this context, the value **686 **refers to the difference between the current X position of the 3rd card in the scroll container and the X value of the card with the margin that needs to be visible on the screen.
We use this difference which is 686, to know how much we want to scroll from the 3rd movie card onwards.
However, this value is not valid for the 4th and 5th cards. To scroll those, we use the complete formula 686+(selected_number-3)*802. Scrolling the 4th and 5th cards is easier as compared to the 3rd card as it is partially inside and partially outside. To scroll the 4th and 5th cards, we just need the width of the card + the margin value between the two cards. Here the width of the card (762) + the margin value (40) is 802 which is then multiplied by (selected_number-3). So when the 4th card has been selected the value to be scrolled will be 686+(4-3)*802.
To summarize, here the value **686 **refers to the scroll value of the **3rd **card, and *(selected_number-3)802 is applicable to get the scroll value for the **4th **and **5th **cards.
2. Add the condition when selected_number < 3
a. In the main scene, under the Detect Trigger, add a new condition. Then set the condition as selected_number < 3
b. Under the condition, add a Scroll trigger. Set the Scroll trigger to scroll the Scroll Container in the main scene
c. Set the scroll mode of the Scroll trigger to Scroll To. Then set the value of the Scroll trigger to 0
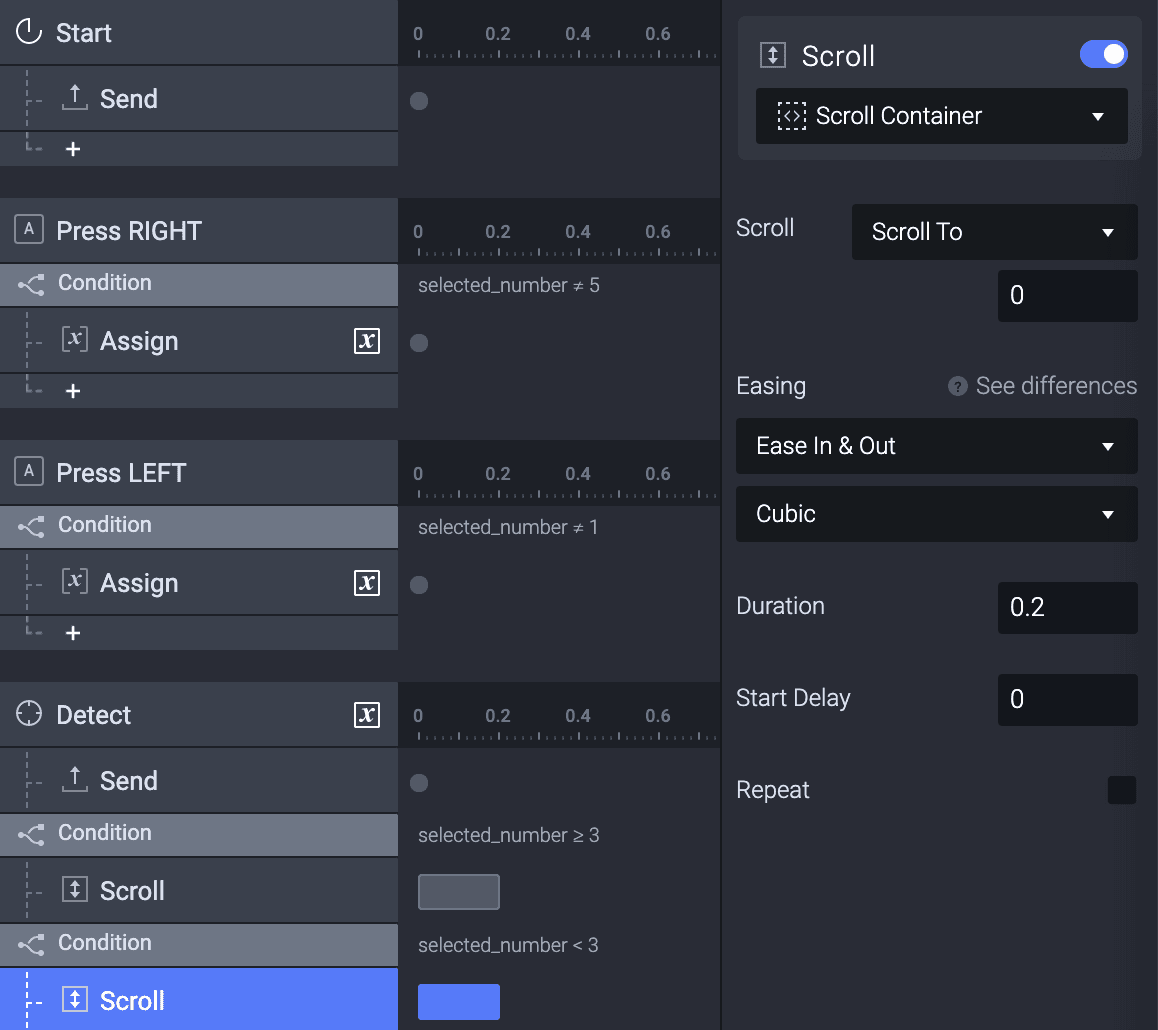
💡 Why < 3?
As the scroll happens from the 3rd movie card, we need this to scroll back to the initial state of the scroll container. The initial value of the scroll is 0. So we set the trigger value to 0.
Congratulations!
Now you've learned how to simulate a TV controller with these simple tips and tricks. Go ahead and try it out for yourself!
We would love to see your crazy experiments. Create your own prototype and share it on Twitter or Instagram with #MadeWithProtoPie


