How to Build an Interactive MacBook Setup Experience in ProtoPie: A Step-by-Step Guide
A detailed tutorial on creating an interactive MacBook setup experience, from input validation and profile editing to advanced accessibility features like voice commands.

In this tutorial, we will guide you through the process of creating a high-fidelity prototype that replicates the familiar and playful MacBook setup experience. This project is designed to showcase some of ProtoPie’s most powerful features in a cohesive and interactive way.
We will cover everything, from creating an interactive profile editor with real-time input validation to building advanced accessibility features, such as text-to-speech and voice commands.
Let's get started.
Part 1: Interactive Profile Editor
This first section focuses on building the "Create Computer Account" screen, where users can input their information and personalize a profile image.
Step 1: Implementing Input Validation
First, we'll build a system to validate user inputs, covering both real-time checks and validation upon form submission.
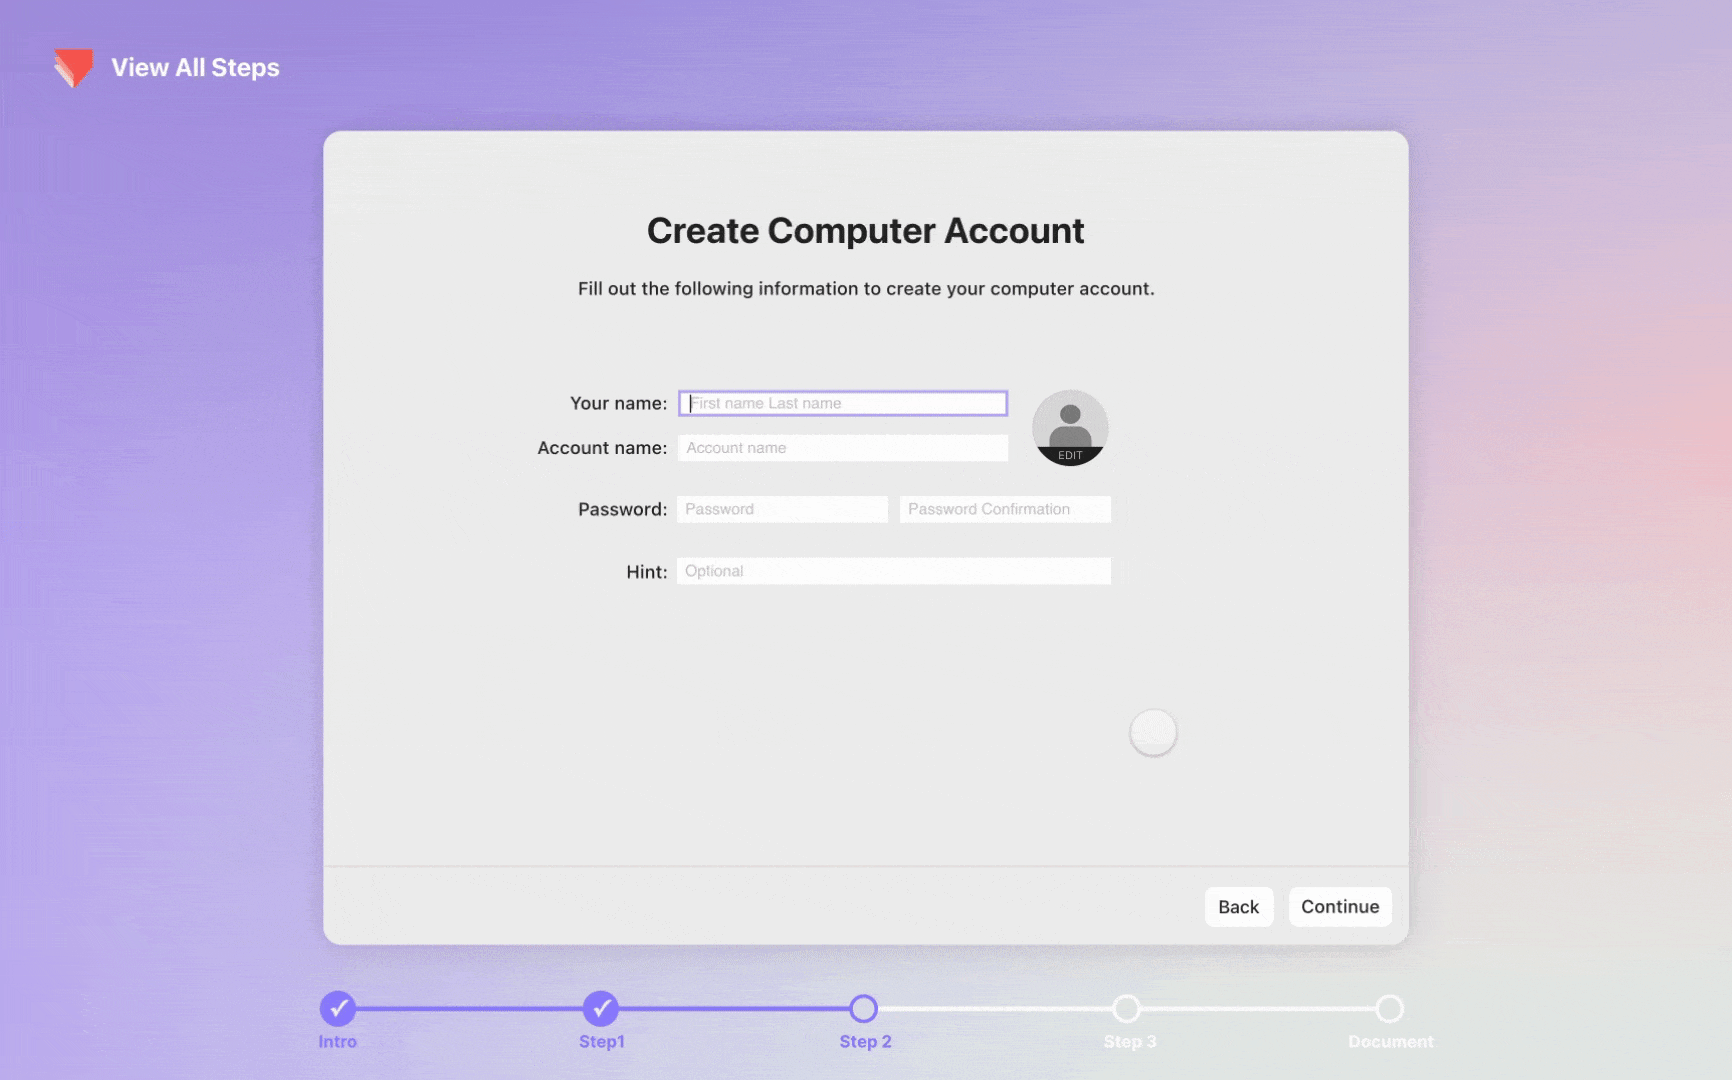
Triggering Validation:
- Create a "Validation" trigger that sends a message containing a Validation_Type variable. This variable will be set to "Continue" for form submission or "Real-Time" for live validation.
- This message should be sent when the "continue" button is tapped or when an input field loses focus.
- When triggering validation, first initialize a variable called Error_Exists to 1.
- Send a "Continue Validation" message if the Validation_Type is "Continue," or a "Real-Time Validation" message if it's "Real-Time."
Handling Validation Messages:
- When the prototype receives "Continue Validation":
- Verify that the mandatory input fields (account name, username, password, and password confirmation) are not empty.
- If the length of an input field's text is 0 (length(input field layer name.text) = 0), display the corresponding error message for that field.
- When the prototype receives "Real-Time Validation":
- Check if the password and password confirmation fields match.
- If they do not match (password input.text = password confirmation input.text), show an error message.
Displaying Errors & Proceeding:
- Based on the validation results, display the relevant error messages.
- If all checks pass, set the Error_Exists variable to 0.
- When the "continue" button is pressed, trigger all input fields to lose focus, which runs the validation checks.
- If Error_Exists is 0, navigate to the next scene.
Step 2: Creating the Profile Popup
This step covers the logic for the profile editing pop-up window.
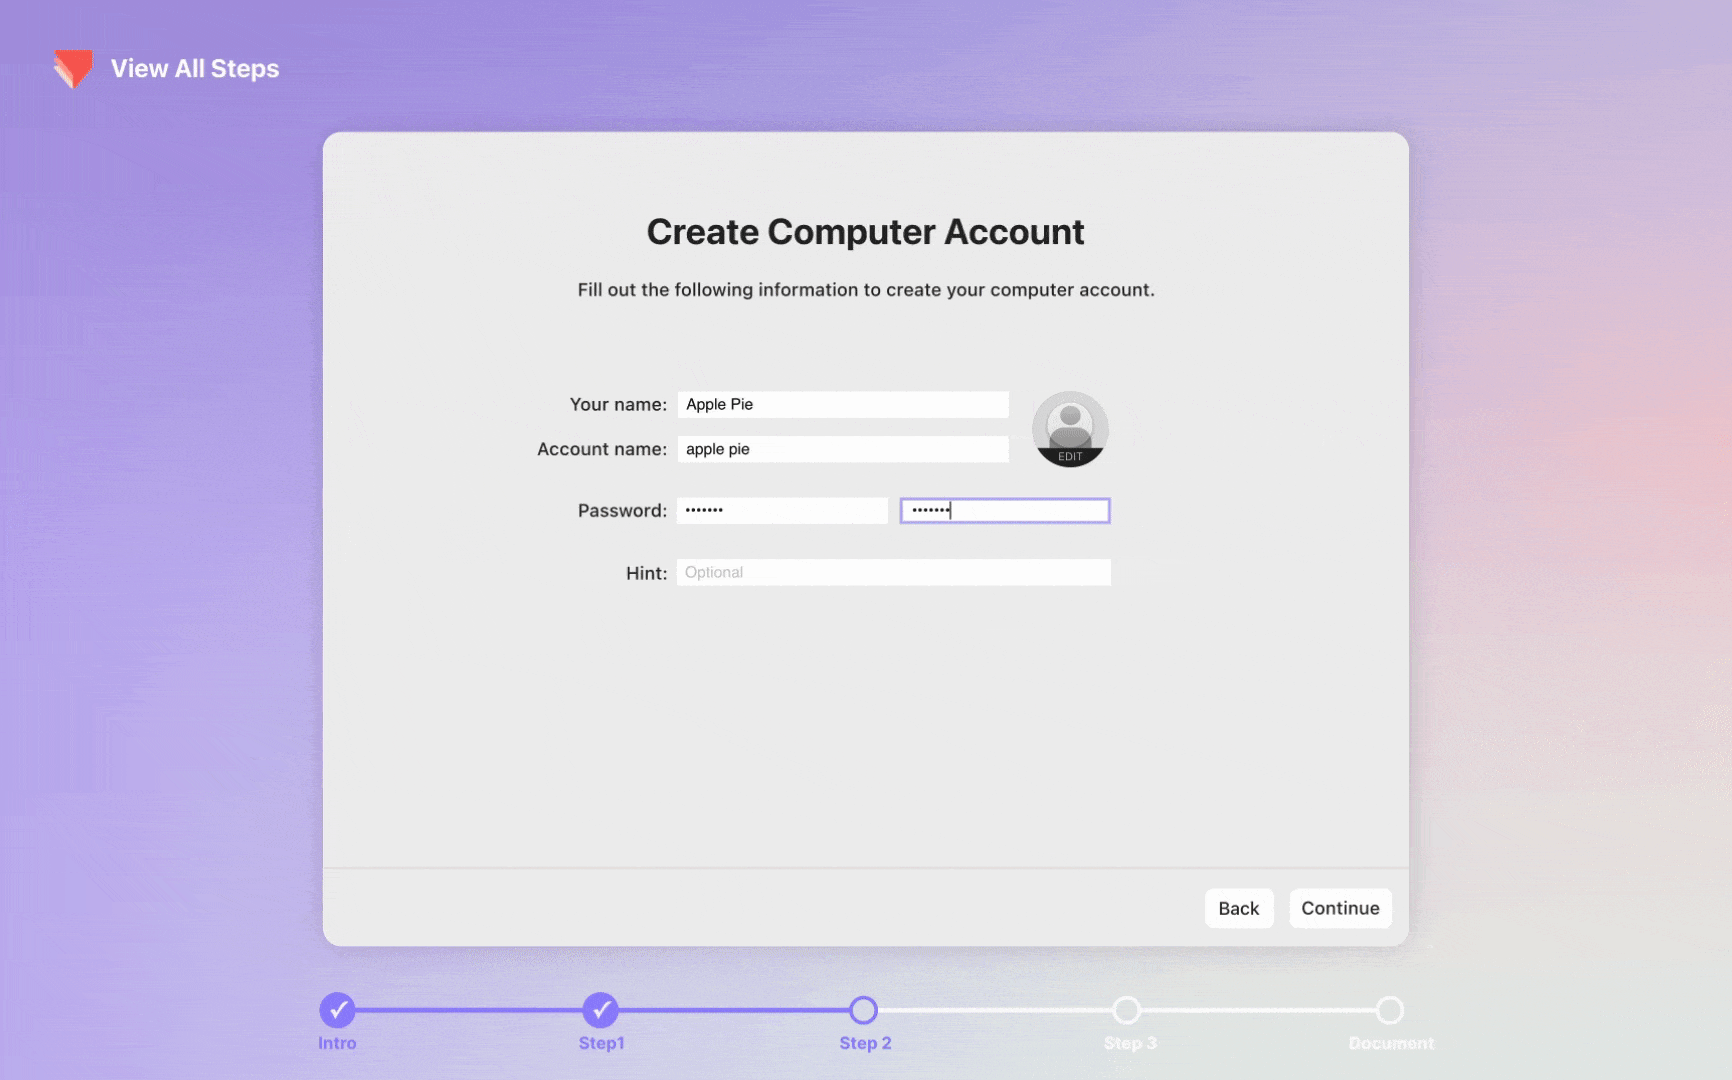
- Toggle Popup: The visibility of the pop-up and the edit button should be toggled when the user clicks the Edit, Cancel, or Save buttons.
- Save Button Logic:
- When the edit button is clicked, check the Current_Profile variable. If it is "None," disable the save button.
- When the user clicks save, update the Current_Profile variable with the value of Selected_Profile.
- Cancel Button Logic:
- If the user clicks cancel, send a "Reset Profile" message to the Previews component, which reverts the profile to the original Current_Profile.
- Also, send a "Reset Selection" message to the Profile component to clear the current selection.
- List Toggling: When the "Emoji" or "Monogram" buttons are clicked, toggle the visibility of their respective lists and selected effects.
Step 3: Saving & Scaling Profile Images
Here, we'll handle the selection, display, and scaling of profile images.

- Profile Selection: When a profile image is tapped, send a "Select Profile" message with the Selected_ID. Also, send a "Reset Selection" message to clear all previous selections before making the new one visible.
- Updating Previews: In the Previews component, use a Reorder_ID variable to manage which image is displayed on top.
- Enabling Save: When the main scene receives the "Select Profile" message, enable the save button.
- Displaying Initial Text: If the selected profile is a "Monogram," make the initial text visible.
- Image Scaling: Make the scaling "Knob" draggable horizontally. Use a Chain trigger to link the Knob's x-position to the size of the Indicator, the Preview image, and the initial text.
Step 4: Creating Monograms with Name Input
This final step for Part 1 outlines how to dynamically generate monogram initials from the user's input name.

- Track Name Input: Create a variable called Your_Name that tracks the text from the Full name input field in real-time.
- Extract Initials: Use a Detect trigger that activates whenever Your_Name changes.
- If no space exists (only a first name): Assign the input to First_Name and assign its first letter to the Initial variable.
- If a space exists: Assign the text before the space to First_Name and the text after to Last_Name. Then, assign the first letter of First_Name plus the first letter of Last_Name to the Initial variable.
- Update Monogram: Send the Initial value in a message to the Profile component to update the monogram text. Ensure the initials also scale proportionally with the image scaling logic.
Part 2: Accessibility Features

This section covers the implementation of four distinct accessibility features, modeled after those found in macOS.
Step 1: Speak Selection (Vision)
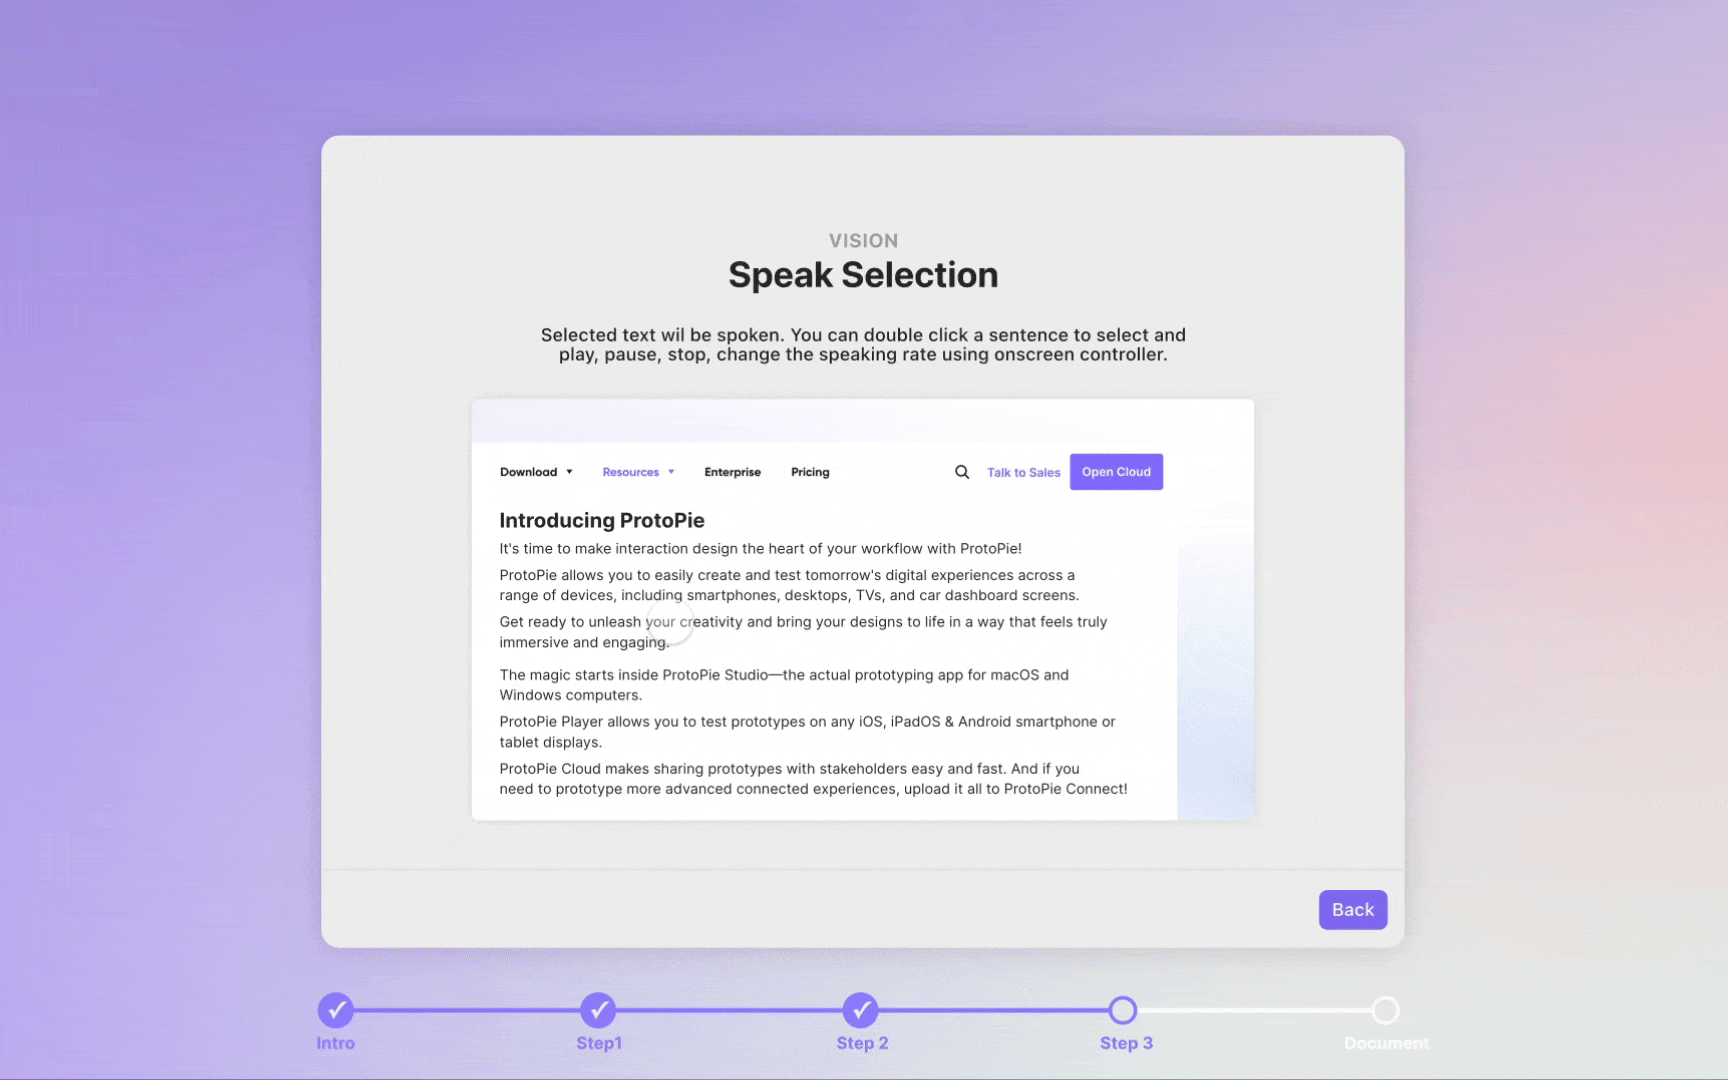
This feature implements text-to-speech for selected text, complete with an on-screen controller.
- Setup: Predefine overridable variables in a component for things like text size, line count, highlight dimensions, and speaking durations (Slow_Duration, Normal_Duration, etc.).
- Triggering: When a user double-taps a sentence, send the selected text and duration values to the main scene. Make the on-screen controller visible and reset any previous highlights.
- Controller: Allow the controller to be draggable. Add mouseover effects to its buttons. The play/stop button toggles an IsSpeaking variable.
- Playback Logic: When play is clicked, check the selected rate (normal, fast, slow) and use the Speak response to speak the Selected_Text at the corresponding duration.
- Resetting: Create a "Reset all" message that stops speaking, clears highlights, and hides the controller.
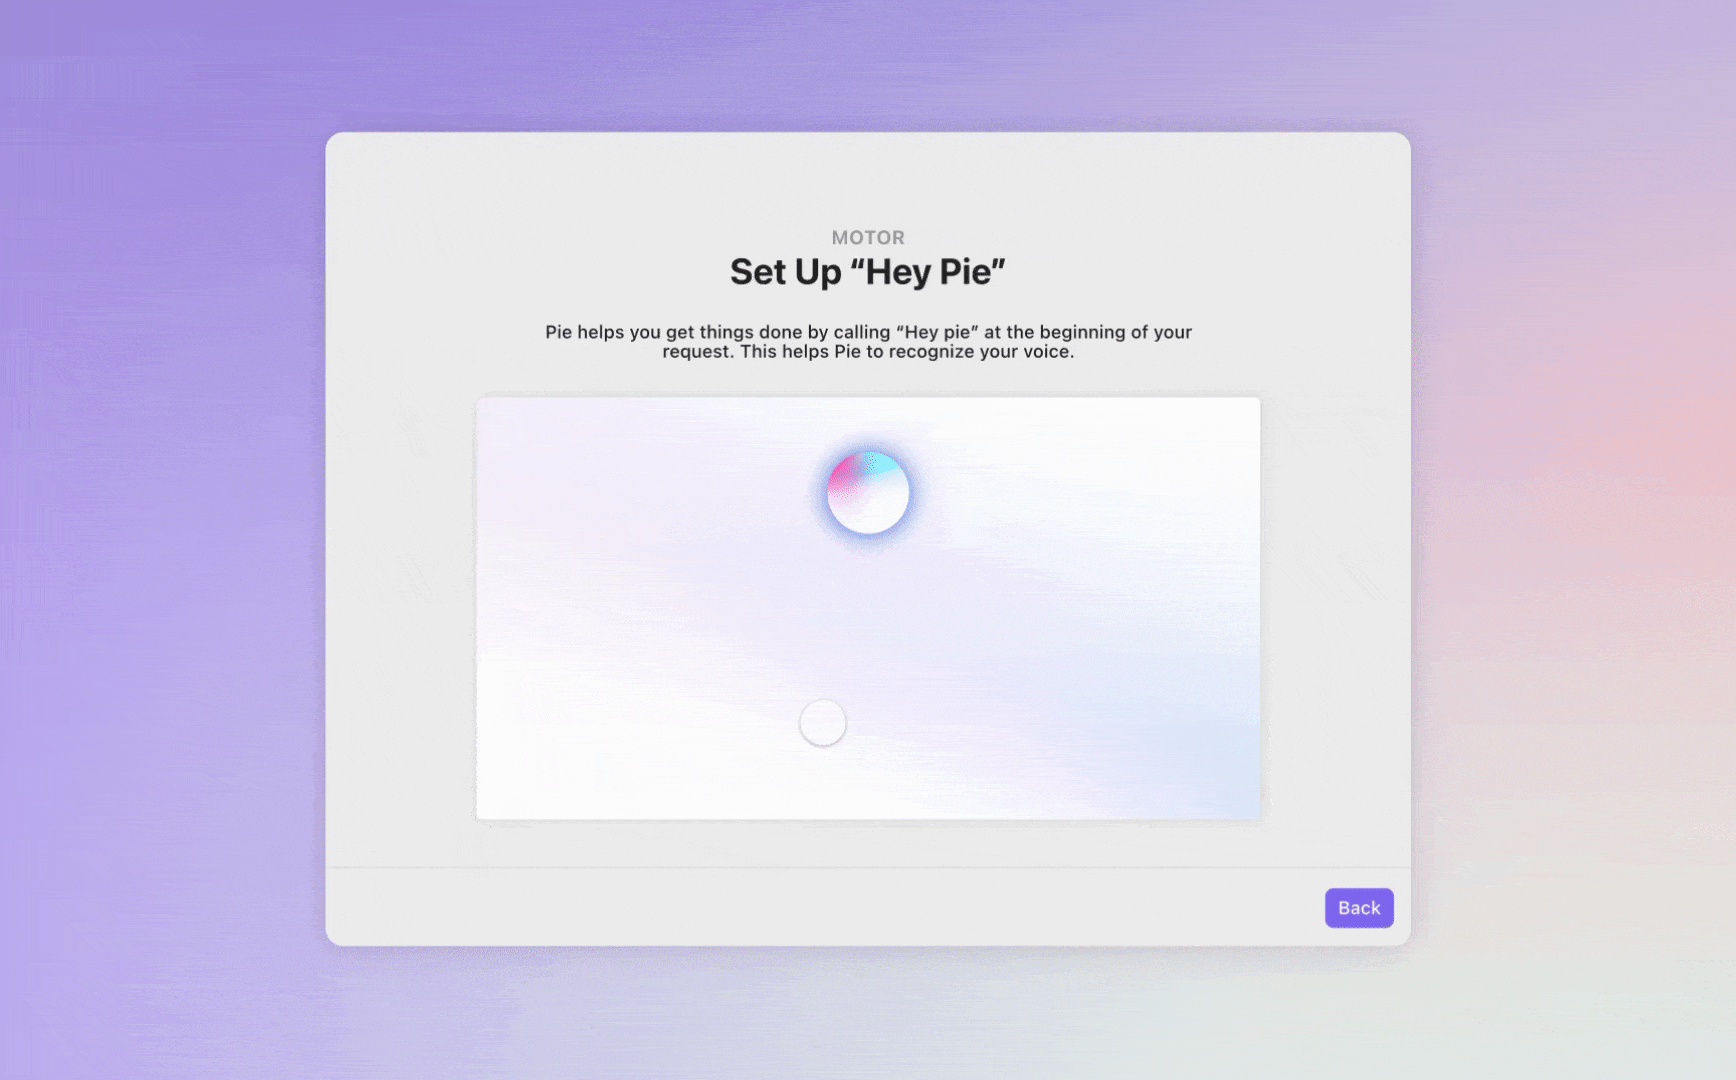
Step 2: Voice Assistance - "Hey Pie" Setup (Motor)
This feature implements a voice assistant that responds to different commands.
- Typing Effect: Use a counter variable (Answer_Char_Counter) and a Receive trigger to write out the assistant’s answer one character at a time, creating a typing effect.
- Voice Commands: Create distinct Voice Commands for different phrases (e.g., "Hello," "Play some chill music").
- Dynamic Responses: Use a Response_Num variable to trigger different Answer_Text values. For example, if the user says "hello," set Response_Num to 1 and have the assistant reply, "Hello, how can I help you?". This can also trigger other responses, like playing music or changing the volume.
- Timeout Logic: Use an invisible timer box to detect when the user hasn't spoken for a certain period (e.g., 10 seconds). If a timeout occurs, have the assistant say, "Sorry, I couldn't understand," and prompt the user again.
Step 3: Live Captions (Hearing)
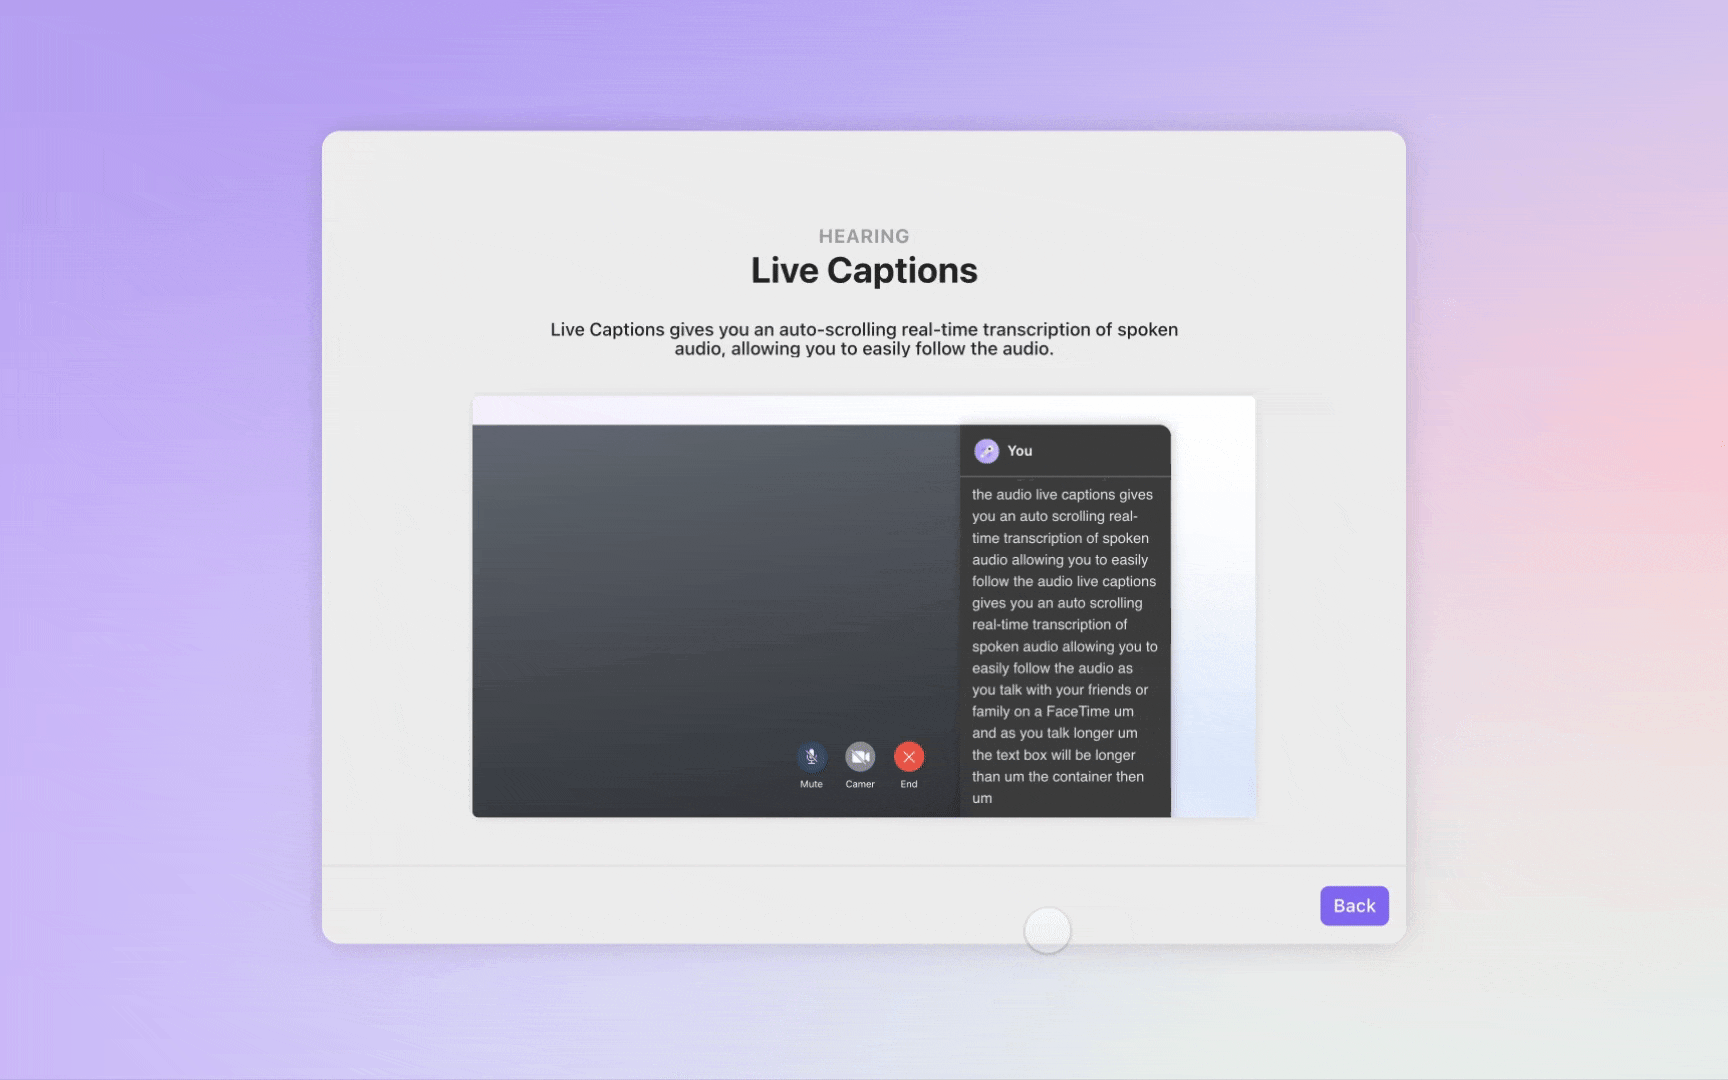
This feature displays a real-time transcription of spoken audio.
- Setup: Upon scene start, immediately begin listening continuously.
- Display Transcript: Use the built-in $voiceTranscript variable and assign its value to a text field every time it updates.
- Auto-Scrolling: Track the height of the text container using a Text_Height variable. Use a Detect trigger to check if Text_Height has exceeded the height of the scrollable container. If it has, automatically scroll the container down to show the newest text.
- Exit: Ensure you use a Stop Listening action before the user leaves the scene.
Step 4: Type To Speak (Speech)
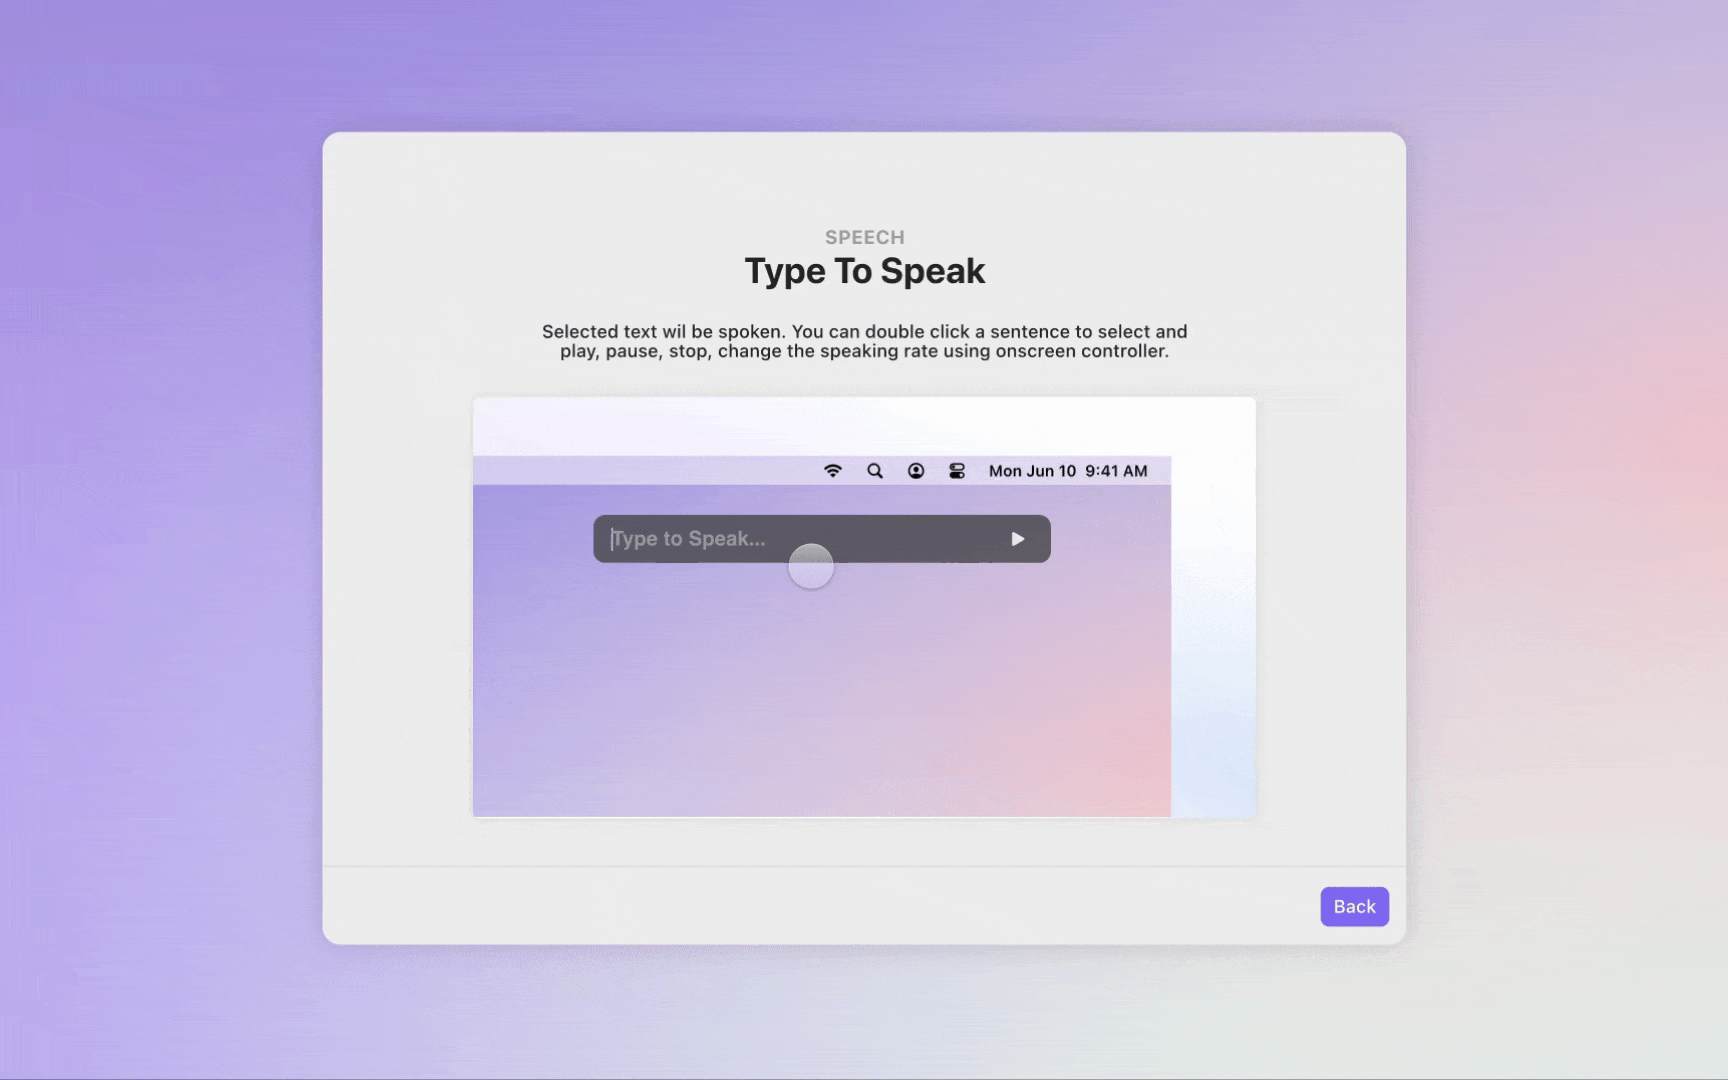
This feature enables users to type text into a field and have the system speak it aloud.
- Setup: Use a start trigger to auto-focus on the text input field when the scene loads.
- Playback: When the user presses play or hits Enter, trigger a Speak response containing the text from the input field.
- Playback Timer: Calculate the duration of the speech (e.g., length(Input_Speaking) * 0.1). Use an invisible timer box to move over this duration.
- End of Playback: When the timer completes, send an "End Timer" message. This should reset the UI, toggle the play/stop buttons back, and handle any text replacement if the user typed while the audio was playing.
And just like that, you've mastered the art of creating awesome, interactive prototypes! Now go forth and build something amazing.
Interested in more tips & tricks on how to get started using ProtoPie?
You can find plenty of learning material, including example Pies ready-to-use, in our ProtoPie School section!

.jpg?fm=webp)