
In this tutorial, we'll dive into IoT prototyping with ProtoPie, focusing on smart lock API integration to revolutionize smart home design. You'll learn how to seamlessly blend IoT design principles with practical smart home prototyping techniques, paving the way for innovative smart home solutions.
Here is a step-by-step demonstration that you can follow for this tutorial.
Overview
Step 1. Install Home Assistant
Step 2. Configure the API Plugin
Step 3. Configure the Pie
Step 4. Run the Pie through ProtoPie Connect
Step 1. Install Home Assistant
To run this demo, you must have Home Assistant installed and working with your smart lock. Follow the instructions below for installation.
What equipment do I need?
You’ll need a smart lock that works with Home Assistant. There are plenty on the market that work with Home Assistant, so one that you find at your local hardware store will likely work just fine. Some locks require additional hardware (e.g., a Zigbee or Z-Wave radio). The options are far too numerous to list here, but if you head over to the Home Assistant community forums, you’ll find plenty of information on everything you need.
What is Home Assistant?
Home Assistant is an open-source project that aims to integrate all your smart home devices, whether designed to work together or not. It can be installed on various devices, such as Raspberry Pi, Windows, or Mac. Additionally, Home Assistant includes an API that we can use with ProtoPie Connect’s API plugin.
How to install Home Assistant?
💡 Pro-tip: If your lock requires an additional radio (e.g., Zigbee or Z-Wave), plug it into an available USB port before you install Home Assistant. Home Assistant should detect it during the onboarding process and prompt you to install the appropriate integration.
Under the installation heading, follow the directions for the path you wish to take https://www.home-assistant.io/installation/.
If installing it seems intimidating, you can buy a Home Assistant Green device with Home Assistant pre-installed: https://www.home-assistant.io/green.
Once installed, continue with the onboarding step, which will guide you through the initial setup of Home Assistant.
What info is needed from Home Assistant?
Once you have set up your smart lock in Home Assistant, you must create API Plugin configurations in ProtoPie Connect and modify the Pie. However, before doing that, you must obtain three pieces of information from Home Assistant.
The IP Address of the machine Home Assistant is running on
In Home Assistant, go to Settings → System → Network
Expand IPv4
You should see it listed. Ignore the
/24portion, and just copy thexxx.xxx.xxx.xxxpart. In the example below, the UI reads10.10.1.100/24. The IP address is10.10.1.100. Ignore the part that says/24.
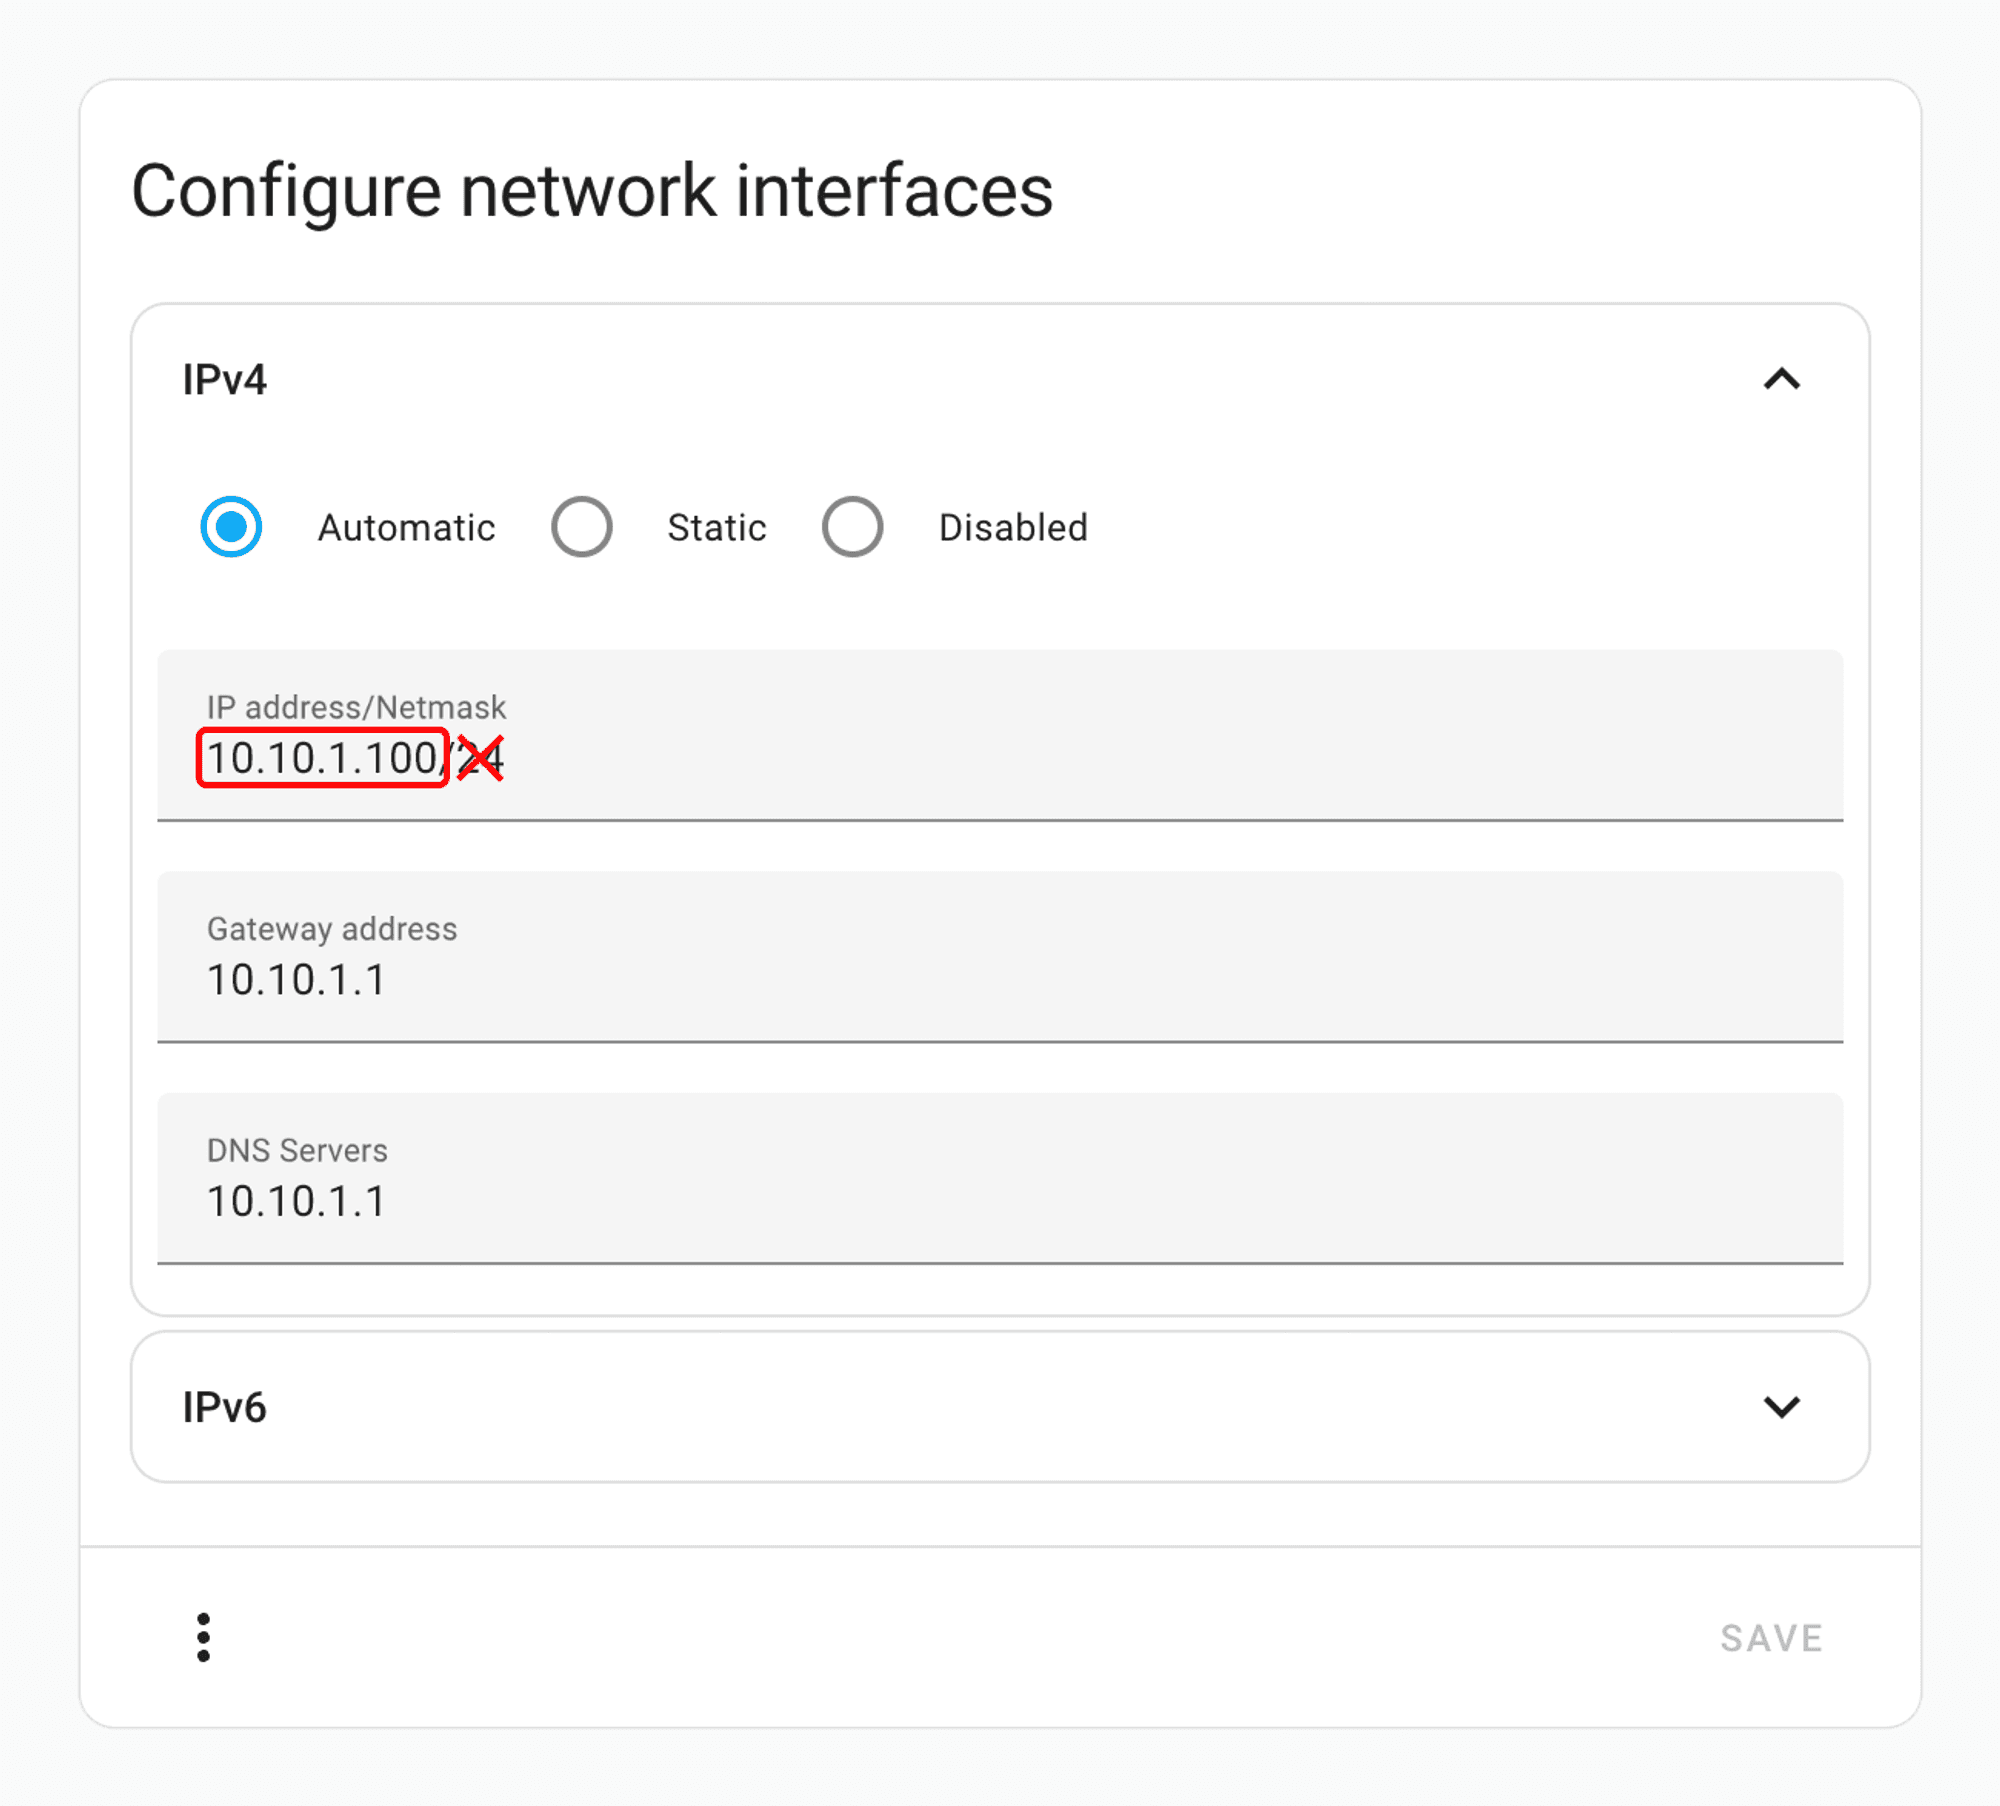
Configure network interfaces inside Home Assistant.
An access token
You’ll need to generate an access token in order to authorize the plugin to interact with your smart home devices. You do this within Home Assistant’s UI:
Click on your user name in the bottom left
Scroll all the way to the bottom to Long-Lived Access Tokens
Click on Create Token
Give it whatever name you like and click OK
A token will be generated and displayed.
❗Important: Copy the token now, as this is the only time you'll ever see it. You may want to save this somewhere safe to retrieve it later.
The Entity ID of the lock you’ll be working with:
This is the unique identifier of your smart lock. You can find it in Home Assistant
Go to Settings → Devices & Services → Entities
Copy the Entity ID
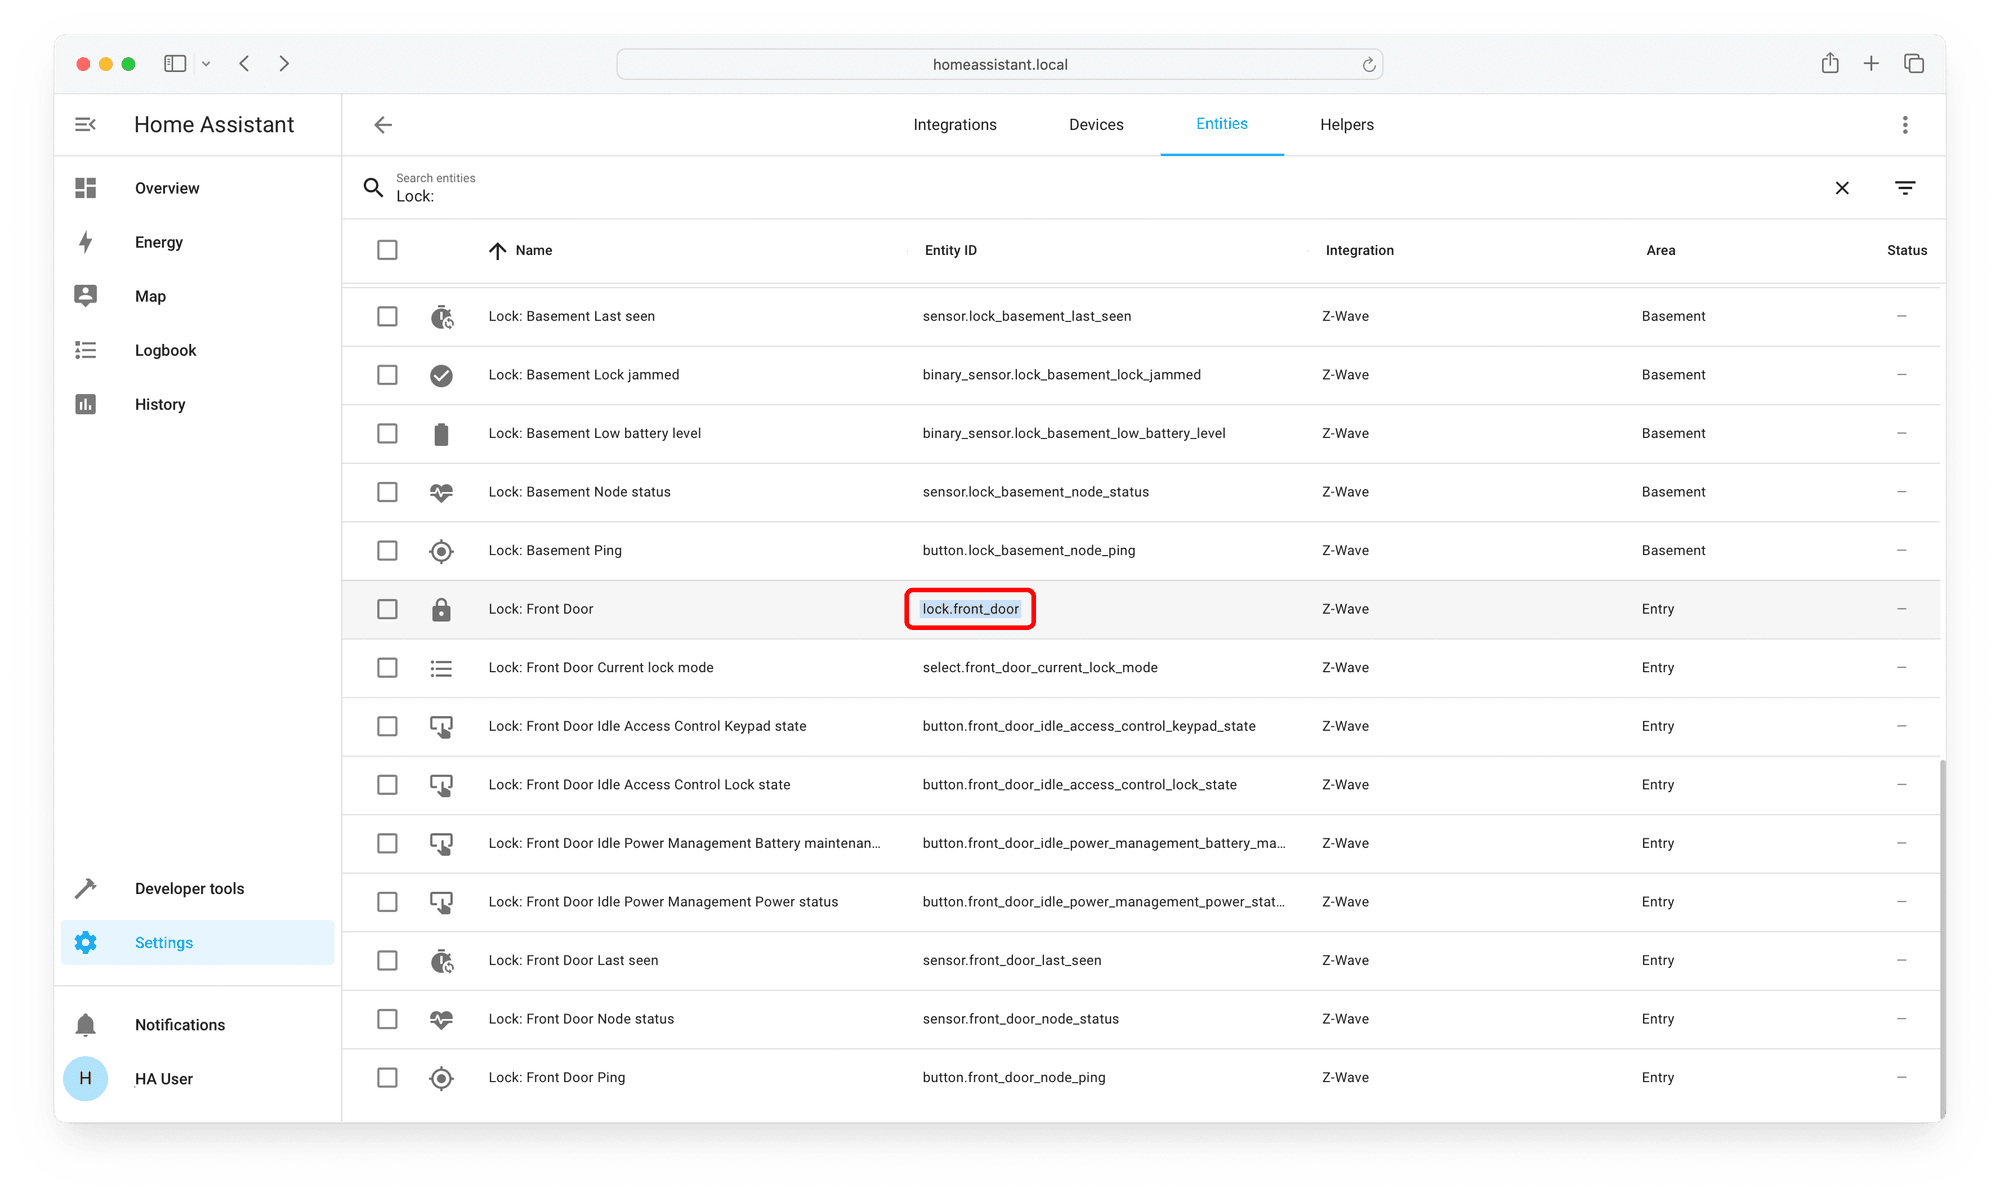
Copy the Entity ID.
Find your lock in the list and copy the Entity ID. It will be something like
lock.name_of_lock_you_gave_it
Step 2. Configure the API Plugin
After obtaining the three pieces of information from Home Assistant, you can configure the API plugin in ProtoPie Connect.
Start ProtoPie Connect.
💡 Note: Log in with Enterprise Credentials, as you’ll need to configure multiple API configurations.
Create three API configurations as follows:
a) Configuration of the first API
Method: GET****
URL: leave blank (will be overridden by Pie
)Header: Replace
<YOUR ACCESS TOKEN>with the access token you created in the first step
{ "Authorization": "Bearer <YOUR ACCESS TOKEN>", "Content-Type": "application/json" }
Message from Pie:
HA_GET_STATECheck “Override” and select URL****
Message to Pie:
HA_STATEClick “Activate”
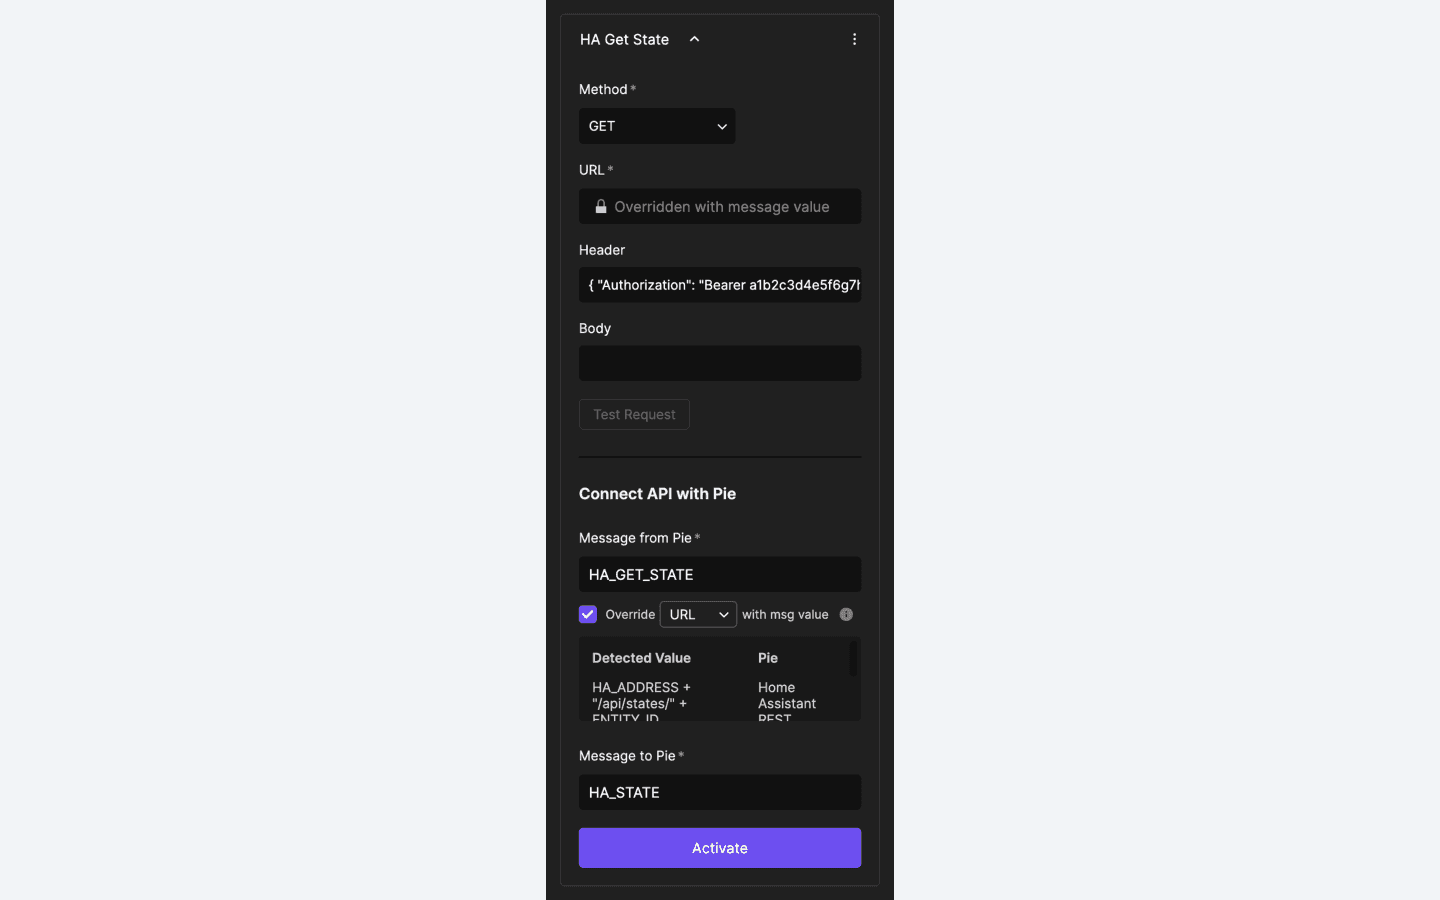
Configuration of the first API.
b) Configuration of the second API
Method: POST
URL:
http://<HA IP ADDRESS>:8123/api/services/lock/lockReplace
<HA IP ADDRESS>with the IP address of the machine Home Assistant is running on.
💡Note: It’s important to use the IP address and NOT the alias homeassistant.local here. For some reason, the REST API's responsiveness is poor when you use the alias.
Header: Replace
<YOUR ACCESS TOKEN>with the access token you created in the first step.
{ "Authorization": "Bearer <YOUR ACCESS TOKEN>", "Content-Type": "application/json" }
Message from Pie:
HA_LOCKCheck “Override” and select Body
Message to Pie:
HA_STATESNotice how this message is plural, while in the previous configuration, it is singular. This is important! ☝️
Click “Activate”
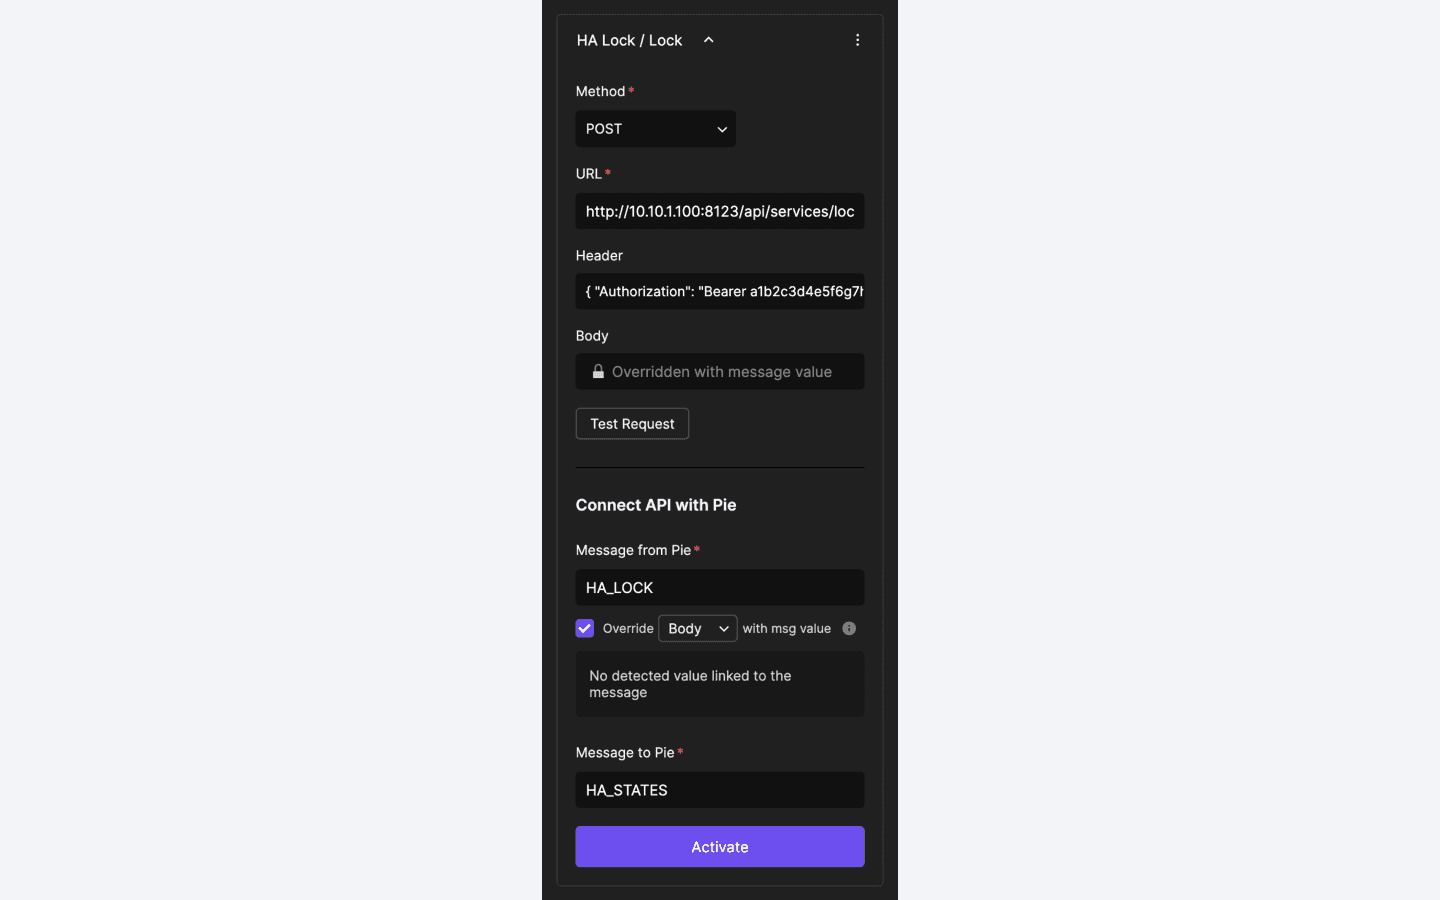
Configuration of the second API.
c) Configuration of the third API
Method: POST
URL:
http://<HA IP ADDRESS>:8123/api/services/lock/unlockAs above, replace
<HA IP ADDRESS>with the IP address of the machine Home Assistant is running on.Header: Replace
<YOUR ACCESS TOKEN>with the access token you created in the first step
{ "Authorization": "Bearer <YOUR ACCESS TOKEN>", "Content-Type": "application/json" }
Message from Pie:
HA_UNLOCKCheck “Override” and select Body
Message to Pie:
HA_STATESOnce again, this message is plural ☝️
Click “Activate”

Configuration of the third API.
ProtoPie Connect is now configured!
Step 3. Configure the Pie
Download the unconfigured Pie file.
Before the Pie can work, you need to adjust two variables. Open the Pie in ProtoPie Studio and update the values for the variables below.
Adjust the variables in ProtoPie Studio.
ENTITY_IDUpdate its value with the entity ID for your lock.
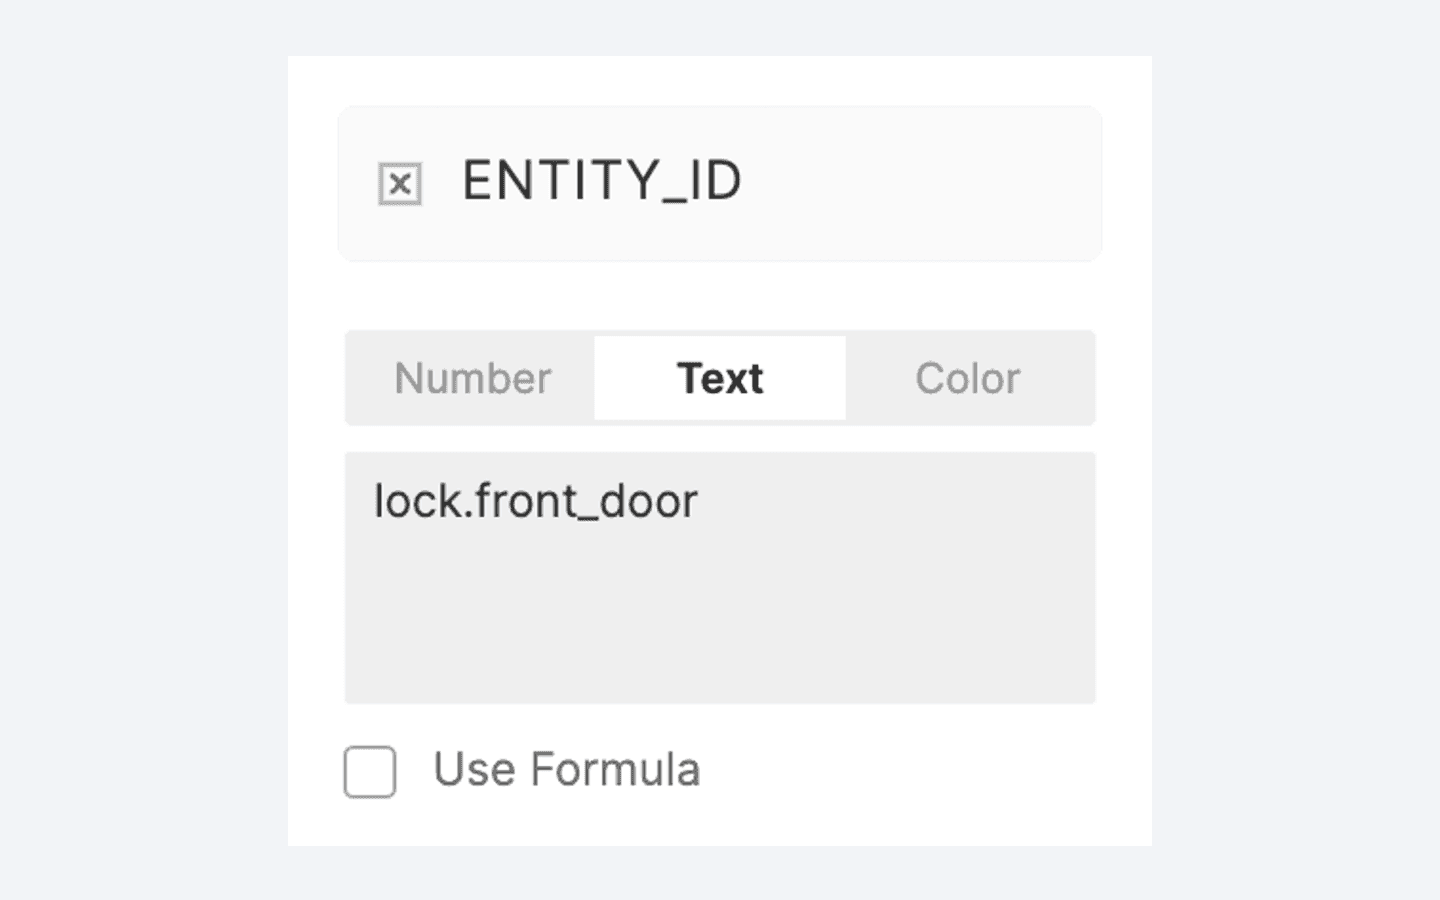
Adjust the ENTITY_ID variable.
HA_ADDRESSUpdate its value with
http://<HA IP ADDRESS>:8123, replacing<HA IP ADDRESS>with the IP address of the machine Home Assistant is running on.
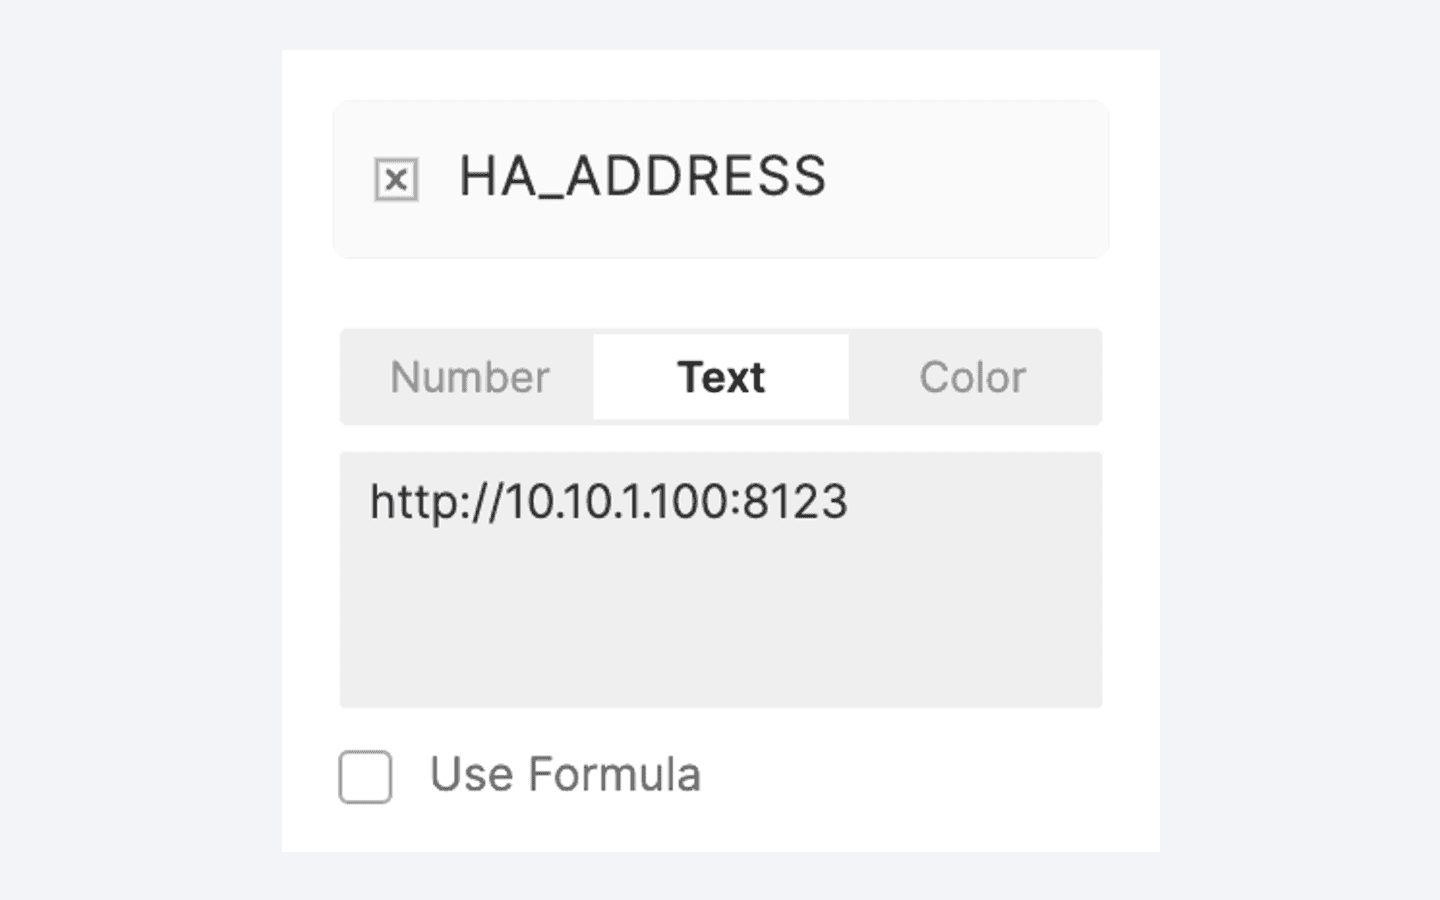
Adjust the HA_ADDRESS variable.
Save the Pie.
Step 4. Run the Pie through ProtoPie Connect
Once you have adjusted the two variables in Studio, run the Pie in Connect and enjoy your homemade smart lock.
Unlock your prototyping potential with ProtoPie
I hope you enjoyed the IoT prototyping tutorial with ProtoPie. By learning to integrate a smart lock API with Home Assistant and utilizing ProtoPie Connect, you have advanced your skills in smart home technology design.
With Home Assistant’s API, you gain access to a wide array of smart home devices, allowing you to expand your prototyping to include gadgets like lights, thermostats, and smart speakers, all compatible with ProtoPie Connect’s API plugin.
ProtoPie offers an extensive range of possibilities for creating interactive prototypes. Start your free trial today and innovate your smart home solutions.


