How to Create an In-Car Voice Control Prototype
Explore how to use our voice prototyping and hardware integration features to design a voice-controlled in-car experience.

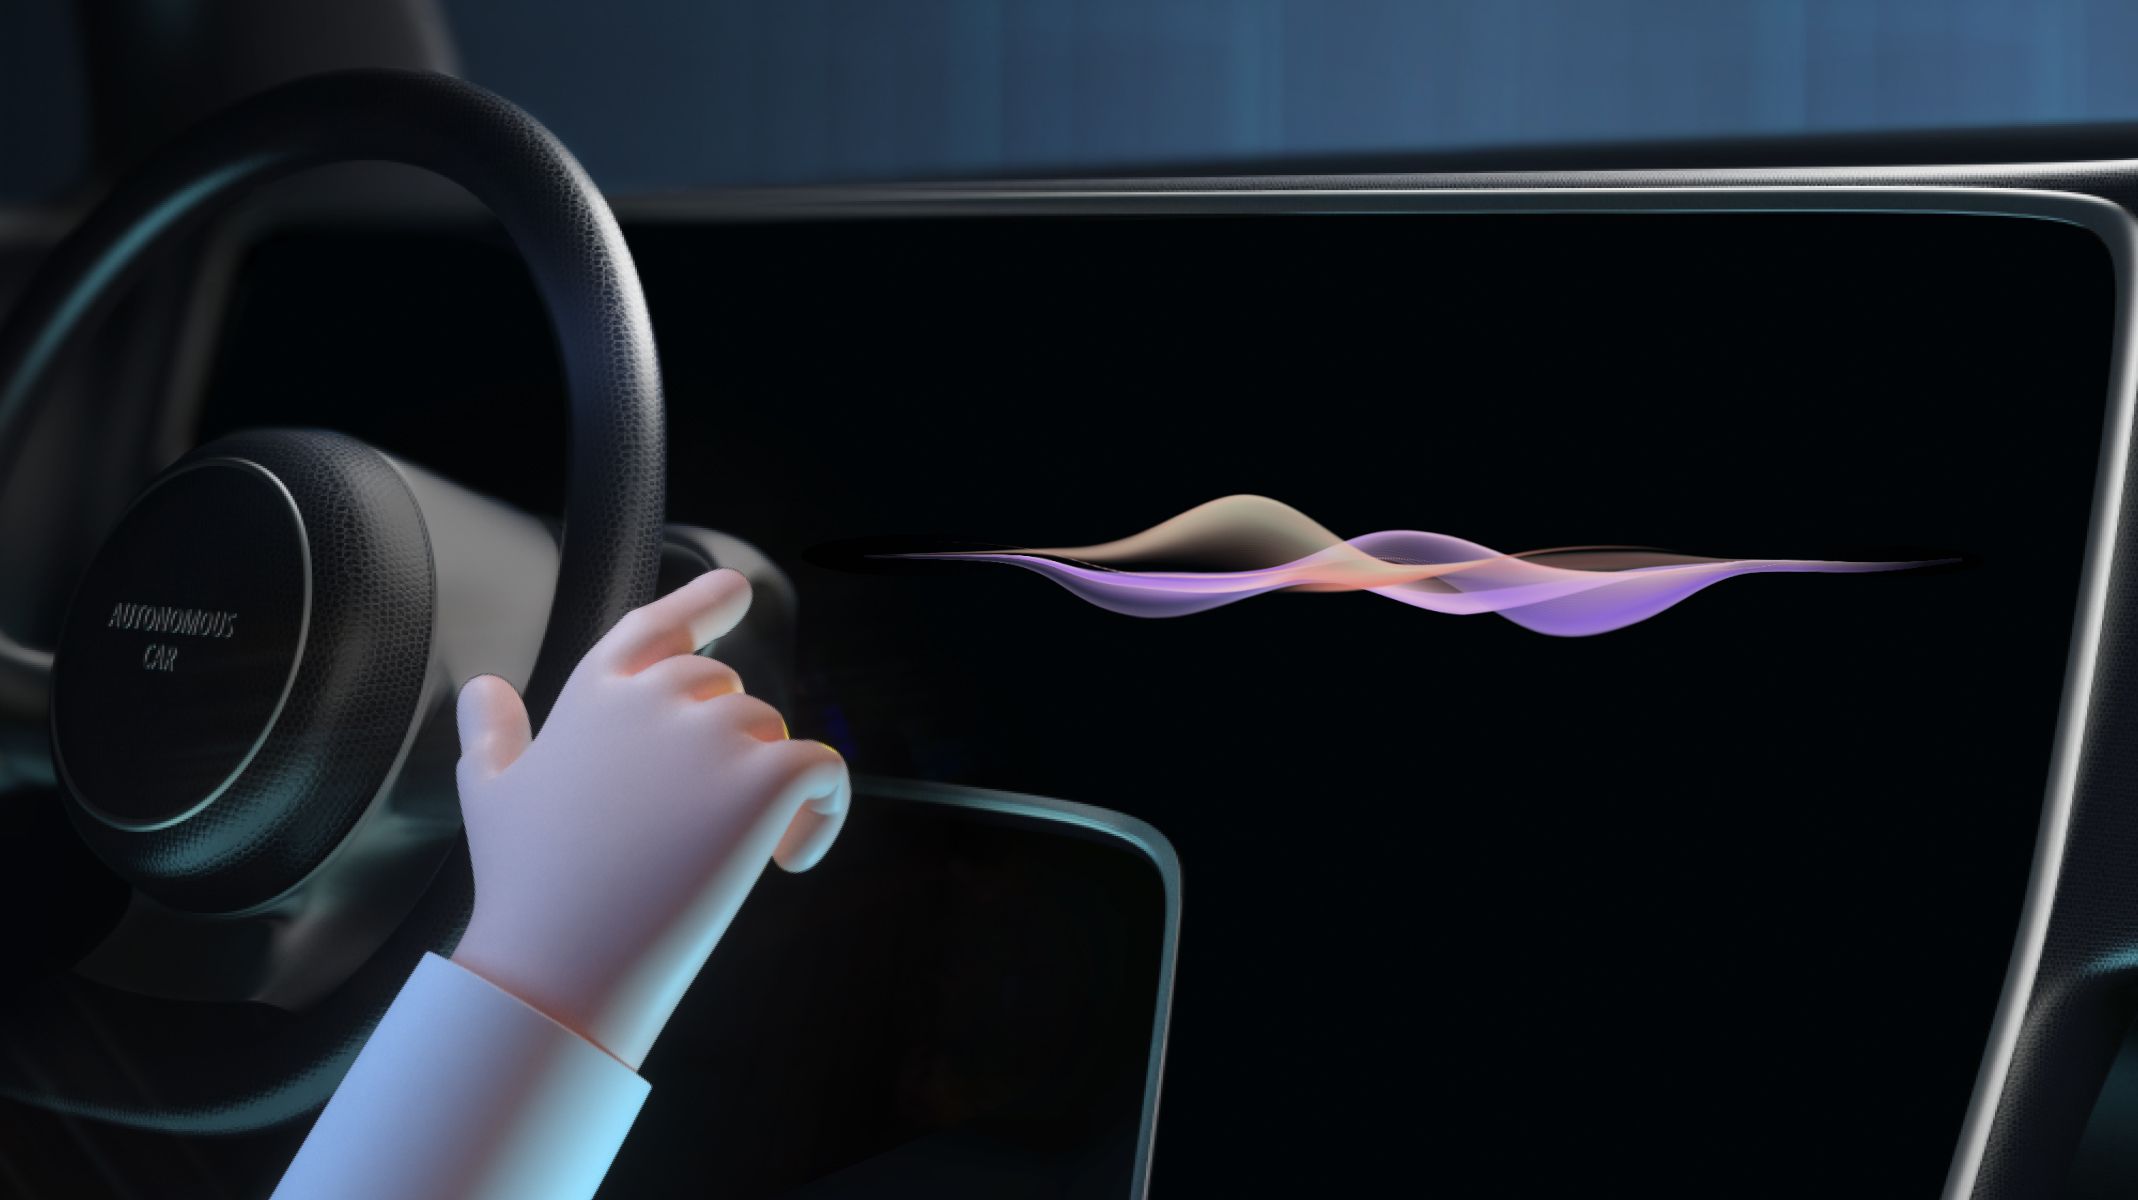
Voice activation is making huge strides, especially in the automotive industry. Tesla has 170+ voice commands. Other companies, including Mercedes Benz, Continental, and Bosch have also turned their attention toward in-car voice control.
But why is this?
They believe that voice technology can both enhance the driving experience as well as increasing safety along the way. For example, it enables drivers to choose a new song without fiddling with their dashboard, or to reply to texts using voice technology alone.
In an ideal world, the process of designing these voice-controlled experiences should be easy and accessible—anyone should be able to bring their ideas to life. That’s why here at ProtoPie, we have created all the features you will ever need to make voice prototyping a reality. The best part is, you can create complex cross-device interactions without even needing to code.
We've created the in-car voice control prototype below to help you visualize how to utilize these features when designing an in-car speech recognition experience.
In this example, we made an interactive prototype of the car’s central screen display that runs on a tablet. We then hooked up the tablet to a steering wheel to create a realistic in-car experience. In the video, you’ll see that the user can control the prototype with the buttons on the steering wheel to easily activate the voice assistant.
You might be thinking: “Okay, this sounds great, but let’s take a step back for a second—how did you even create this in-car voice control prototype in the first place?”.
Before we show you the process that I followed, let’s first cover two key topics.
1. Understanding voice function
In order to utilize voice control, you need to first understand how the different voice interaction elements (Voice Command Trigger, Listen Response and Speak Response) work together. If you’re already familiar with our voice feature, please continue on to step 2.
The Listen Response activates the voice function—this is where you can set the language that ProtoPie listens to, selecting one out of 52 potential languages and variants. You can then combine the Listen Response and Tap Trigger together, for example, which means that ProtoPie will start listening to your voice once you tap a button on the screen.
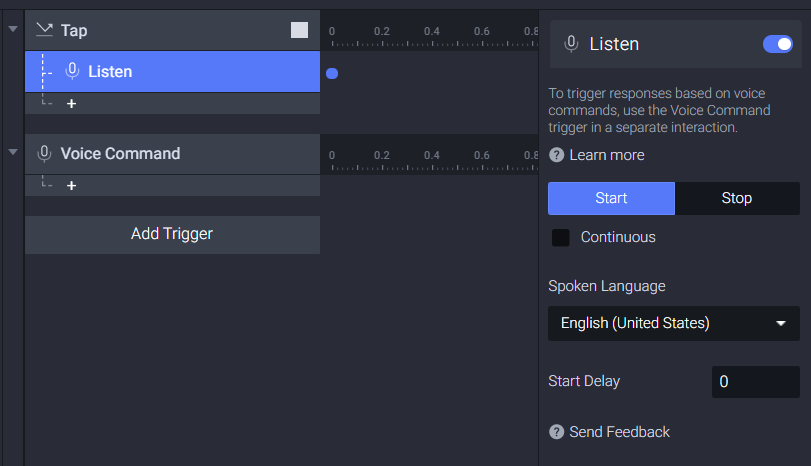
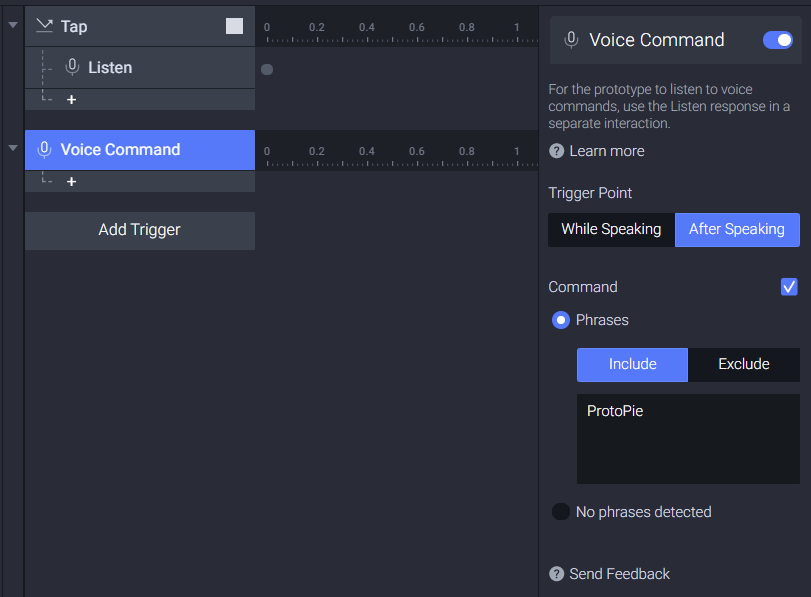
After activating the voice function, you can then define your own voice commands to trigger a wide variety of interactions. The Voice Command Trigger includes options such as when to trigger (during or after you’re speaking) and which specific keywords/commands it should follow.
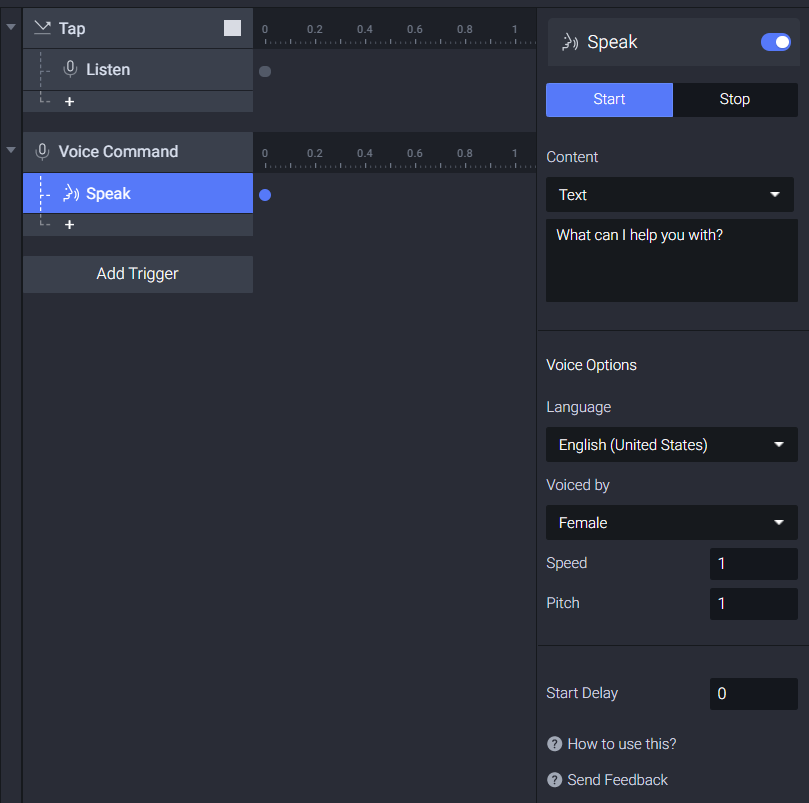
And if you want your prototype to be able to speak, simply check out the Speak Response feature. There are two options when it comes to making ProtoPie speak. First, you can simply tap a button. Alternatively, you can instead just ask it to speak whenever you ask a question. The Speak Response feature has a ton of additional, customizable options: the language it speaks, whether it’s a male or female voice, the speed, pitch, and so on.
Now that you’re familiar with voice interaction pieces, let’s get back to this example scenario.
2. Creating the prototype using ProtoPie’s voice feature
Okay, you should now be familiar with the theory behind creating voice prototypes—but how do all the different elements mentioned above work together?
Let’s imagine I say “Play music for rainy days”. ProtoPie will repeat my command back to me before playing a designated playlist. Behind the scenes, Listen Response has already been activated (meaning your prototype is listening to any requests made in English), while you’ve set the keyword “music” as a Voice Command Trigger. The Speak Response by a female English speaker’s voice has also been enabled, which is why the prototype repeats “Play music for rainy days”.
How Tony created his prototype
Okay, it’s time to dig into the details and show you precisely how I created this in-car voice control prototype.
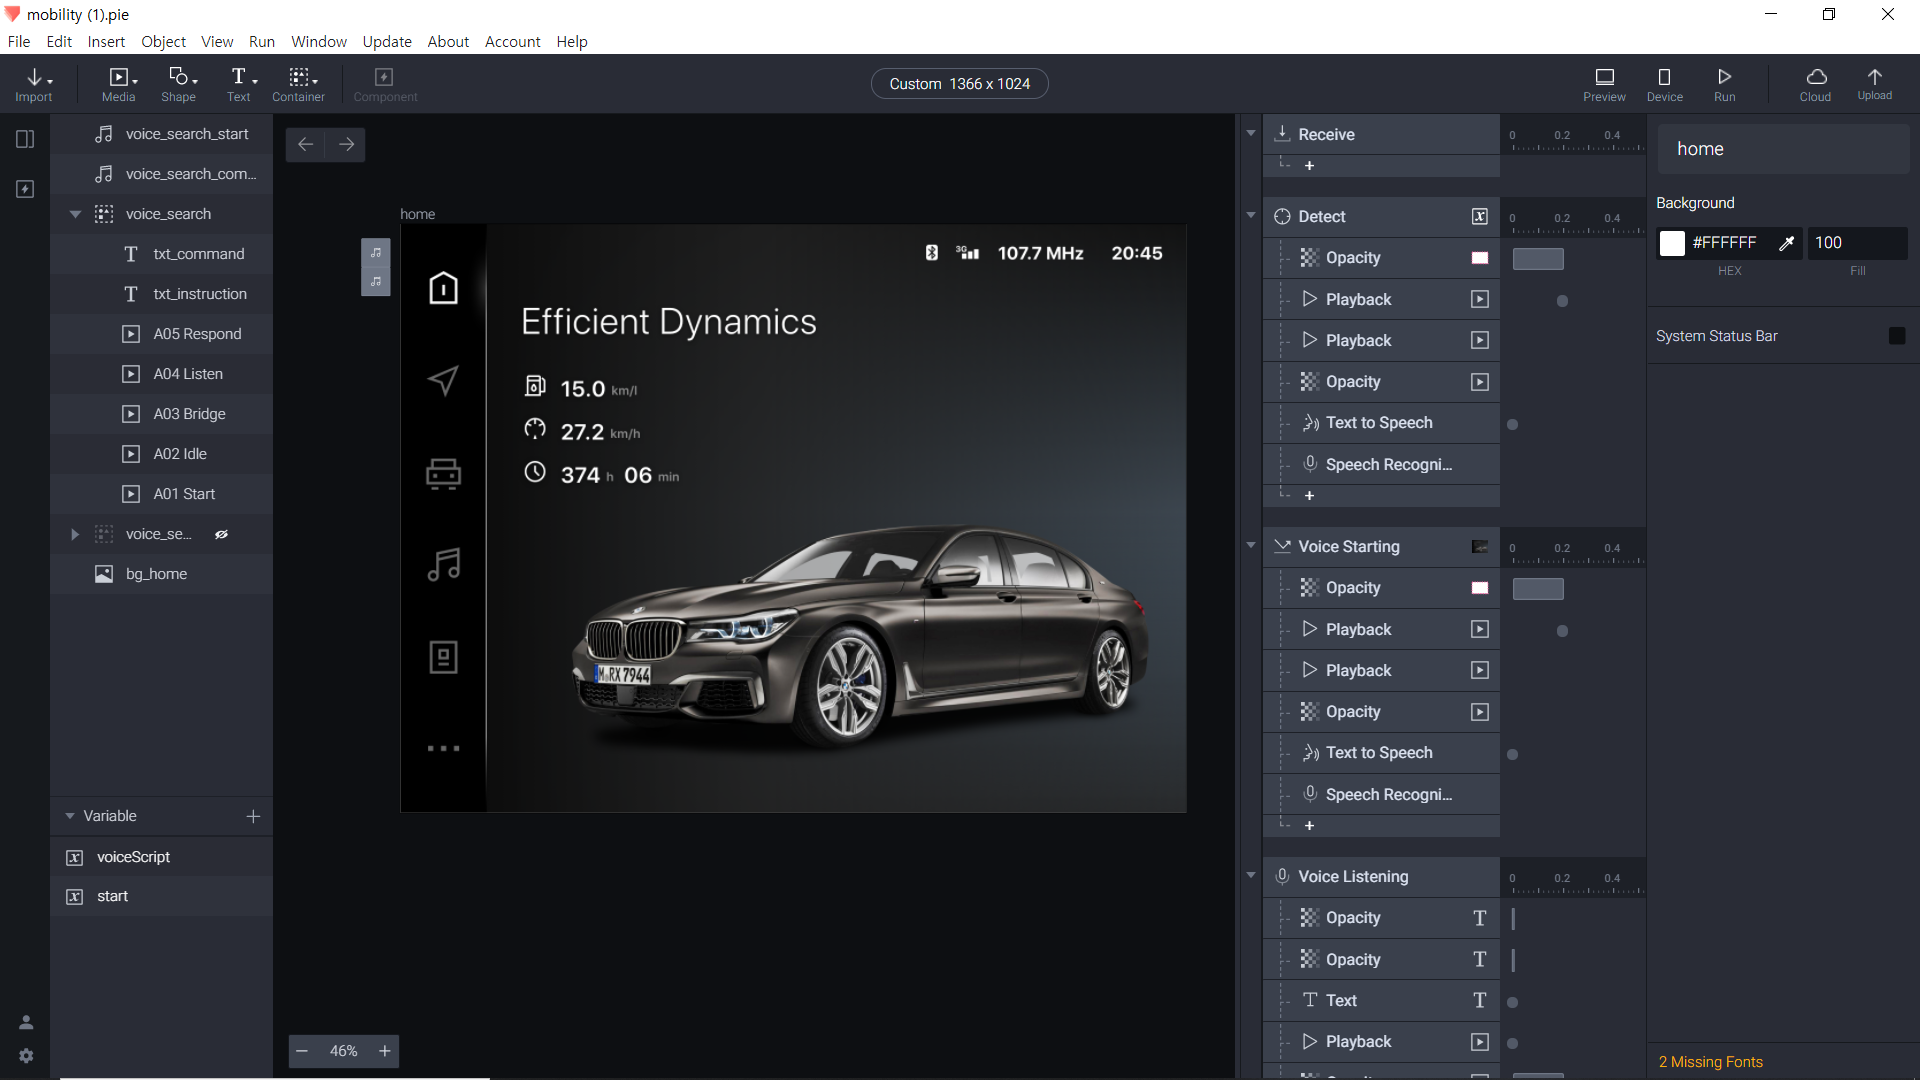
1. Prepare separated movie clips for the status of voice interface
The voice user interface can have multiple statuses, such as the following:
- Activating: start listening
- Standby: waiting for your voice command
- Listening: actively listening to your speech
- Understanding: judging whether what you say matches the predetermined voice commands
- Confirming: repeating what it understood to confirm your intent
- Reacting: triggering the actions defined by your voice command
You can easily demonstrate the interface’s current status by preparing different movie clips for each status. In this example, I used 5 separate movie clips.
2. Show the real-time transcript
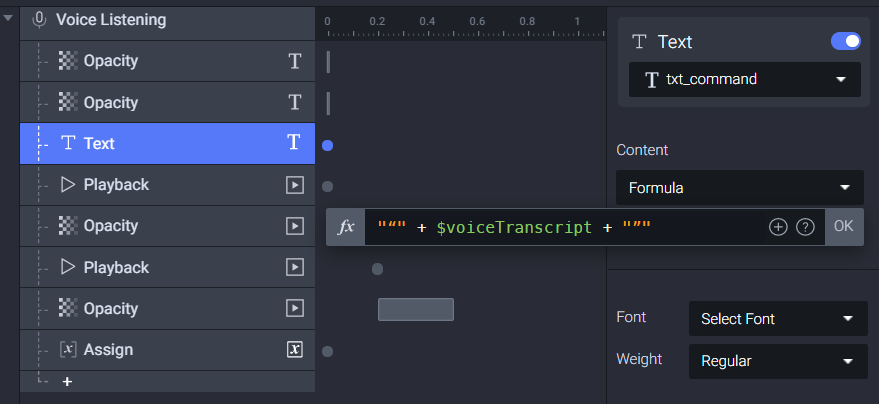
You can use a predefined variable named “$voiceTranscript” to display your speech in text in real-time. There’s a simple 3-step process to follow:
- Add a Listen Response and set “Start”;
- Add a Voice Command Trigger and set “While Speaking”. Uncheck the “Command” option;
- Add a Text Response and use a Formula to select the “$voiceTranscript” predefined variable. (Or, you can alternatively use the Speak Response instead if you want the prototype to read what you’re saying aloud).
This means that the ProtoPie will listen to whatever you’re saying thanks to the Listen Response and Voice Command Trigger, while enabling Text Response means that whatever you say will appear in text.
Finished creating your voice-enabled prototype? Great—it’s now time to move on to the steering wheel component.
3. Use ProtoPie Connect to set up the steering wheel
Right, let’s make this prototype a tad more realistic. Drivers generally use the voice assistant button (rather than the wake-up command) due to it generally being a safer, more accurate option. However, this prototype starts from pushing the button on the steering wheel—in this case, a Logitech G29.
To make this happen, you need to integrate ProtoPie Connect with the Pie file (the prototype made within ProtoPie) and the steering wheel. A Bridge App is then required so that ProtoPie Connect can communicate with the steering wheel. It will receive events from the Logitech G29 through the device driver, convert these to JSON, and finally, deliver them to ProtoPie Connect through Socket.IO.
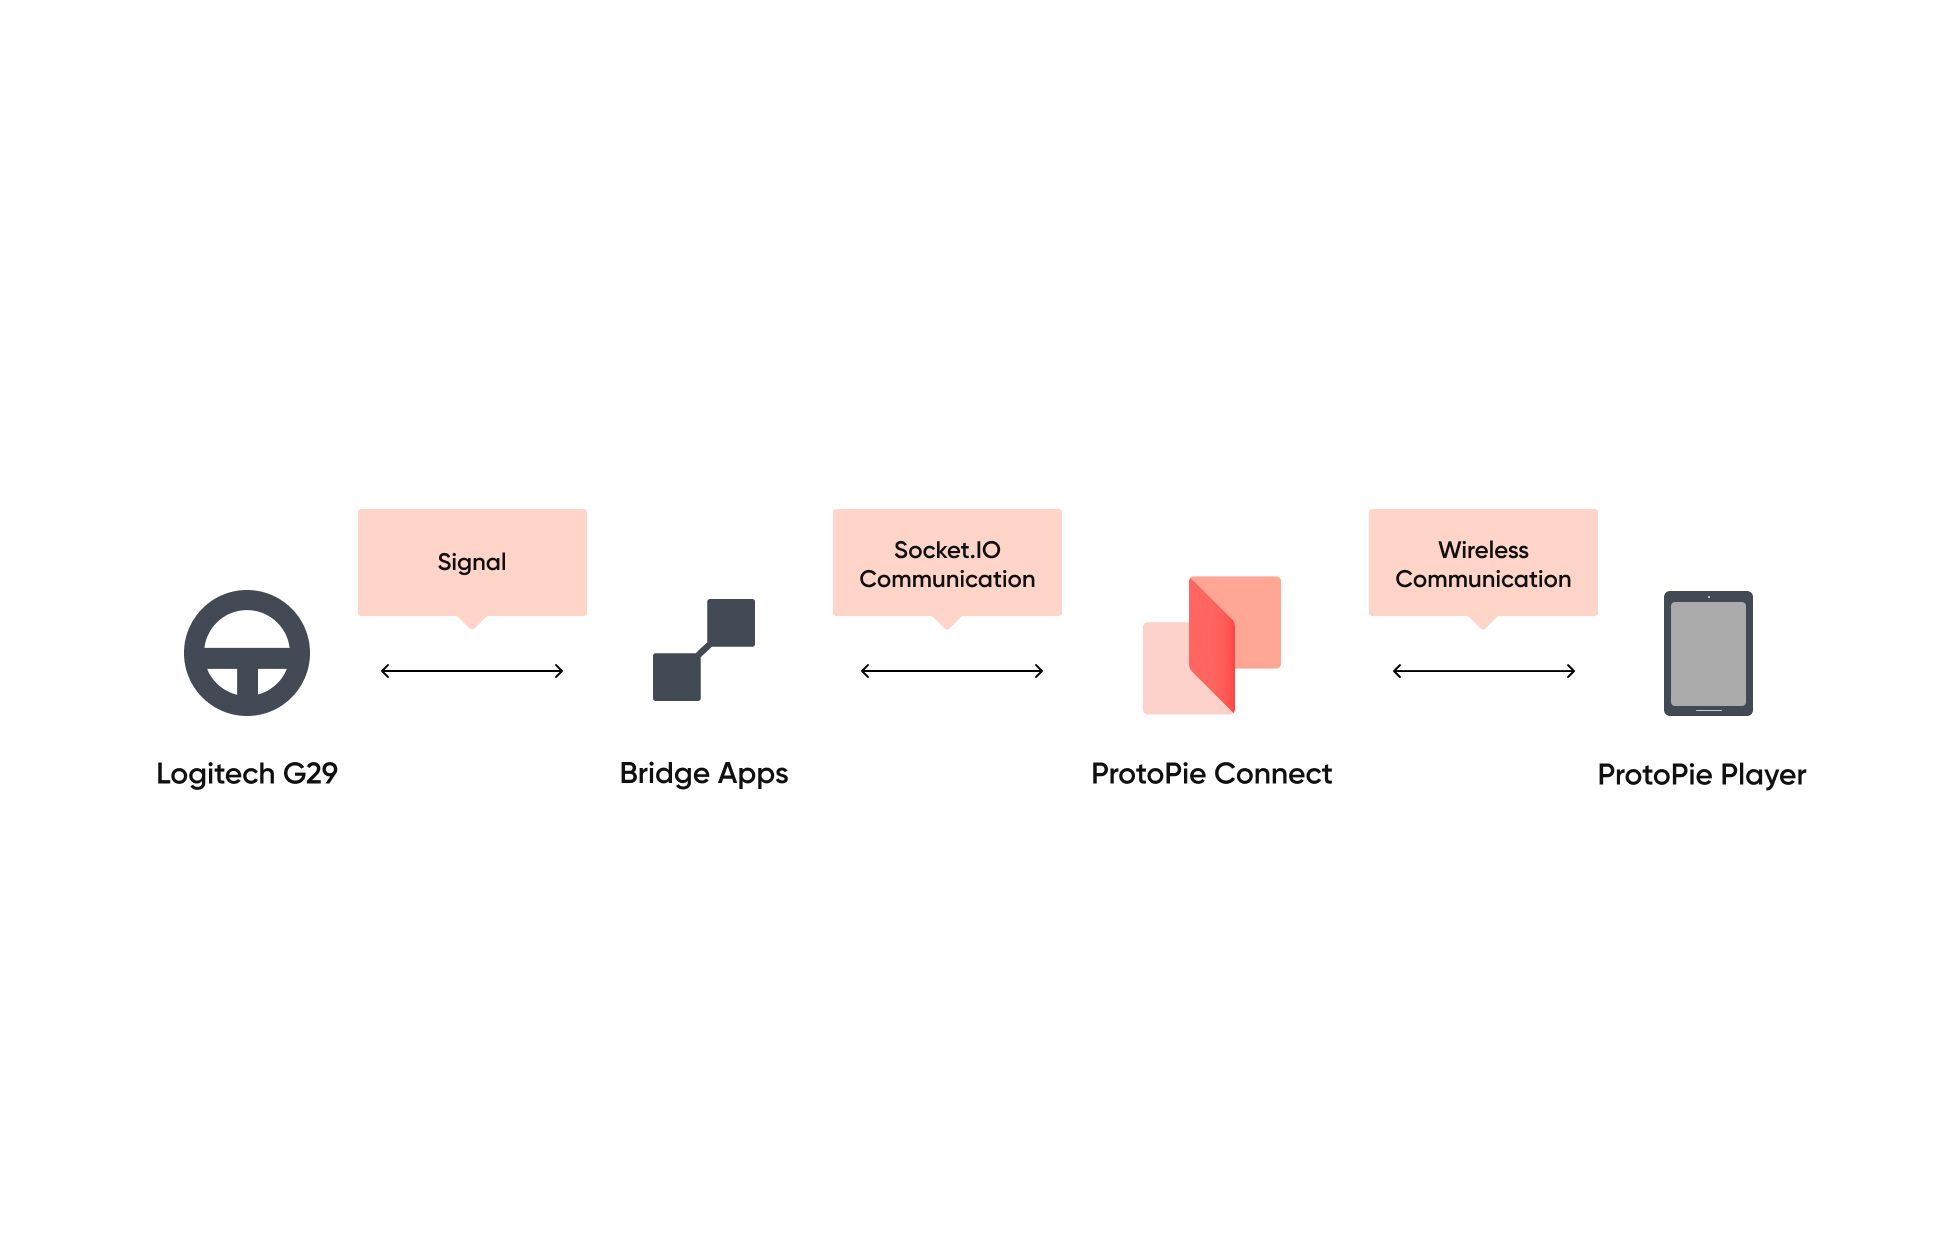
Learn more about how ProtoPie Connect and our Bridge Apps connect up to any piece of hardware, enabling you to easily run prototypes simultaneously across multiple devices and displays.
For this prototype in particular, you can download the Bridge App for G29 here.
After setting it up, the prototype will then operate as follows:
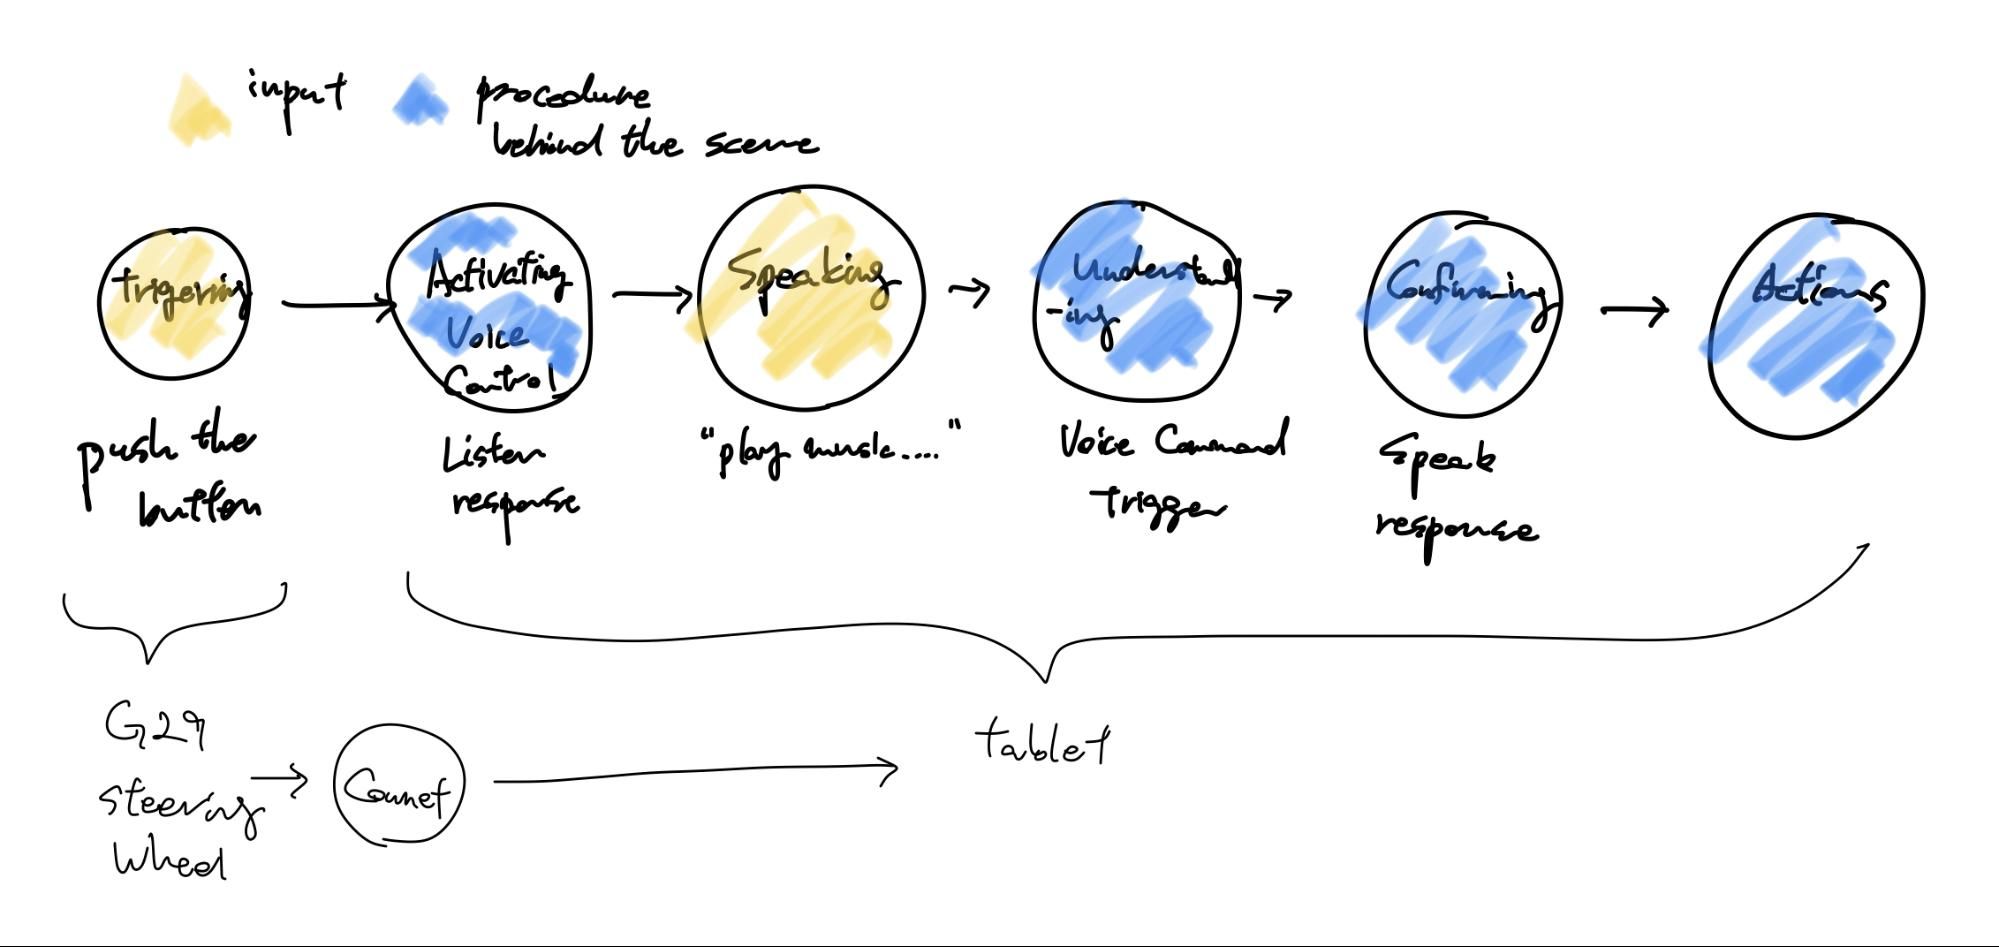
- Push the button on the Logitech G29 steering wheel. This will deliver a signal to the Bridge App, before the signal is then delivered to ProtoPie Connect.
- Once ProtoPie Connect receives this signal, the Listen Response is now triggered to activate voice control—in other words, it’s ready for a voice command.
- The voice command feature will kick in after you’ve finished speaking (and in this case, have included the keyword ‘ProtoPie’).
- ProtoPie will then repeat your voice command to confirm that it heard you correctly.
- Finally, ProtoPie will play the music you requested (which has been set up as a predefined action).
Access Tony's Prototype and try it for yourself.
Tada! You’re all set to begin creating your own in-car voice control prototypes.
There are more car brands than ever before, fueled in large part by the emergence of electric vehicles. As self-driving technology and other innovations come to the fore, in-car experience is increasingly becoming a key differentiator.
In the near future, consumers might even make their purchasing decisions on the basis of in-car experience versus a car’s exterior appearance. By mastering in-car voice control, you can transform your in-car experience by reimagining your multimodal user interface. ProtoPie’s range of voice assistant features will help you push the boundaries of human-machine interaction, whether in-car or not.
To find out more about how ProtoPie’s voice prototyping features can be applied to create other voice experiences, check out our ‘Prototyping for Voice’ post. Or, if you want to explore additional ways to use ProtoPie Connect for the automotive industry, visit our Automotive Solutions page.
Voice Prototyping Masterclass
Do you want to acquire practical knowledge and valuable skills that will empower you to create seamless and engaging voice experiences? Join us in the Masterclass in Advanced Voice Prototyping, a transformative project led by industry experts.
In this masterclass, you will gain practical knowledge and valuable skills that will propel you forward in the field of voice interaction design. Our expert instructors will guide you through immersive learning experiences, equipping you with the tools and techniques needed to create captivating voice interfaces.
Lastly, if you’re interested in using ProtoPie Connect or would like to schedule a demo session, don’t hesitate to contact us.
