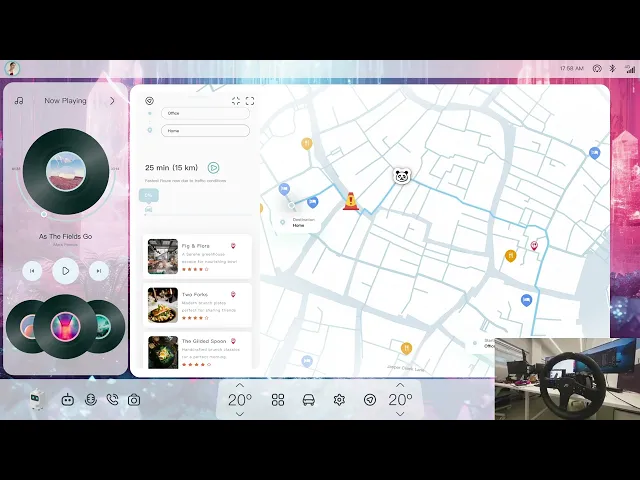
This tutorial is based on the open-source project fanatec-ffb-bridge. It walks you step by step through setting up a "ProtoPie prototype → real Fanatec wheel force feedback" demo environment. No racing game and no SimHub required — once it's set up, you can control the wheel's steering force, vibration, and angle directly from a Send Message trigger in ProtoPie Studio.
By the end of this tutorial you'll be able to:
Make the wheel produce real-time steering force and vibration alerts driven by your ProtoPie scenario
Kick off the whole demo with a physical push-button (wired to an Arduino) for extra realism
Troubleshoot the most common connection and permission issues
Estimated time: 30–45 minutes (not counting hardware procurement).
1. Prerequisites
Before you start, make sure you have:
A Windows PC — the bridge talks to the wheel via DirectInput, so it only supports Windows
A Fanatec wheelbase, connected via USB and powered on
Python 3.9 or newer, available from python.org
ProtoPie Connect, running locally and reachable on port
9981FanaLab and Fanatec Control Panel closed — both of these can grab an exclusive FFB lock and block the bridge from opening the wheel
(Optional) An Arduino board (Uno, Nano, Leonardo, etc.) and a push-button, for physical button triggering
2. Step One: Download and Install the Bridge
Clone or download the repository:
git clone https://github.com/JubzMajulee/fanatec-ffb-bridge.gicd fanatec-ffb-bridge(Recommended) Create a virtual environment to keep things isolated from your system Python:
python -m venv .venv.venv\Scripts\activateInstall dependencies:
pip install -r requirements.txt
3. Step Two: Power On the Wheel and Run the Bridge
Plug in and power on your Fanatec wheel.
Start ProtoPie Connect and confirm it's listening on
http://localhost:9981.From the project folder, run:
python main.py
If everything is working, you should see output similar to this:
=== ProtoPie -> Fanatec FFB Bridge ===ProtoPie Connect: http://localhost:9981Wheel keyword: fanatec
—————————————————————————————
[FFB] 2 joystick(s) detected: [0] Fanatec ... [1] Fanatec ...[FFB] Haptic opened on [1] Fanatec ...[FFB] Constant force armed (signed -1..+1, ramp 1.00/sec)[FFB] Sine vibration armed (0..1, period=50ms)[FFB] Centering wheel (1500ms)...[FFB] Wheel centered[SocketIO] Connected to http://localhost:9981
The wheel will briefly self-center, then sit idle waiting for messages. Press Ctrl + C at any time to stop the program.
Seeing "No joysticks detected"? Windows isn't seeing the wheel. Check the USB cable and power, and confirm the device shows up under Windows' "Set up USB game controllers."
Seeing "None of the candidates would open for haptic"? This is almost always FanaLab or Fanatec Control Panel holding an exclusive FFB lock — close them and try again. Also make sure no racing game is running in the background.
4. Step Three: Send Control Messages from ProtoPie Studio
Once the bridge is running, it continuously listens for messages broadcast by ProtoPie Connect. In your ProtoPie Studio prototype, add a Send Message trigger and set the Message ID and Value according to the table below:
Message ID | Value Range | Effect |
|---|---|---|
|
| Pulls the wheel left (negative) or right (positive). |
| e.g. | How fast |
|
| Wheelbase vibration intensity, applied immediately. |
| degrees, e.g. | Parks the wheel at a specific angle and holds it there. |
|
| How firmly |
A Few Common Combinations
Simulate the system correcting to the right: send
set_ffb = 1.0Make the correction feel gentler: send
set_ffb_speed = 0.3first, thenset_ffb = 0.0(a slow drift back to center)Simulate an urgent turn-in: send
set_ffb_speed = 8.0first, thenset_ffb = 0.7(near-instant)Lane-departure vibration alert: send
set_vibration = 0.6, thenset_vibration = 0.0to stopAutonomous takeover, wheel turns to 30° and locks: send
set_angle = 30first, thenset_angle_strength = 0.7
As long as your ProtoPie prototype is connected to ProtoPie Connect, any message it sends will be picked up by the bridge and translated into real force feedback on the wheel.
5. (Optional) Step Four: Wire Up a Physical Button with Arduino
If you want the demo to feel more immersive — for example, using a real button to kick off an "autonomous takeover" scenario — you can add an Arduino as follows.
Wiring
Just two wires:
Arduino Pin | Connect To |
|---|---|
| One leg of a momentary push-button |
| The other leg of the button |
A0 uses the chip's internal pull-up resistor, so no external resistor is needed. Any Arduino board with a USB serial connection works (Uno, Nano, Leonardo, Pro Micro, etc.).
Flashing the Sketch
Install the Arduino IDE.
Open
Arduino/pushButtonDemo.inofrom the repository.Tools → Board — select your board.
Tools → Port — select the COM port your board enumerated as.
Click Upload (the right-arrow icon).
Open Tools → Serial Monitor at 9600 baud and press the button — you should see
Arduino||1on press andArduino||0on release. Close the Serial Monitor afterward, since it holds the COM port open.
Connecting It to ProtoPie Connect
In ProtoPie Connect, open Add Device → Serial (naming may vary slightly by version).
Select the Arduino's COM port and set the baud rate to 9600.
In your ProtoPie Studio prototype, add a Receive Message trigger with Message ID =
Arduino. Use the message's value (1= pressed,0= released) to kick off your autonomous-driving simulation scenario.
Once wired up, the full chain looks like this: press the physical button → Arduino sends Arduino||1 → ProtoPie Connect forwards it → the ProtoPie prototype starts the scenario → the scenario sends set_ffb, set_vibration, etc. → the bridge translates those into real force feedback on the wheel.
6. Adjusting the Defaults
If the default feel doesn't match what your demo needs, you can edit the top of main.py:
PROTOPIE_URL = "http://localhost:9981" # ProtoPie Connect URLWHEEL_KEYWORD = "fanatec" # substring match for the wheel device name
And in ffb_driver.py, FanatecFFB exposes these constructor parameters:
force_ramp_rate=1.0— default ramp rate forset_ffbcenter_on_start=True— whether to auto-center the wheel at startupcenter_duration_ms=1500— how long the centering spring runswheel_range_deg=900— full lock-to-lock range; this must match your Fanatec driver's setting, orset_anglewill map incorrectly
7. Troubleshooting Quick Reference
Symptom | Likely Cause | Fix |
|---|---|---|
| Windows doesn't see the wheel | Check the USB cable and power; confirm the device appears under "Set up USB game controllers" |
| FanaLab / Fanatec Control Panel holding an exclusive lock | Close both programs and make sure no racing game is running |
| ProtoPie Connect isn't running, or is on a different port | Open Connect and confirm the port; if different, edit |
Wheel doesn't react to messages | Message isn't reaching the bridge, or the wheel/driver itself has an issue | Check whether the terminal logs a line like |
Wrong device gets picked | Multiple Fanatec devices, or a non-standard device name | Change |
Summary
The whole setup boils down to three lightweight layers: Arduino (optional physical trigger) → ProtoPie (scenario logic and message orchestration) → the bridge (translating messages into wheel force feedback). Each layer is simple on its own, and the cost to set it all up is low — but put together, they let a reviewer or test participant feel, within minutes, what "the wheel taking over during autonomous driving" actually feels like. That's exactly the kind of persuasive power a prototype needs.
👉 Want to see it in action? Book a session and watch how real hardware and prototypes work together in real time.