Lesson 1: Quick Start Using ProtoPie in 3 Steps
Dive into ProtoPie's zero-stress workflow starting with importing, creating, and testing/sharing your prototypes.

-Quick-start-ProtoPie-in-3-steps.jpg)
Welcome to ProtoPie! In this tutorial you’ll learn how to get started in bringing your great ideas to life in just 3 easy steps:
- Add assets by importing your design from Figma, Sketch or Adobe XD
- Add interaction using ProtoPie’s Trigger, Response & Object model
- Test your prototype on your device and upload it to the cloud in order to share your great work with others.
What is ProtoPie? Before we jump in, let’s take a minute to learn a little bit more about ProtoPie. ProtoPie allows you to create interactive and realistic prototypes that work just like your actual digital product – all without writing any code at all. While other prototyping tools are great for making quick click-through screen-to-screen prototypes, when it’s time for more functionality – say, for usability testing – ProtoPie’s Trigger, Response & Object model allows you to make your prototype look and feel just like the real thing.
ProtoPie School
ProtoPie can seem daunting at first, but not to worry! We’ll break everything up into small digestible chunks that you can quickly master before moving on to more advanced topics. The ProtoPie School series of articles starts with the basics and finishes with covering ProtoPie’s most powerful features.
Ready? Let’s jump in!
Step 1: Add assets from your design program
ProtoPie allows you to create shapes such as rectangles and ellipses natively, however an easier way to get your design into ProtoPie is to import your work from other tools such as Figma, Sketch and Adobe XD. Check the available plugins below and follow the instructions to install.
In order to follow along with this tutorial, install the Figma plugin, and grab the ProtoPie UI starter pack for Figma below.
If you don’t have a Figma account, it’s free to create one so you can follow along. After installing, open ProtoPie Studio and click New Pie.

Now switch to your design tool and start the plugin from your design tool. In Figma choose Plugins → ProtoPie.

Next, choose what you would like to import. If you import entire artboards in Figma, they will be imported as scenes in ProtoPie. If you choose individual layers, they will be imported into the current scene in ProtoPie.

After you click Export, two new scenes will be created in your Pie.

Step 2: Add interaction using ProtoPie’s Trigger, Response & Object model
ProtoPie’s Trigger, Response & Object (TRO) model is at the heart of how ProtoPie works. Understand TRO, and the sky is the limit with what you can make in ProtoPie. A Trigger is some kind of event, usually direct user input but not always. An example of a Trigger is Tap when the user taps a button on their device. A Response is the subsequent action to take as a result of a Trigger. For example, a Tap trigger associated with a button could have a Jump response that will navigate to a different scene. Finally, Objects are the layers involved in the Triggers and Responses.


Here’s a working example. I’d like to be able to navigate to the second scene when the user taps the Next button:
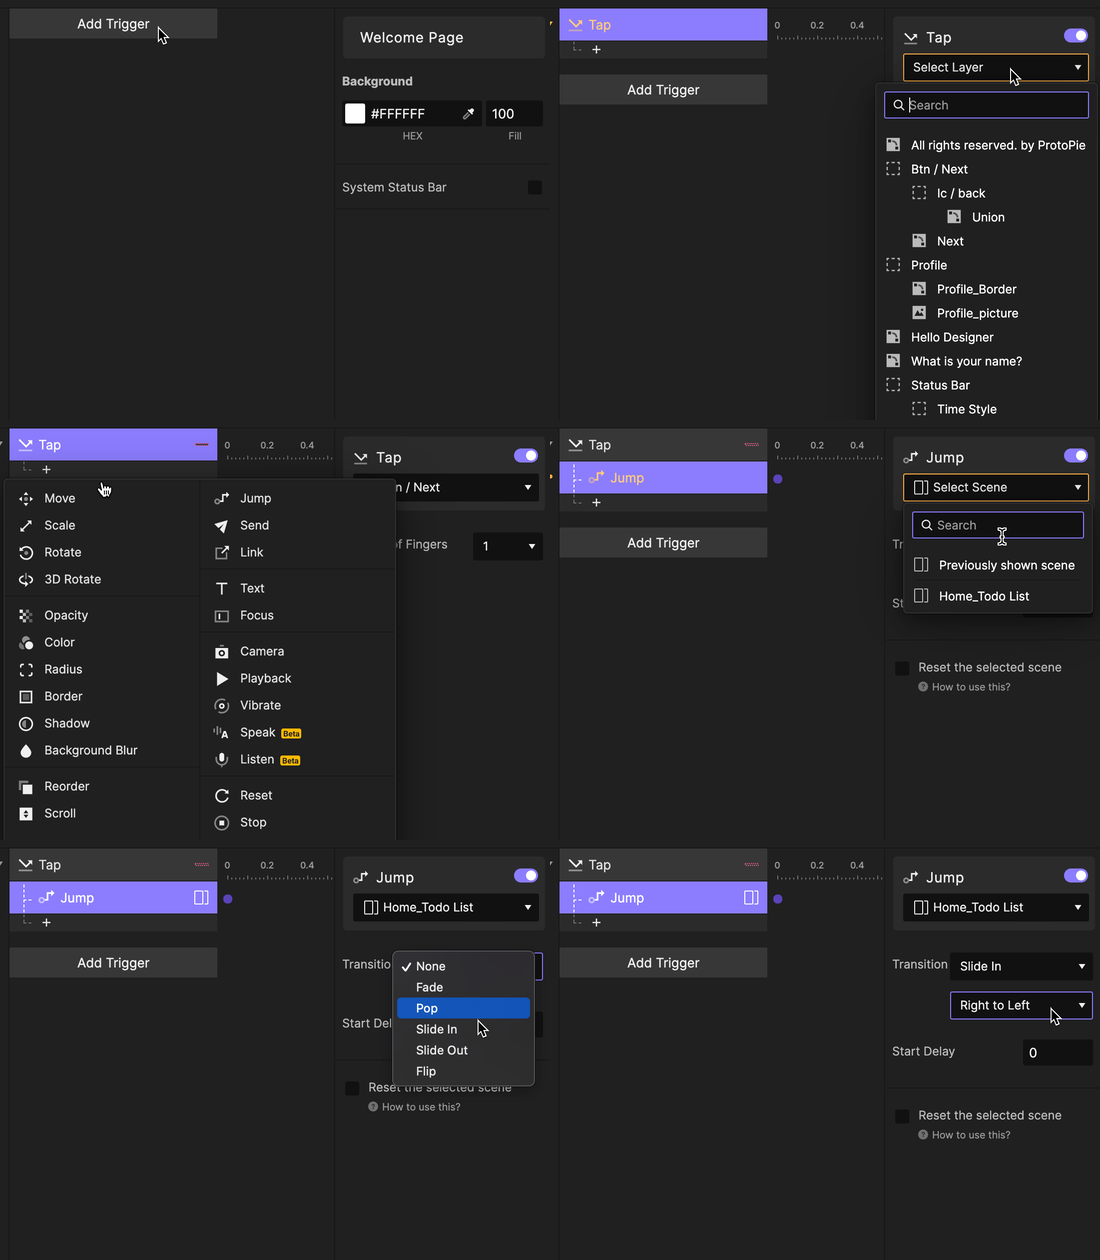
- Click Add Trigger in the interactions panel on the right side of the UI.
- A drop down will provide a list of all of the available Triggers. Choose Tap.
- Choose the Object to be tapped. In this example, it is the layer named
Btn / Next - Now we need to add a Response to this trigger. Click the
+icon below the Tap trigger. A drop down appears showing all of the available responses. Choose the Jump response. - Configure the Response. Pick the Scene you wish to Jump to –
Home_Todo List.Additionally you can configure a transition. This example uses Slide In from Right to Left.
This basic example shows only a single Response under this Trigger, but it is possible to add as many as you would like by clicking the + icon at the bottom of the Trigger, and each Response can operate on a different Object. Additionally, our interactions can be conditional, such that we’ll only navigate to the second Scene if the Your Name field is filled out. It is in this manner that you’ll create all of your interaction in ProtoPie.
Before long, you’ll be able to create interactions with multiple Triggers and Responses, like this:

Don’t worry if this image looks complicated. We’ll get there in future articles. But first, let’s test out our interaction to make sure it works the way we’d like.
Step 3: Testing and Sharing
Now that you’ve created your first interaction, it’s time to test it out. Click the Preview icon at the top right. This will open a new window with your Pie in preview mode. Click the Next button in your scene. You should see navigation to the Home_Todo List scene using the transition you chose. At any time you can reset your preview to the initial state by clicking the Reset icon at the bottom-left of the preview window.

Now that it’s working, our best experience is if we can interact with the prototype directly on a device. In order to do this you’ll need to install the ProtoPie Player app on your device. Follow the instructions here.
To preview the Pie on your device it either needs to be connected to the same WiFi network as your computer or it needs to be connected to your computer with a USB cable.
In ProtoPie Studio on your computer, click on Device in the upper right, which will reveal a QR code.

On your device start the ProtoPie Player app. Tap on Scan QR Code. Scan the QR code you revealed in the previous step and your Pie should load on your device.

You should now be able to interact with your Pie. Tap the Next button in your scene to navigate to the Home_Todo List Scene.
In order to reset your Pie to its initial state on your device, double-tap with two fingers anywhere on the screen. This will reveal options for your Pie, including the Reset option.

Congratulations! You’ve created your first working Pie.
It’s now time to share your work with others, say an engineer who will code your creation. You can share your work with others by uploading your Pie to the cloud. Others will be able to access and preview your work without the need to have ProtoPie Studio installed.
To upload your Pie, click the Upload icon at the top right . If you have a Team or Enterprise license you’ll be asked which space to upload to: A team project or your personal space. If you have an Individual plan, this step will be skipped. When your Pie is done uploading, a link will be displayed that you can share with others. If you ever need the link again, you can retrieve it by clicking the Cloud icon immediately to the left of the Upload icon.

Anyone who clicks on the link will be able to open the Pie in their browser, with a built-in preview they can interact with.

Additionally it can be previewed on their device by if they install the ProtoPie Player app and scan the QR Code that can be revealed with the link underneath the Pie’s description.

As the author of the Pie, you can customize some options for sharing. Click the 3 dots icon to reveal some additional menu items:
For example, you can set password protection and restrict who can view or download your Pie by choosing Access Settings.

Give yourself a pat on the back!
In this tutorial you’ve learned how to import your work from your design tool, you’ve added interaction using ProtoPie’s Trigger, Response & Object model, and you’ve tested and shared your work in ProtoPie Cloud. See you in the next lesson.
.png)
-Interaction-libraries.jpg)